Migrating WebFOCUS Data and Settings
This section describes WebFOCUS migration considerations
and provides the procedures for migrating WebFOCUS data and settings.
For information on migrating Reporting Server configuration
settings, see the Server Administration for UNIX, Windows,
OpenVMS, IBM I, and z/OS manual.
Note: The following special considerations apply to WebFOCUS
migration:
xMigrating Managed Reporting Data and Settings
The
following types of authentication and authorization models can be
migrated from WebFOCUS 7.x to WebFOCUS 8. Managed Reporting authorization
rules from these authorization scenarios are migrated, but the security
settings are not.
- Internal authentication
– internal authorization.
- Trusted authentication
– internal or external authorization.
- Realm drive DBMS/AD/LDAP
authentication - internal authorization.
- Realm drive DBMS/AD/LDAP
authentication - DBMS/AD/LDAP authorization.
- Realm drive with
stored procedures.
In WebFOCUS 8, the migration:
- Creates content,
users, groups, roles, and rules.
- Handles ReportCaster
and Business Intelligence Dashboard as separate migration procedures.
- Migrates WebFOCUS
7.x passwords to WebFOCUS 8 (SHA-1 salted hash of user passwords).
- Sets User Default
Roles.
Note:
- The
following characters are not allowed in the creation of users:
Hex
20 = , ' & * ( ) | ; " ? /
During the migration process,
these characters are converted to an underscore (_).
- If you previously
had WebFOCUS Administration Console integration, it will be lost.
Any user that previously had an Administrator Role is placed into
the Administrators group and has access to the Console.
- If provisioning users
externally, using AD/LDAP:
- All of the authorization
information is now stored internally.
- You can configure
the environment to use external authorization through AD/LDAP using
WebFOCUS to AD/LDAP Group mapping.
x
Procedure: How to Export Managed Reporting Data and Settings From WebFOCUS 7.x
The
Managed Reporting migration utility exports the current 7x basedir,
including Domains, procedures, content, users, groups, and role
information, to a WebFOCUS7x\utilities\mr\export directory. Any
authorization information stored externally using the Realm drive
(SQL Repository or AD/LDAP) is also retrieved and extracted.
Note:
- The Managed Reporting
authorization rules implemented in Technical Memo 4624, Configuring
the Managed Reporting Repository Filter are not migrated.
- If you are using
the Realm drive with an SQL repository, you must add your JDBC drive or
drives to the script file.
-
Copy the
drive:\ibi\WebFOCUS80\utilities\mr directory into the drive:\ibi\WebFOCUS7x\utilities
directory.
-
From the
pasted directory, run mr7xto80export.bat in a Windows environment
or mr7xto80export.sh on UNIX or Linux environments.
You are prompted for the WebFOCUS version
from which you are migrating.
-
Select the
appropriate version.
WebFOCUS notifies you when the export process is
complete. By default, the export log is saved in the WebFOCUS7x\utilities\mr\export
directory and named mr_migrate_export.log.
In addition to
the log file, the export typically contains the following files
and folders:
- groups.xml
- psets.xml
- repos.xml
- roles.xml
- rules.xml
- users.xml
- root
- root\WC\UserInfo
- root\WFS\Repository
and all content below it in the WebFOCUS 7.x repository
-
Copy the
WebFOCUS7x\utilities\mr\export directory into the WebFOCUS80\migration_import
directory.
These files will be imported into the new WebFOCUS 8 repository
in a separate procedure.
Now
you can import the exported Managed Reporting data and settings
into WebFOCUS 8.
x
Procedure: How to Import Managed Reporting Data and Settings Into WebFOCUS 8
You must
have already created and initialized the 8 database repository
with the default values contained within the initial load, using
WFReposUtil and the original XML.
-
Verify the
import package by running the drive:\ibi\WebFOCUS80\utilities\mr\mr_migrate_import_check.bat
script in a Windows environment or the drive:/ibi/WebFOCUS80/utilities/mr/mr_migrate_import_check.sh
script in a UNIX or Linux environment.
-
If prompted,
enter a Managed Reporting ID and password.
-
Select one
of the following options to set the logging level:
-
1 for
info. This is the recommended setting.
-
2 for
debug.
-
q to
quit the verification process.
WebFOCUS notifies you when the verification is complete.
-
Import the
Managed Reporting data and settings by running the drive:\ibi\WebFOCUS80\utilities\mr\mr_migrate_import.bat
script in a Windows environment or the drive:/ibi/WebFOCUS80/utilities/mr/mr_migrate_import.sh
script in a UNIX or Linux environment.
Note:
User
IDs longer than 64 characters may cause errors in the import process.
-
If prompted,
enter a Managed Reporting ID and password.
-
Select one
of the following options to set the logging level:
-
1 for
info. This is the recommended setting.
-
2 for
debug.
-
q to
quit the import process.
WebFOCUS
notifies you when the import is complete. Logs are saved in the drive:\WebFOCUS80\migration_import\export
directory, along with the import log file, which is named import_migration.log.
xMigrating Dashboard Data and Settings
When Dashboard data and settings are migrated to WebFOCUS
8, the data is extracted from the earlier release into a file named
migrate.zip. You can then copy the zip file to the WebFOCUS 8
Server, then run the migration utility to import the data from
the file into WebFOCUS 8. You must use the Dashboard Migration
utility to import the data. Manually copying directories and
files into the WebFOCUS80 directory structure does not guarantee a
functioning Dashboard environment.
The Dashboard Migration utility is in the drive:\ibi\WebFOCUS80\utilities\mr
directory. It is named bid_migrate_extract.bat in Windows and bid_migrate_extract.sh
in UNIX. It copies the relevant Dashboard files from the drive:\ibi\WebFOCUS7x\worp
directory for use with the latest WebFOCUS release. The entire
worp directory is not migrated, only the worp_users and worp_custom
folders, and (if it exists) the userdata folder.
To migrate custom template directories located in the worp/worp_html
directory automatically, prefix the custom template directory names
with custom_. If the directory names are not prefixed with custom_,
you can manually copy the custom templates to the drive:\ibi\WebFOCUS80\worp_html
directory. If they exist, the mpv.xml and xxxx.tbx files are also
migrated from the drive:\ibi\WebFOCUS7x\worp\worp\conf directory.
Note:
-
Dashboards can
be migrated from WebFOCUS 7.1 and higher.
-
Unicode Dashboard
migration to WebFOCUS 8 is only supported from WebFOCUS 7.7. If
you are using an earlier version of WebFOCUS, first migrate the
Unicode Dashboard settings to WebFOCUS 7.7, then migrate them from
WebFOCUS 7.7 to WebFOCUS 8.
-
In full WebFOCUS
8 installs, the drive:\ibi\WebFOCUS80\ibi_html/publish directory
and drive:\ibi\WebFOCUS80\ibi_html\template directory, which
contained the background images selected by users during the creation
of published pages in WebFOCUS 7.x , are no longer created. However,
these directories are preserved during Service Pack installs and
will be created as needed in the migration to WebFOCUS 8.
-
Saved searches from WebFOCUS 7.7 do not appear
in WebFOCUS Release 8.0 Version 02 after performing the Business
Intelligence Dashboard migration. The XML file containing the search
is moved from WebFOCUS 7.7 to Release 8.0 Version 02, but it is
not used. Saved Searches can be migrated as part of the Favorite
migration utility, provided to migrate the Favorite and Mobile Favorites
list of items for a user. The migration step should be performed
after the Managed Reporting and Business Intelligence Dashboard
migration steps have been completed. The Favorites content found
in the favorites.xml file under the following user directory will
be migrated to the new database repository, drive:\ibi\WebFOCUS80\worp\worp_users\username.
x
Procedure: How to Export Dashboard Data and Settings in a Windows Environment
-
Copy the
drive:\ibi\WebFOCUS80\utilities\mr directory into the drive:\ibi\WebFOCUS7x\utilities
directory.
-
Stop your
web and application servers.
-
Run drive:\ibi\WebFOCUS7x\utilities\mr\bid_migrate_extract.bat.
The Dashboard Migration Utility dialog box appears.
-
Select Extract
an existing Dashboard environment and click Next.
-
Specify
the worp directory for the existing Dashboard environment and click Next.
A directory may appear by default if the worp directory
exists under the WebFOCUS installation directory.
Note:
The migration utility also migrates the drive:\ibi\WebFOCUS7x\ibi_html\publish directory
and the drive:\ibi\WebFOCUS7x\ibi_html\template directory.
These directories are no longer created by the WebFOCUS install
and will not appear in new full installations of WebFOCUS 8.
-
Select
the release from which you are migrating and click Next.
WebFOCUS
notifies you when the extraction is complete. The migrate.zip and
bid_extract.log files are saved in the drive:\ibi\WebFOCUS77\utilities\mr\export\
directory.
x
Procedure: How to Export Dashboard Data and Settings in a UNIX Environment
-
Stop your
web and application servers.
-
Run the drive:/ibi/WebFOCUS7x/utilities/mr/bid_migrate_extract.sh
script.
The Dashboard Migration prompt is displayed.
-
Enter 1 to
export Dashboard data from the old release.
WebFOCUS displays a default path to the worp
directory.
-
If the directory
listed is correct, press Enter. If the directory listed is incorrect,
type the correct directory path and press Enter.
Note: The migration utility also migrates the drive:/ibi/WebFOCUS7x/ibi_html/publish directory
and the drive:/ibi/WebFOCUS7x/ibi_html/template directory.
These directories are no longer created by the WebFOCUS install
and will not appear in new full installations of WebFOCUS 8.
-
If the default
path is correct, press Enter. Otherwise, specify the path to the
worp directory.
The utility prompts for the WebFOCUS release number from
which you are migrating.
-
Enter one
of the following values to specify the release from which you exporting
data, and click Next.
Valid options are:
-
1 for
WebFOCUS 7.7
-
2 for
WebFOCUS 7.6
-
3 for
WebFOCUS 7.1
-
4 to
exit the migration utility.
WebFOCUS notifies you when the extraction is complete. The
migrate.zip and bid_extract.log files are saved in the drive:/ibi/WebFOCUS77/utilities/mr/export
directory.
x
Procedure: How to Import Dashboard Data and Settings in a Windows Environment
-
Copy the
migrate.zip file from the drive:\ibi\WebFOCUS7x\utilities\mr
directory into the drive:\ibi\WebFOCUS80\migration_import
directory.
-
Stop your
web and application servers.
-
Run drive:\ibi\WebFOCUS7x\utilities\mr\bid_migrate_import.bat.
-
Select the
release of the and click Next.
WebFOCUS notifies you when the data is successfully loaded
in the database. The bid_load.log file is created in the drive:\
ibi\WebFOCUS80\migration_import directory.
x
Procedure: How to Import Dashboard Data and Settings in a UNIX Environment
-
Copy the
migrate.zip file from the drive:/ibi/WebFOCUS7x/utilities/mr
directory to the drive:/ibi/WebFOCUS80/migration_import directory.
-
Stop your
web and application servers.
-
Run the drive:/ibi/WebFOCUS7x/utilities/mr/bid_migrate_import.sh
script.
The Dashboard Migration Utility prompt appears.
-
Enter 2 to
import data into WebFOCUS 8.
WebFOCUS notifies you when the data is successfully loaded
in the database. The bid_load.log file is created in the drive:/ibi/WebFOCUS80/migration_import
directory.
xMigrating Favorites and Mobile Favorites
In WebFOCUS 8, Favorites and Mobile Favorites content
is stored in the database repository. A utility is provided to migrate
the Favorite and Mobile Favorites list of items for a user. The
migration step is to be performed after the Managed Reporting and
Business Intelligence Dashboard migration steps have been completed.
The Favorites content found in the favorites.xml file under the
following user directory will be migrated to the new database repository, drive:/ibi/WebFOCUS80/worp/worp_users/username.
x
Procedure: How to Migrate Favorites and Mobile Favorites in a Windows Environment
-
Edit user
ID and password in the favoritesmigration.bat file, if necessary.
The user ID and password are set to admin, by default.
-
Run the drive:\ibi\WebFOCUS80\utilities\bip\favoritesmigration.bat
script.
The favorites_migration.log
file is created in the
drive:\ibi\WebFOCUS80\utilities\bip
directory.
x
Procedure: How to Migrate Favorites and Mobile Favorites in a UNIX environment
-
Edit the
user ID and password in the favoritesmigration.sh file, if necessary.
The user ID and password are set to admin, by default.
-
Run the drive:/ibi/WebFOCUS80/utilities/bip/favoritesmigration.sh
script.
The favorites_migration.log
file is saved in the
drive:/ibi/WebFOCUS80/utilities/bip
directory.
xMigrating ReportCaster Data and Settings
To
migrate ReportCaster content from WebFOCUS 7.x to WebFOCUS 8, you
need to export the content from WebFOCUS 7.x and then import it
into WebFOCUS 8.
x
Procedure: How to Export ReportCaster Data and Settings From WebFOCUS Version 7.x
-
If you are
migrating from:
-
WebFOCUS 7.7,
copy the drive:\ibi\WebFOCUS80\utilities\rc directory into
the drive:\ibi\WebFOCUS77\ReportCaster directory.
-
WebFOCUS 7.6,
copy the drive:\ibi\WebFOCUS80\utilities\rc directory into
the drive:\ibi\ReportCaster76 directory.
-
WebFOCUS 7.1,
copy the drive:\ibi\WebFOCUS80\utilities\rc directory into
the drive:\ibi\ReportCaster71 directory.
-
If you are migrating from:
-
WebFOCUS 7.7 or WebFOCUS 7.6,
run rcExport2XML.bat on Windows or rcExport2XML.sh on UNIX or Linux.
-
WebFOCUS 7.1,
run rc71Export2XML.bat on Windows or rc71Export2XML.sh on UNIX or
Linux.
-
You are
prompted for a user ID and password and asked whether you want to
export Library content.
The scripts export the current 7.x ReportCaster repository,
including Schedules, Distribution Lists, Library Access Lists, Execution
IDs, Blackout Dates, and Library content.
WebFOCUS
notifies you when the export process is complete. By default, the
exported data saved in the
drive:\ibi\WebFOCUS7x\ReportCaster\rc\rc_export
directory, along with a log file named export_migration.log.
The export typically contains
the following files and folders in addition to the log file:
-
accessList
-
addrBook
-
blackoutDate
-
execId
-
library
-
schedule
Now
you can import the exported ReportCaster data and settings into
WebFOCUS 8.
x
Procedure: How to Import ReportCaster Data and Settings Into WebFOCUS 8
Note: If you are migrating Managed Reporting
content, you must run Managed Reporting migration before you import
ReportCaster content from an earlier release.
To
import ReportCaster content from WebFOCUS 7.x into WebFOCUS 8:
-
Copy the drive:\ibi\WebFOCUS7x\ReportCaster\rc\rc_export
directory into the drive:\ibi\WebFOCUS80\migration_import
directory.
-
Import the
ReportCaster data and settings by running the drive:\ibi\WebFOCUS80\utilities\rc\rc_migrate_import.bat
script in a Windows environment or the drive:/ibi/WebFOCUS80/utilities/rc/rc_migrate_import.sh
script in a UNIX or Linux environment.
-
When prompted,
enter a user ID and password and specify whether you migrating Managed
Reporting content and Library reports.
WebFOCUS
notifies you when the import is complete. The log file created from
the import is saved in the drive:/ibi/WebFOCUS80/migration_import/rc_export
directory.
x
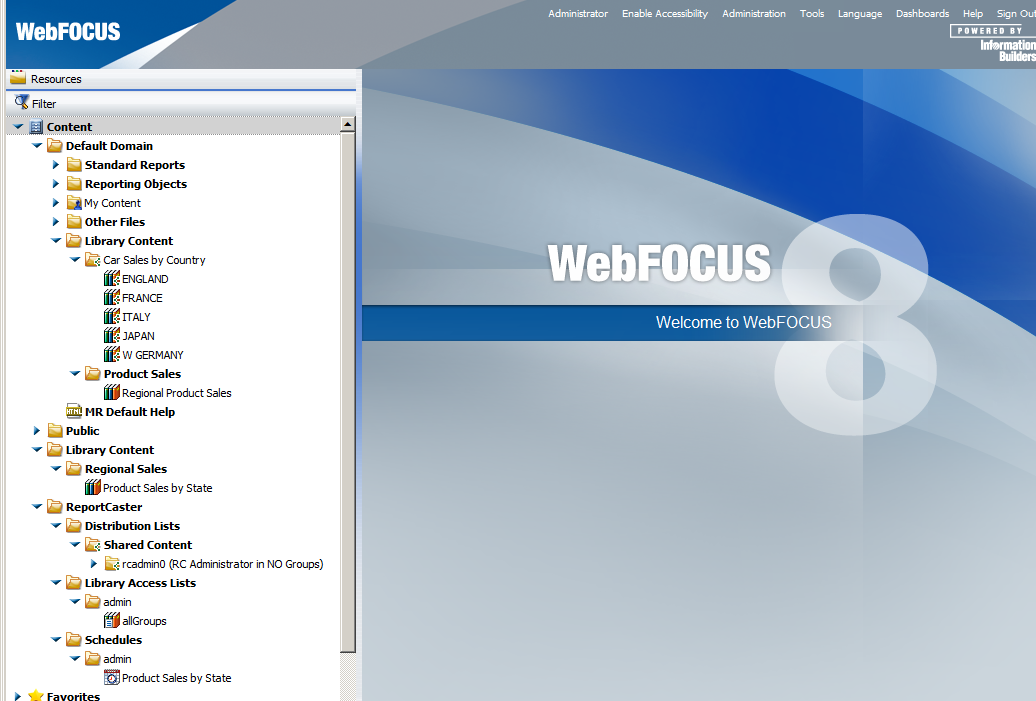
Migrated ReportCaster Content
After migration, ReportCaster content is placed in designated
folders in WebFOCUS 8. The migration import creates:
-
Two folders named
ReportCaster and Library Content.
-
A My Content folder
for each user who has migrated ReportCaster content. Schedules, Distribution
Lists, and Access Lists that belong to a user are placed in the
My Content folder for that user.
-
Folders for Categories
under the Library Content folder. Under each Category folder, the import
creates a Library item with the name of the migrated report and
adds the report versions to that Library item. If the report is
burst, a folder is created with the name of the report and a Library
report item is created in that folder for each burst value. The report
versions for each burst value are placed in the Library item for
that burst value.
-
A Library Content
folder under each domain folder that has Library report output.
If that Library output was stored under a Category, the import also
creates a Category folder under the Library Content. The Library
item with the name of the migrated report is created under the Library
Content or Category folder and the report versions are added to
that Library item. If the report is burst, a folder is created with
the name of the report and a Library report item is created in that
folder for each burst value. The report versions for each burst
value are placed in the Library item for that burst value.
-
When a schedule
with distribution to a Prepared Report directory is migrated, the
FTP Host and Location are set to the values of the Prepared Report
directory in the previous installation. This schedule will continue
to run, provided that the distribution server in WebFOCUS 8 has
FTP access to this location.
-
If you migrate
WebFOCUS 7.x ReportCaster schedules to WebFOCUS 8, and the Reporting
Server node referenced in a particular schedule has not been defined
in WebFOCUS 8, the migration process will automatically create a
Reporting Server node with that name in the ReportCaster configuration
file of the WebFOCUS 8 installation.
-
Migrated Managed
Reporting schedules will display the Name information as the WebFOCUS
7.x path (HREF) value. New schedules created in WebFOCUS 8 will
display the IBFS path value.
-
If a Library report
from a domain that has been deleted from Managed Reporting is migrated,
the report will be placed in a folder in the repository. The folder
is named after the original Domain HREF and appended with the words
(Domain not Found).
-
When migrating
from WebFOCUS 7.x to WebFOCUS 8, in order to view migrated applet-based
graphs in the Report Library, the WebFOCUS 7.x ibi_html alias must
exist in WebFOCUS 8.
For example, if you have a WebFOCUS 7.x
installation with an alias of ibi_html_7x, you will have a report
with a src=ibi_html_7x/javaassist reference. If you install WebFOCUS 8
with an alias of ibi_html_80 and migrate the library from WebFOCUS
7.x, you will not be able to view migrated reports that contain
applet graphs. To prevent this, add the ibi_html_7x alias to the
application server and point that alias to the WebFOCUS 8 installation.
You can have ibi_html_80 for the WebFOCUS 8 installation, but you
must also have ibi_html_77 for migrated reports that contain applet
graphs to work.
The following image shows the folder
structure after a migration import.
x
As of WebFOCUS Release 8.0 Version 02, there is an alternate
migration utility that enables a migration in place, that is, a
conversion of a WebFOCUS 7.x repository into a WebFOCUS 8 repository
without requiring the export and import of the Report Library.
This utility is located in the WebFOCUS80\utilities\WFReposUtil
folder and is named upgrade7xDBto8x.bat for Windows and upgrade7xDBto8x.sh
for UNIX and Linux. It is available for Oracle, Derby, and Microsoft
SQL Server 2008 and 2012 repositories.
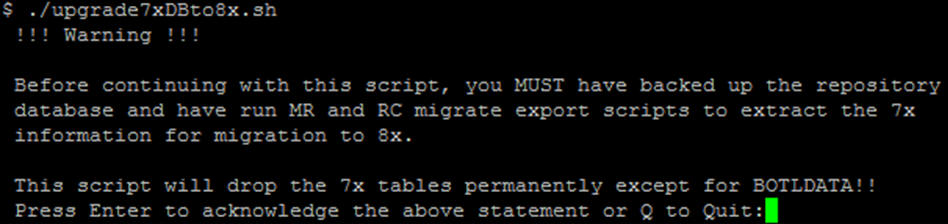
The BOTLDATA table, which contains the report output stored in
the Report Library, is the table with the largest amount of data.
The new utility allows for migration of existing WebFOCUS 7.x ReportCaster
BOT tables to WebFOCUS 8without dropping the WebFOCUS 7.x BOTLDATA
table.
x
Procedure: How to Migrate in Place
-
Ensure that
there is a database backup of the existing WebFOCUS 7.x ReportCaster repository
tables. This is a best practice when running the migration process
several times during testing.
-
If Managed
Reporting content is being migrated, follow the WebFOCUS 8 export
steps in Migrating Managed Reporting Data and Settings.
-
Copy the
exported Managed Reporting content (…/utilities/mr/export) to the WebFOCUS
8 migration_import directory.
-
Follow the
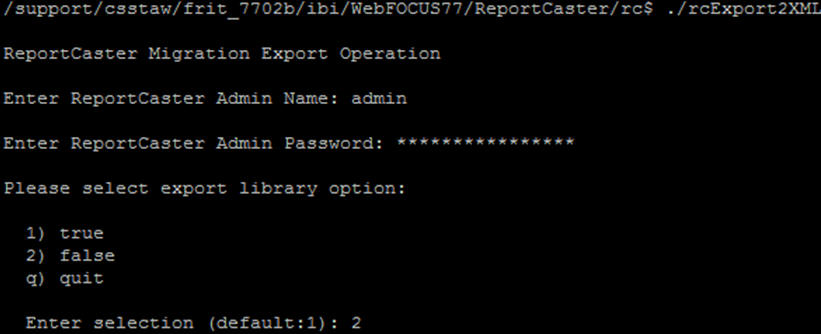
WebFOCUS 8 export steps for ReportCaster in Migrating ReportCaster Data and Settings.
Note: When prompted for the export library option,
type 2 (false), as shown in the following
image. This option will export the Library report references, but
will not export the actual report output.
-
Copy the
exported ReportCaster content (utilities/rc/rc_export) to the WebFOCUS
8 migration_import directory.
-
Review and
modify the upgrade7xDBto8x script, as shown in the following image:

-
If you are migrating Managed Reporting content, change MR_ENABLED
to yes.
-
After you complete the above steps and are ready to run the
migration script, change RUN_TYPE to actual.
-
Run the
upgrade7xDBto8x script, as shown in the following image.
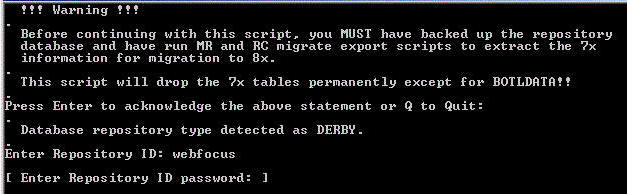
-
When prompted
for repository credentials, as shown in the following image, type
the ID and password. These credentials are validated against the
repository credentials specified in the WebFOCUS 8 webconfig.xml
file.
-
When prompted
for a valid WebFOCUS credentials, type WebFOCUS 8 administrator
ID and password (for example, admin/admin).
-
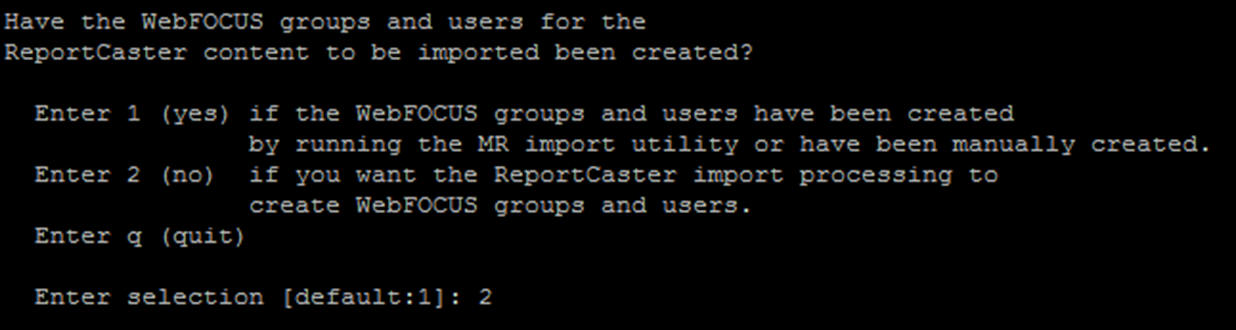
At the following
prompt, enter 1 or 2 to indicate whether the Managed Reporting import has
already been done or if the ReportCaster import should be used to
create new WebFOCUS groups and users. Option 2 should be specified
if Managed Reporting content is not being migrated.
-
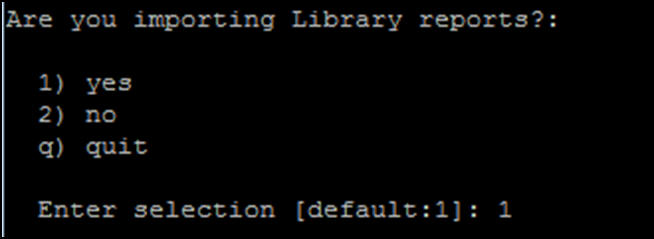
Even though
the actual reports are not technically being migrated, the Library
report references and links to the reports need to be migrated.
When prompted to import Library reports, type 1 (yes),
as shown in the following image.
As the
script is running, you will see the output indicating the status
of the migration process. This also provides some insight into the
specific tasks that are included in this process.

The
standard migration logs should be used for review of any import
errors:
- Repository Creation
and Load
drive:\ibi\WebFOCUS80\utilities\WFReposUtil\WFReposUtilCmdLine.log
- Managed Reporting
drive:\ibi\WebFOCUS80\migration_import\export\mr_migrate_import.log
- ReportCaster
drive:\ibi\WebFOCUS80\migration_import\rc_export\rc_migrate_import.log
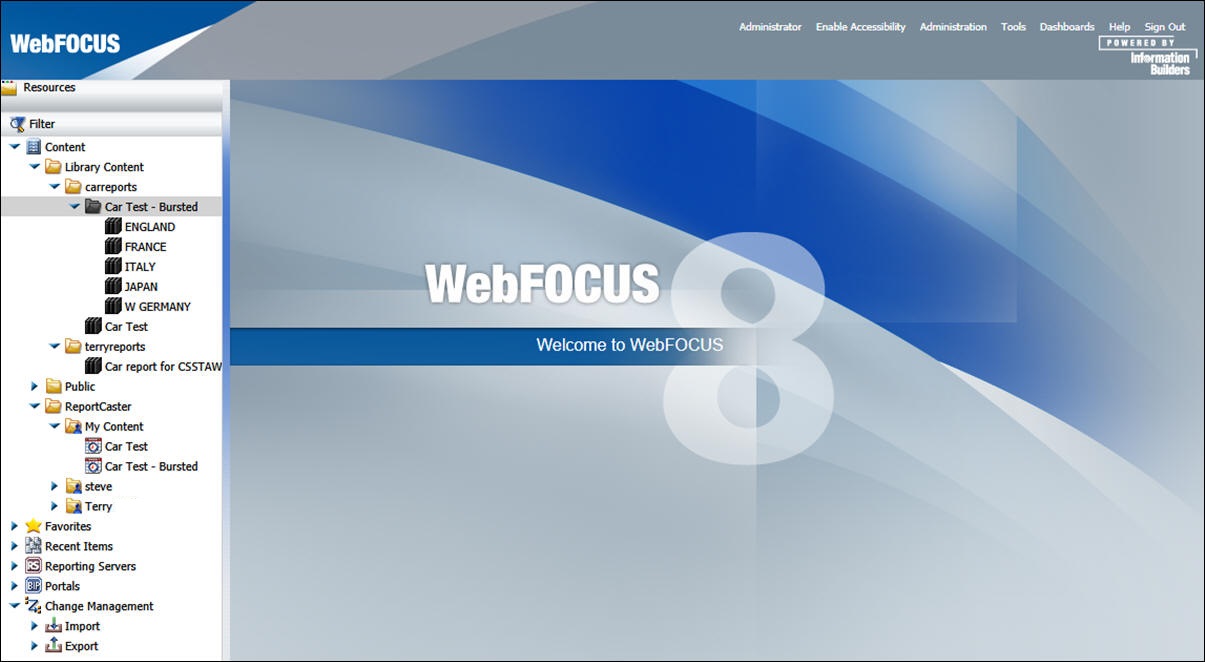
As
is the case for all migrated ReportCaster content in WebFOCUS 8,
the schedules that run Reporting Server procedures are migrated
to the ReportCaster folder. The Report Library content is migrated
to the Library Content folder, as shown in the following image.
x
After
migration, you must take additional steps to enable the display
of the User Default Role tab in the Security Center and to configure
the public user. If the WebFOCUS 7.x public user is named public,
the user is migrated to WebFOCUS 8 and assigned the WF_Role_Public
UDR. However, if the user has been given another name, the account
will be migrated but not automatically assigned the WF_Role_Public
UDR. You must manually update this account if you wish to continue
using it as the public user.
Regardless of the account name, the WebFOCUS Reporting Server
credentials for the public user are not migrated from WebFOCUS 8.
The Reporting Server credentials must always be entered manually.
x
Procedure: How to Display the User Default Role Tab in the Security Center
-
Sign in
to WebFOCUS 8 as an administrator and select Administration
Console from the Administration menu.
The Administration Console appears
-
In the navigation
pane, expand the Configuration node and then
select Other.
-
Set IBI_Enable_UDR
to True, save your changes, and close the Administration Console.
-
In the Portal,
select Security Center from the Administration
menu.
The Security Center appears.
-
Click the New
User button or select an existing user and click Edit
User.
The New User or Edit User dialog box appears, with
the Default Role tab enabled, as shown in the following image.
x
Procedure: How to Configure the Public User
The
WebFOCUS Reporting Server credentials for the public user are not
migrated from WebFOCUS 8 and must be entered manually. Additionally,
if the public user is not named public, the account will
be migrated but not automatically assigned the WF_Role_Public UDR.
You must manually update this account if you wish to continue using
it as the public user.
-
Sign in
to WebFOCUS 8 as an administrator and select Administration
Console from the Administration menu.
The Administration Console appears
-
In the navigation
pane, expand the Configuration node and then
the Application Settings node, and then select Other.
-
If the public
user is named public, proceed to step 4. If the public user
account has another name, enter the name in the IBI_Anonymous_User
field.
-
Enter the
Reporting Server user ID and password in the IBI_Anonymous_WFRS_User
and IBI_Anonymous_WFRS_Pass fields respectively.
-
Save your
changes and restart the application server.
-
If the public
user is named public, you have finished configuring the public
user. If the public user account has another name, sign in to WebFOCUS
again and select Security Center from the
Administration menu.
The Security Center appears.
-
Select the
public user, right-click, and select Edit.
-
Click the Default
Role tab.
-
Select the
WF_Role_Public role. If any other roles are assigned to the public
user, remove them, then click OK to return
to the Security Center.
-
Add the
public user to the Anonymous group and click Close to
exit the Security Center.
The public
user is now configured.