Overview of Developing WebFOCUS Maintain Applications
Now that you know what a WebFOCUS Maintain application is and how it works, you are ready for a step-by-step view of the development process. This section summarizes the steps.
Another way to get started immediately developing WebFOCUS Maintain applications is by using Update Assist. All you need is a Master File for the data source for the application you want to create. For more information, see the Developing Reporting Applications manual.
xStep 1: Creating the Project
Your first step is to create the project file for the application. The project file keeps track of all the pieces of the application: procedures, forms, images, scripts, data source descriptions, and so on.
- From the Windows Start menu, click Programs, WebFOCUS 80 Developer Studio, and then WebFOCUS Developer Studio.
WebFOCUS Developer Studio opens.
- Click the Open MAINTAIN button
 on the toolbar to open the WebFOCUS Maintain Development Environment.
- Ensure that Projects on localhost is selected in the Explorer window, and in the File menu, choose New Project.
or
Right-click Projects on localhost, and click New Project.
The Create a Project - Step 1 of 2 dialog box opens.
- Select the file name of your new project and designate its directory path. A message appears if the directory does not exist. Click Yes to create the new folder.
The Create a Project - Step 2 of 2 dialog box opens.
- Type any directories that contain files you want to use.
- Click the Finish button when you are done.
WebFOCUS Maintain creates a briefcase for your project with four components, HTML Files, Maintain Files, Master Files, and Procedures, and places it in the Explorer, as shown in the following image.
For a more complete overview of setting up your project, see Setting Up Your WebFOCUS Maintain Project in the Developing WebFOCUS Maintain Applications manual.
xStep 2: Describing the Data
The purpose of most WebFOCUS Maintain applications is to manipulate data in a data source. Before WebFOCUS Maintain can do this, it has to know what the data in the data source looks like. It does this by using a data source description (also known as a Master File).
There are two methods for putting a data source description into your project, depending on whether it already exists:
- When you set up your WebFOCUS Server, you may have created data source descriptions for your data using the Server Console. This is the preferred method for creating data source descriptions.
- Open the Master Files folder.
- Turn on Show All Files, either by clicking the Display all files button
 in the Exploring toolbar, or by clicking Show All Files in the View menu.
- Right-click the data source description and click Add to Project.
If a data source description is in your project path, you can easily add the data source description to your project.
Note: You can easily add directories to your project path by right-clicking the project, clicking Properties to open the Properties dialog box, and clicking the Directories tab.
If the data source description is not in your project path, open WebFOCUS Environments (at the bottom of the left pane of the Explorer window). It contains your local WebFOCUS development server (localhost), as well as any other WebFOCUS Servers you have set yourself up to access. Open the WebFOCUS Server where the data source description resides and find it (usually in Data Servers\EDASERVE\Applications). Then drag it into your project folder.
- If you need to create data source descriptions from scratch, you can design them on your desktop using the Master File Editor. For more information on the Master File Editor, see the Describing Data With Graphical Tools manual.
xStep 3: Logically Partitioning the Application
Your next step is to plan which platform should run each piece of logic in your application. This is called logically partitioning the application.
In general, you must classify each piece of logic into one of two types:
-
Front-end logic. This generally includes forms, Web links, VBScripts, and JavaScripts.
-
Data access logic. This is the part of your application that extracts data from the data source and writes data to the data source.
If you have more than one WebFOCUS Server in your environment, you must determine on which server each piece of data access logic needs to run.
Logically partitioning the application enables you to place each procedure on a different WebFOCUS Server easily. The Maintain language contains a special command, CALL, which enables one procedure to run another procedure at any WebFOCUS Server.
To create a procedure, follow these steps:
- Right-click the project or the Maintain files folder in the Explorer, click New in the shortcut menu, and then click Project File.
- In the Create new project file dialog box, type a name for your Maintain procedure and click OK, as shown in the following image.
The Maintain Procedure Editor opens, displaying code for the newly created project file.
- Close the window.
xStep 4: Creating the Front End
Your next step in developing an application will probably be to create the front end, meaning the user interface with which the end user interacts. Your user interface is made up of forms, which you develop using the Form Editor.
To create a form:
- Select the procedure you want the form to be in (a form is one of the components of a procedure).
- Right-click the procedure in the Project Explorer, click New in the shortcut menu, and click Form in the submenu.
One of your procedures is designated as the starting procedure, which means that WebFOCUS Maintain runs this procedure to run your application. You probably want the opening form of your application to be in this procedure (although it does not have to be here). You use the project Properties dialog box to specify the starting procedure.
WebFOCUS Maintain supplies you with a form (named Form1) in every procedure and supplies the code to display this form immediately after running the application. Using the name Form1 in the initial form of your application is recommended.
After you have created your forms, edit them using the Form Editor, as shown in the following image.
Here is a brief overview of how to create forms using the Form Editor:
- The Controls Palette contains the controls that you can place on your form, as shown in the following image.
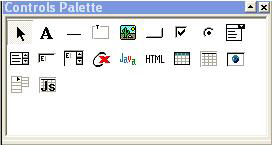
These controls represent various graphic elements that you are probably familiar with (text boxes, radio buttons, and check boxes).
To place a control on the form, first click the control on the Controls Palette. Then move your cursor to the form and click and drag a rectangle that defines the size of the control.
After you place controls on a form, you can easily move them around and resize them. The Form Editor also contains many alignment tools that enable you to place your controls exactly where you want them.
- The Properties sheet displays the properties of the selected control or, if no control is selected, the properties of the form itself, as shown in the following image.
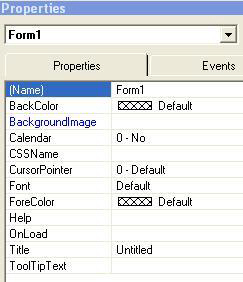
Properties define how form and control appear, and how they behave at run time.
To change a property, select it in the list and then click the box at the right and type a new value. To change some of the properties, you must open a dialog box. Do this by double-clicking the property name.
You can also set many of these properties at run time by dragging them into an open text-editing window.
- The Event Handler editor is where you define what happens when an end user performs an event in your application. An example of the Event Handler editor is shown in the following image.
An event can be anything done by the end user, such as opening a form, clicking a button, or typing text in a field. You use the Event Handler editor to assign these events to some action, such as retrieving data from a data source, opening another form, writing data to a data source, or verifying a value.
You can open the Event Handler editor in one of the following ways:
- Use the Events tab in the Property sheet.
- In the Form menu, click Edit Event Handlers.
- Right-click any form or control and, in the shortcut menu, click Edit Event Handlers.
- Click the Edit Event Handlers button
 in the Layout toolbar.
After you open the Event Handler editor and select a combination of a control and an event, you can assign one of the following actions:
-
Perform a Maintain function. Click the Maintain Function button
 in the Event Handler editor, create a function in the Project Explorer, and then drag it into the Event Handler editor.
-
Perform a JavaScript. Click the JavaScript button
 in the Event Handler editor and type the code in the entry box.
-
Perform a VBScript. Click the VBScript button
 in the Event Handler editor and type the code in the entry box.
-
Access a Web link. Click the Web Link button
 in the Event Handler editor, and select a Web link or create a new one.
-
Close the form. Click the Close Form button
 in the Event Handler editor.
-
Close the application. Click the Close Project button
 in the Event Handler editor.
For more information on the Form Editor, see Using the Form Editor,
Developing and Using Forms,
Defining Events and Event Handlers, and Developing and Using Controls in the Developing WebFOCUS Maintain Applications manual.
xStep 5: Creating the Data Access Logic
Your next step in developing the application is to create the data access logic, meaning the code that extracts data from the data source, manipulates it, and writes it back to the data source.
You code all of your data access logic using the Maintain language. The Maintain language is a robust yet simple, object-based 4GL. It is consistent across all platforms while incorporating the functionality of a 3GL and the data access capabilities of SQL.
You must specify which data sources you want a procedure to access before writing any code to read or write to that data source.
x
Procedure: How to Make a Procedure Access a Database
Specify which data sources you want a procedure to access.
-
If you want to put your data access code in a separate procedure (to take advantage of n-tier processing), create a procedure in your project.
-
In the Project Explorer, right-click the procedure, and then click Use data sources.
-
If you wish, use the Display all files button to view all the files in the project path.
-
Select the data sources this procedure will access and click OK, as shown in the following image.
x
Procedure: How to Write Maintain Language Code
-
Double-click the procedure to open the Procedure Editor.
-
Between the CASE Top and END keywords, specify the code that your procedure will run. You can do this in either of the following ways:
- Right-click in the window and click Language Wizard in the shortcut menu. Then follow the instructions to generate your Maintain language code.
- Type the code that your function runs. For more information, see Command Reference in the Maintain Language Reference manual.
You can obtain context-sensitive Help by selecting any keyword and pressing the F1 key. Notice also that your procedure code is color-coded.
xStep 6: Setting Up Front End and Data Access Procedures to Call Each Other
After you have written the front-end and data access procedures, you must set them up to call each other, and pass data back and forth. Since all variables are local, meaning defined only within the context of a procedure, you must pass these variables back and forth.
For example, suppose you have an application running on a Windows web server that accesses accounting data on UNIX and inventory data on MVS. A procedure called GetAccData, accesses the data on the UNIX machine and a procedure called GetInvData, accesses the data on the MVS machine. Both of these procedures pass data back to the Start procedure on the Windows machine, which displays a form with this data.
x
Procedure: How to Set Up Procedures to Call Each Other
-
Declare all variables in the calling procedure and called procedure.
-
In the called procedure, use the Procedure Parameters dialog box to declare what parameters it expects to receive and what data it passes back to the calling procedure. To open this dialog box, right-click the procedure and in the shortcut menu, click Add parameters, as shown in the following image.
-
In the calling procedure, use the CALL command. The parameters of the CALL command determine the data that gets passed to the called procedure and what data gets passed back. You can easily place a CALL statement in your procedure using the Language Wizard.
For more information, see Command Reference in the Maintain Language Reference manual.
xStep 7: Adding Other Application Components
WebFOCUS Maintain enables you to incorporate many other types of files into your application. Here are some of the most common:
-
JavaScripts and VBScripts are standalone functions that are embedded in your webpages for execution at the browser level.
JavaScripts and VBScripts can perform local validation. Local validation enables validating user interaction on a webpage without having to return to the web server.
You can include script libraries, and then assign functions in the script libraries to event handlers in the Event Handler editor.
For more information, see Defining Events and Event Handlers in the Developing WebFOCUS Maintain Applications manual.
-
Procedures are WebFOCUS procedures, written using the WebFOCUS language. They generate reports, manipulate your environment, and run other non-WebFOCUS Maintain programs, such as 3GL programs (COBOL, C, C++), CICS transactions, IMS/TM transactions, and RDBMS stored procedures (from Oracle or Sybase, for example).
-
HTML Files are hypertext documents that are portable from one platform to another. There are several ways you can use an HTML file in your application:
- Use an HTML file as a launch page to start your WebFOCUS Maintain application. For more information, see Running WebFOCUS Maintain Applications in the Developing WebFOCUS Maintain Applications manual.
- Use the Frame control to place an HTML file on a form.
- Use the Help property to open an HTML file in a form.
-
Java applets are compiled Java programs that can perform interactive animation, immediate calculations, or other simple tasks without having to send a user request back to the server. You include Java applets on a form using the Java applet control.
-
Images improve the appearance and usability of your forms.
x
Procedure: How to Use a WebFOCUS Procedure in Your Application
If the WebFOCUS procedure already exists, you can simply include it in your application.
-
Open WebFOCUS Environments (at the bottom of the left pane of the Explorer window). It contains your local WebFOCUS development server (localhost), as well as any other WebFOCUS Servers you have set yourself up to access.
-
Open the WebFOCUS Server where the WebFOCUS procedure resides and locate it (usually in Data Servers\EDASERVE\Applications).
-
Drag it into your project folder.
-
Return to WebFOCUS Developer Studio.
-
You will see your project listed in the WebFOCUS Developer Studio Explorer. Create a new procedure in the Procedures folder and use any of the WebFOCUS Developer Studio tools to create code.
-
In Report Painter, select a field in the report, and click Options in the Properties menu.
-
In the Field Properties dialog box, click the Drill Down tab.
-
In the Drilldown Definitions drop-down menu, select Maintain Procedure.
-
Type the name of the Maintain procedure in the Procedure Name box.
-
Optionally, you can create parameters to pass to the Maintain procedure using the With Parameters section.
-
Open the Maintain procedure or the Event Handler editor.
-
Use the Language Wizard to specify that you want to create code to Run another procedure.
You could also type in the syntax. See the description of EXEC in Command Reference in the Maintain Language Reference manual.
For more information, see Using WebFOCUS Procedures in Your Application in the Developing WebFOCUS Maintain Applications manual.
xStep 8: Testing All the Application Procedures Locally (Optional)
After you have created all of your application procedures, it is time to test them. If you test your application locally before deploying it, you can determine whether an application works without worrying about the WebFOCUS Server environment.
Note: If you decide to test your application locally, you must have your data source residing locally. If you cannot easily obtain local versions of your data, skip this step.
To test your application, click the Deploy and Run scenario button  on the Exploring toolbar.
If there are any errors, they are listed in the Run tab of the Output window. To find the erroneous code, double-click the syntax in the Run tab, and WebFOCUS Maintain automatically opens the appropriate editor at the line with a problem.
xStep 9: Setting Up the Deployment Scenario
Your next step is to deploy your project files, which means moving the components of the project to the appropriate WebFOCUS servers and web servers for execution. Your deployment scenario determines where your project components should be moved to in order for your application to work. You can have as many deployment scenarios as you wish, so you probably have one deployment scenario using a test WebFOCUS Server, and another deployment scenario that deploys to the production WebFOCUS Server.
x
Procedure: How to Set Up Your Deployment Scenario
-
Create a deployment scenario by doing one of the following:
- Select New Deploy Scenario in the list of deployment scenarios in the Exploring toolbar.
- Right-click the project, click Project Development, and then click New Scenario.
- In the File menu, click Deploy, and then click New Scenario.
-
In the New Scenario dialog box, give your scenario a name. If you wish, you can specify a starting object (the component that should be run first) and a default partition (the default WebFOCUS Server to which WebFOCUS Maintain assigns all components).
-
Open the Deploy folder. This folder appears in the project folder the first time you create a deployment scenario.
Note: The Local Deploy deployment scenario, along with any deployment scenarios you created, appears in the list of deployment scenarios. Local Deploy deploys your application to your local WebFOCUS Server. You cannot edit Local Deploy.
-
Open your deployment scenario.
The components of your project appear on the left. A list of the WebFOCUS Servers to which you have access appears on the right.
-
Expand the WebFOCUS Servers to which you want to assign components. Under each server appears a WEB/APPROOT/Project folder and an EDA/EDASERVE/APPPATH/Project (you may see others, as well). The WEB folders represent web servers and the EDA folders represent WebFOCUS Servers, as shown in the following image.
-
Drag each component of your project to the appropriate web server or WebFOCUS Server. In general, you deploy files that you create with WebFOCUS Developer Studio (WebFOCUS files, Maintain files, Master Files) to the WebFOCUS Server, and you deploy third-party files (HTML files, images, script files) to the web server. There are exceptions to this rule.
For more information on deployment, see Partitioning and Deploying Project Files in the Creating Reporting Applications With Developer Studio manual.
Your project is now ready to be deployed and run.
xStep 10: Deploying and Testing the Application
Now that you have set up the deployment scenario, you can deploy and test your application.
- Make the deployment scenario active by selecting its name in the list of deployment scenarios in the Exploring toolbar.
- Do one of the following:
- In the File menu click Deploy, and then click Deploy and run.
- Right-click the application, in the shortcut menu click Deploy, and then click Deploy and run.
- In the Exploring toolbar, click the Deploy and run scenario button .
For more information, see Running WebFOCUS Maintain Applications and Debugging WebFOCUS Maintain Applications in the Developing WebFOCUS Maintain Applications manual.