Creating a Job and Adding a Batch
This procedure shows you how to create a data flow that
uses the Bulk API to load data from a CSV file to a Salesforce object.
The name and location of the file are variables that are specified
at run time so that the same flow can be used for different data and
objects. It performs insert operations, although that too could
be a variable.
This example creates a job and then adds a batch to it. The maximum
number of records that can be processed in a batch is controlled
by Salesforce to balance resources among their customers. To process
more records additional batches could be added to the job.
x
- Right-click an application directory and select New,
then Flow.
A new data flow window opens.
- Right-click the SQL object and select Add,
then Join.
- Right-click the Inner Join object and select Add,
then Select.
- Right-click the new SQL object Select Columns (T1) and select Add,
then Source.
A Select Synonym object opens.
- Select the synonym createjob and click Select.
- Double-click the SQL object T1 to open
it. Double-click JOBID to select it. Click OK.
- Right-click the SQL object T1 and select Where
Filter. Click the Relational Expression tab.
- Under Columns/Variables, double-click OPERATION and enter
the value insert. For the CONTENTYPE value,
enter CSV. For OBJECT, use the variable name ‘&OBJECT’ so
that the same flow can be used for more than one object.
When
you are done, the calculator display should look like the following
image.

- Click OK.
xAdding a Batch for a Delimited File
- Right-click Inner Join and select Add Source.
A
Select Synonym window opens. If the filter button is checked, click
it.
- Select the synonym addbatch and click Select.
- Double-click the Inner Join object.
The Join Editor opens.
Under Left Source and Right Source, click on the field JOBID and
then click the  button. Click Ok.
- Double-click the main SQL object.
The Column Selection window
opens. Under T1, click JOBID, and under T3
Ctrl-click BATCHID, as shown in the following image.

Click
the  button and OK.
- Right-click the main SQL object and select WHERE
Filter.
The WHERE Filter Calculator opens.
- Click the Relational Expression tab.
Double-click CONTENTTYPE and enter ‘CSV’.
Click FILE and enter ‘&INPUTFILE’.
When you are done, it should look like the following image.

- Click OK.
xSetting the Target Properties
The target created by the flow in this procedure is
going to have a single line that contains the Job ID and Batch ID
assigned by Salesforce for the job. This information is important
for the next steps.
- Right-click the workspace to the right of the SQL object
and select Add target, then New.
- Right-click the target object and select Properties.
The
Target Properties window opens.
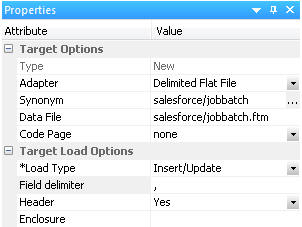
- Select an available adapter, such as Delimited Flat file. Enter
an application directory and synonym name, such as salesforce/jobbatch.
- Enter a location for the table or file, such as salesforce/jobbatch.ftm.
Enter a comma (,) for the field delimiter and select Yes for
the Header, as shown in the following image.
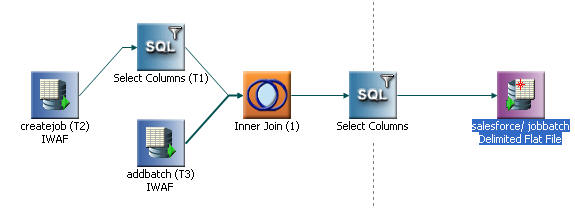
- Close the Properties panel.
The completed data flow should
look like the following image.
- Click the Save button to save the flow.
The
Save Procedure as window opens. Enter a name for the flow, such
as create_job_batch. Click Save.