Recording and Reproducing User Actions
You can use the Web Console Record and Playback tools
to record an exact sequence of user actions applied through a browser,
and then reproduce it (play it back) to evaluate server response
times in an environment that simulates single or multiple users
under the same or different conditions. Files generated by record
and playback, known as HTI scripts (HTTP internal scripts), are
stored in the scale directory of the server (parallel to APPROOT).
The file name can be edited before recording starts. These scripts,
along with server traces, are used for testing and analysis of problems.
Record/Playback is an iterative process in which you can repeat
your tests under varying conditions until you achieve the throughput
and response time you require.
Tip: It is often useful to employ two browser
windows for stress testing using the Record/Playback tool, one to
turn the recording on and off and enter playback parameters, the
second to capture the actions you wish to record. (Note that if
you do not use two sessions, you will have to edit the request being
stressed to remove the record/setup actions.)
In order to be able to capture these actions, you must properly
configure your LAN setting.
Here is an overview of the steps:
- Set your browser
to use the Reporting Server as a proxy server. This will allow you
to capture user actions in a web browser. For details, see How to Configure Your Browser to Use the Reporting Server as a Proxy
Server.
- Start the script
recording.
- Run the request you
want to test.
- Stop the recording.
You will be able to reuse this script with varying test conditions.
- Play back the script
you recorded, setting stress parameters, such as the number of threads
(simulated users) and the intervals at which the request will be
run.
- Evaluate server performance
using the Playback log, the output (.hto) files generated by the
test, and stress test performance reports.
- Repeat steps 2-7
as many times as necessary to simulate and evaluate the conditions
you want to test.
Note: The Report/Playback feature is not currently
supported on the PDS Deployment Server. Therefore, options are disabled
on the Web Console.
x
Procedure: How to Configure Your Browser to Use the Reporting Server as a Proxy
Server
When using an Reporting Server as
a proxy, you can record user actions that are directed to any web
site. In order to be able to record the sequence of actions that
a user will complete using the browser, you must first enter the
proper LAN settings.
-
From the
Internet Explorer toolbar, select Tools and
then Internet Options from the browser menu
bar.
-
Select the
Connections tab, then click the LAN Settings button.
The Local Area Network (LAN) Setting window opens.
Tip: Before you make the required changes, note
your standard settings. You will want to revert to them later.
-
Click the Use
a proxy server for your LAN check box.
-
Enter the
host name in the Address box. (This identifies the machine on which
the client software is installed.)
-
Enter the
port number for which the client is configured.
-
Click OK to
return to the Internet Options window.
-
Click OK again
to complete the task.
Leave
the browser open since you will use it to display the Web Console.
x
Procedure: How to Stress Test Server Performance
The simplest way to record an HTI script
is by running a stress test on a procedure. For information, see How to Run a Stress Test.
-
From the
menu bar, select the W icon, then Scalability.
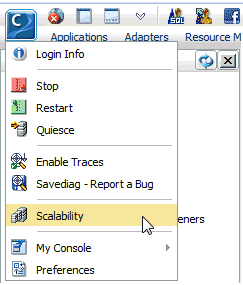
The Scalability tree opens in the navigation pane.
-
Right-click the Scalability folder
and select New, and then Recording.
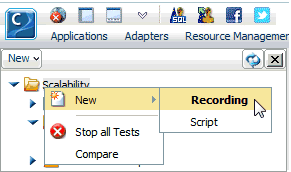
The Playback of HTI Script files pane opens.
-
Click New,
then Recording on the expanded menu bar to
open the Recording of HTI Script File pane, where you can specify
a script name and the directory in which you want to store it.
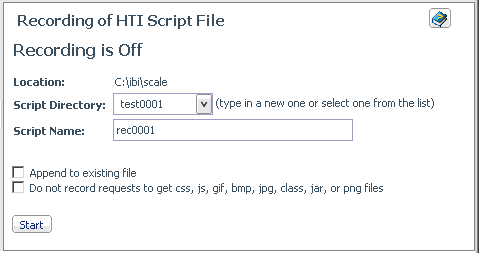
A default directory name appears
in the Script Directory drop-down list. You can use the default
name, edit it, or choose an existing directory from the list.
-
Enter a
script name or use the default name. This is the name of the file
that will contain the script.
-
By default,
a new HTI script is generated when you start a recording session.
Click the Append to Existing check box if
you prefer to append a recording to the existing HTI script.
-
By default,
the recording captures all user actions. Click the Do
not record requests to get css, js, gif, bmp, jpg, class, jar, or
png files if you wish to exclude requests for these
operations from the recording.
-
Before you
start the recording, you must get into position to execute the set
of actions you want to test. Open a second browser and ensure that
the correct LAN setting are in effect. (For details, see How to Configure Your Browser to Use the Reporting Server as a Proxy
Server.)
-
Return to
the first browser window, where the Recording of HTI Script pane
is still open, and click Start to begin recording.
-
Return to
the second browser window and perform the actions you wish to record.
-
When you
have captured all of the required actions, return to the first browser
window, where the first the Recording of HTI Script pane is still
open. Click Stop to end the recording.
-
Click the Refresh icon
on the navigation pane to display the new directory and script.
-
Since you
have completed the recording task in the second browser window,
it is a good idea to remove the LAN setting you entered expressly
for this purpose. (For more information, see How to Configure Your Browser to Use the Reporting Server as a Proxy
Server.) You can now
close this window.
-
You are
now ready to perform your stress tests. From the Playback folder
in the navigation pane, expand the Individual Tests folder,
expand the script directory you named in step 3, and click the script
name you entered in step 4.
-
Choose Start from
the menu. The Playback of HTI Script Files pane lists the available
test parameters.
You can choose basic and advanced test options
from the Playback of HTI Script Files pane. For details about these
options, see Parameters for Playback of HTI Script Files.
For example, you might wish to perform
a stress test twice with the following conditions:
Test 1: Use the default Number
of Threads (1) to simulate one user and the default Interval Parameters (.5)
second to indicate how often you want the request to run. Enter
a Test Description, such as Baseline
with one user, to be able to distinguish among the tests.
Click the Advanced tab and accept the default
format of one file per thread. (In this case,
you are only testing one thread.)
Click Start to
run the test.
Test 2: Set Number
of Threads to 30 to see how performance would be affected
if 30 users ran the request simultaneously (with a given number
of agents that may or may not be less that 30). This setting is
key to stress testing. Adjusting the number of threads allows you
to assess how many requests the server will be able to handle at
a given point in time. Increasing the number of threads puts more
load on the server(s). In practice, users may want to start out
with a smaller or larger number depending on their installations.
Keep the Interval Parameters as .5 seconds.
Enter Sample 30 Users as the Test description.
Click the Advanced tab. This
time select one file per request (rather
than per thread) in the Results field and set the Keep
alive parameter to 30 to indicate how long, in seconds, you
want the script to run. This option enables enough statistics to
be generated to make a comparison among server response times. (You
may need to try different settings to find the optimal length of
time to run the script.)
Click Start to
run the test.
In each
case, two files are stored in the ibi/scale/performance directory:
- A summary log is
displayed in a separate window. The log provides information about
the number of threads that ran (indicated by thread=), the number
of requests serviced (indicated by request=), how long it took to
service each request (indicated by resp=), and the time that the
processing began (indicated by start=). It also reiterates your
input and summarizes the test processing.
- An .hto output file is displayed in the Playback, Individual
Tests folder, under the specified script directory and script name.
This file indicates whether the client/server communication worked
properly.
-
You can
perform the following additional functions from the Individual Tests
folder. Click a script name and choose:
-
Show requests. Lists all submitted hti requests.
-
Edit script. Opens the hti script file in a text editor.
You can save the script or refresh from the disk.
-
Start. Opens the Playback of HTI Script Files pane, where you
can revise parameters and rerun the script.
-
View Log file. Reopens the log file.
-
View Graph. Produces the same output as the log file in graph
format. The graph is particularly useful for comparing the average
response time of the server with your specified Maximum Response
time to determine if you have met your performance goals.
-
Delete Result. Deletes the generated output but retains the
script for reuse.
-
Delete Script and Result. Deletes the generated output but
retains the script for reuse.
-
Once the
script is run, you may also want to open the Performance Reports
folder and choose:
- Basic Report to see
basic stress test statistics.
- Extended Report to
see an expanded group of stress test statistics.
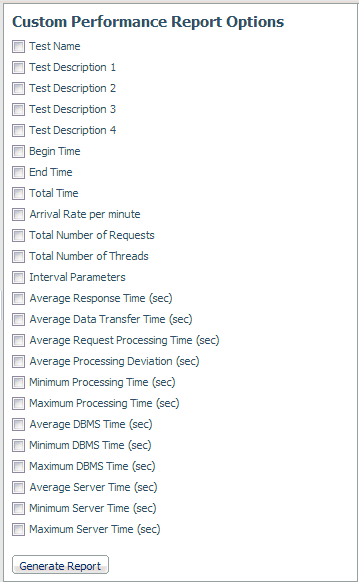
- Custom Report to
specify which statistics to include in the reports.
-
Typically,
you would run additional tests with different input parameters in
order to compare statistics under different simulated loads conditions.
Based on these comparisons, you could determine the best server
scenario for your needs.
x
Procedure: How to Refresh or Remove Script Directories
You can expand the Individual Tests folder and click a specific
directory. A pop-up menu enables you to remove the selected directory
or refresh it without having to refresh all of the other test directories.
-
From the
menu bar, select the C icon, then Scalability.
-
From the
navigation pane, expand the Individual Tests folder
(if not already expanded).
-
Right-click
a directory and choose either Refresh or Delete
Script Directory from the menu.
x
Procedure: How to Display Percentile Statistics in Results
A percentile is the point in a distribution of scores below
which a given percentage of scores is found. When you perform a
stress test you can calculate percentile statistics for processing
time by specifying the percentage against which the percentile value
will be derived.
You request percentile statistics
from the Playback HTI Script Files pane, which you can access in
either of the following ways:
As a diagnostics option:
-
From the
menu bar, select the W icon, then Scalability.
-
In the navigation
pane, expand a directory folder, click a script name, and select Start from
the menu. The Playback of HTI Script files pane lists Basic and
Advanced test parameters. Enter basic test conditions: Number
of Threads and Interval Parameter.
-
Click the Advanced tab.
A variety of additional test options are displayed.
-
In the Show
percentile statistics field, enter a number N,
between 1 and 99, to calculate the processing time in your stress
test distribution against which N% of the
other processing times are lower. For example, if the distribution
of 6 processing times in a stress test includes the following values:
1-1-3-3-4-5, and the percentage value for Show Percentile
Statistics is set to 50 (%),
then the 50th percentile processing time will be 3 because that
is the lowest value in the distribution against which 50% of the
processing times are lower.
-
Click Start to
run the test with the specified condition(s).
The Percentile result, along with other test
results, appears in a separate window.
When stress testing a particular procedure:
- From the Web Console
menu bar, select Applications.
- Expand an application
directory, right-click a procedure, and select Run Advanced,
then Run Stress. The Playback of HTI Script
Files opens. This pane lists the available test parameters.
- Enter basic test
conditions: Number of Threads and Interval
Parameter.
- Click the Advanced tab,
and proceed as described in steps 4 and 5 above.
x
Reference: Parameters for Playback of HTI Script Files
Following is a list of general playback
parameters that are available.
Basic:
-
Number of Threads
-
A positive number of threads to be used when
playing the script. Each thread represents a single client (user).
-
Interval Parameter
-
Specifies timing in a multiple-client (multi-threaded)
playback. Possible formats of this value are m or m, n, k,
where m is the number of seconds between each client startup,
and after each n started clients, an interval of k seconds
is used instead.
-
Test Description
-
Enables you to create notes at playback time
that will be displayed in the Extended Report.
If you reset statistics, all information about previous runs
is deleted, including any Test descriptions.
Tip: This description provides a useful
way to distinguish results as you test different combinations of
options.
Advanced:
-
Compare option
-
Determines whether the response data received
by all clients (threads) are identical. It uses a binary comparison
mode and writes the comparison results to a playback log file.
-
Immediate processing
-
Ignores every SLEEP and WAIT statement in
the HTI script. Issues HTTP requests without any delay between them.
-
Show percentile statistics
-
A percentile is the point in a distribution
of scores below which a given percentage of scores is found. When
you perform a stress test you can calculate percentile statistics
for processing time by specifying the percentage against which the
percentile value will be derived.
Enter a
number N, between 1 and 99, to calculate the processing time
in your stress test distribution against which N% of the
other processing times are lower. For example, if the distribution
of 6 processing times in a stress test includes the following values:
1-1-3-3-4-5, and the percentage value for Show Percentile Statistics
is set to 50 (%), then the 50th percentile processing time will
be 3 because that is the lowest value in the distribution against
which 50% of the processing times are lower.
For
related information, see How to Display Percentile Statistics in Results.
-
Size statistics
-
Displays general output file size statistics
for multiple-client playback in the log.
These
are useful for analyzing Playback results with a large number of
threads. Size should be consistent between similar runs. A size
change would generally indicate an execution failure.
-
Simulate browser caching
-
Enables browser-style simulated caching of
static pages (currently, css, js, gif, bmp, jpg, class and jar files).
Each thread (simulated user) maintains its own cache of requests.
When a cached static URL is requested again by the same user, the
Stress tool skips the request instead of downloading the URL again.
-
Submit as deferred
-
Executes a request using deferred, rather
than immediate, logic.
-
Save playback statistics
-
Choose this option to make statistics for
the current run available on reports.
The
statistics are saved internally in the $EDACONF/catalog directory
as rec0001.hti, rec0001.log, and rec0001_0001.hto.
For example, if the script generated in a recording session
has the name rec0001.hti, then the run log and statistics are stored
in the rec0001.log file and the output generated by each of three
threads is rec0001_0001.hto, rec0001_0002.hto, rec0001_0003.hto.
-
Traces
-
Sets the Playback utility traces on or off.
A trace file (TRC) is then created for each thread.
-
Keep alive for
-
Causes every thread to repeat a request for
a specified time, in seconds. This option enables the server to
generate enough statistics to make a comparison among response times.
-
Result
-
The HTTPTST module that records and plays
back Web Console sessions can simulate multiple client access to
the Web Console on playback (that is, a multi-threaded application).
Each thread does what is recorded in the .hti file.
The server reply is recorded in the .hto file. However, you can
control the output provided by selecting one of the following options:
-
One file per thread (default). Displays output in .hto
files. The server generates a summary .hto file that reports on
the success or failure of the server/client communication in the
format: For example:
Number of successfully run threads :5
You can access this file by selecting Playback, Individual
Tests, and then the script_directory folder
in the format
scriptname--nnnn
where:
- nnnn
Is a number that is appended to the file name. It indicates
the size of the generated file.
This option
also generates a separate .hto file for each thread being tested;
these files contain the code that renders the report. You can access
these files by selecting Playback, Individual
Tests, and then the script_directory folder
in the format
scriptname_thread#_filesize
and
view the contents in a text editor.
-
One file per request. Displays
a single .hto file in the Playback>Individual Tests folder. This
is the summary file that reports on the success or failure of the
server/client communication. For example:
Number of successfully run threads :5
You
can access this file by selecting Playback, Individual
Tests, and then the script_directory folder
in the format
scriptname--nnnn
where:
- nnnn
Is a number that is appended to the file name. It indicates
the size of the generated file.
In addition
to the summary file, the output for each request is written to the ibi/scale/performance
directory in the format
scriptname_thread#_request#.ext
where:
- ext
Is determined by the nature of the request (for example,
HTML), and by its success or failure (failure is often represented
as a .txt file). For example:
rec0001_0002_0041.html
where:
- rec0001
Is the script name.
- 0002
Is the thread number.
- 0041
Is the request number.
Additional requests in the
thread would be represented as:
rec0001_0002_0042.html
rec0001_0002_0043.html
-
Server
-
Sends request to a server defined in the odin.cfg file.
-
Use HTTP proxy
-
Send all requests through an HTTP proxy server. For example, www.myproxy.com:3192.
-
Save output to another directory
-
Saves output files, including traces, to a specified location
(for example, c:\myfiles).
x
Reference: Additional Recording Hints
- When recording is
on, the HTTP listener records every CGI request. It is important
to ensure that no one else is submitting requests to the same listener.
- Do not try to record
a script from the middle of a persistent session. Always try using
user ID and password, then recording the first request.
x
Reference: Playback Files
Playback log files are generated during script playback.
Each file contains general information about playback processing,
such as thread startup and termination, connection errors, and comparison
results.