Configuring the Adapter for IWAF
Configuring the adapter consist of specifying connection
and authentication information for each of the connections you want
to establish.
Note: You can declare connection attributes
for an adapter that will allow you to create synonyms for either
a service or an event.
x
Procedure: How to Configure the IWAF Adapter
You
can configure the adapter from either the Web Console or the Data
Management Console.
-
From the Web Console menu bar, click Adapters
or
From the Data Management Console, expand the Adapters folder.
The
Adapters folder opens.
-
Expand the Available folder,
if it is not already expanded.
-
Expand the Procedures folder,
and then expand the IWAF folder.
-
Right-click IWAF and select Configure.
-
Click OK to
allow changes to the server configuration.
The IWAF Successfully added to configuration window appears.
-
Click Restart
Java Services and then click OK.
x
Procedure: How to Declare Connection Attributes for an IWAF Adapter
You
can declare connection attributes for an IWAF adapter from either
the Web Console or the Data Management Console.
-
From the
Web Console menu bar, click Adapters
or
From the Data Management Console, expand the Adapters folder.
The
Adapters folder opens.
-
Expand the Available folder, if
it is not already expanded.
-
Expand the Configured folder,
right-click IWAF, and select Add Adapter.
-
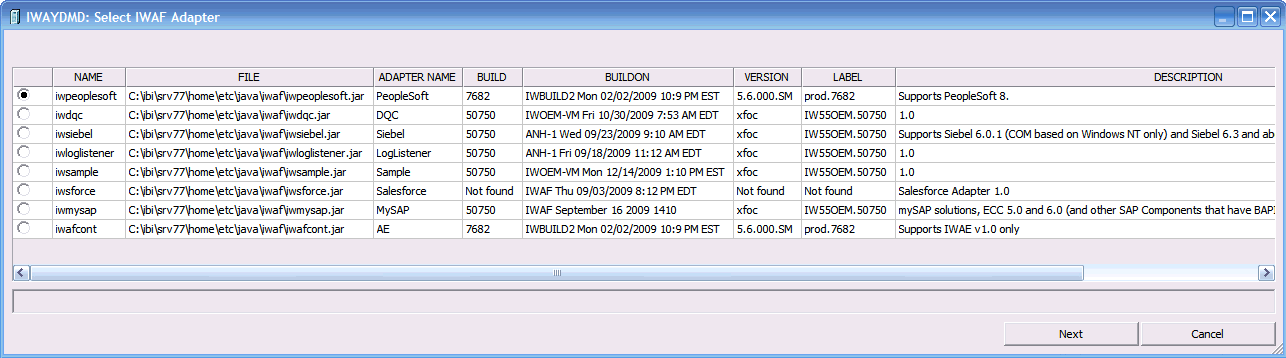
From the
list of IWAF adapters, check the radio button for the one you want
and click Next.
This list of IWAF adapters will vary from the illustration
below depending on what has been installed on your server.
For
an explanation of the information in the adapters list, see IWAF Adapter Information.
-
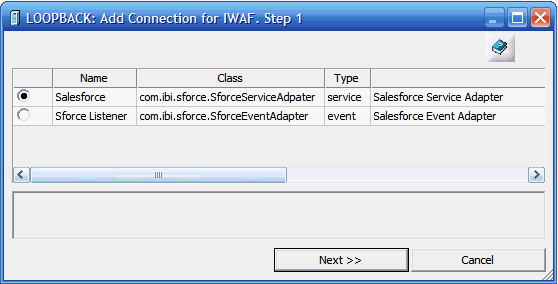
Select the connection type and click Next.
The following image shows the dialog box
for Salesforce.com with the Salesforce Service Adapter selected
(service type). The parameters required will
depend on whether you select a service or event adapter.
For
an explanation of the information in the adapters list, see IWAF Connection.
-
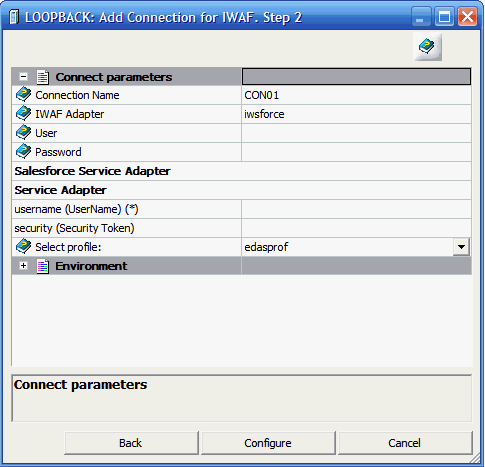
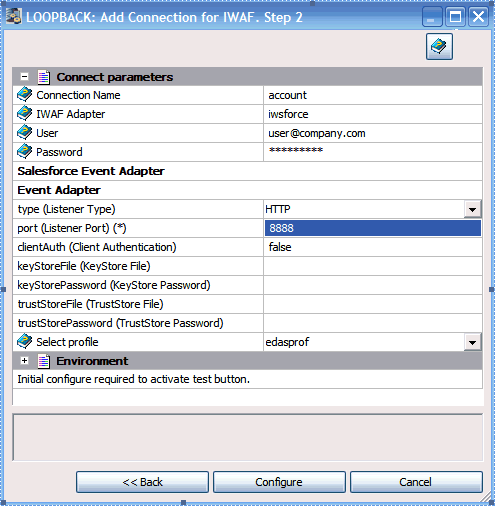
Enter values
for the parameters required by the adapter and click Configure.
For a description of these parameters, see IWAF Connection Parameters.
The following illustration shows sample connection
parameters for a Salesforce.com service adapter.
The following illustration shows sample connection
parameters for a Salesforce.com event adapter.
x
Reference: IWAF Adapter Information
The following list describes the information
in Select IWAF Adapter dialog box.
-
Name
-
Internal name of the Adapter.
-
File
-
Full path and location of the jar file for this adapter.
-
Adapter Name
-
Name of the adapter as it will appear in the Metadata tree.
-
Build
-
iWay build number.
-
Build on
-
Date and time the adapter was built.
-
Version
-
iWay internal build number.
-
Label
-
iWay Subversion number.
-
Description
-
Adapter description.
x
Reference: IWAF Connection
The
following list describes the information in the Select IWAF Adapter
dialog box.
-
Name
-
Name of the IWAF adapter.
-
Class
-
Name of the class file.
-
Type
-
Name of the Java class.
-
Option
-
Description of the adapter type.
x
Reference: IWAF Connection Parameters
The
following list describes the information in the Add Connection to
IWAF dialog box. Not all options appear for all applications.
-
Connection name
-
Logical name used to identify this particular set of connection
attributes. The default is CON01.
-
iWAF Adapter
-
Name of the IWAF adapter.
-
username (UserName)
-
User name for this connection.
-
security (Security Token)
-
The value provided by salesforce.com.
-
type (Listener Type)
-
HTTP or HTTPS.
-
User
-
Authorization ID to connect to the source.
-
Port (listener port)
-
The port number that will listen for SOAP messages from the application.
-
Password
-
Password associated with the authorization ID.
-
Adapter Specific
-
Additional options depending on the adapter selected.
-
Select profile
-
Select a profile from the drop-down menu to indicate the
level of profile in which to store the CONNECTION_ATTRIBUTES command.
The global profile, edasprof.prf, is the default.
If you
wish to create a new profile, either a user profile (user.prf)
or a group profile if available on your platform (using the appropriate
naming convention), choose New Profile from
the drop-down menu and enter a name in the Profile Name field (the
extension is added automatically).
Store the connection attributes
in the server profile (edasprof).