How to: Reference: |
The WebFOCUS installation provides an option to install the Tomcat Connector (plug-in). In some environments, manual configuration is needed after the installation completes. If you chose to configure the Tomcat Connector (plug-in) with WebFOCUS Client, it should be installed in:
C:\Program Files\Apache Software Foundation\Jakarta Isapi Redirector
If the Tomcat Connector is not installed, you can follow the steps below to manually install and configure the Connector.
Successful installation of the Tomcat Connector performed the following steps. You do not need to perform these steps manually unless there was an error during the WebFOCUS installation, if the Connector is not working properly, or if you would like to add the Connector later. In addition, if you want to change which IIS website uses the connector, you may need to perform some manual configurations.
- If they do not already
exist, manually create the following subdirectories under the C:\Program
Files\Apache Software Foundation directory:
\Jakarta Isapi Redirector\bin
\Jakarta Isapi Redirector\conf
\Jakarta Isapi Redirector\log
- The connector should
be installed on your system in the following default directory:
C:\Program Files\Apache Software Foundation\Jakarta Isapi Redirector\bin
Note: If you changed the default directory, substitute your values accordingly.
If it does not exist, you can obtain a copy of the isapi_redirect.dll file from the following directory:
drive:\ibi\WebFOCUS80\utilities\install\iisCopy the isapi_redirect.dll file to the default directory.
Note: For Windows AMD 64-bit installations, a copy of the 64-bit isapi_redirect_64.dll file can be found in the following directory:
drive:\ibi\WebFOCUS80\utilities\install\iis - In the \Jakarta Isapi
Redirector\conf subdirectory, create the following files:
-
uriworkermap.properties
The following example provides the structure of the uriworkermap.properties file, which you can use as a reference:
# uriworkermap.properties -
#
# This file provides sample mappings for example
# ajp13w worker defined in workermap.properties
/servlet-examples/*=ajp13w
# Now filter out all .jpeg files inside that context
# For no mapping the url has to start with exclamation (!)
!/servlet-examples/*.jpeg=ajp13w
The uriworkermap.properties file informs IIS when to route requests to Tomcat. This file must specify the following WebFOCUS context roots:
- /ibi_apps
- /ibi_help
Note: If you are using a custom alias in your environment, ensure that the custom alias that is used for the context root is specified.
Using a text editor, open the uriworkermap.properties file, which is located in the following directory:
C:\Program Files\Apache Software Foundation\Jakarta Isapi Redirector\
conf\uriworkermap.properties
Tip: If the formatting of the file appears incorrect in Notepad, use WordPad. However, if you use WordPad, ensure the file is saved as text (.txt).
Ensure that the context roots are defined as follows:
/ibi_apps/*=ajp13w
/ibi_help/*=ajp13w
If these lines do not exist, add them after the following:
/servlet-examples/*=ajp13w
Using the default line, IIS will forward
http://hostname/ibi_apps/
but not
http://hostname/ibi_apps
If you want both forwarded, add the following lines, in addition to the other lines at the very end of the uriworkermap.properties file:
/ibi_apps=ajp13w
/ibi_help=ajp13w
However, the exact line can only appear once.
Note: If you want Tomcat to process the approot alias and want IIS to only forward requests for them, add /approot/*=ajp13w to the uriworkermap.properties file and create a context on Tomcat that points to the approot WAR file: ...\install_directory\ibi\WebFOCUS80\webapps\approot.war
Save and exit the editor. Restart IIS.
-
workers.properties
The following example provides the structure of the workers.properties file, which you can use as a reference:
# workers.properties -
#
# This file provides minimal jk configuration properties needed to
# connect to Tomcat.
#
# The workers that jk should create and work with
#
worker.list=ajp13w
#
# Defining a worker named ajp13w and of type ajp13
# Note that the name and the type do not have to match.
#
worker.ajp13w.type=ajp13
worker.ajp13w.host=localhost
worker.ajp13w.port=8009
-
uriworkermap.properties
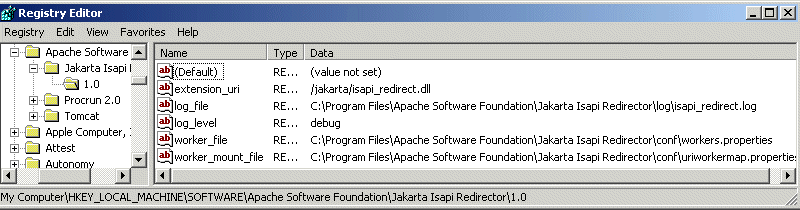
- Create Registry settings
under:
HKEY_LOCAL_MACHINE\SOFTWARE\Apache Software Foundation\Jakarta Isapi
Redirector\1.0
The following table shows the settings. Confirm that they are created correctly on your system.
Value Name
Value Data
extension_uri
/jakarta/isapi_redirect.dll
log_file
C:\Program Files\Apache Software Foundation\
Jakarta Isapi Redirector\log\isapi_redirect.log
log_level
info
worker_file
C:\Program Files\Apache Software Foundation\
Jakarta Isapi Redirector\conf\workers.properties
worker_mount_file
C:\Program Files\Apache Software Foundation\
Jakarta Isapi Redirector\conf\uriworkermap.properties
The following image shows the settings created in the Registry Editor.
- Create a Virtual
Directory (alias) with scripts and executables permissions under the
default IIS website.
Alias
Path
/jakarta
C:\Program Files\Apache Software Foundation\
Jakarta Isapi Redirector\bin\
This must have execute permissions of Scripts and Executables. You can confirm or add this using the Internet Services Manager. If you are not sure how to add a Virtual Directory, see Configuring IIS Virtual Directories (Aliases).
If you want to use the connector with a different website, create this Virtual Directory under that site as well or replace the existing one.
- Add the following
file as an ISAPI filter to the default website:
C:\Program Files\Apache Software Foundation\Jakarta Isapi Redirector\
bin\isapi_redirect.dll
In the Internet Services Manager, select and right-click the default website, choose Properties, and select the ISAPI Filters tab. Click Add, enter Jakarta in the Filter Name field, and the full path to the isapi_redirect.dll as the executable.
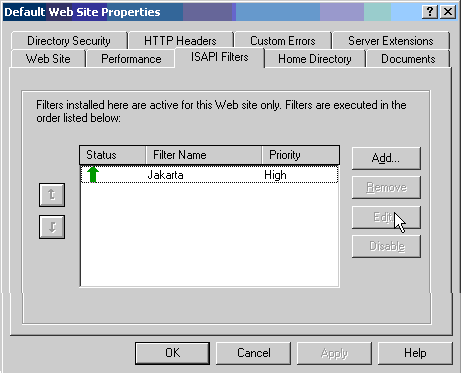
If you want to use the connector with a different website, create this filter under that site, instead. Be sure to add the filter for the specific website and not for the entire IIS server.
Note:
- To use multiple instances of the connector to connector to separate instances of Tomcat, see the Technical Memo: 4595: Installing Multiple Instances of WebFOCUS Using Apache Tomcat on Windows.
- If WebFOCUS installed the Tomcat Connector, you can manually uninstall it by removing the registry settings, ISAPI Filter, Virtual Directory, and Jakarta Isapi Redirector directory.
The workers.properties file informs IIS where to find Tomcat. It is located in the following directory:
C:\Program Files\Apache Software Foundation\Jakarta Isapi Redirector\
conf\workers.properties
Normally, you do not need to edit this file. You only need to edit this file if you changed the default port 8009 or if Tomcat is not on the same machine as IIS. If you ran the Tomcat Connector installation manually, the workers.properties file is used instead.
Note: IIS finds the workers.properties file by looking in the registry. However, if an isapi_redirect.properties file is in the same directory as an isapi_redirect.dll file, IIS reads the isapi_redirect.properties file instead of the registry.
If you are not using Windows 2003 Server, proceed to Tomcat Connector Debugging.
On Windows 2003 Server, you must create a Web Services Extension for the Tomcat Connector.
-
Open the
Internet Services Manager. You can access this from the Start menu
by selecting Start, then Run,
and entering the following:
inetmgr
-
Press Enter.
The Internet Information Services window opens.
- Expand your hostname on the left, right-click Web Service Extensions, and select Add a new Web service extension.
-
In the Extension
name field, enter:
jakarta
- Check Set extension status to allow.
-
Click Add and
browse to select the isapi_redirector.dll file. For example:
C:\Program Files\Apache Software Foundation\Jakarta Isapi
Redirector\bin\isapi_redirect.dll
- Click Open and then OK to close windows and return to the main Internet Services Manager window.
- Ensure the Jakarta-Tomcat web service extension status is set to allow.
- Restart IIS.
The default log file for the Tomcat Connector is written under:
C:\Program Files\Apache Software Foundation\Jakarta Isapi Redirector\log
In some environments, the isapi_redirect.log file may be empty. If you want to use this log file, you may need to set NTFS permissions so IIS can write or modify the log directory. Normally, this requires granting Modify/Write permissions to the IUSR_servername user and Authenticated Users group, but the required user IDs may vary based on your configuration.
You can control how much information is logged through the registry under:
HKEY_LOCAL_MACHINE\SOFTWARE\Apache Software Foundation\Jakarta Isapi
Redirector\1.0\log_level
You can set this to one of the following:
debug
info
error
emerg
You must restart IIS if you change the log_level.