You can create a process flow either by starting a new
flow (the preferred method) or by building upon an existing data
flow (which is suitable for some simple situations). In either case,
you add objects to the process flow base, which varies slightly depending
upon the method you choose. For more information about these approaches,
see Process Flow Methodology.
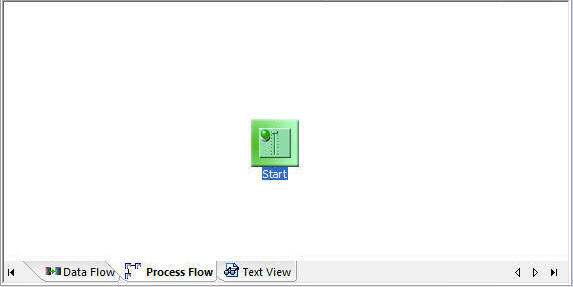
- If you create
a new flow, the process flow workspace initially contains only the Start
object, as shown in the following image. You can then begin to add
other objects to the flow.
For
details, see How to Create a Reusable Process Flow.
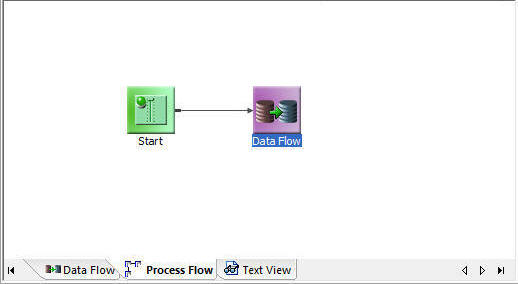
- If you build
upon an existing data flow, the process flow workspace initially
contains the Start object connected to the embedded data flow object,
as shown in the following image. You can then add others to the
flow.
For
details, see How to Create a Process Flow From a Data Flow.
With either method, the Start object can only have one object
as output. It can be any object type except for a Wait object, which
can only follow a Parallel Group object.
The connector arrow from the Start object to the next object
in the flow will always be black (that is, unconditional) and cannot
be changed.
x
Procedure: How to Create a Reusable Process Flow
This
procedure describes the recommended modular process flow design
methodology described in Process Flow Methodology. To create a reusable process flow:
-
Right-click
an application directory in the navigation pane and select New then Flow.
-
Click
the Process Flow tab. A new workspace containing a Start object opens
in the workspace.
-
To add
objects to the workspace:
- Drag a data
flow, another process flow, or a procedure into the workspace from
the navigation pane. You can open another flow within the process flow
by right-clicking it and selecting Open.
- Click an object
from the Insert group and drag it to the workspace, then double-click
the object to open a properties specification pane. See the detailed
topics in this chapter for information on property specifications
for each type of object.
-
To connect
objects in the workspace, right-click the left object and, holding
the mouse button down, drag from the left object to the right object,
creating a connecting arrow. Release the mouse button.
-
When
you have finished building the process flow, save and name it.
-
Click the Save or Save As button
from the Quick Access Toolbar. The Save Procedure As dialog box
opens.
-
Name the process flow.
-
Save it to any application directory in your application path.
-
Click OK to return to the Process Flow workspace.
Alternatively, you can save and name the process flow at
any point during development and then continue to click Save to update
the flow as you build it.
x
Procedure: How to Create a Process Flow From a Data Flow
Use the following steps only when you
wish to create a process flow that contains a limited number of
objects and when you do not intend to use the embedded data flow
with other process flows.
-
After
creating and saving a data flow, click the Process Flow tab.
The Start object and the embedded Data Flow object are connected
by default.
-
To add
new objects to the workspace, you can do either or both of the following:
- Drag a data
flow, another process flow, or a procedure into the workspace from
the navigation pane. A process flow can be comprised of data flows,
process flows, and/or procedures from any application directory
in the search path of the user.
- Click an object
in the Insert group and drag it into the workspace, then double-click
the object to open a properties specification pane. See the detailed
topics in this chapter for information on property specifications
for each type of object.
-
To connect
objects in the workspace, right-click the left object and, holding
the mouse button down, drag from the left object to the right object,
creating a connecting arrow. Release the mouse button.
Tip: If you want to add an object between the Start
object and Data Flow object, right-click the connecting arrow and
choose delete, then add the new object. Connect
Start to the new object, then connect the new object to the Data
Flow object.
-
When
you have finished building the process flow, save it under the data flow
procedure name. Both the data flow and process flow logic are contained
in the same procedure.
Alternatively, you can save the process flow at any point
in the development cycle.
For
an illustration of this technique, see Navigation Pane: Procedures.
x
Process flows are saved on the DataMigrator server.
The first time you save a process flow, you will select an application
directory and assign a name to it. After that, you can save it with
the same name or assign a new one.
The following restrictions apply to flow names:
- Names can contain
only letters, numbers and underscores.
- Uppercase letters
are converted to lowercase when the flow is saved.
- Names can be up to
64 characters long, except on z/OS with PDS deployment where names
are limited to 8 characters.
x
Procedure: How to Save a Process Flow
-
Click the Save button from
the Quick Access Toolbar.
Note: A flow can only be saved once changes have
been made to it. If no changes have been made, the button and Save
option in the main menu will both be inactive (grey).
If
this is the first time a flow is being saved, the Save Procedure
As dialog box will open. See How to Save a Data Flow with a New Name.
-
Check the
console window for a message indicating that the flow was saved
successfully.
x
Procedure: How to Save a Process Flow with a New Name
-
Click the Save
As button from the Quick Access Toolbar.
The Save Procedure As dialog box opens.
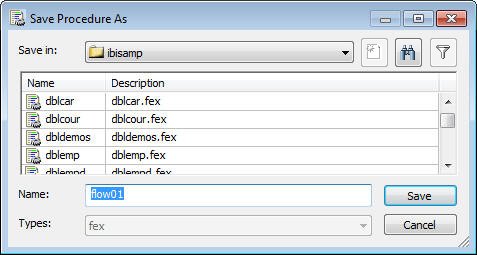
-
Select the
application directory where you want to save the flow from the Save
in: drop-down menu.
-
Enter the
name you wish to use for the flow in the Name field.
Click Save.
-
Check the
console window for a message indicating that the flow was saved
successfully.