Setting User Preferences

In this section:

You can customize App Studio by setting specific user preferences through the App Studio Options dialog box.

To open the Options dialog box, click Options in the Application menu. The tabs at the top of this dialog box include the following:

These tabs are identified in the subsequent topics.


Top of page

x
General Tab

The General tab contains the following options.

Main Window Options

Option

Description

Maximize main window

Maximizes the application window when you begin each session.

Open the Console window

Launches the Console window each time you begin a session.

Open last accessed file on startup

Opens the last file opened in the appropriate mode.

Minimize when running a Procedure

Minimizes the application window when you run a procedure.

Smart Context

Option

Description

Set new column type based on metadata/surrounding fields

Sets new column types by using metadata and surrounding fields.

Activate Field ribbon tab when selecting a field on the report canvas

Activates the Field tab on the ribbon upon selection of a field within the report canvas.

Activate Layout ribbon tab when no selection is made on the report canvas

Activates the Layout tab on the ribbon when no selection is made on the report canvas and you click the white space.

Other Settings

Option

Description

Show Welcome Screen

Controls the appearance of the Welcome screen when App Studio is launched.

Confirm close

Displays a prompt for users to confirm that they want to exit App Studio.

Start local WebFOCUS Server

Starts the local Reporting Server when App Studio is launched.

Stop local WebFOCUS Server on exit

Stops and closes the local Reporting Server when you exit App Studio.

Recent file list limit

Allows you to set the number of recently used files that appear in the Recent file lists. The default value is 25.

Ping Interval (minutes)

Sets the frequency at which requests are sent to the Web/Application Server so your connection does not time out. The default is 5.

Reset all message boxes

Resets all message boxes to their default state. For example, if you selected the Don’t show this message again check box in any message box, clicking this button will reset all message boxes. Once you click this button, it becomes inactive until you choose not to display a message box in the product.

Default file editor

Lists file editor options, such as:

  • Edit in App Studio canvas
  • Edit in Text Editor
  • Edit in Windows registered tool

Note: The Edit in Windows registered tool is only visible if the file type you are accessing has been associated with a Windows application.

The file editor used determines which context menu options are available and controls the default behavior for double-clicking and right-clicking files.


x
Reporting Tab

In this section:

The Reporting tab contains the following options.

Option

Description

Screen

Formats reports for the screen.

Printer

Formats reports for the printer.

Field List Options

The following options affect the appearance of the Fields tab of the Object Inspector.

Option

Description

Sort the list by field name

Sorts any list of field names alphabetically.

Show fully qualified field names

Displays any list of field names as qualified field names, which includes data source and table names, alphabetically.

Display the field name

Displays the full field name in the Fields tab, as specified in the file description.

Display the field alias

Displays the alternate field name in the Fields tab, as specified in the file description.

Display field titles

Displays the column title in the Fields tab, as specified in the file description.

Display field descriptions

Displays descriptive information about the field in the Fields tab, as specified in the file description.

Display the data formats

Displays the field length and format type in the Fields tab, as specified in the file description.

Expand field tree

Displays fields in expanded mode when using a Field tree. If this option is not selected, segments appear collapsed wherever a Field tree appears.

Note: This option can also be accessed from the Field tree context menu.

Display Filters in Filters Folder

Displays Filters in a separate Filters folder of the Field tree. If this option is not selected, Filters appear with the rest of the fields in the segment.

Note: This option can also be accessed from the Field tree context menu.

Style Sheet Merge Options

Option

Description

Drilldowns

Preserves drill downs in your current StyleSheet when you apply another StyleSheet to a report.

Authoring Mode

The Authoring Mode options determine how field names in a procedure (.fex) are written in the WebFOCUS source code. These options are not affected by the selected Field List options.

Option

Description

Qualified fieldname

Writes the source code using qualified field names, for example:

BY 'GGSALES.SALES01.CATEGORY'

Unqualified fieldname

Writes the source code using unqualified field names, for example:

BY CATEGORY

Alias fieldname

Writes the source code using alias field names, as defined in the ALIAS field of the Master File. The ALIAS field assigns an alternative name for a column.

The following example shows source code in which the Category field name is assigned E02 in the ALIAS field of the ggsales.mas Master File.

BY E02

Other

Option

Description

Default Report Format

Select the display format for your reports. You can select from the following options:

  • HTML
  • HTML active report
  • active report for Flash
  • active report for PDF
  • PDF
  • Excel 2007
  • Excel 2000
  • PowerPoint
  • Default (This option is the FOCUS default. It applies whichever of the previous formats was set as an environment parameter.)
  • User

Maximum number of records to retrieve

Specifies a limit on the number of records to retrieve from the data source. Setting a retrieval limit creates selection criteria for both Retrieval Limit and Read Limit dialog boxes.

Specify a retrieval limit when you need only a few records to test the design of a new report, or you know how many records meet the test criteria and want to stop a search after those records are retrieved. This reduces total retrieval time.

Maximum number of readings to make

Specifies a limit on the number of readings that can be made against the data source.

Default Style Template

Specifies the default styling template when you open the Report feature.

Default Report Template

Specifies the default report settings when you open the Report canvas. Click Browse to select user-created templates.


x
Setting the Default Report Format

The Reporting tab of the App Studio Options dialog box allows you to set a report format to use as the default format by the Report feature.


x
Procedure: How to Set the Default Report Format

The following procedure describes how to set the default report format. In this example, User format is selected.

  1. From the Application menu, click Options.
  2. Click the Reporting tab.
  3. From the Default Report Format drop-down list, select the required format, as shown in the following image.
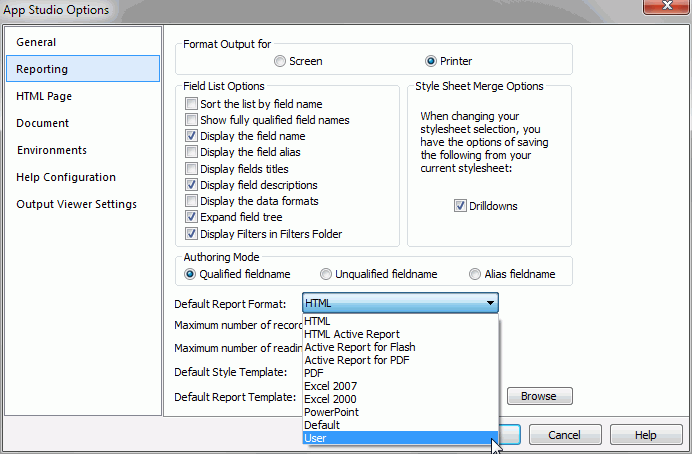
    Reporting tab of App Studio Options dialog box

  4. Click OK.

    The User output is now the Default Report Option in the App Studio Report mode. The User format allows the application to select the actual output type at run time. For example, a developer could choose to view a report as Excel 2007, PDF, active report for Flash, and more.


Top of page

x
HTML Page Tab

The HTML Page tab contains the following options.

Grid Settings

Option

Description

Show Grid

Enables you to view a grid while you create an HTML page. The Show Grid check box is selected by default. Clear this check box if you do not want to develop with a grid.

Snap to Grid

Enables you to snap to grid on demand. The Snap to Grid check box is selected by default. Clear this check box if you do not want to enable the snap to grid option.

Width

Customizes the width of your grid. The default is 10 pixels.

Height

Customizes the height of your grid. The default is 10 pixels.

Form type

Option

Description

None

Specifies no layers in the HTML page.

Single layer

Specifies a single layer in the HTML page. This is the default setting.

Multiple layer

Select the Multiple layer radio button for the HTML page if you want multiple layers in the HTML page.

Specifies multiple layers in the HTML page.

Click Form Settings to open the Form settings dialog box. The options for Form settings are described in the Form Settings table.

Form settings

Option

Description

To the left of the input

Sets the prompt orientation to appear to the left of the form settings.

Above the input

Sets the prompt orientation to appear above the form settings. This is the default setting.

Distance between prompt and input

Sets the distance between prompt and input. The range is from 0 to 99 pixels. The default setting is 5 pixels.

Horizontal distance between controls

Sets the horizontal distance between controls. The range is from 0 to 99 pixels. The default setting is 4 pixels.

Vertical distance between controls

Sets the vertical distance between controls. The range is from 0 to 99 pixels. The default setting is 10 pixels.

Number of columns

Sets the horizontal distance between controls. The range is from 0 to 99 pixels. The default setting is 10 pixels.

Add schedule button

Adds a schedule to your HTML page. This is the default setting.

Add defer button

Enables deferred running of a report. This is the default setting.

Start each chain on a new line

Starts chains on a new line. This is the default setting.

Check boxes

Option

Description

Show 'New Parameters' dialog

Sets the New Parameters dialog box to appear in the HTML page. This is the default setting.

Default caching option

Sets the Default caching option to run in the HTML page. By default, this option is not selected.

Auto Arrange Objects

Sets the objects in the HTML page to arrange automatically. This is the default setting.

Preview settings

Option

Description

Reports and Charts Preview

Enables you to preview reports and charts before saving and deploying the HTML page. This is the default setting.

Simulated Data

Enables you to run the HTML page based on simulated data from WebFOCUS.

Live Data

Enables you to run reports and charts using live data in the HTML page. This is the default setting.

Record limit for reports

Sets the record limit for reports. Values range from -1 to 999. The default setting is 500.

Record limit for input controls

Sets the record limit for input controls. Values range from -1 to 999. The default setting is 10.

Use Prefix

Sets a prefix to run before each report or chart component on an HTML page.

Refresh thumbnails every seconds

Sets the time interval for refreshing thumbnails. Values range from 0 to 999 seconds. The default setting is 20.

Default Theme

Sets the default theme for an HTML page from the Default Theme drop-down list. The Information Builders theme is the default theme.


x
Document Tab

The Document tab contains the following options.

Grid Settings

Option

Description

Show Grid

Enables you to view a grid while you create a document. The Show Grid check box is selected by default. Clear this check box if you do not want to develop with a grid.

Snap to Grid

Enables you to snap to a grid on demand. The Snap to Grid check box is selected by default. Clear this check box if you do not want to enable the snap to grid option.

Width

Customizes the width of your grid. The default is 10 pixels.

Height

Customizes the height of your grid. The default is 10 pixels.

Preview Settings

Option

Description

Reports and Charts Preview

Enables you to preview reports and charts before saving and deploying the document. This is the default setting.

Simulated Data

Runs the document based on simulated data from WebFOCUS.

Live Data

Runs reports and graphs using live data in the document. This is the default setting.

Record limit for reports

Sets the Record limit for reports. Values range from -1 to 999. The default setting is 500.

Use Prefix

Sets a prefix to run before each report or chart component on a document.

Refresh thumbnails every seconds

Sets the time interval for refreshing thumbnails. Values range from 0 to 999 seconds. The default setting is 20.


x
Environments Tab

Note: The Environments options are used to control the development areas that are visible in the Configured Environments tree. At least one option must be selected and applied to all configured environments.

The Environments tab contains the following options.

Environments settings

Option

Description

Show Projects area

Displays the Projects area in the Configured Environments tree. This is the default setting.

Show Data Servers area

Displays the Data Servers area in the Configured Environments tree.

Show Repository area

Displays the Repository area in the Configured Environments tree.

Show Web Applications area

Displays the Web Applications area in the Configured Environments tree.


x
Help Configuration Tab

The Help Configuration tab provides the fields in which you can modify the App Studio Help configuration information to access the online Help system from your environment.

Option

Description

Protocol

Specify the protocol, either HTTP or HTTPS.

Host

Type the name of the machine where the Help resides.

Port

Type the port number of the web and/or Application Server.

Help Context Root

Type the context root for the location where the Help is hosted.


x
Output Viewer Settings Tab

The Output Viewer Settings tab enables you to set Microsoft® Internet Explorer® or the App Studio Viewer (default) for output, and to set the navigation options (run in new window, run in same window).

Option

Description

User Internet Explorer

Selects Microsoft Internet Explorer as the default output viewer.

Run in new window

Sets the output to run in a new window.

Run in same window

Sets the output to run in the same window.


WebFOCUS