You can add graphical elements, such as a corporate
logo or a graph, and background patterns, such as a watermark, to
your reports. You can place graphic report images on every page,
and within the headings and footings of a report.
The image must exist as a separate graphic image file in the
following formats for use in a report:
- For Bitmap
files (.BMP), GIF files (.GIF), JPEG files (.JPEG), JPG files (.JPG), Enhanced
Metafiles (.EMF), and Windows Metafiles (.WMF), Scalable Vector
Graphics (.SVG).
- For HTML reports,
GIF (.GIF) or JPG (.JPG).
- For PDF (or
PS) and PPT reports, GIF (.GIF).
Tip: Since GIF images are supported in all report formats,
using GIF images ensures that your images appear whether you display
your report as HTML or PDF.
You can insert individual images in a report or reference a report
field to use as the file name for the image. When referencing a
report field, you must have a field in the data source whose values
identify the image file names.
In both cases, the image file must be in the application path(s)
or you must include the image files fully qualified path. Images
used in HTML reports must reside on the web server. Images used
in PDF (or PS) reports must reside on the WebFOCUS Reporting Server.
You can specify a local file or identify an image elsewhere on the
network using a URL.
You can also:
- Specify the
position of an image in relation to the object area in which it
is embedded.
- Specify its
height and width (scale).
- Adjust its
location in the report.
- Update the
image to the latest available version.
- Preview the
image in a Preview pane, without running the report.
- Create a pop-up description
to provide alternative information about the image in the output.
- View the following
image properties in the Object Inspector: the location of the image,
image name, positioning on page, and size.
Note that a graph can be saved as a .GIF, .JPG, or .SVG file
and incorporated as a graphical image into a webpage.
x
Procedure: How to Include a Single Image in a Report
-
Click Images from
the Report menu or click the Options button
from the Output Format toolbar and select the Images tab.
The Report Options dialog box opens at the Images tab.
-
Click File
Name and type the path of the image in the entry field.
This is the default image source option.
or
Click Browse to select
the image file from the Open dialog box.
-
Click Add to
add the selected image to the list.
The
image file and its path appear in the list box.
x
Procedure: How to Include Image(s) When the Field Record Value Is a Graphic File
-
Click Images from
the Report menu or click the Options button
from the Output Format toolbar and select the Images tab.
The Report Options dialog box opens at the Images tab.
-
Click Field
Value as the image source.
-
Choose
a field from the drop-down box.
-
Click Add to
add the selected field to the list.
The field name appears in the list box.
x
Procedure: How to Include a Graph Image
-
Click Images from
the Report menu or click the Options button
from the Output Format toolbar and select the Images tab.
The Report Options dialog box opens at the Images tab.
-
Click Graph as
the Image Source box and type the path of the image in the entry
field.
or
Click Browse to select
the graph file from the Open dialog box.
Note: A graph image source file is available
if there is a graph file saved as an image for the procedure.
-
Click Add to
add the graph image to the list.
The
graph file and its path appear in the list box.
x
Procedure: How to Create a Pop-Up Description for an Image
The
pop-up description option enables you to provide alternative information
about the image in the output, when the mouse is hovered over the image.
-
In Report Painter, click Images from the
Report menu.
The Report Options dialog box opens at the Images tab.
-
Select the
Image Source for the image.
The selected image source appears in the list box.
-
Type a description
for the image in the Pop-up description field.
-
Click Add to
add the image source and set any additional image properties.
-
Click OK to
close the Report Options dialog box and run the report.
When you hover the mouse over the image in the output,
the pop-up description appears.
x
Procedure: How to Edit the Pop-Up Description for an Image
You
may edit the pop-up description for an image through the Report
Options Images tab, or with the Image Properties dialog box.
- Click Images from
the Report menu to open the Report Options dialog box and edit the
text in the pop-up description field.
- Click the Images tab
of the Object Inspector and double-click the image to open the Image
Properties dialog box. Edit the text in the pop-up description field.
x
Procedure: How to Specify the Position of an Image
-
Click Images from
the Report menu or click the Options button
from the Output Format toolbar and select the Images tab.
The Report Options dialog box opens at the Images tab.
-
Select
the image from the List tab.
-
Enter
the desired (X,Y) coordinates in the Position fields.
The position of the image is in relation to the report
object in which the image is embedded (for example, Page Footer).
or
- Click the Images tab
located at the bottom of Report Painter.
- Double-click
the image to open the Image Properties dialog box.
- Enter the desired
(X,Y) coordinates in the Position fields.
Note: Since Report
Painter uses internal Cascading Style Sheets (CSS) to position images
in HTML reports, ensure that Cascading Style Sheets is selected from
the Features tab in the Report Options dialog box. However, this
ability to position the image through CSS does not allow you to
insert a line break after the image. If you want to insert a line
break after an image, you must turn off the Cascading Style Sheets option.
You can turn off the CSS option from the Features tab in the Report
Options dialog box.
x
Procedure: How to Scale the Size of an Image
-
Click Images from
the Report menu or click the Options button
from the Output Format toolbar and select the Images tab.
The Report Options dialog box opens at the Images tab.
-
Select
the image from the List tab.
-
Select Custom as
the Size option.
-
Enter
the desired height (X) and width (Y) coordinates in the Size fields.
By default,
the image is rendered at its original size; it can then be resized. To
return to the original size, click the Default button.
Note: For
HTML reports, ensure that Cascading Style Sheets is selected in the
Report Options Features tab.
x
Procedure: How to Change the Location of an Image
-
Click Images from
the Report menu or click the Options button
from the Output Format toolbar and click the Images tab.
The Report Options dialog box opens at the Images tab.
-
Select
the image from the List tab.
-
Select
one of the locations from the Location drop-down list: Page, Background,
Page Footer, Page Header.
If you add a subfooting, subheading, subtotal, report heading,
or report footing to your report, these object areas are also listed
to enable you to attach an image to these locations.
-
Click OK.
x
Procedure: How to Preview an Image
-
Click Images from
the Report menu or click the Options button
from the Output Format toolbar and click the Images tab.
The Report Options dialog box opens at the Images tab.
-
Click
the Preview tab and select the image.
The image is displayed in the right pane in the Preview tab.
x
Procedure: How to Update an Image in a Report
To
ensure that the current version of an image is included in a report:
-
Click Images from
the Report menu or click the Options button
from the Output Format toolbar and click the Images tab.
The Report Options dialog box opens at the Images tab.
-
Select
the image from the List tab.
-
Select
the Include as Reference check box, located
in the Image properties section.
-
Click OK.
x
Procedure: How to Delete an Image From a Report
-
Click Images from
the Report menu or click the Options button
from the Output Format toolbar and click the Images tab.
The Report Options dialog box opens at the Images tab.
-
Select
the image from the List tab.
-
Click Delete.
-
Click OK.
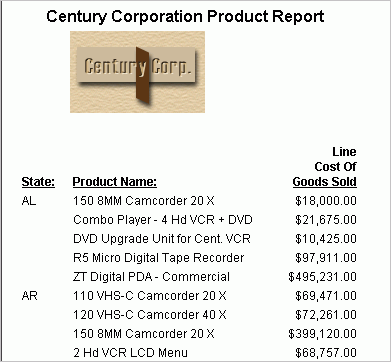
Example: Placing an Image in a Report
Suppose
you want to enhance the appearance of your reports by including
a graphical image. The following example shows how to add the Century
Corporation logo in the heading of a sales report.
- Open the CENTORD data
source in Report Painter.
- Identify and
format your report columns.
Tip: From the Object Inspector,
show fields using the Field Tree view.
- Identify your
sort columns. Click By on the Report Painter
toolbar. Double-click or drag STATE and PRODNAME from
the Fields tab of the Object Inspector.
- Identify your
sum column. Move the insertion point after the Product Name column
and click Sum on the Report Painter toolbar. Double-click
or drag LINE_COGS from the Fields tab of
the Object Inspector.
- Format the
Line Cost of Goods Sold column. Right-click Line Cost of
Goods Sold in the Report Painter window and select Format.
Ensure Decimal is selected in the Format
Types box. Click Floating dollar -- M from
the Edit Options list. Click OK.
- Add a report
heading and page heading.
- Click Report
Heading from the Headings and Footings toolbar to show
the Report Heading object in Report Painter, if not already visible.
- Position the
cursor in the report heading by clicking your left mouse button
in the heading area. Type the following in the heading area:
Century
Corporation Product Report
Note: If the
report heading is not viewable, click Boundaries from
the View tab of the Report Options dialog box.
- Highlight the
report heading. Right-click, click Justify, and
click Center from the context menu.
- Click Page
Heading from the Headings and Footings toolbar to show
the Page Heading object in Report Painter, if not already visible.
- Position the cursor
in the page heading by clicking your left mouse button in the heading
area.
- Press the Enter
key six times to create six blank lines between the page heading
and the report columns.
- Add the Century Corporation logo to
the page heading.
- Place the cursor
in the page heading, right-click and click Options to
open the Properties for Page Header dialog box.
- Click the Images tab.
- Ensure that File
Name is selected in the Source box (default). Click Browse.
- Browse to the
C:\ibi\apps\ibinccen\images directory, select the file cc_logo.gif and
open it.
- Click Add to
save the location of the image file.
- Click Apply and OK to
return to the Report Painter window.
- Adjust the position
of the image by how it appears in the Report Painter window. You
can use the Images tab of Report Painter to view, move, and adjust
the image properties.
- Run the report.
The
report appears in the browser, as shown in the following image.