Inserting a spot marker in a text string in an object
area enables you to separate the string into items that can be styled
or aligned individually. You can insert a spot marker for this purpose
in any object area.
x
Procedure: How to Style or Align an Individual Item in a Text String
-
Select Show
Markers from the View menu to display spot markers.
-
Place
the cursor in the position at which to insert a spot marker.
-
Right-click
the object area and select Insert Spotmarker from
the context menu.
Report Painter inserts a spot marker to the right of the
cursor. A spot marker looks like <+0>.
-
To style
an individual item in a text string, highlight a portion of the
text string in the object and use the Font toolbar to adjust the
Font Name, Font Type, and Font Size.
-
For additional
styling options, highlight the entire item, right-click, and select Options from
the context menu.
The Properties dialog box for the object opens at the Style
tab, from which you can style the background color, font color,
and so on.
Note: You must use spot markers when changing
the font color portions of text in a heading or footing. Spot markers
denote the start and end of the text that is being modified.
-
To align
an individual item in the text string, highlight the entire item, right-click
and click Alignment Grid. Then right-click
an area in the grid and select Alignment Options.
Choose the desired alignment options. For more information about
using the Alignment Grid, see Aligning Fields and Text in Headings and Footings.
Example: Separating Text Items For Individual Styling
In
the following sample procedure, a spot marker is inserted in the
page heading text to separate it into two items (Quantity Over and
400,000), which are then styled individually.
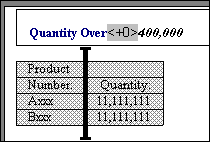
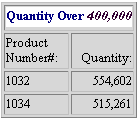
In
the following sample output, Quantity Over appears in bold, while
400,000 appears in bold italic.
x
Procedure: How to Style an Individual Item in a Subheading or Subfooting
You may selectively style individual
items in the subheading and subfooting object areas by using the
Properties for Subheader (or SubFooter) dialog box. Style and Drill
Down options, similar to the Field Properties dialog box, are available
for subheadings and subfootings.
-
To add
a subheading or subfooting to a report, select the sort field from
the Report Painter window.
-
Do one of the following:
- Click the SubHeading (or SubFooting) button on the
Headings and Footings toolbar.
- Click Subheading (or Subfooting)
from the Insert menu.
A Subheading (or Subfooting) object area is added to
the Report Painter window.
-
Position
the cursor in the subheading (or subfooting) by clicking your left mouse
button in the subheading (or subfooting) object area.
-
Type
the subheading (or subfooting) text.
-
To embed
field values in a subheading (or subfooting):
-
Place the cursor in the subheading (or subfooting) where you
want to embed the value.
-
Double-click a field from the Fields list in the Object Inspector.
The field is embedded in the subheading (or subfooting)
object area.
-
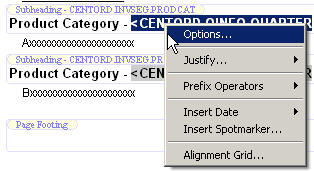
To style
an individual item in a subheading or subfooting, highlight the selected
item, right-click and click Options from
the context menu, as shown in the following image.
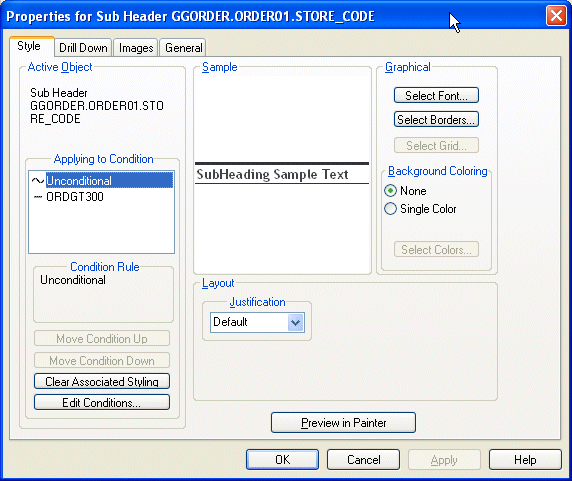
The
Properties for Sub Header (or SubFooter) dialog box opens.
-
Use
the Style, Drill Down, and Images tabs to style the individual portion of
the subheading (or subfooting), as shown in the following image.
Note: If
you are only using text in the subheading (or subfooting), you can format
a portion of the text string by using the Font toolbar.