Using Controls to Supply Incoming Parameter Values
In this section: How to: Reference: |
Controls enable you to prompt users for a parameter value. When
you create a parameter as part of a report or graph, HTML Composer
automatically adds a control, Submit button, and Reset button for
the parameter to your layout. The parameter appears on the Parameters
tab. You can also add an input control and bind it to a parameter.
When you delete a parameter in Report
Painter that was assigned
a control in HTML Composer, you must delete the associated controls individually
in the layout.
Controls, with the exception of a text box which does not supply
a list of possible values, can supply values with a dynamic or static
list of values:
The properties of a control, as well as the parameters associated
with each control, can be controlled with the Properties tab of
the Properties window, and with the Parameters tab. For details,
see Working With the Properties Window and Working With the Parameters Tab, respectively.
Note: Pertaining to the Default selection property, at
run time, when using a combo box, there must be a value selected.
In order to have nothing selected, you must add the Make selection
value.
For details about static and dynamic controls, see Creating a Static List of Values and Creating a Dynamic List of Values.
For details about active controls, see Creating Active Technologies Dashboards With HTML Composer.
xAutomatically Creating Controls From the New Parameters Dialog Box
When a report contains one or more new amper variable parameters
created in Report Painter, the New Parameters dialog box
appears when you save the report. You can set the Control Type for
each parameter prior to returning to HTML Composer. This eliminates
the need to select each parameter individually to set the associated
Control Type.
If you reference or import an existing report that uses a Master
File containing a parameter, the New Parameters dialog box opens
with that parameter in the list, as well as any parameters from
the report procedure
Note: When referencing or importing an existing report
that uses a Master File containing a parameter, the Add “ALL”
option and the Add “No Selection” option are unavailable.
If linking hyperlink properties to another page or
procedure, HTML Composer parses the other file for unresolved parameters
and opens the New Parameters dialog box.
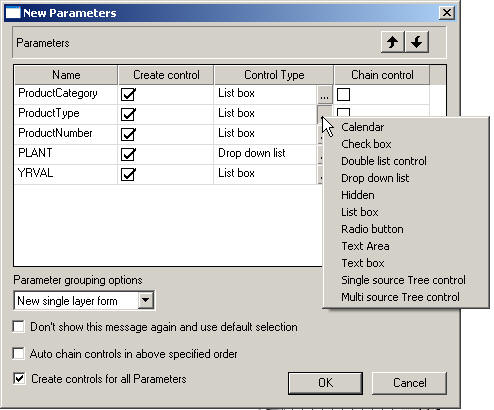
The following image shows the New Parameters dialog box. For
each parameter, you will find Name and Control Type fields, a Create
control check box, and a Chain control check box. The Control Type
ellipsis button enables you to select a new or existing control
type for the parameter.
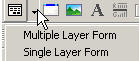
The Parameter grouping options menu in the New Parameters dialog
box provides options for the placement of the controls associated
with new amper variable parameters created in Report
Painter. The option selected
is set from the HTML Page tab, which is located in the Developer
Studio Options dialog box. You may create a single or multiple layer
form, or select an existing form from the layout.
- Select Do
not create a form to insert the controls for each of
the new parameters in separate locations on the HTML page.
- Select New
multiple layer form to insert the controls for all of
the new parameters inside one form element you can position anywhere
on the HTML page. This form element also contains submit (run) and
reset buttons. The multiple layer form contains group boxes around
each element in the form. You may move and resize each element of
the control.
- Select New
single layer form to insert the controls for all of the
new parameters inside one form element, which you can position anywhere
on the HTML page. This form element also contains submit (run) and
reset buttons. The single layer form contains all of the elements
within a single group box.
Single layer is
the default form type selected in the HTML Page tab. To change the
default form type, select Options from the
Window menu. The Developer Studio Options dialog box will open.
From the Developer Studio Options dialog box, select the HTML Page
tab.
- Select form(n),
where n is the number of a control that already exists in
the layout. The parameter is added to the selected control.
- Select Don't
show this message again and use default selection to
control whether or not the New Parameters dialog box appears when
adding parameters in HTML Composer.
Tip: You
may view the New Parameters dialog box again by selecting Show
New Parameters dialog from the HTML Page tab. To access
the HTML Page tab, select Options from the Window
menu. The Developer Studio Options dialog box will open. From the
Developer Studio Options dialog box, select the HTML Page tab.
- Select Auto
chain controls in above specified order to automatically
chain the selected controls from the New Parameters dialog box.
The auto chain option is useful since it creates the chain, or links
of a chain, automatically for the parameters selected in the Chain
control column. For more information, see Automatically Chaining Parameters From the New Parameters Dialog Box.
- Select Create
controls for all Parameters to switch between creating
controls for all or none of the parameters in the New Parameters dialog
box. When importing or referencing a report with parameters to an
HTML page, all of the controls will have Create control selected
by default. The create controls for all parameters selection is
useful when there is a long list of parameters that you do not want
to add controls for on the HTML page.
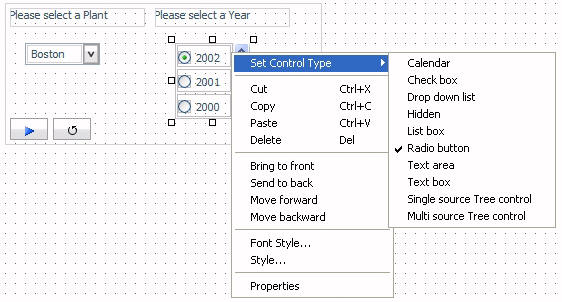
To edit the Control Type that you selected from the
New Parameters dialog box, select the parameter object on the Parameters
tab or the Design tab, right-click, and select the control type
option from the Set Control Type menu.
x
Procedure: How to Manually Create a Control in the Layout
When you create a parameter as part of a report or graph,
HTML Composer automatically adds a control, Submit button, and Reset
button for the parameter to your layout. Manually adding a control
to the layout enables you to create the individual objects on the
control.
Inserting a control in the Design view
creates the control object in the layout with the Submit button
and Reset button. You must manually add the input controls to be
used in the control. For more information, see Using Controls to Supply Incoming Parameter Values.
-
Insert
a control by doing one of the following:
The
cursor changes into a crosshair.
To change the default
form type, select Options from the Window
menu. The Developer Studio Options dialog box opens. From the Developer Studio
Options dialog box, select the HTML Page tab.
The multiple
layer form contains group boxes around each element in the form.
You may move and resize each element of the control. The single
layer form contains all of the elements within a single group box.
-
Drag
the crosshair to create a control and adjust it to the size you want.
A control is created in the layout and assigned
the form(n), where n is a number.
-
You
may add input controls in the control object to create parameter values.
- Create an insert
control and add it in the control object. For example, insert a
List Box, Drop Down List, and so on.
- Click the Parameters
tab to create parameter values.
The Properties and
settings dialog box opens. Creating an input control from the Design
view prompts you to create a bound parameter on the Parameters tab.
- Create the
parameter values for the input control.
For details about creating
parameter values, see Creating Parameter Values.
- Optionally,
you may close the Properties and settings dialog box for the input control
if you wish to bind a parameter to a control.
-
Bind
the input controls to a parameter.
Binding a control to a parameter will populate
the parameter. Drag a control object to a parameter object on the
Parameters tab. For details about creating input controls, see Using Input Controls to Supply Parameter Values.
-
Optionally,
you may assign hyperlink properties to the Submit button. For more
information, see How to Add a Hyperlink to a Push Button or an Image.
x
Procedure: How to Change the Type of Control Associated With a Parameter
-
In the
Parameters tab or the Design tab, select the input control associated
with the parameter name.
-
Right-click and select Set Control Type.
-
Select
the type of input control for the form.
Options are Calendar, Check box, Drop down
list, Hidden, List box, Radio button, Text area, Text box, Single
source Tree control, and Multi source Tree control.
The following image shows the input control options when
right-clicking a control object on the Design tab.
x
Procedure: How to Bind or Unbind a Parameter To/From an Existing Control
When a control is automatically added to the layout with
the New Parameters dialog box, it is associated (bound) to a parameter.
Click the Parameters tab and notice the direction
of the arrow. The control object is bound to the parameter object,
which means that the control will populate the parameter.
If you deselect the Create control option
from the New Parameters dialog box, the deselected parameter name
is added to the Unbound Parameters box on the Parameters tab. The
Unbound Parameters box is a container for the unbound parameters,
only for parameters not selected from the New Parameters dialog
box. Any parameters created or unbound from the Parameters tab are
not automatically moved here. Optionally, you may click and drag
parameters to and from the Unbound Parameters box for your own organization.
-
To unbind
a parameter from a control:
- Click the Parameters tab.
- Select the
arrow head on the line between the parameter and the input control, so
that the line is bold.
- Right-click
and select Break binding.
-
To bind
a parameter to a control:
- Click the Parameters tab.
- Select the
center of the input control object.
-
Click and drag the control to the
center of the parameter object.
-
Release the mouse to complete the binding.
x
Reference: Types of Controls
Controls can be single-select or multiselect. Single-select
controls enable you to select a single value from a list of supplied
values. Multiselect forms enable you to select multiple values from
a list of supplied values.
Examples of single-select controls are:
Examples of multi-select
controls are:
A drop-down list is
the default control type for all single-select parameters on the
New Parameters dialog box. A list box is the default control type
for all multi-select parameters on the New Parameters dialog box.
You can change the type of input control using the Parameters
tab. For details, see How to Change the Type of Control Associated With a Parameter.
Note: Individual multiselect parameters
must be designated as multiselect in Report
Painter in order to process
multiple values.
x Using the Delete Container Only Option
When creating parameters, the Grouping option selected
in the New Parameters dialog box generates a container for controls.
After the container is created, you may choose to delete the container
by using the Delete Container Only option. This option allows you
to delete the container without deleting the objects inside. You
can Delete Container Only using the Edit menu, by using the Ctrl
+ Delete keys, or by right-clicking the container and selecting Delete
Container Only from the context menu.
The following image shows the Delete Container Only option on
the Edit menu.
The following image shows the Delete Container Only option on
the context menu when right-clicking a container.
Note: If you delete a form container, the Reset
button is deleted with the form. The Reset button is deleted because
it is attached to the form.