This section provides detailed descriptions of new security
features.
This information is still in development.
xConfiguring OPSYS as One of Multiple Security Providers
OPSYS security
can now be configured as one of multiple security providers. The
server has to be authorized to run security OPSYS if OPSYS is a
primary or secondary security provider. When a user logs onto the
server as an OPSYS user, the user ID and password of that user become
the credentials for the agent that is started when the user issues
a request. When a user logs onto the server as a non-OPSYS user,
any request must still start an agent by impersonating a valid operating
system user. Therefore, when configuring OPSYS as one of a set of
providers, you must supply a valid operating system user ID and
password in the OS User ID and OS User Password fields.
To add OPSYS security along with other security providers:
- On the Access Control page of the Web Console, right-click
the Security Providers folder and select Change Provider from
the context menu.
The Change Provider page opens.
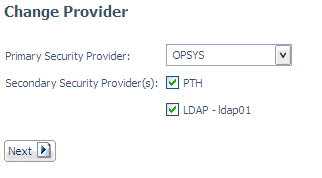
- Select OPSYS as the primary or a secondary provider and click Next.
The following page opens:
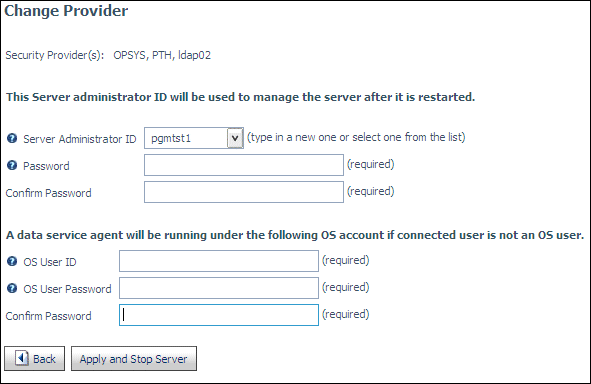
- Enter a valid OS user ID and password. They will be used to
start an agent if the connected user is not an OS user. They are
added to the admin.cfg file as the opsys_userid and opsys_passwd
attributes.
- Click Apply and Restart Server.
xTransferring File Permissions With the GRANT Privilege
The server
administrator normally provides access control permissions for
application folders to groups and users. If the server administrator
issues the GRANT privilege to another security subject (role, group,
or user), that security subject can then grant its own file permissions
to any other security subject,
For example, if user A has Read but not Write permission on folder
X, he can transfer Read permission to user B. He cannot grant Write
permissions to anyone.
Note that if user A loses the permission later on, user B will
retain his transferred permission.
Example: Granting Permissions to Another User
In the following configuration, user
pgmtst2 is an Application Administrator with the GRANT privilege.
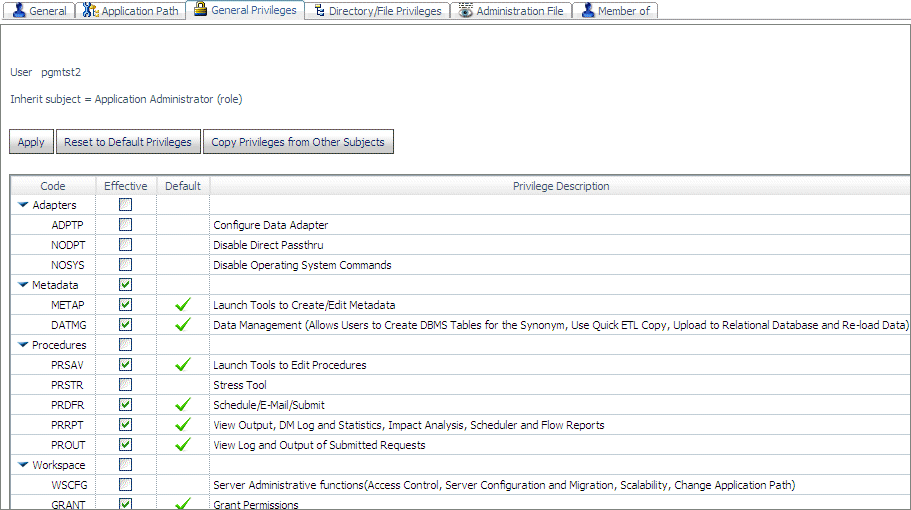
User pgmtst2 has Read, Execute, and
List privileges on application app06, while user pgmtst3 has no
privileges on this application.
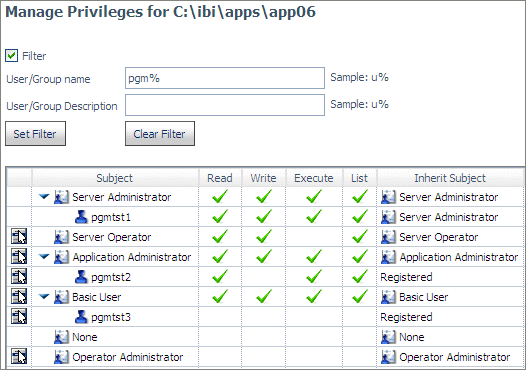
Since user pgmtst2 has the GRANT privilege
for this application, user pgmtst2 can edit the privileges for user
pgmtst3.
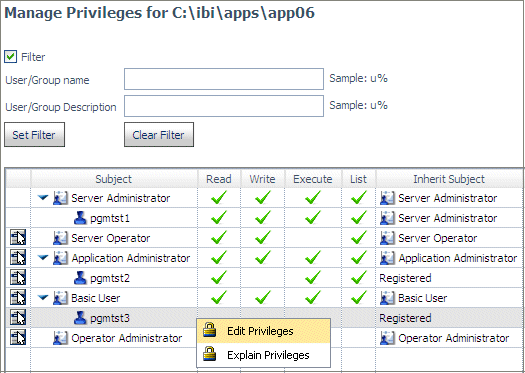
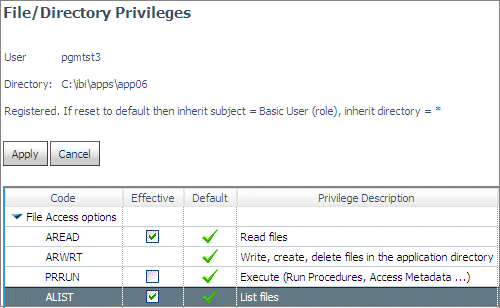
However, the privileges pgmtst2 can
edit are only those that pgmtst2 has for this application. Therefore,
the ARWRT privilege is not available for editing.
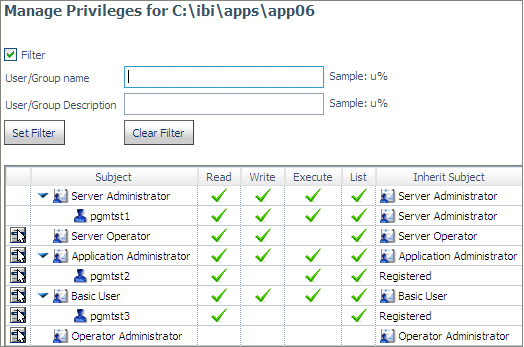
When user
pgmtst2 clicks Apply, user pgmtst3 will be assigned
Read and List privileges to app06.
xConfiguring Security Templates for Multi-Tenant Environments
Very often, multiple tenants in a multi-tenant environment
have an identical security structure. Each tenant has an identical
set of application folders and groups that conform to a standard
naming convention that includes the tenant ID in the name of each
subgroup and application folder. The folder and group setup is repeated
from one tenant to the others. In most cases, tenants have no access
rights outside of their main application folder.
In this type of configuration, you can establish file privileges
for a model tenant and its associated groups, and dynamically apply
them to other tenant groups by creating a template based on the
model tenant. The template defines regular expressions that identify which
actual group names should be assigned file privileges based on that
template. Each group ID should match only one template.
x
Procedure: How to Configure Security Templates
The following steps outline the tenant management process
in the Reporting Server.
-
Identify the tenant root application folder.
The tenant root application folder can be
under approot or can be a mapped application or SQL mapped folder.
The application must be in the APP PATH. For example, c:\ibi\apps\tenants.
-
Set the permission for this folder to no access for all
non-server administrator roles. in order to prevent tenants from
accessing folders assigned to other tenants.
-
Using the established naming convention, create the model
tenant folder under the tenant root. Give the model tenant groups
explicit access permissions to the model folder and its subfolders.
The model tenant groups must follow the tenant
group structure and naming conventions established in the security
software for the installation. The model group must be registered
in the admin.cfg file. If the security provider is PTH, the tenant groups
must also be registered in the admin.cfg file.
For
example, using the departments application as the tenant root, create
the sales application under the tenant root.
The server administrator creates the groups sales, sales/dev, sales/basic,
and any other groups needed.
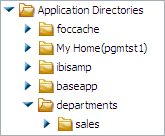
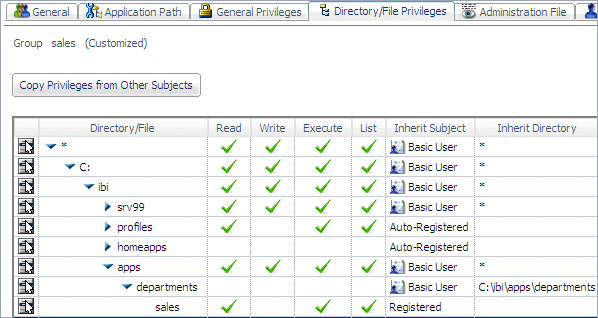
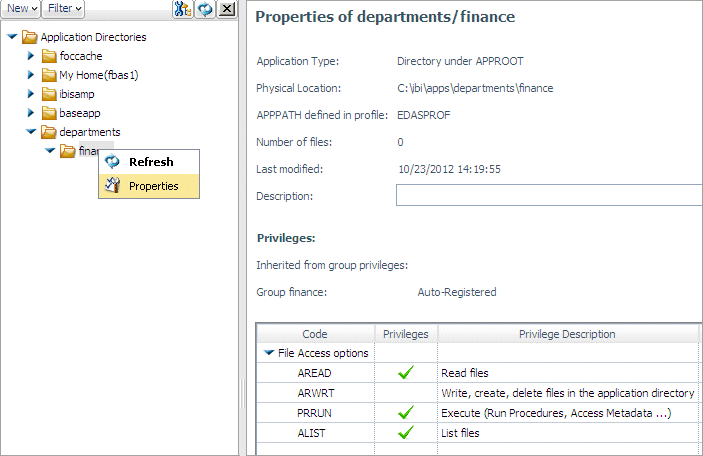
In
the following image, the tenant root folder is called departments,
and the sales application is the model application.
The sales application is not only a model, it is an existing group
or tenant that must be registered, with privileges to the application departments/sales.
Once you create one registration, you can assume it as the model and
create a template based on it:
The server administrator defines the file and directory privileges
for the sales, sales/dev and sales/basic groups on the sales folder
and its children. These privileges will be replicated in groups
for other tenants when their group ID matches one of the established
template group IDs.
The following image shows
that the sales group, whose role is Basic
User, has been given Read, Execute, and List privileges on the sales folder.
-
Establish a template that specifies how the model access
rules are replicated to other tenants.
-
On the Access Control page, right-click
the Templates folder and select Register Group Template from the
context menu.
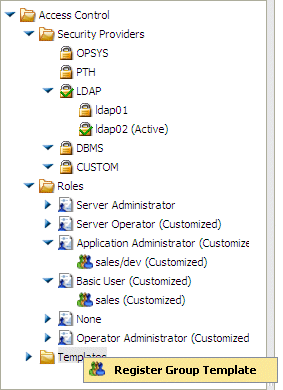
The Group Template Registration
page opens.

-
Enter the following values to establish the rules
for deriving access control privileges for groups that match the
template, and click Register.
- Template Group ID
-
Is a regular expression that must contain
a tagged expression. The tagged expression is used to identify a
part of the model group ID that will be replaced by the corresponding
characters in the actual group ID passed to the Reporting Server
for the connected user.
For information
about regular expressions, see Summary of Regular Expressions.
- Model Group
-
Identifies the group that will be replicated.
- Exclude Group IDs
-
Is a regular expression that identifies
any group IDs that should be excluded in the template matching process.
- Replace Pattern
-
Is used for admin_privilege strings to
model file/directory privileges from the model group registration
to a target group.
For example, the sales application has the sales/dev
group that is registered with specific privileges on the sales folders.
When the finance application is created, it will have a group named
finance/dev that will be assigned the same privileges on the finance
folders that the sales/dev group has on the sales folders. The finance
groups will not be registered, but the template describes how to
replace the word sales with the word finance when
the group name ends with the characters /dev.
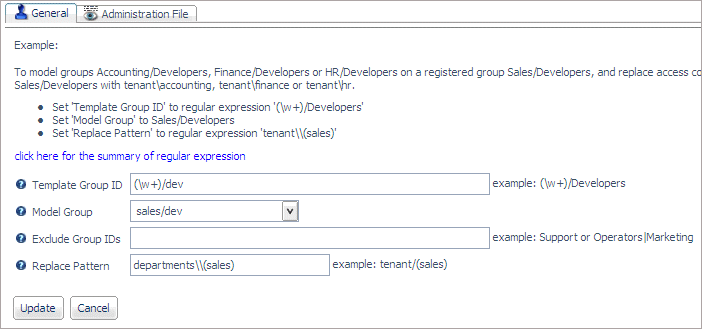
When
you register the template, the following attributes are added to
the admin.cfg file:
admin_group_template = (\w+)/dev
BEGIN
  model_group = sales/dev
  file_replace_pattern = departments\\(sales)
END
For example, the template group ID pattern
(/w+)/dev specifies that any word followed by the characters /dev
matches the template pattern.
The replace pattern
departments\\(sales) indicates that the text sales will
be replaced. If the group ID finance/dev is passed to the Reporting
Server, the tagged expression in the Template Group ID will cause
the characters finance to replace the characters sales in order
to determine the file privileges for the connected user. Therefore,
a user in the group finance/dev will inherit the privileges under
the finance tenant application that the group
sales/dev has under the model sales application.
To create a template that applies to
the group sales, you need to make sure that
you exclude other group names that start with the characters sales/ because
without the exclusion, sales will match all of the templates, and
it may be assigned the wrong one. The following image shows the
template for the sales group.
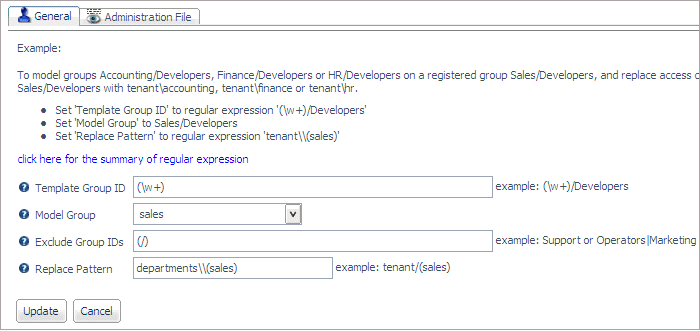
The
regular expression (/) in the Exclude Group IDs field specifies
that group names that contain a slash do not match the template.
For information about regular expressions, see Summary of Regular Expressions.
At this point the
system is ready to add new tenants.
To add a new
tenant (for example, finance), the server administrator must create
the finance application under the tenants root application. The
installation must provision groups and users (that conform to the
established naming conventions) in the relevant security provider,
for example LDAP, OPSYS, or Custom. This is done outside of Information Builders
software. The new tenant is now ready to be used. No access control
for it needs to be established by the server administrator. The
server will dynamically assign the access control privileges based
on the model and the template.
For example, the
user fbas1 (which is part of the finance group) logs on. The properties for
this user show that the user has Read, Execute, and List privileges
on the finance folder because the sales model group was given those
privileges on the sales folder.
Note
that the sales tenant is not visible to this user.
x
Reference: Summary of Regular Expressions
A regular expression is a string containing a tagged expression.
A tagged expression is a portion of the string that will be replaced
with actual characters passed to the Reporting Server in the group
ID for a user.
Tagged expressions must be enclosed
in parentheses. The backslash character (\) is a special character
in tagged expressions. If a group ID actually contains a backslash character,
you indicate that you want the backslash character to be treated
as a normal character by entering two successive backslash characters
(\\).
The following can
be used to create the tagged expression:
- abc
-
Matches abc anywhere
within the string.
- (abc)
-
Matches abc anywhere
within the string, but the parentheses act as a tag.
- []
-
Defines a character class (or set) that matches
any one of the characters in the class. For example, [abc] matches
the character a or b or c. The expression [x-y] matches any character
from x to y.
- .
-
Matches any single character except newline.
- \w
-
Matches any word character string (alphanumeric
plus "_").
- \W
-
Matches any non-word character.
- \s
-
Matches any whitespace character.
- \S
-
Matches any non-whitespace character.
- \d
-
Matches any digit.
- \D
-
Matches any non-digit character.
- \t
-
Matches a tab character.
- \r
-
Matches a return character.
- \f
-
Matches a form feed character.
- \e
-
Matches an escape character.
- \b
-
Matches a word boundary or a backspace.
For example, test\b matches test, but not testing. However, \b matches
a backspace character when specified inside a class (that is, [\b]).
- \B
-
Requires that there is no word boundary.
hello\B matches hello, but not hello there.
- ^
-
Matches characters only at the beginning
of the string. For example, ^abc matches abc
at the beginning of the string.
- $
-
Matches characters only at the end of the
string. For example, abc$ matches abc at
the end of the string.
- |
-
Specifies alternative matching characters.
For example, a|b matches either a or b. This metacharacter can also
be used with words, for example, abc|def.
- [^abc]
-
Matches a character that is not in the set.
[^abc ]+ will match such strings as hello, test,
and perl.
- \
-
Is the escape character. For example, \*
matches the * character. Use the backslash (\) character to escape
(remove the special meaning of) characters that have significance
in a regular expression.
- (?i)
-
Ignores case. For example, (a(?i)b|c) matches aB, c,
and C.
You can follow any character, wildcard, or series of
characters and/or wildcards with a repetition indicator:
- *
-
Matches 0 or more occurrences of the character
sequence.
- +
-
Matches 1 or 0 occurrences of the character
sequence.
- ?
-
Matches 0 or more occurrences of the character
sequence or the shortest match.
- {}
-
Is the repetition modifier.
- {n}
-
Matches exactly n occurrences
of the character sequence.
- {n,}
-
Matches at least n occurrences
of the character sequence.
- {n,m}
-
Matches at least n but
not more than m occurrences of the character
sequence.
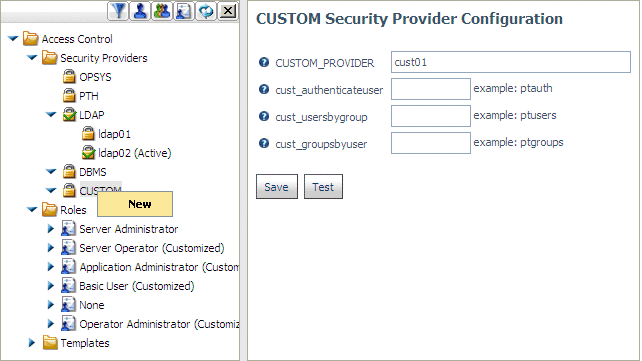
xAssigning a Default Server Administrator for a Custom Security Provider
When you add a custom provider, you need to enter the name of
a procedure for authentication that you created beforehand. If you
do not enter a procedure name in the cust_authenticateuser field
on a custom provider, and you make it the primary provider using
the Change Provider page, the server will prompt for a default server
administrator. You can use this user ID to connect to the server
when it is restarted. If you change the primary provider to a custom
provider with a cust_authenticateuser procedure entered, the procedure
will be used for user authentication.
If your authentication procedure does not work correctly, you
can make any corrections needed by starting the server with security
OFF, connecting to the Web Console, and editing the cust_authenticateuser
procedure.
x
Procedure: How to Specify a Default Server Administrator for a Custom Security Provider
When you configure a custom security provider, you are responsible
for creating and identifying a procedure that will authenticate
the credentials entered by the user attempting to connect to the
server. If you configure a new custom provider as the primary provider,
or change to the custom provider as the primary provider and have
not entered the name of an authentication procedure, you can specify
a default Server Administrator ID.
-
On the Access Control page of the Web Console,
either right-click Security Providers and
select Change Provider or right-click CUSTOM under
Security Providers, and select New from the
context menu.
If you are
changing to an existing Custom provider, continue with step 3. If
you are creating a new provider, the CUSTOM Security Provider Configuration
page opens.
-
Enter a name for the custom provider or accept the default
name. If you entered the name of an authentication procedure, we
recommend that prior to saving your configuration, you test it by
clicking Test.
The Testing
CUSTOM Security page displays, prompting you for a user ID and a password.
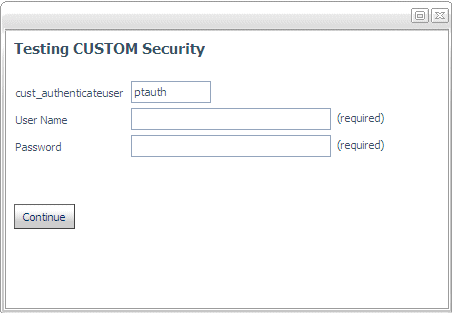
Test the configuration with a valid user ID and an invalid user
ID. In each case, check that the authentication procedure returns
the correct code to the server.
-
When you are satisfied with the results of your tests,
click Save.
The Change
Provider page opens.
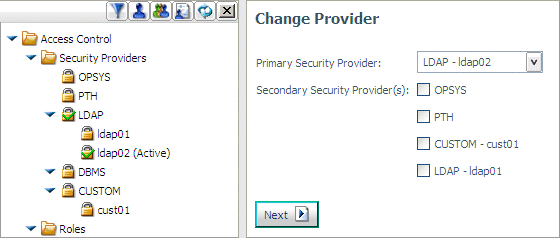
-
Select your custom provider as the primary provider and
click Next.
The Change
Provider page displays fields for entering Server Administrator credentials.
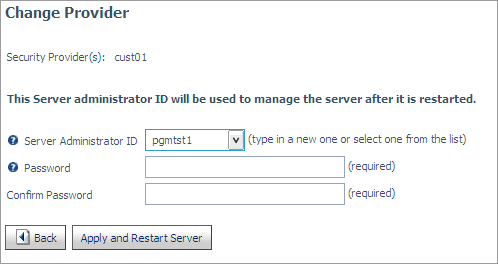
- Select or enter a Server Administrator user ID in the Server
Administrator ID field.
- Enter a Server Administrator password in the Password field.
- Reenter the password in the Confirm Password field.
-
Click Apply and Restart Server.
xUser and Group System Variables for a Secured Server
The following two new Dialogue Manager System variables
are now available and populated automatically:
- &FOCSECUSER is the user ID of the user connected to
the running agent on a server running with security ON.
- &FOCSECGROUP is the primary group ID of the user ID stored
in &FOCSECUSER.
If the server is running with security OFF or values are unavailable,
these variables are set to blank. The values of these system variables
cannot be changed by a user.
One application for &FOCSECUSER is in the DBA section of
a Master File. This variable can be used in the USER= attribute
of the DBA section in a synonym that needs to be protected. If the
system variable is to be used in a synonym, it must be declared
first:
FILENAME=filename,SUFFIX=FOC,
VARIABLE NAME=&FOCSECUSER,DEFAULT='UNKNOWN',$
Then it can be used the DBA section at the end of the Master
File:
END
DBA=XXX,$
USER=&FOCSECUSER,....
It can also be used prior to any request against the file to
set the user value for DBA security. For example, a server profile
can contain the following setting:
SET PASS = &FOCSECUSER
Using this variable eliminates the need to create an MFD_PROFILE
to collect the ID of the connected user for use in the DBA section
of the Master File.
xDATMG Privileges Required for SQL-based Upload
Uploading data to a relational database is only available
to users who have DATMG privileges. These privileges are part of
the Metadata section on the General Privileges pane, shown as Data
Management (Allows Users to Create DBMS Tables for the Synonym,
Use Quick ETL Copy, Upload to Relational Database and Re-load Data).