Updating a Data Source Using a Read/Write Grid

In this section:

How to:

Another option for updating the fannames data source is to create a form that includes a read/write grid. A read/write grid enables you to display the contents of a data source stack in a grid and to make changes directly to the stack. There are two read/write grids available in the MDE – an ActiveX Grid and a JS (JavaScript) Grid. This tutorial uses the ActiveX Grid, however, most of the information given here also applies to the JS Grid. For more information about the two read/write grids, refer to Developing and Using Controls in the Developing WebFOCUS Maintain Applications manual.


Top of page

x
Procedure: How to Create An Update Form With a Read/Write Grid

The following procedure enables you to create a form containing a read/write grid.

  1. Create a new form in the Start procedure.
  2. Give it the name Grid_Form.
  3. Give it the title Update Fans Using a Grid.
  4. Open the ShowFan form.
  5. Put a new button on the form called Grid Update Screen.
  6. Double-click the Grid Update Screen button to open the Event Handler editor.
  7. Click Event.
  8. Drag the Grid_Form into the Event Handler editor and select Show a Form from the pop-up menu.
  9. Reopen Grid_Form (if necessary) and on the Controls palette, click the Grid button Grid button.
  10. Draw a rectangle on the form representing roughly where you want your grid to go on your form.

    WebFOCUS Maintain opens the Control Columns dialog box, where you define the contents of your grid.

  11. Select GetFanStack from the Stack list.

    Note: Make sure you did not select AddFanStack.

    The Control Columns dialog box now displays the columns in the stack GetFanStack.

  12. Copy the fields LASTNAME, FIRSTNAME, COMPANY, EMAIL, and TITLE into the Column selection list.
  13. Use the Move up button Move Up button and the Move down button Move Down button to rearrange these fields so that they are in the following order: TITLE, FIRSTNAME, LASTNAME, COMPANY, and EMAIL, as shown in the following image.
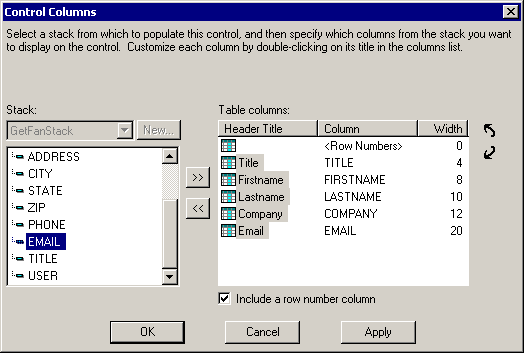
    Control Columns dialog box

    You can change the appearance of any of these columns by opening the Grid Column dialog box. For example, suppose you want to change the header titles for the FIRSTNAME and LASTNAME fields so that they read First and Last.

  14. Double-click Firstname.
  15. In the Grid Column dialog box, change the Header title to First, as shown in the following image.
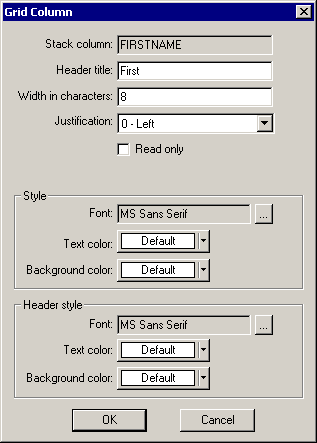
    Grid Column dialog box

    You can also change the width, justification, font, and color if you wish.

  16. Click OK.
  17. Repeat the process to change Lastname to Last.
  18. Click OK to leave the Column Properties dialog box, and click OK to close the Grid Control Columns box.
  19. Copy navigation buttons onto the Grid_Form.
    • Open Update_Form and copy the Update button.
    • Close Update_Form and paste the Update button into Grid_Form by clicking Paste in the Edit menu. (This command performs a deep copy.)
    • Open Update_Form and copy the Back button, then paste the Back button into the Grid_Form. You may need to adjust the position of these buttons on your form.
  20. You will need to modify the logic behind the update button in the next procedure to allow you to update multiple fields at one time.
  21. Copy the title (Update or Remove a Fan) from Update_Form and paste it onto Grid_Form.
  22. Change the name to Update Fans Using a Grid.
  23. Add spiralbg image to the background.

    Your form will resemble the following:
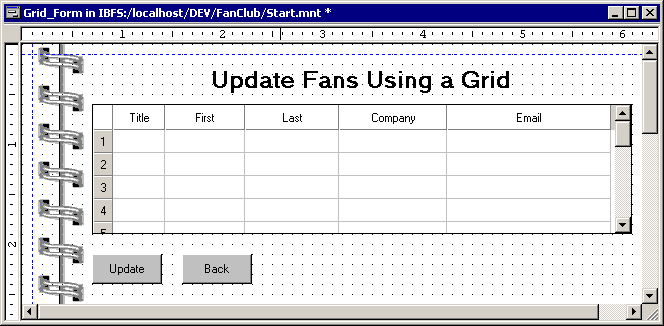
    Grid_Form image example


Top of page

x
Procedure: How to Update Multiple Records Using the Read/Write Grid

When you copied the UpdateButton from the Update_Form, the deep copy imported the logic from the UpdateFan case. This logic updates only one field in a stack at a time. The following modification to the logic behind the Update button enables you to update the entire GetFanStack at once.

  1. Double-click UpdateFan case in the Project Explorer to access the following code:
    Case UpdateFan
     
    Update fannames.CUSTOMER.LASTNAME fannames.CUSTOMER.FIRSTNAME 
    fannames.CUSTOMER.COMPANY fannames.CUSTOMER.ADDRESS 
    fannames.CUSTOMER.CITY fannames.CUSTOMER.STATE fannames.CUSTOMER.ZIP 
    fannames.CUSTOMER.PHONE fannames.CUSTOMER.EMAIL 
    fannames.CUSTOMER.TITLE from GetFanStack(GetFanStack.FocIndex) ;
     
    EndCase
  2. Highlight the block of code beginning with Case UpdateFan and ending with EndCase.
  3. Copy and paste the code beneath EndCase.
  4. Rename the pasted code Case GridUpdate. This creates a new function.
  5. Replace Update fannames with For all Update fannames. This enables you to update all fields in the data source stack.
  6. Replace GetFanStack(GetFanStack.FocIndex) with GetFanStack(1).
  7. When you have modified the code, it should appear as the following:
    Case GridUpdate
     
    For all Update fannames.CUSTOMER.LASTNAME fannames.CUSTOMER.FIRSTNAME 
    fannames.CUSTOMER.COMPANY fannames.CUSTOMER.ADDRESS 
    fannames.CUSTOMER.CITY fannames.CUSTOMER.STATE fannames.CUSTOMER.ZIP 
    fannames.CUSTOMER.PHONE fannames.CUSTOMER.EMAIL 
    fannames.CUSTOMER.TITLE from GetFanStack(1);
     
    EndCase
  8. Save your changes. The GridUpdate case appears in the Project Explorer after you have saved the new code.
  9. Double-click the Update button on the Grid_Form to open the Event Handler editor.
  10. Change Perform UpdateFan( ); to read Perform GridUpdate( );.
  11. Close the Event Handler editor.

The Update button on the Grid_Update form will now update the entire fannames data source, allowing you to make multiple changes to the read/write grid and update with one click.


Top of page

x
Using a Read/Write Grid

Try running your application and accessing the Grid_Form from the ShowFan form.

Change some of the values in the grid and click the Update button. You should see the changes you made in the grid appear on ShowForm. Note that using the read/write grid to update extremely large data sources is not recommended. For detailed information on grid functionality, see Developing and Using Controls in the Developing WebFOCUS Maintain Applications manual.


WebFOCUS