Enhancing Synonyms Using the Modeling View
The Synonym Editor Modeling View tab provides a visual presentation for the synonym for which positioning is preserved and stored in the Access File. Use the Modeling View to define dimensions for OLAP analysis, view join properties, create cluster joins, and add or edit segments. For more information about using the Dimension Builder in the Modeling View, see Defining Dimensions for OLAP Analysis.
Note: The Modeling View is not available for Cube data sources.
x
Procedure: How to Enhance Synonyms Using the Modeling View
Use the Modeling View to enhance a synonym by adding a segment.
-
From the Projects or Data Servers area, open a synonym by double-clicking a Master File from the Master Files folder.
The Synonym Editor opens.
-
Click the Modeling View tab.
The Synonym Editor Modeling View tab opens in the workspace.
-
Right-click a segment in the workspace.
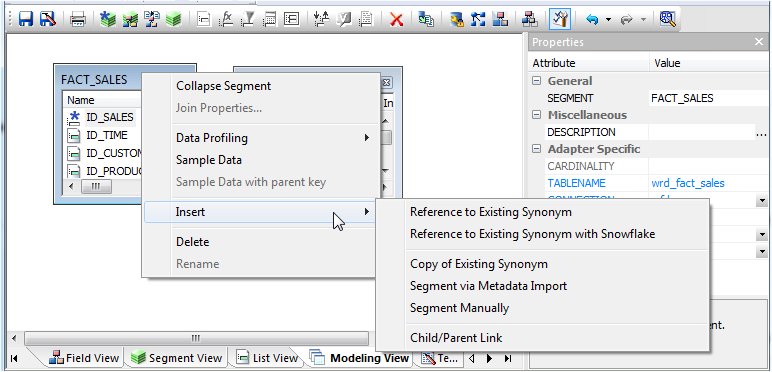
The following context menu appears.
-
Insert segments through one of the methods listed:
- Insert Reference to Existing Synonym adds an existing synonym as a segment to the current synonym.
- Insert Reference to Existing Synonym with Snowflake adds an existing synonym as a segment to the current synonym. The selection list will show candidate synonyms as well as any synonyms that they reference.
- Insert Copy of Existing Synonym enables you to add a table as a segment from an existing synonym.
- Insert Segment via Metadata Import enables you to add segments by using the Create Synonym tool. This tool creates a synonym and includes it as a segment in the synonym from which the tool was launched.
- Insert Segment Manually enables you to add segments manually to the current synonym.
Note: You would use this approach only if you are coding a new Master File, as you would for a FOCUS data source.
x
Procedure: How to Edit Synonyms Using the Modeling View
To edit synonyms using Modeling View:
-
From the Projects or Data Servers area, open a synonym by double-clicking a Master File from the Master Files folder.
The Synonym Editor opens.
-
Click the Modeling View tab.
-
Right-click a segment icon.
A context menu appears, providing options for adding segments.
Note: Options for adding segments are also available from the icons above the workspace.
To insert a segment from an existing synonym:
-
Select Insert, then Reference to Existing Synonym from the context menu.
The Insert Reference to Existing Synonym dialog box opens.

Columns can be customized and sorted. Synonyms displayed in this dialog box are based on the Reporting Servers APP Path configuration.
-
Click a synonym and click Select.
The segment is added to the synonym.
To insert a segment from an existing synonym with Snowflake:
-
Select Insert, then Reference to Existing Synonym with Snowflake from the context menu.
The procedure is the same as Reference to Existing Synonym, except the selection list will show both candidate synonyms and any synonyms that they reference.
To insert a segment via Metadata Import:
-
Select Insert, then Segment via Metadata Import from the context menu.
This method enables you to launch the Create Synonym tool, create a synonym, and incorporate it as a new segment in the synonym from which you initiate the import.
-
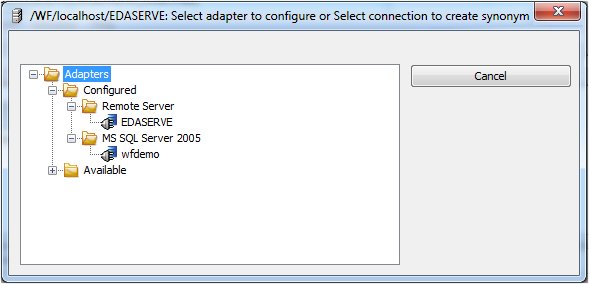
When this option is selected, you are first presented with the Select Adapter dialog box where you can select a configured adapter connection to continue or configure a new adapter, if necessary, as the following example demonstrates.
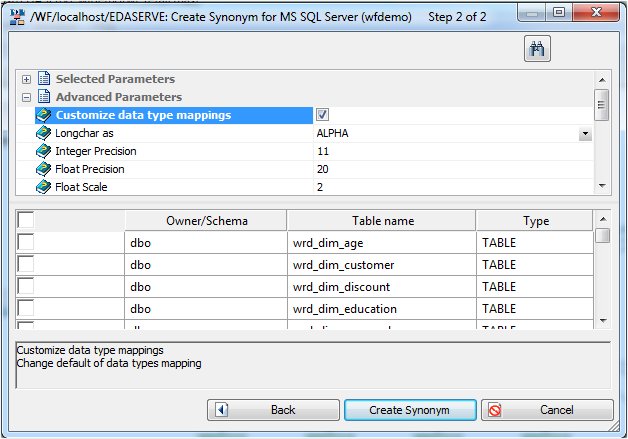
The following image is an example of a screen where you provide information for the connection parameters.

The following image is an example of a screen that enables you to select tables to create synonyms.
The segment is added to the synonym.
To insert a segment manually:
-
Select Insert, then Segment Manually.
The segment is added to the Modeling View and a default field is created, using a default segment name.
-
Attributes for the new segment or segments can be modified in the Modeling View tab through the Properties window or from the other views.
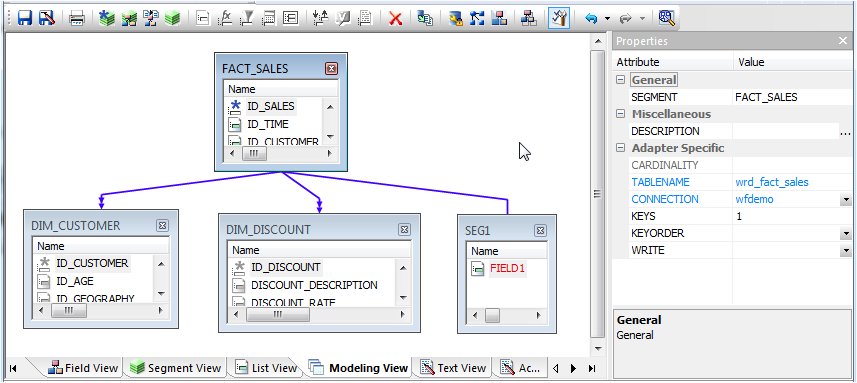
The following image shows a synonym that has had several segments added in the Modeling View tab.
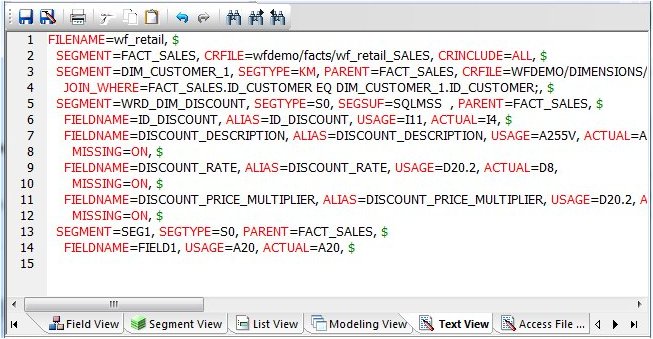
The following image shows the resulting Text View.
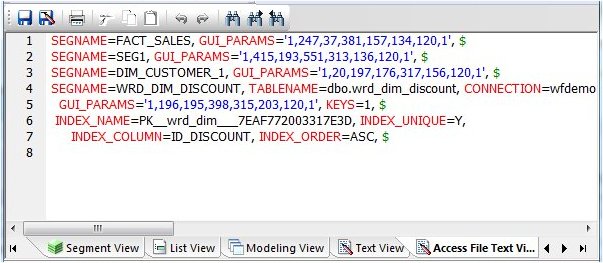
The following image shows the resulting Access File Text View.
x
Reference: Modeling View Context Menu
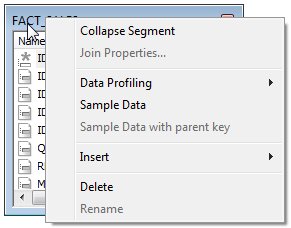
When you right-click a synonym or segment in the Synonym Editor Modeling View tab, the following context menu appears.
The context menu has the following options:
-
Collapse Segment
-
Changes the view from a file icon to a table view, which enables you to see columns, sample data, and sample data parent keys.
Tip: You may also double-click a file icon to open the table view. Double-click the table to close the table view, or click the X button from the toggle toolbar to close.
-
Join Properties
-
Provides access to the Join Properties window.
Note: Join options are not available for FOCUS files.
-
Data Profiling
-
Provides the characteristics of the data for a segment.
-
Sample Data
-
Displays sample data in the workspace.
-
Sample Data with parent key
-
Displays sample data with parent key in the workspace.
-
Insert
-
-
Reference to Existing Synonym. Enables you to reference an existing synonym as a segment to the current synonym.
-
Reference to Existing Synonym with Snowflake. Enables you to reference an existing synonym as a segment to the current synonym. The selection list will show candidate synonyms as well as any synonyms that they reference.
-
Copy of Existing Synonym. Copies an existing synonym to the current synonym.
-
Segment via Metadata Import. Enables you to create a new synonym through the Create Synonym tool and add it to the current synonym.
-
Segment Manually. Inserts a segment to the current synonym, that must by coded manually.
-
Delete
-
Deletes the segment.
-
Rename
-
Enables you to rename the segment.
x
Reference: Join Editor Dialog Box
When you select Join Properties from a segment in the Synonym Editor Modeling View tab, the Join Editor dialog box appears.
The Join Editor dialog box contains Left and Right Source columns, Join Type, and Join Condition options, as well as One-to-Many and One-to-One choices. Use the left and right source columns to create join maps and view sample data.
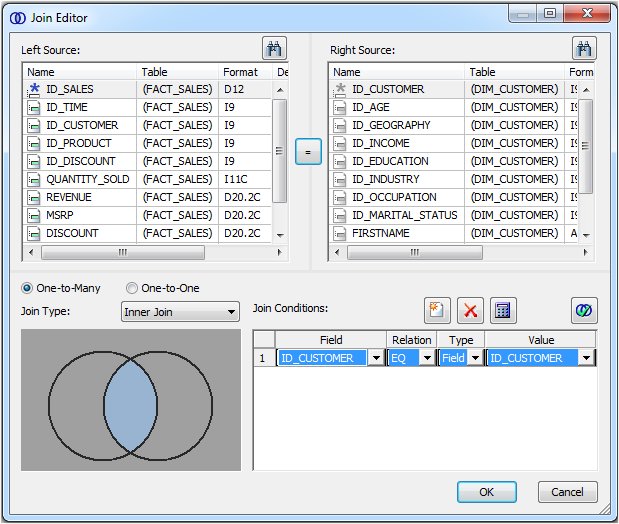
Note: Join options are not available for FOCUS files.