Working With Joins

How to:

Reference:

After a Join exists, you can retrieve it, report from it, view its syntax, and clear it. Clearing a join makes it inactive.


Top of page

x
Procedure: How to Retrieve a Join

  1. Right-click a procedure folder in the Explorer and select Edit in Developer Studio Tool from the context menu.
  2. Right-click a Join component in the procedure window and select Open.

The Join window opens, displaying your saved Join.


Top of page

x
Procedure: How to Run a Join

Running a Join executes the generated code and checks the syntax.

If the Join window is already open, displaying a Join, run the Join by doing any of the following:


Top of page

x
Procedure: How to Clear a Join
  1. Use any of the following methods to clear a Join:
    • Click the Clear Join button from the Join toolbar.
    • Click Clear Join from the Developer Studio File menu.
    • Select Clear Join from the right-click context menu in the Join window.

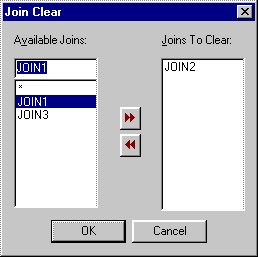
    The Join Clear dialog box opens, as shown in the following image.

    Join Clear

  2. Select the join or joins you want to clear from the Available Joins list. To clear all joins, select All Joins (*).
  3. Click the Join Clear button.

    The selected joins appear in the Joins to Clear list.

  4. Click OK.

Note: You can also clear a join that is already in effect from a previous procedure and does not appear in the list of available joins. Type the name of the join in the Available Joins field you want to clear and click OK.


Top of page

x
Reference: Join Clear Dialog Box

The Join Clear dialog box has the following fields and options:

Available Joins

Lists all current joins.

Joins To Clear

Displays the joins that will be deleted when you click OK.

Double Right Arrow

Moves the selected joins to the Joins to Clear list.

Double Left Arrow

Moves the selected joins to the Available Joins list.


Top of page

x
Procedure: How to Copy a Join From One Procedure to Another
  1. Open the procedure that contains a Join component.
  2. Open the procedure to which you wish to copy that component.
  3. Select the Join component and press the Ctrl key.
  4. Drag the Join component to the component connector in the second procedure where you want the Join to appear.

    When you do not use the Ctrl key, you move the object instead of dragging it. Your cursor changes depending on whether you move or copy the object.


Top of page

x
Procedure: How to View Join Syntax

You can quickly view the underlying syntax created by the Join tool.

Click the Show/Hide Source Code button or choose Focexec from the View menu. Syntax similar to the following appears in an editor window, as shown in the following image.

Join syntax


Top of page

x
Procedure: How to View Qualified Field Names
  1. Select Options from the Window menu.
  2. Select the Reporting tab.
  3. Do one of the following:
    • Check Show fully qualified field names to make this change globally for all tables.
    • Right-click a table inside the Join tool and select Qualified Names.

Top of page

x
Reference: Join Properties Dialog Box

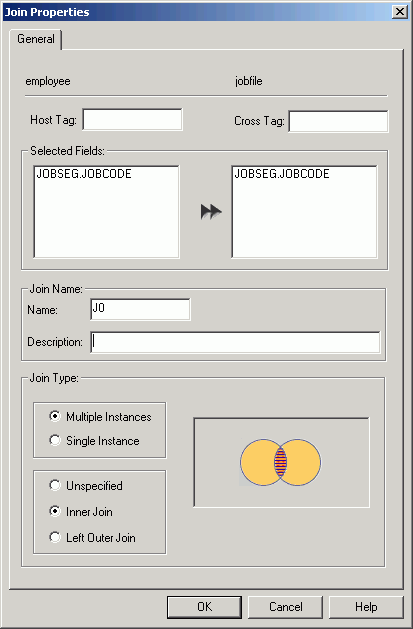
To view or modify the properties of a join, right-click the join link and select Properties or double-click the join. The Join Properties window appears, as shown in the following image.

Join Properties

The Join Properties window has the following fields and options:

Host Tag

Enter a tag name for the data source.

Cross Tag

Enter a tag name for the cross-referenced file.

Selected Fields

Displays the field that has been joined from the host file to the cross-referenced file. A single arrow indicates a unique join, and a double-arrow indicates a non-unique join.

Join Name

Displays the name of the join. To change the default join name, type a new name in this field and click OK.

Note: The join name must be unique and cannot exceed eight characters.

Description

Enter a description. This is not used in the Join command. It is used for reference purposes. A comment (-*) is added to the procedure.

Join Type

Indicates the type of join. Choose from the following:

Multiple Instance (Non-Unique). A one-to-many join structure that matches one value in the host data source to multiple values in the cross-referenced field. Joining employee ID in an employee data source to employee ID in a data source that lists all the training classes offered by that company would result in a listing of all courses taken by each employee, or a joining of the one instance of each ID in the host file to the multiple instances of that ID in the cross-referenced file. This is the default selection.

Single Instance (Unique). A one-to-one join structure that matches one value in the host data source to one value in the cross-referenced data source. Joining an employee ID in an employee data source to an employee ID in a salary data source is an example of a unique join.

Unspecified. This option is selected in the Join properties when a join that was created in an earlier release is opened in the Join tool. In earlier versions, the defaults for join type and other operators were assumed and not specified in the generated code. Since the Join tool cannot determine the type of join that was created and if there were other commands set to control the join, select the appropriate options (Inner Join, Left Outer Join, Multiple Instances, Single Instances) from the Join tool to upgrade the generated code.

Inner Join. A join that results when a report omits host rows that lack corresponding cross-referenced rows.

Left Outer Join. Extends the results of an Inner Join and retrieves records from both host and cross-referenced tables, including all records from the left table (host) and any records from the right table (cross-referenced) where the condition values match. If there are no matching values in the cross-referenced table, the join still retrieves records from the host table.

WebFOCUS