
In this section: |
The WebFOCUS Resource option opens the Resource Tree on the right-hand side of the window. The tree shows you the content stored in the WebFOCUS Repository. You can access this content in the Content section of the tree. Alternatively, you can find a resource that you marked as a Favorite or Mobile Favorite, or one that you ran recently in the Recent Items section.
Depending on security, you may also have access to the Reporting Servers section to manage metadata. You cannot insert a report that is stored on the Reporting Server into a portal.
The Resource Tree can either be docked on the right (the default position), or it can float above the page. When it is docked, you can keep it open, close it, or unpin it so that it collapses to the side. The Resource Tree is shown in the following images.
In the first image, the Resource Tree is docked on the right.
In the second image, the Resource Tree floats above the page.
You can drag in any WebFOCUS procedure to run inside a portal. You can create a procedure in either Developer Studio or WebFOCUS InfoAssist, or you can use the web-based text editor. The Properties are shown in the following image.

The properties are:
A URL is a link to a website. To create one, right-click a folder in the Content section of the tree, point to New, and select URL. In the Create URL dialog box that opens, type a display title, a file name, and the URL itself. Optionally, you can provide a summary that is displayed in a ToolTip when the mouse pointer rests on the URL in the tree.
The Create URL dialog box is shown in the following image.
If you insert a URL inside the portal, be aware that some sites may not work, as their owners may not allow them to run inside a frame. Internet Explorer will show a message. Firefox® and Chrome™ browsers display just a blank frame.
A URL is a link to a WebFOCUS Visual Discovery Analyst Edition (AE) Project. Visual Discovery AE Projects are web-based analytic dashboards composed of various interactive and interconnected charts that visually expose trends, relationships, and other measured values.
To create one, right-click a folder in the Content section of the tree, point to New, and select Visual Discovery AE. In the Create Visual Discovery AE URL dialog box that opens, type a display title, a file name, and the URL itself. Optionally, you can provide a summary that is displayed in a ToolTip when the mouse pointer rests on the URL in the tree.

You can insert a Resource Tree to allow users to perform activities such as run content, create content, and schedule content. In addition to the tree nodes shown in the pop-out tree, you can also choose to show a node named Portals, which lists all the portals that the user can access. The Resource Tree is shown in the following image.
Note: If you place a Resource Tree into a column (which is a percentage of the whole horizontal size), it cannot be resized.
Click the Filter button to access the Filter option, as shown in the following image. The Filter feature is not a search feature. To access search, right-click the Content node or any folder in it. As you browse through the tree, the filter returns only items that meet the filter criteria.

The properties for the Resource Tree are shown in the following image.

The properties for the Resource Tree are:
From the following list, choose which sections of the tree to show:
By default, all sections are enabled. The enabled sections appear for any user that has security access to those sections. A portal designer can deny access to a section by hiding it, even from a user who has access, but a designer cannot grant access to a user who does not have access.
When the first option is set to Window, there is a second option named Window, giving you the ability to choose a New Window or name the window to run in.
When the first option is set to Panel, you can choose to create a new panel, accordion, or tabbed container, as well as choose from one of the existing content areas on the page. In the case of an existing accordion or tabbed container, choosing the title of the container itself creates a new area or tab in that container. Choosing an existing area replaces that area.
To create a portal listing, either insert a Resource Tree and show only the Portals section, or insert a Portal Tree. The difference is that in a Resource Tree, the Portals section is not expanded by default, while in a Portal Tree, it is expanded. A Portal Tree is shown in the following image.
Each node in the tree has a context menu. The options that you may see are:
For more information about Security, see the WebFOCUS Security and Administration manual.
You can also expand a portal to see a list of the pages in that portal. While you cannot open the portal to a particular page, you can remove the customizations for just that page. You can also delete the page and manage security on the page. An expanded portal is shown in the following image.

The properties of a Portal Tree are shown in the next image.

The Portal Tree has properties that apply to the content type and the Area ID. Running or editing a portal takes place in the window that contains the portal.
When working in the portal, you can customize a Custom Tree using the properties that display, as shown in the following image.
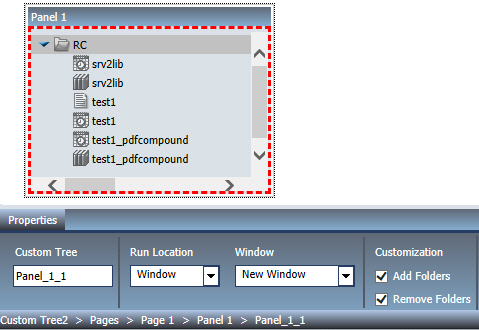
With the Custom Tree selected, you can change the name of the Panel. You also have access to the following options:
Note: If Panel is selected, you can click the Panel drop-down list to select New Tabbed Panel, New Accordion Panel, or the current default Panel name.
Note: If the customization settings are turned off (unchecked), they are always off for all users. When they are checked, adding or removing folders is not allowed if a page is locked or if a user does not have the Customization privilege (opCustomize).
The last type of content is text. The text area is simple to use. All styling is applied to all the text. You cannot style individual words or characters. The text area is shown in the following image.

The text area has no properties other than the content type and the Area ID, as shown in the following image.

| WebFOCUS |