The content in both the Menu Bar and the Resource Tree varies,
depending on whether or not you are signed in and who you are.
x
The Menu Bar is located in the upper-right section of
the screen, inside the Top Banner. The following image shows the
Menu Bar that appears when you are signed in to WebFOCUS.

The Menu Bar allows you to perform a variety of activities.
When You Are Signed Out
- Access the Business
Intelligence Dashboard Public Views.
- Enable accessibility
(turn on a screen reader; applies to Internet Explorer® only).
- Get help.
- Sign in.
When You Are Signed In (You can access additional options,
as well as all the options that you see when signed out, except
that you cannot access the Dashboard Public Views.)
- Change your password
(click on your name).
- Enable accessibility
(turn on a screen reader; applies to Internet Explorer only).
- Administration:
- Access the Security
Center, where you define users and groups and grant access permissions.
- Access the Administration
Console, where you configure, administer, and monitor the components
of the WebFOCUS application.
- Access the Magnify
Console, where you specify settings, configure security, and perform
maintenance and diagnostic tasks for Magnify.
- View and administer
the private resources for groups and users.
- Switch between Normal
mode (seeing your own content) and Manager mode (managing other
user content).
- Tools:
- Access the View Builder,
where you view and administer Public, Group, and Library Views,
and manage users.
- Access the ESRI Configuration
Utility to create or edit a file.
- View the status of
deferred reports, and manage them.
- Stop your outstanding
interactive requests that are running.
- Access the ReportCaster Explorer, where you view ReportCaster content within
columns that provide detailed information specific to the displayed
ReportCaster item (Schedules, Distribution Lists, Library Access
Lists, Library Reports, Watch List Reports).
- Access the ReportCaster Console, where you view the status of your scheduled
jobs and log reports. Authorized users can also view the status
of the ReportCaster Distribution Server and perform configuration
and administration tasks.
- Access the Magnify
Search Page.
- Switch language (this
option appears only if the environment is configured for multiple
languages).
- Access the Business
Intelligence Dashboard Personal Views and Group Views.
- Get help.
- Sign out.
x
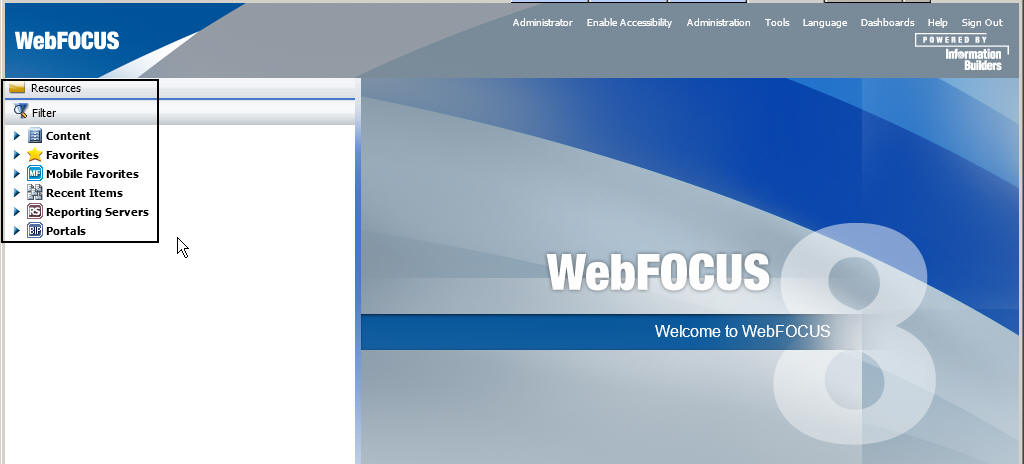
The Resource Tree, located on the left side of the page,
contains your WebFOCUS Resources, such as Content and Portals. The following
image shows the Resource Tree that appears when you are signed in
to WebFOCUS.
The resources are secured using WebFOCUS
8 security, which is a folder-based system similar to that
of desktop operating systems. The resources differ for every user,
for example, the public user sees only public content.
You may want to create reports using WebFOCUS InfoAssist,
or run existing reports before building or accessing a portal. To
make this easy for you to do, the WebFOCUS Resource Tree is available immediately upon
sign in.
In addition to a simple Filter dialog box, the Resource Tree
contains the following nodes:
-
Content. Lists
the folders that you have created on the portal. Yellow folders
are published folders. Gray folders are unpublished.
-
Favorites. Lists
the items that you have designated as Favorites. To designate an
item as a Favorite, right-click the item, and on the context menu
that opens, select Favorites.
-
Mobile Favorites. Lists
the items that you have designated as Mobile Favorites. To designate
an item as a Mobile Favorite, right-click the item, and on the context
menu that opens, select Mobile Favorites.
-
Recent Items. Lists
the items that you have recently worked on.
-
Reporting Servers. Lists
the servers that you can access.
-
Portals. Lists
all the portals that you have created. Portals with a blue icon
are published. Portals with a gray icon are unpublished.
-
Change Management. Lists
the Import and Export facilities.
-
Import. Enables
an administrator to move a change package into an acceptance test.
-
Export. Enables
a developer to move changes made to application files to the user
acceptance test environment.
x
Node Context Menu Options
Each node in the Resource Tree has a context menu. The
options are:
-
View. This
option is only available for the Content node. The options are:
-
Display By Title. Displays
folders by title. The default display.
-
Display By Name. Displays
folders by name.
-
Repository View. The
default view.
-
Full View. Lists
the servers as folders. Open a folder to list the databases contained
on the server.
-
New. The options
are:
-
Folder. Creates
a new folder.
-
Enterprise Domain. Creates
a new enterprise domain.
-
SaaS Tenant Domain. Creates
a new SaaS tenant domain.
-
Refresh. Refreshes
the tree. The option is available for all nodes.
-
Paste. Pastes
the item under the applicable node. This option is only available
for the Content node.
-
Search. Opens
the Search dialog box, where you can define a search query. This
option is only available for the Content node.
-
Security. The
options are:
-
Rules. Opens
the Security Rules dialog box, where you set up simple and advanced
security rules for groups and users.
-
Rules on this Resource. Opens
the Rules on this Resource dialog box, where you can view and run
reports on the security rules defined for the repository.
-
Effective Policy. Opens
the Effective Policy dialog box, where you can view the effective
policy by privilege and user.
-
Owner. Opens
the Set Resource Owner dialog box, where you can set the portal
user, set the group to which the user belongs, and publish the portal.
-
ReportCaster Explorer.
Accesses the ReportCaster Explorer, where you view ReportCaster
content. This option is only available for the Content node.
-
Clear Favorites. Clears
the Favorites list. This option is only available for the Favorites
node.
-
Clear Mobile Favorites. Clears
the Mobile Favorites list. This option is only available for the
Mobile Favorites node.
-
Send Email. Opens
the Mobile Favorites Email dialog box opens, where you can type
the email address to which you want to send your Mobile Favorite.
This option is only available for the Mobile Favorites node.
-
Clear Recent Items. Clears
the Recent Items list. This option is only available for the Recent
Items node.
-
New Portal. Creates
a new portal. This option is only available for the Portal node.
For more information on context menus for folders and items in
the tree, see Types of Content in the Tree.