What Is WebFOCUS App Studio?
WebFOCUS App Studio is the new Windows-based graphical
user interface (GUI) development environment for creating advanced
WebFOCUS applications. App Studio utilizes the Microsoft Windows®
ribbon framework to deliver an interactive user interface (UI) from
which you can build multiple business intelligence applications
in the same workspace.
In App Studio, you can do the following:
Access data and descriptions. Using the Metadata canvas,
you can create new synonyms, and view or modify existing synonyms,
in a graphical user interface. Synonyms enable you to access and
interpret data sources for use in reporting applications.
Create reporting applications. Build reporting procedures
in the Report Canvas, Chart Canvas, HTML Canvas, or Document Canvas.
-
Reports. Display your data in a tabular format. You
can create stand-alone reporting procedures, or add the report to
a document or an HTML page.
-
Charts. Communicate your data in a more illustrative
format. You can translate complex data into an easy-to-read and
understandable visual format. This often provides a new perspective
to the information that users view. You can create stand-alone charting
procedures or add the chart to a document or an HTML page.
-
HTML pages. Build webpages for users to launch, view,
and analyze data. You can add multiple reports and charting procedures
to an HTML page, in addition to the controls that enable you to
manipulate the data. You can also apply styling through the use
of Cascading Style Sheets, JavaScript files, and jQuery animations.
-
Documents. Combine multiple report and charting procedures
in a single output that you can organize and format. You can also
add pre-process and post-process codes to customize how your document
is executed.
-
Alerts. Create event-driven procedures that apply test
conditions and then trigger customized reports if the test conditions
are true. You can schedule an Alert using ReportCaster Distribution
Methods.
-
Reporting Objects. Transform complex views of data into
simple objects that are labeled with common business terminology
for users to understand and use as templates to create their own
reports.
Customize reporting applications. In addition to customizing
your reporting applications by applying styling and color, you can
add the following components to a procedure.
-
Virtual fields (DEFINE or COMPUTE statements). Create
temporary fields that are treated as real fields stored in the data
source.
-
Define functions. Create user functions that you can
use in components of a procedure. You can retrieve your stored functions
from the Functions Arguments dialog box.
-
Joins. Define relationships between two or more data
sources so a report can use the data from all sources at once. You
can also merge data sources by creating logical expressions on the
Match canvas.
-
OLAP hierarchies. Create temporary OLAP hierarchies and
dimensions for a procedure.
Manage your environment. You can apply the following functions
to your reporting applications to change the behavior of your environment.
-
Set. Control the way that reports and charts appear
on the screen or printer, the content of reports and charts, data
retrieval characteristics that affect performance, and system responses
to user requests. The Set component also helps you to set up your
metadata and manipulate information, such as dates. Use the Set component
to override default settings for your procedure.
-
Allocation. Assign logical names and storage locations
to the files that you create and use in WebFOCUS.
-
Use. Identify a FOCUS data source to use in your procedure.
x
This topic briefly explains the main WebFOCUS components
and implementations. For a complete description of WebFOCUS, see
the WebFOCUS documentation.
x
WebFOCUS and Your Network
WebFOCUS integrates into your existing network by connecting
your web server to your data. End users access WebFOCUS applications
through a web browser, so they need only the following elements:
-
Web browser. To access WebFOCUS applications, users
need a browser and a TCP/IP connection to a web server.
-
Web server. Web servers handle requests by returning
files to a browser or by executing processes that provide additional
functionality. You can provide WebFOCUS functionality by connecting
to the web server using Java servlet calls.
-
Data. WebFOCUS can access data from almost anywhere.
Once you have configured data access and described that data, you
can report on it.
x
There are two main WebFOCUS components.
-
WebFOCUS Client. The WebFOCUS Client resides on the
web server and connects WebFOCUS to the web through Java servlets.
When a user makes a request from App Studio or a browser, the WebFOCUS
Client receives and processes the request by passing it to the Reporting
Server.
Note: When you perform a full App Studio installation
for stand-alone development, you do not have to install the WebFOCUS
Client separately because it is packaged with App Studio.
A
stand-alone development environment is typically one in which all
software components (the web server, WebFOCUS Client, and Reporting
Server) are installed on the same local machine. This configuration
gives you access to all your application files and data from a single
machine. You do not need a physical network connection to access
any other machine in order to accomplish your development tasks.
-
WebFOCUS Reporting Server. The Reporting Server resides
on machines that can access your data. The Reporting Server provides
data access, number crunching, and report generation functionality.
x
WebFOCUS employs a distributed architecture, so the
WebFOCUS Client, Reporting Server, and your data can be located
on any platform, anywhere in your network.
You can easily connect an Apache™ web server running on UNIX
to SQL Server data on Windows, or DB2 data on z/OS. Any number of
WebFOCUS Reporting Servers can be connected to the WebFOCUS Client.
WebFOCUS can report on all of them.
Configuring a distributed architecture requires the following:
- The WebFOCUS Client must reside on a machine with a web
server.
- An instance of the Reporting Server must be installed on machines
with your data, or machines that have access to your data.
x
This topic briefly explains the main App Studio components
and implementations.
WebFOCUS App Studio includes the following components:
x
Reference: Derby Database
The
Derby database installed with your edition of App Studio comes preloaded
with IDs that possess developer and administration permissions.
These IDs enable application development in specific development
areas of a WebFOCUS environment, and the permissions to change user
passwords.
The following
table lists the preloaded IDs available in App Studio.
|
ID
|
Password
|
Function
|
|---|
|
wfdesktop
|
leave blank
|
Provides all the required privileges to
develop using a stand-alone version of App Studio.
When you
connect to a WebFOCUS environment using the ID wfdesktop, with no
password, you can develop applications in the Local Projects area,
Data Servers area, and Web Applications area.
This ID does
not allow development in the Repository area.
|
|
admin
|
admin
|
Provides access to the WebFOCUS Administration Console
and Security Center.
When you connect to a WebFOCUS environment using
the admin ID and password, you can develop applications in all areas.
|
x
Procedure: How to Change User Passwords Through the Security Center
Using
the preloaded administrator IDs installed in the Derby database,
you can access the administrative privileges that let you change
user passwords through the Security Center.
To
change user passwords through the Security Center, follow these steps:
-
Open the WebFOCUS Sign In page through one of
the following options:
- From the Start menu, select All Programs.
Open the Information Builders folder, and expand the WebFOCUS App
Studio folder. Expand the WebFOCUS App Studio Utilities folder, and
click WebFOCUS Administration Console.
- Open the following page in a web browser:
http://localhost:8080/ibi_apps
Note: To
use this option, you need to use the default Tomcat application server
with port 8080, and a default alias of ibi_apps.
The
WebFOCUS Sign In page opens, as shown in the following image.
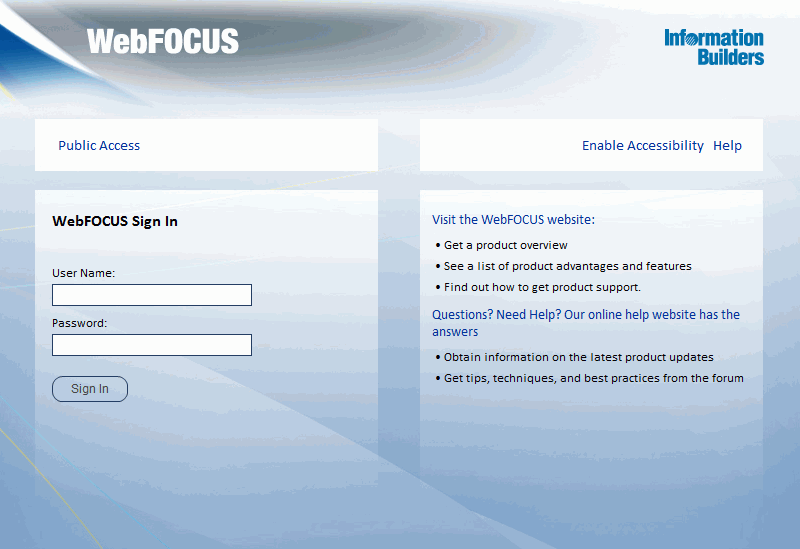
-
Type the User Name admin with
the Password admin.
-
Click Sign In.
The WebFOCUS Welcome page opens.
-
At the top of the Welcome page, click Administration,
and then click Security Center.
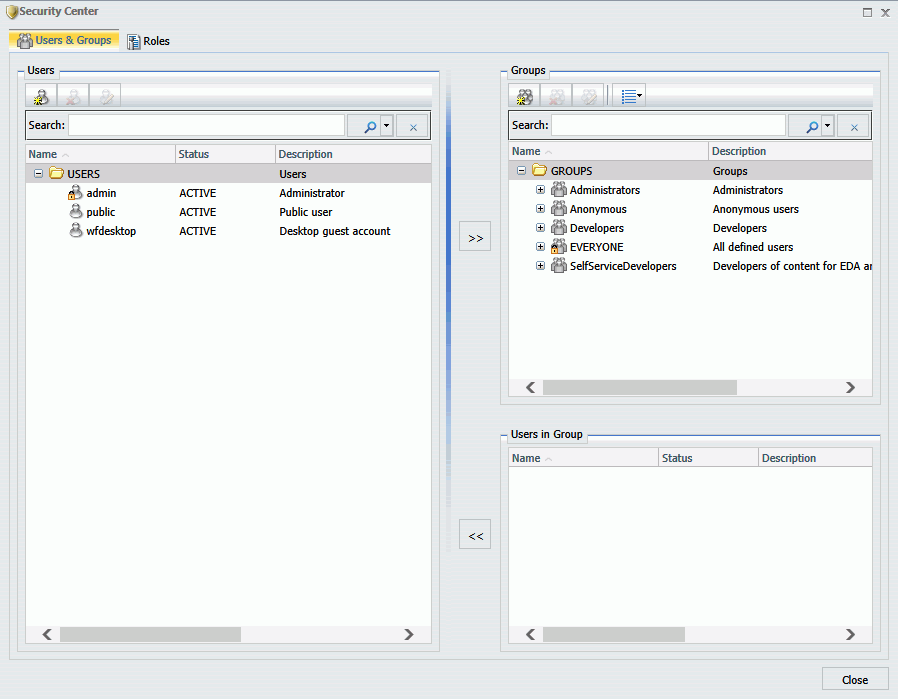
The Security Center dialog box opens, as shown in the following image.
-
As the administrator, you can change the password of
any user. On the Users & Groups tab, under Users, right-click
a user, and click Set Password.
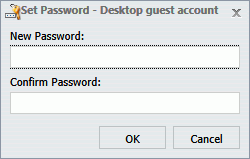
The Set Password - User dialog box opens, as shown in the
following image.
-
Type a new password, confirm the password, and click OK.
The new password is effective immediately.
For
more information on setting user credentials, see the WebFOCUS Security
and Administration manual.
x
Reference: App Studio Directory Structure
This
topic references the App Studio directory structure created under drive:\optional_drive_folder\ibi.
- \apps
-
Contains directories and data. By default, this is the Application
Root directory (APPROOT directory) in which WebFOCUS searches for
application files. Sample files are provided in the \ibinccen and
\ibisamp directories.
The Application Root directory
is created during the installation of App Studio and the WebFOCUS
Reporting Server.
It is defined by the APPROOT variable in
the server configuration file, edaserve.cfg, and the IBI_Approot_Directory
variable that is defined during the WebFOCUS installation. These
variables point to the Application Root directory for applications
that reside on the web server where WebFOCUS is installed.
For
Project-based development, the Application Root directories must
point to the same location.
- \AppStudio80
-
Contains the graphical front-end components for creating
App Studio content.
- \AppStudio80\srv80\home
-
Contains the local Reporting Server files.
- \AppStudio80\derby
-
Contains the Derby database files.
xWebFOCUS and App Studio Processing
The following figure illustrates how WebFOCUS and App
Studio process requests. Each step is explained below the figure.
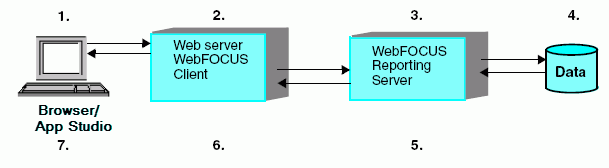
- A user makes a request and passes parameters by calling
a WebFOCUS Servlet through links and forms on a webpage, or through
App Studio.
- The request and parameters come to the WebFOCUS Client on the
web or application server, which processes the parameters and creates
a request for the Reporting Server.
- The Reporting Server receives the request, processes it, and
accesses any necessary data.
- Data is retrieved from data sources to process the request.
- The Reporting Server processes the user request using the retrieved
data.
- The response is returned to the WebFOCUS Client on the web or
application server.
- The response is returned to the user.
App Studio processes requests the same way that WebFOCUS does:
- To access WebFOCUS or a remote Reporting Server, App Studio
calls a servlet on a remote web or application server.
- To process requests using the local WebFOCUS Client and Reporting
Server installed with App Studio, App Studio calls the local Reporting
Server through a local web or application server using a servlet.
Therefore, to run reports locally, your machine requires a web server.
xApp Studio Development Modes
App Studio allows local (stand-alone) development and
development against a remote environment. From the Environments
Tree panel, you can develop projects locally on your machine, or
against a remote WebFOCUS environment.
In App Studio, you build applications consisting of different
kinds of files. You can create the project as a stand-alone application
in a development environment or as a web-based self-service application.
With a full App Studio installation, you can do the following:
- Locally develop self-service applications from the Local
Projects area.
Stand-alone Project-based development requires
installation of a Reporting Server on the same machine as App Studio.
A WebFOCUS Client is also required for Project-based development.
The files that you create for a local project reside in a subdirectory under
APPROOT as described earlier. In Project-based development, the
Application Root directories (APPROOT directories) must point to
the same directory.
- Connect to one or more remote servers and modify existing self-service applications
on those servers. For example, you can add a reporting procedure
to an existing application.
- Configure access to one or more WebFOCUS environments so you
can manage resources on the WebFOCUS Client and Reporting Server,
and in the Repository (if Managed Reporting is installed). For example,
you can create and edit procedures, metadata, HTML files, and more.
Note: If you do not have a Reporting Server and WebFOCUS
Client on your development machine (for example, the Managed Reporting
Application edition of App Studio), your environment allows the
last two capabilities.
x
Project-Based Development
App Studio supports two configurations for Project-based
development:
- In the first configuration, App Studio, Reporting Server,
and WebFOCUS Client are installed on the same machine (a full installation).
This WebFOCUS environment is referred to as localhost, which
describes your local machine.
Note: When configuring a
WebFOCUS environment, provide a full domain for the host name, including
top-level domain name, second-level domain, and subdomains as specified
by your organization (for example, hostname.companyname.com).
This format is recommended to ensure that requests are properly
resolved and redirected. In this environment, the project files
that you create reside in a subdirectory under the Application Root
directory (APPROOT directory).
See the WebFOCUS App
Studio Installation and Configuration manual for information
about other required components that you must install, such as Java SDK
and a servlet engine. All required components are packaged with
App Studio.
A full App Studio installation also allows Project-based
development against a remote WebFOCUS environment. In this case,
App Studio does not utilize the local Reporting Server or its local
WebFOCUS Client. It utilizes these components from the remote WebFOCUS
environment.
- In the second configuration, you can use a remote WebFOCUS installation
for Project-based development. App Studio is installed on a local
machine (a thin installation), and the WebFOCUS components
(which includes a Reporting Server and WebFOCUS Client that resides
on the web server) are installed on remote machines.
Use of a remote environment for Project-based development requires
the following:
- The Reporting Server must be at a supported release level.
- The Reporting Server must be installed on a supported Windows
or UNIX platform.
- The Reporting Server and the WebFOCUS Client must be properly
configured and the APPROOT variable must point to the same physical
location.
- You must have read/write permission to the Reporting Server
and the WebFOCUS Client.
x
Reference: Summary of Steps for Project-Based Development
To create a new project, follow these
steps:
-
Install App Studio. Use
the installation program to install App Studio (this includes a
Reporting Server for stand-alone development) on your Windows machine.
-
Configure the web server. For local/stand-alone development,
configure aliases and servlet functionality on the local web server.
-
Configure communications and data access. Set up remote
access to Reporting Servers, and create or copy data source descriptions.
You must also set up data adapters to access other data sources,
such as relational databases.
-
Create a project in the Local Projects node of the desired environment. Before
you begin Project-based development, you must create a project directory
to store the associated files. You create this directory using the
Project Wizard. Use the Project Wizard to name the project,
designate a directory for it, and optionally, add other directory
paths from which the project can retrieve information or paths to other
resources.
Sample projects are provided for editions that allow
local/stand-alone development. When working against a remote WebFOCUS
environment you do not see any sample projects by default.
-
Create, develop, and test the project components. Open
the project, create its components (procedures, data source synonyms,
HTML files, and related files), and develop and test them on the
Reporting Server and web server.
For
more information about installing App Studio, configuring the web
server, and configuring communications and data access, see the WebFOCUS
App Studio Installation and Configuration manual.
x
App Studio provides the following scenarios for remote
development:
- Use the Data Servers area to develop applications directly
on the Reporting Server and edit resources in place against remote
environments.
- Use the Repository area to access the Managed Reporting repository.
From here, you can develop and manage Managed Reporting applications
against a configured WebFOCUS environment.
- Use the Web Applications area to manage resources on the web
tier, and edit the resources in place against remote environments.
HTML pages, Cascading Style Sheets (CSS), and other web components
can be stored in the Web Applications node. You can view and modify
files with an editor.
x
Reference: Summary of Steps for Remote Development
To
create a new application on a server platform:
-
Install App Studio. Use
the installation program to install App Studio on your Windows machine.
-
Add a WebFOCUS environment. Add an environment from the WebFOCUS
Environment Properties dialog box.
-
Create an application folder on the server. Create the
application folder in the Data Servers area, or develop directly
against the Repository.
-
Create, develop, and test the application components. Open
the application, create its components (procedures, data source
synonyms, HTML files, and related files), and develop and test them
on the Reporting Server and WebFOCUS Client.