|
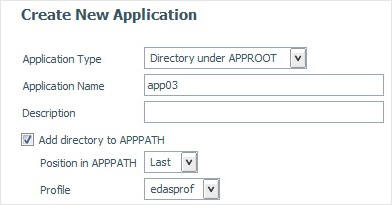
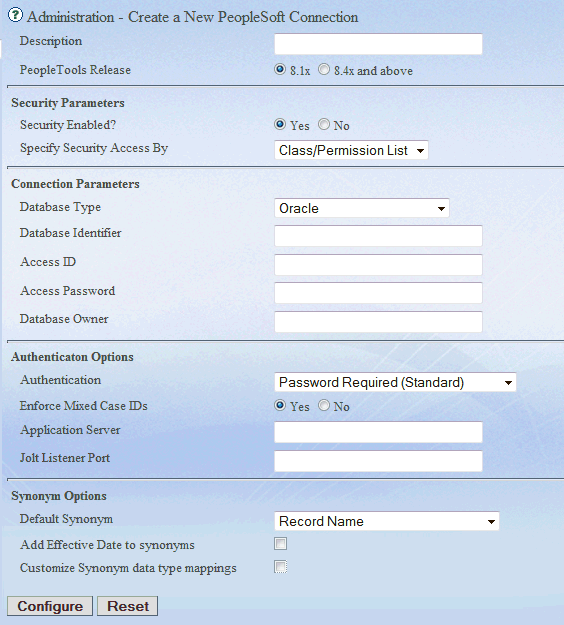
Description
|
|
Row.
|
|
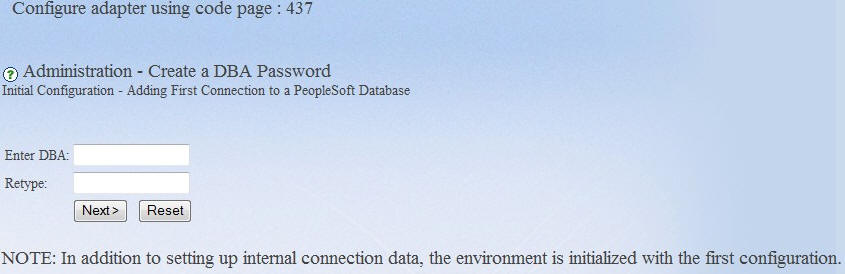
DBA
|
|
8-character identifier for linking metadata
to PeopleSoft security rules. Must be consistent across multiple
connections.
|
|
PeopleTools Release
|
|
Major release of PeopleTools (8.1x, or 8.4x
and above)
|
|
Security Enabled?
|
|
Specifies whether PeopleSoft data security
(row-level and access group) is enforced.
|
|
Specify Security Access By
|
|
Specifies security access; by User (OPRID)
or permission list (OPRCLASS).
|
|
Database Type
|
|
Designation for RDBMS. The options are Oracle,
MS SQL Server, or DB2 Universal Database.
|
|
Database Identifier
|
|
Database System Identifier (SID) or Source
Name used by the appropriate DBMS client software on the server.
|
|
Server
|
|
Name of the Database Server (for SQL Server
only, not Oracle or DB2). If the instance of SQL Server you are configuring
for is not running with the default port number, then the following
syntax should be used:
nnn.nnn.nnn.nnn\instance_name, port where - nnn.nnn.nnn.nnn
Is the IP address of the machine where SQL Server is running. - instance_name
Is the name of the SQL Server instance. - port
Is the listening port of the SQL Server instance.
|
|
Access ID
|
|
ID used by PeopleSoft to connect to the
RDBMS.
|
|
Access Password
|
|
Password associated with the access ID.
|
|
Database Owner
|
|
Data source owner ID for the PeopleSoft
data source.
|
|
Authentication
|
|
Select Password to
always verify the user ID/password. Select Trusted to
accept only user ID. Trusted authentication is useful when deploying
in previously authenticated environments, such as a Portal.
|
|
Enforce Mixed Case IDs
|
|
Provides backwards compatibility for sites
that previously used a case-insensitive version of PeopleSoft. (Yes
or No)
|
|
Application Server
|
|
This is the IP address of the machine on
which the JOLT Listener resides for the configured PeopleSoft environment.
|
|
JOLT Listener Port
|
|
Is the port number of the JOLT Listener.
|
|
Default Synonym
|
|
The type of synonym to default to when creating
new metadata.
- Record Name
- Record Name with
Prefix
- Record Name with
Suffix
- Table Name
- Table Name with Prefix
- Table Name with Suffix
Note: If you specify
any of the options with Prefix or Suffix, an additional input box
is displayed for your Prefix or Suffix entry.
|
|
Prefix/Suffix Default
|
|
Enter the prefix or suffix
you wish to prepend or append to the synonym name.
|
|
Add Effective Date to synonyms
|
|
If this option is selected, additional field
entries are added to any synonym created (or refreshed) after the configuration
is saved. These new field entries provide the End Date of any row
where an effective date field is part of the key. If an effective
sequence is also part of the key, then the effective sequence field
is also used in the calculation for the End Date field.
In addition, filters are added to the synonym which can be used
in requests against the synonym and are available in the WebFOCUS
reporting tool set.
|