Creating a Multiple Drill Down Procedure

How to:

Reference:

The multiple drill down feature enables you to add detail to a report by creating hyperlinks that have multiple actions. For example, you can create hyperlinks that run a detail report or Maintain procedure, execute a JavaScript function, and link to a URL. When you click a component in the summary report, a pop-up menu appears, with the possible options to drill down to.

The multiple drill down feature applies to:

Note: You may change the default styling of the drill down menu by applying StyleSheet syntax. For more information, see Creating Multiple Drill-Down Links in the Creating Reports With WebFOCUS Language manual.


Top of page

x
Procedure: How to Create a Multiple Drill Down Procedure

To create a multiple drill down procedure:

  1. Create a new procedure or open an existing procedure in the Report Painter window.
  2. Right-click the report component for which you will drill down.
  3. Click Options from the context menu.

    The Field Properties dialog box opens.

  4. Click the Drill Down tab.
  5. Select the Multiple Drill Downs check box.

    The Drill Menu Items input box is enabled and the default drill down name, DrillDown 1, appears.

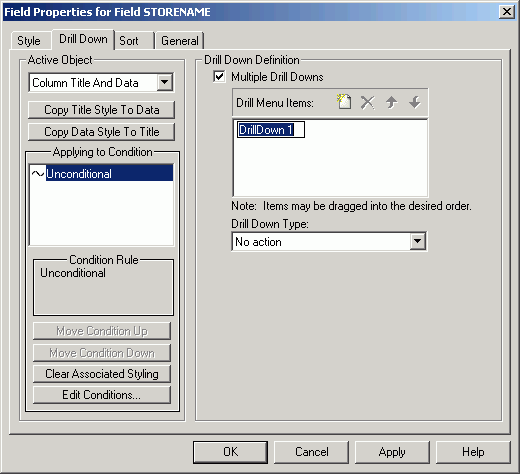
    Tip: The pop-up menu of drill-down options is only visible in the report output if the Multiple Drill Downs check box is enabled and you have at least one drill down definition, as shown in the following image.
  6. Double-click DrillDown1 and type the first drill down name in the Drill Menu Items input box.

    This is the name that appears on the pop-up menu in the report output.

    The Drill Menu Items input box also features buttons that allow you to add, delete, or change the order of drill down names.

  7. Select a drill down type from the Drill Down Type drop-down list.

    The drill down type can be any of the following:

    • An executable procedure.
    • An executable Guided procedure. For more information on Guided Reports, see Creating Guided Reports.
    • A URL.
    • A URL from a field.
    • A JavaScript function.
    • A Maintain procedure.
    • A compiled Maintain procedure.
    • A Maintain case.
    • A Drill Through procedure.

    For a description of the drill down types, see Field Properties Drill Down Tab.

  8. Enter any values required by the selected drill down type. For example, if the drill down type is Execute Procedure, the Procedure Name drop-down list appears. Select the name of the detail procedure.
  9. Click Add if you need to pass a parameter from the main report. For more information, see Creating a Parameter.

    The Drill Down Parameter dialog box opens.

    For a description of the fields in the dialog box, see Drill Down Parameter Dialog Box.

    Click Cancel to return to the Field Properties dialog box.

  10. After creating the first drill down definition, click the Add new item button on the Field Properties dialog box.

    When you click the Add new item button, the default name for the next drill down, DrillDown2, appears in the Drill Menu Items input box, then DrillDown3, and so on. If you change the default name of the first drill down definition, DrillDown 1, that value appears again when you create the second drill down definition.

  11. Type an additional drill down name in the Drill Menu Items input box.

    When you create multiple drill down items, the Multiple Drill Downs check box is automatically checked and disabled to avoid the inadvertent loss of drill down items you previously created. If you delete drill down items until one remains, the Multiple Drill Downs check box is enabled again.

  12. Select a drill down type from the Drill Down Type drop-down list.
  13. Enter any values or parameters required by the selected drill down type.
  14. To continue adding drill down items, click the Add new item button and repeat steps 6-9.
  15. When you are finished, click OK to return to the Report Painter window.
  16. Save and run the report by clicking the Save and Run buttons on the toolbar.

    The main report appears in the browser.

  17. To view the pop-up menu of drill down options:
    1. Place the cursor over one of the highlighted components to reveal the drill down icon (a hand).
    2. Click the component.

      The pop-up menu appears, as shown in the following image.
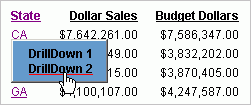
  18. Click each of the menu options to open the corresponding drill down item.

    The currently selected option is underlined in red. An additional browser window opens with your output.

  19. Click Back on your browser to return to the main report.
  20. Click a highlighted component to redisplay the pop-up menu.

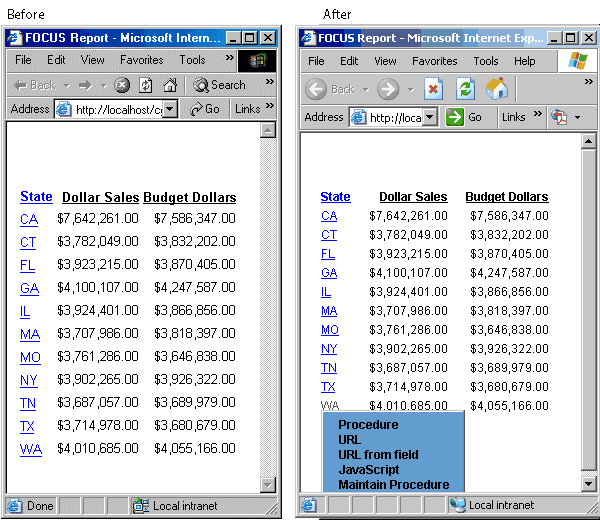
    If you click the last field of the report output, scroll bars appear in the browser window if required for access to all of the menu options.
Top of page

x
Procedure: How to Select HTML Format

To use the multiple drill down feature, select HTML output format from the Report Painter window:

  1. Choose Output from the Report menu.

    The Report Options dialog box opens.

  2. Select HTML or HTMTABLE from the Select Format drop-down list.
  3. Click OK to return to the Report Painter window.

Another way is to select HTML from the Output Format toolbar.

If you select a report format other than HTML in the Report Options dialog box, the multiple drill down feature is disabled as shown in the following image.

If you select the display format User, you can create a multiple drill down report in Report Painter. When you run the report, Developer Studio prompts you for the desired format. If you choose a format other than HTML, the report runs, but the pop-up menu of drill down options is not displayed, and the drill down action defaults to the first drill down definition created.


Top of page

x
Reference: Multiple Drill Down Error Messages

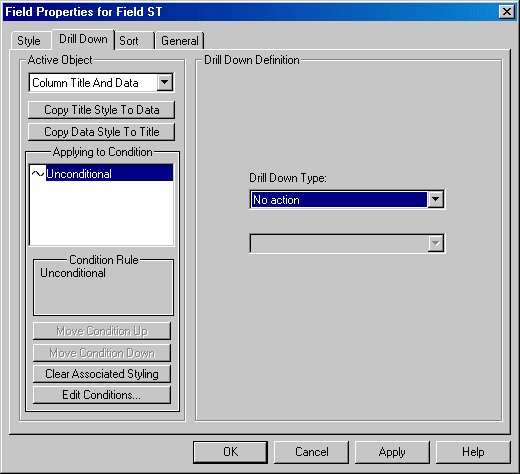
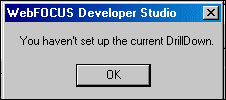
If you try to create a new drill down definition without selecting a Drill Down Type for the current definition, the following error message appears:

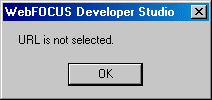
If you create a drill down definition with a drill down type, but omit the required value for the type, an error message appears if you try to create a new definition. For example, if you select URL from the Drill Down Type list, and you do not supply a URL address, the following error message appears when you click New.


Example: Creating a Multiple Drill Down Report

The following example illustrates the multiple drill down feature using the main and detail reports that were created in Creating Drill Down Reports. It assumes you completed and have access to those reports.

The examples use the GGSALES.MAS Master File. The State column in the main report will provide the hyperlinks available from the pop-up menu of drill down options.

  1. Open the main GGSALES report in Report Painter.
  2. Do one of the following to ensure that HTML is the selected output format:
    • Select Output from the Report menu to display the Report Options dialog box. Select HTML or HTMTABLE as the selected output format.
    • Select HTML from the drop-down list on the Output Format toolbar.
  3. Do one of the following to open the Field Properties dialog box:
    • Right-click the field State in the Report Painter window and select Options from the context menu.
    • Select the field State. From the Properties menu, select Options.
  4. Click the Drill Down tab.
  5. In the Drill Down Definition area, select the Multiple Drill Downs check box.
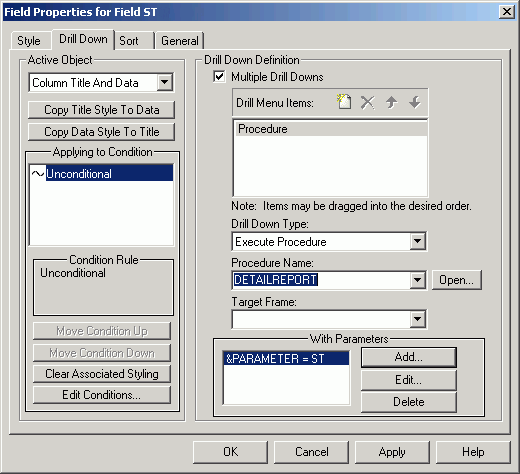
  6. Double-click the default value, DrillDown 1, and type the drill down name Procedure in the Drill Menu Items input box.
  7. You previously created the detail report in Creating Drill Down Reports, so values for Drill Down Type, Procedure Name, and With Parameters are already supplied. The first drill down definition is complete.

  8. Click the Add new item button to create the second drill down definition.
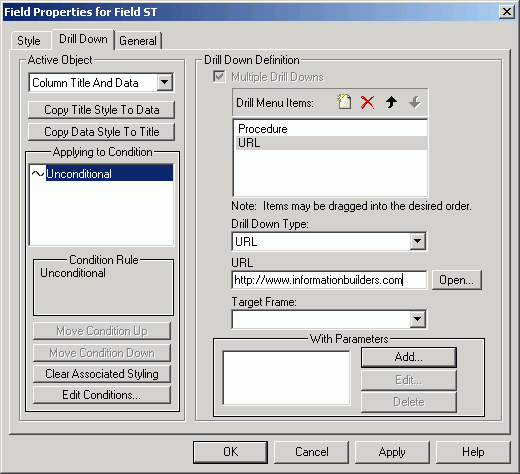
  9. Double-click the default value and type URL in the Drill Menu Items input box.
  10. Select URL from the Drill Down Type list.
  11. To simplify this example, you will specify a single URL that accesses a website. For details on the URL drill down type, see Creating a URL Hyperlink With Parameters, and the section on linking a report to other resources, in the Creating Reports With WebFOCUS Language manual.

    Type the URL address, http://www.informationbuilders.com, in the URL input box.

    Tip: You must type the entire address, including http://.

  12. Click Open to ensure the URL is working properly. Close the browser.
  13. Click OK on the Field Properties dialog box to return to the Report Painter window.
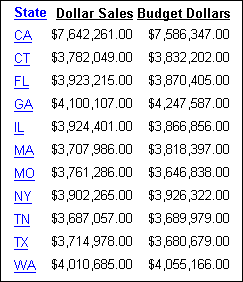
  14. Save and run the report by clicking the Save and Run buttons on the toolbar.

    The main report appears in the browser, as shown in the following image.

  15. To view the pop-up menu:
    1. Place your cursor over CA in the State column to reveal the drill down icon (a hand).
    2. Click CA.

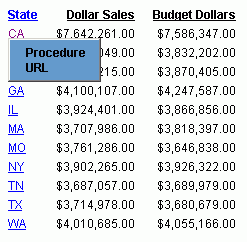
      The pop-up menu appears, as shown in the following image.

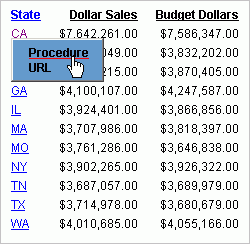
      When you point to a drill down menu item, it appears in red and is underlined, as shown in the following image.

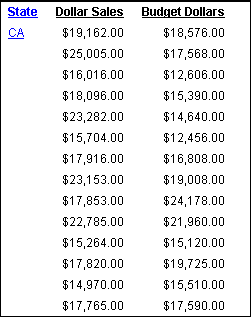
  16. Click the Procedure menu option. The detail report opens in the browser, as shown in the following image.

  17. Click Back on your browser to return to the main report.
  18. Click CA to redisplay the pop-up menu.
  19. Click the URL menu option.

    The website opens in the browser.


WebFOCUS