You can produce a report based on selected data, or a subset
of the records in a data source. You do this by specifying certain
selection criteria. Report Painter includes only the records that
meet those conditions in the report.
For example, you might want a report that lists only those employees
hired since the beginning of 2001. If your data source contains
the field START_DATE, you would specify record selection criteria
in which the START_DATE is greater than 12/31/00.
There are four types of record selections you can create: WHERE,
IF, WHERE TOTAL, and Retrieval Limits.
x
Procedure: How to Add Record Selection Criteria
To
add record selection criteria:
-
Depending on the type of field you
want to select records from (Detail, Sum), do one of the following:
- If you want
data evaluated before it is retrieved, click Where from
the Where/If drop-down menu to open the Expression Builder.
- If you want
data evaluated based on a Boolean expression, click If from
the Where/If drop-down menu to open the Expression Builder.
- If you want
data selected after all the data has been retrieved and processed, click Where
Total from the Where/If drop-down menu to open the Expression
Builder.
The Expression Builder opens. The Expression
Builder assists you in constructing selection criteria. For details
about the Expression Builder, see Using the Basic Expression Builder.
Note: If you are typing an expression with multiple criteria directly
into the Advanced section of the Expression Builder, you must explicitly
include parentheses to control the order of evaluation.
-
Click OK to
confirm your expression. Report Painter checks your syntax before
exiting. If you have made any errors, you will be unable to exit
until you fix them.
Example: Creating Record Selection Criteria
Suppose that you want to see total sales
for specific products. The following example shows how to create
a report of the Gotham Grinds Latte and Espresso sales for each
store within each region.
- Open the GGSALES data source in Report
Painter.
- Identify and format your report columns.
- Identify your sort columns. Click By on the Report Painter
toolbar and double-click or drag REGION, STCD, and PRODUCT from the Fields
tab of the Object Inspector.
- Identify your summary column. Click Sum on the Report Painter
toolbar and double-click or drag DOLLARS from
the Fields tab of the Object Inspector.
- Format the
Dollar Sales column. Right-click Dollar Sales in
the Report Painter window and click Format.
Click Decimal in the Format Types box. Click Floating
dollar -- M from the Edit Options list. Click OK.
- Apply selection
criteria:
- Click Where from
the Where/If drop-down menu on the Columns toolbar to open the Expression
Builder.
- Click PRODUCT from
the Fields list.
- Click equals from
the Logical Relations list.
- Click Value from
the Compare Type list to retrieve a list of data available for the
PRODUCT field.
- Double-click
the Compare Value section to bring up the Multiple Value Builder dialog
box. In the Data Source section click Select Field and
click Latte and Espresso. Click OK to
close the Multiple Value Builder dialog box.
- Click OK to
return to the Report Painter window.
- Run the report
by clicking the Run button on the toolbar.
The
report appears in the browser.
xRetrieving a Certain Number of Records
You can retrieve a specified number
of records on a report. It is useful to limit record retrieval when:
- You are designing
a new report and need only a few records from the data source to
test the design.
- You already
know the number of records that meet the test criteria and want
to stop the search after that number has been retrieved. This reduces
the total retrieval time.
x
Procedure: How to Retrieve a Certain Number of Records
-
Click Retrieval
Limit from the Where/If drop-down menu on the Columns
toolbar to open the Retrieval Limits dialog box.
-
Enter
the number of records to retrieve in the Record Limit box.
-
Click OK.
When you run the report, only that number of records appears.
You can also restrict record retrieval. For more information, see Reading a Certain Number of Records.
xCreating a List of Acceptable Values
You can create a list of acceptable values for one or
more selection criteria (Where statements) and use each set of values
to run a parameterized report. The user is prompted for a value
when the report is run.
To ensure that a supplied value is valid and being used properly
in a procedure, you can test it for presence, type, and length by
screening a value. You screen a value by adding suffixes to the
variable value.
If you call Report Painter from the HTML Composer and create
a procedure that defines acceptable values for one or more fields,
the values populate drop-down lists from which a user can choose.
For information about the HTML Composer, see the Designing a User Interface for a Web Application With the
HTML Composer manual.
Note: To avoid conflicts, do not name variables
beginning with Date, IBI, or WF, as variables beginning with these
values are reserved for Information Builder use.
x
Procedure: How to Create a List of Acceptable Values for a Parameter
-
Click Where from
the Where/If drop-down menu on the Columns toolbar to open the Retrieval
Limits dialog box.
-
Double-click
a field name from the list on the left side of the window to add
it to the Column to filter column.
If you want to change the field name in
the Column to filter column, click the down arrow and select a different
field name from the list.
-
Click
the down arrow in the Logical Relations column to select a relation from
the drop-down list.
-
Click
the down arrow in the Compare Type column and click Parameter from
the drop-down list.
-
Double-click
the Compare Value column. The Variable Editor
opens.
-
In the
Name input box, type a name for the variable. This name will appear
as the Column title if the field is added to the report.
-
Optionally,
enter text in the Prompt input box to prompt a user to supply a
value for the variable.
If no Prompt text is entered, the Name
entered in the preceding step is used.
-
From
the Variable Type drop-down list, click Multiselect OR to
add values for fields you want to include in your list of valid values.
-
In the
Data source area, click Values for field.
-
Click
the Select a field ellipsis button to get values
for a field. The Value Retrieval dialog box opens.
The Value Retrieval list provides a list
of available fields in your data source. Double-click a field, click Get
Data, or click OK to close the
Value Retrieval field list and return to the Variable Editor. The
available values are listed.
-
Double-click values to
add them to the Accept List.
-
Click OK to
close the Variable Editor.
-
Click OK to
close the Expression Builder.
x
Procedure: How to Edit Multiple Values
-
Click Where from
the Where/If drop-down menu on the Columns toolbar to open the Retrieval
Limits dialog box.
-
Double-click
a field name from the list on the left side of the window to add
it to the Column to filter column.
-
Click
the down arrow in the Logical Relations column to select a relation from
the drop-down list.
-
Click
the down arrow in the Compare Type column and click Value from
the drop-down list.
-
Double-click
the Compare Value column.
The Multiple Value Builder dialog box opens.
-
Click
the Select a field ellipsis button in the Data
source area to select a field from the Value Retrieval list.
-
The
Value Retrieval list provides a list of available fields in your
data source. Double-click a field, click Get Data,
or click OK to close the Value Retrieval
field list and return to the Multiple Value Builder dialog box.
The available values are listed.
-
Double-click
values to add them to the Values List.
Tip: Repeat this
process to add other values to the list.
-
Click OK to
close the Multiple Value Builder dialog box and return to the Expression
Builder.
-
Click OK to
close the Expression Builder.
x
Procedure: How to Specify a Range of Values for Variables in Your Report
-
Click
inside the Fields tab on the Object Inspector.
-
Right-click
the Variables folder and click New Report Variable Field from
the menu that opens.
The Variable Editor opens.
-
In the
Name input box, type a name for the variable.
This name will appear as the Column title
if the field is added to the report.
-
Optionally,
enter text in the Prompt input box to prompt a user to supply a
value for the variable.
If no Prompt text is entered, the name
entered in the preceding step is used.
-
From
the Variable Type drop-down list, click Range.
-
A list
box appears, providing a list of available fields in your data source. Select
a field to populate the From and To selection lists.
-
Click
a value from the From selection list to add it as the From range value.
-
Click
a value from the To selection list to add it as the To range value.
-
Click OK to
close the Variable Editor. The variable appears in Report Painter
as a Report Variable field.
x
Procedure: How to Compare the Selected Field to Another Field
-
Click Where from
the Where/If drop-down menu on the Columns toolbar to open the Retrieval
Limits dialog box.
-
Double-click
a field name from the list on the left side of the window to add
it to the Column to filter column.
If you want to change the field name in
the Column to filter column, click the down arrow and select a different
field name from the list.
-
Click
the down arrow in the Logical Relations column to select a relation from
the drop-down list.
-
Click
the down arrow in the Compare Type column and click Field from
the drop-down list.
-
Double-click
in the Compare Value column to open the Single
Value Builder dialog box.
-
Double-click
a field from the data source to add it to the Values List. The field
selected is compared to the selected field in the report.
-
Click OK to
close the Single Value Builder dialog box and return to the Expression
Builder.
-
Click OK to
close the Expression Builder.
x
Procedure: How to Create a Variable Field in Your Report
-
Click
inside the Fields tab on the Object Inspector.
-
Right-click
the Variables folder and click New Report Variable Field from
the menu that opens.
The Variable Editor opens.
-
In the
Name input box, type a name for the variable.
This name appears as the Column title when the field is
added to a report.
-
Optionally,
provide text for the message that prompts a user to supply a value
for the variable in the Prompt input box.
-
From
the Variable Type drop-down list, ensure that Single Select is
selected. This is the default option.
-
In the
Data Context area, click Values for field.
-
Click
the Select a field ellipsis button to get values
for a field. The Value Retrieval dialog box opens.
The Value Retrieval dialog box provides
a list of available fields in your data source. Double-click a field,
or select a field and click Get Data to close the
Value Retrieval dialog box and return to the Variable Editor. The
available values for the field are listed.
-
Double-click
values to add them to the Accept List.
-
Click OK to
close the Variable Editor. The variable appears in the fields list
as a Report Variable field.
x
Procedure: How to Add Multiple Values With the Variable Editor
-
Click
inside the Fields tab on the Object Inspector.
-
Right-click
the Variables folder and click New Report Variable Field from
the menu that opens.
The Variable Editor opens.
-
In the
Name input box, type a name for the variable.
This name will appear as the Column title
if the field is added to the report.
-
Optionally,
enter text in the Prompt input box to prompt a user to supply a
value for the variable.
If no Prompt text is entered, the Name
entered in the Name field is used.
-
From
the Variable Type drop-down list, click Multiselect OR.
-
In the
Data Context area, select one of the following:
The Data Context list displays available values.
-
In the
Data Context list, double-click values to add to the Accept List table.
To customize the display of values, double-click
a value in the Return Value column and type the name as you want
it to appear in the output.
-
Click OK.
The field appears in the Report Variables folder of the Object Inspector.
x
Procedure: How to Screen a Simple Variable With Prefix Operators
-
In Report
Painter, right-click inside the Object Inspector and click New
Report Variable Field from the context menu.
The Variable Editor opens.
-
Click Simple from
the Variable Type drop-down list.
-
Type
a name for the variable in the Name input field.
This name appears as the Column title if
the field is added to the report.
-
Use
the Operator drop-down list to select a suffix to add to the variable value. None is
the default option.
-
Click OK to
close the Variable Editor.
The variable appears in the fields list
as a Report Variable field.
For more information about screening a variable value, see
the Developing Reporting Applications manual.
x
Procedure: How to Set the Display Value for Dynamic Lists With the Variable Editor
When using a Dynamic Accept list, you may select a value
to be displayed as a parameter. A dynamic list retrieves values
from a specified data source when the request is run. The display
value can be different from the return value by using the Values
for Displayed Field option in the Variable Editor.
Note: Setting
the display value for dynamic lists is only applicable if you are
using a Data source that contains both a code and description field.
-
In Report Painter, right-click inside the Object Inspector
and click New Report Variable Field from
the context menu.
The Variable Editor opens.
-
Type a name for the variable in the Name input field.
This name appears as the Column title if
the field is added to the report.
-
Optionally, enter text in the Prompt input box to prompt a
user to supply a value for the variable.
If no Prompt text is entered, the name
entered in the Name field is used.
-
Click Single Select or Multiselect OR from
the Variable Type drop-down list, depending on whether you are supplying
single or multiple values for your parameter.
-
Select Dynamic list from the Accept
List section of the Variable Editor.
-
From the Source File list, double-click the data source to
be used for the report.
Note: You may
also click the Populate field list ellipsis
button to populate the field list for that data source.
-
In the Values for Return Fields list, select a return field
from the selected data source.
-
In the Values for Displayed Fields list, select a value field
to be displayed as the return field.
The following
image is an example of the Variable Editor populated with the field
values and selection criteria required to create a dynamic list
parameter with a display value.
-
Click OK to close the Variable Editor.
The variable appears in the fields list
as a Report Variable field.
-
Save and run the report.
The display value appears as the return
field parameter.
x
Procedure: How to Add No Selection to a Static List of Parameter Values
No Selection sends _FOC_NULL to the list of available
parameters at run time and is only available when using a Static
Accept list. When selected, _FOC_NULL removes the parameter from
the procedure and the report will run without the Where clause.
-
In Report Painter, right-click inside the Object Inspector
and click New Report Variable Field from
the context menu.
The Variable Editor opens.
-
Type a name for the variable in the Name input field.
This name appears as the Column title if
the field is added to the report.
-
Optionally, enter text in the Prompt input box to prompt a
user to supply a value for the variable.
If no Prompt text is entered, the name
entered in the Name field is used.
-
Click Single Select or Multiselect OR from
the Variable Type drop-down list, depending on whether you are supplying
single or multiple values for your parameter.
-
Select Static list from the Accept List
section of the Variable Editor.
-
From the Data Context area, add the Fields from database or
Values for fields, and select the values to be used for the report.
-
Select the Add No Selection option from
the Add New Item drop-down list, as shown
in the following image.
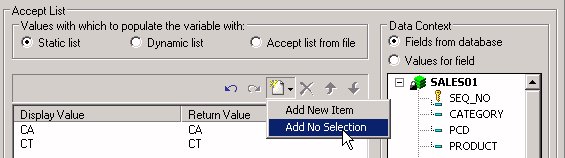
No Selection is added as the
Display Value with _FOC_NULL as the Return Value, as shown in the
image below.

-
Optionally, to customize the default Display Value, double-click No
Selection in the Display Value column and type the name
as you want it to appear in the output.
-
Click OK to close the Variable Editor.
When you run the report,
No Selection appears in the parameter list, as shown in the image
below.
x
Procedure: How to Edit Variables With the Variable Editor
-
Open
the Variables folder in the Object Inspector.
-
Open
the Report Variables folder.
-
Right-click
the variable and click Edit Report Variable Field.
Example: Adding Multiple Values With the Variable Editor
The following is an example of adding multiple values
with the Variable Editor.
- Create a new
procedure, using CENTORD as the data source.
- In the Report
Painter main window, add the following fields to your report:
- ORDER_DATE
- PROD_NUM
- PRODNAME
- PRICE
- QUANTITY
- Select the ORDER_DATE field,
and click By.
- Click the Where button
from the Where/If drop-down menu.
The Expression Builder opens.
- Double-click PROD_NUM in
the list on the left side of the window to add it to the Column
to filter column.
- Click the down
arrow in the Logical Relations column, and click equals from
the drop-down list.
- Click the down
arrow in the Compare Type column and click Parameter from
the drop-down list.
- Double-click
the Compare Value column.
The Variable
Editor opens.
- In the Name
input box, enter Product Number.
This
name will appear as the Column title if the field is added to the
report.
- Enter Product
Number in the Prompt input box.
- From the Variable
Type drop-down list, click Multiselect OR to
add values for fields you want to include in your list of valid
values.
- In the Data
Context area, click Values for field.
- Click the Select
a field ellipsis button to get values for the PROD_NUM
field. The Value Retrieval dialog box opens.
The Value Retrieval
dialog box provides a list of available fields in your data source. Double-click
the PROD_NUM field to close the Value Retrieval dialog box and return
to the Variable Editor. The available values for the PROD_NUM field
are listed.
- Double-click 1020 in
the list box to add it to the Accept List table. Do the same for
the values 1022 and 1024.
- Click OK to
close the Variable Editor.
- Click OK to
close the Expression Builder.
- The field
appears in the Report Variables folder of the Object Inspector.
x
Reference: Variable Editor Dialog Box
The Variable Editor dialog box is shown in the following
image.
The
Variable Editor dialog box is used to:
-
Create a variable field as a column in order to be able to
control report output. For example, you can define a variable as
&COST, and allow a user to select RETAIL_COST or DEALER_COST
at run time.
-
Define lists of acceptable values that can be used to populate
a drop-down list from which a user can make a selection at run time.
The dialog box includes the following fields:
-
Name
-
If you are defining a list of acceptable
values, this field displays the name of the variable that you specify
in the Expression Builder. For more information, see How to Create a List of Acceptable Values for a Parameter.
If you are
creating a Variable field, enter its name in this box. See How to Create a Variable Field in Your Report.
-
Prompt
-
An optional text field that is used to
prompt a user to supply a value for the variable or to select a
value from those you identify as acceptable. If no text is entered
in this Prompt field, then the value from the Name field is used
by default.
-
Variable Type
-
Choose the type of selection the user will
have. The options are:
Single Select. Select one value from a list of accepted values.
Multiselect OR. Choose
multiple OR values from a list of accepted values.
Multiselect AND. Choose multiple
AND values from a list of accepted values.
Note: Multiselect AND is not applicable
for selecting data values, and should only be used when selecting
field name values for a variable. Multiselect AND variable type
with field name values is useful for application development using
the HTML Composer. For more information, see Creating Parameter Values in the Designing
a User Interface for a Web Application With the HTML Composer manual.
Multiselect BY. Choose
multiple values from a list of vertical sort values.
Multiselect ACROSS. Choose
multiple values from a list of horizontal sort values.
Simple. Screen a value
by adding suffixes to the variable value.
Range. Specify a range of values rather
than a list of acceptable values.
-
Validate Input
-
When checked, at run-time, this validates whether the data
entry is consistent with the definition of a parameter.
-
Accept List
-
Displays
the values of the selected field.
Populate the variable with:
Static list. Consists
of a list of values you supply. These values do not change unless
you change them.
Dynamic list. Retrieves
values from a specified data source when the request is run.
Accept list from file. Retrieves
values from an Accept list defined in the Master File for the selected
field.
-
Data Context
-
These options are only available when you
select the Static list option in the Accept List area. You can choose
from the following options:
Fields from database displays a selection menu which enables
you to select the field names you want to include in an Accept list
for the variable field.
Values for field enables you to use the Value Retrieval
dialog box to select the values for the selected field that you
want to include in an Accept list for the variable field.
Display Value/Return Value shows
the selected fields that were added to the Static Accept list from
the Data Context area. You may Redo/Undo the last field added, move
items up or down the list, and delete selected items. In addition:
- To customize
the name of the values in the Static Accept list, double-click a
Display value or Return Value and type the name as you want it to
appear in the output.
- To manually
enter a Display value or Return value, click the Add New
Item
 button
(or press Ctrl + Enter) to add a new Display and Return value.
button
(or press Ctrl + Enter) to add a new Display and Return value.
- To add No
Selection as a Display Value, click Add No Selection from
the Add New Item drop-down list. For more information, see How to Add No Selection to a Static List of Parameter Values.
-
Source File
-
This section is only available when you
select the Dynamic list or Accept list from file options in the
Accept List area. This enables you to select a Master File from
a list.
-
Values for Return Fields
-
This section is only available when you
select the Dynamic list or the Accept list from file options in
the Accept List area. This enables you to select a return field
from the selected Master File.
-
Values for Displayed Fields
-
This section is only available when you
select Dynamic or Accept list. This enables you to set the display
value as something different from the return value. For more information,
see How to Set the Display Value for Dynamic Lists With the Variable Editor.
xCreating Variable Parameters With Accept Values in the Variable Editor
When you create a variable parameter that references
an Accept clause in a procedure, only the list of values defined
in the Master File are valid. All other values, including values
that exist in the database, are rejected.
You can use the Variable Editor to create a variable parameter
in a procedure, utilizing an Accept clause defined in a Master File,
by performing the following:
- Create an Accept
clause with the Synonym Editor.
- Create a variable
parameter in a procedure with the Variable Editor.
x
Procedure: How to Create an Accept Clause With the Synonym Editor
-
From
the Projects area in Developer Studio, double-click a synonym from
the Master Files folder, or right-click the synonym and click Edit
in Synonym Editor.
The Synonym Editor opens.
-
Select
the field name in the left pane and use the Accept value drop-down
list in the right pane to select OR as the validation criteria.
OR enables you to specify an acceptable value.
OR is the default Accept value, as shown
in the following image.
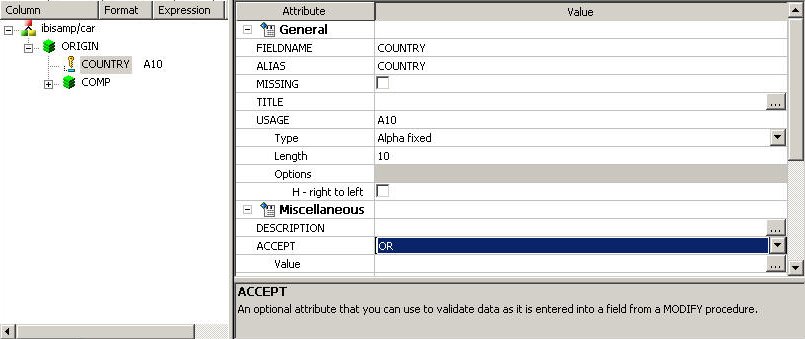
The only Accept Type supported
in the Variable Editor is Accept list from file.
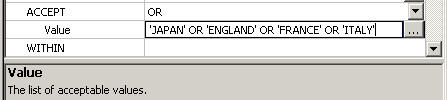
-
In the
Value field, type a valid accept field value.
You may type multiple
OR value fields, as shown in this example:
Or
Click the Value ellipsis
button to open the Accept Value(s) dialog box where you may add
and delete values, as shown in the image below.

-
Click Save from
the File menu to save the accept value in the synonym.
-
Click Close from
the File menu to close the Synonym Editor and return to the Projects
area of Developer Studio.
-
To view
the resulting Accept clause syntax, right-click the Master File and
click Edit in Text Editor.
The following image shows the Accept clause
syntax as defined in the Master File.
x
Procedure: How to Create a Variable Parameter in a Procedure With the Variable Editor
Open a procedure with Report Painter and add several fields,
including the field you used to create the Accept clause in the
previous steps. Then, add a Where clause to the procedure and add
a variable parameter with the variable editor by performing the
following steps:
-
In Report
Painter, click Where from the Where/If drop-down
menu.
The Expression Builder opens.
The
following image shows the Expression Builder populated with all
selection criteria (except the Compare Value field).
-
Double-click
the field name (used to create the Accept clause) in the file directory
list in the left pane to add it to the Column to filter column.
-
Click the down arrow in the Logical Relation column and select
a relational operator from the drop-down list.
-
Click the down arrow in the Compare Type column and click Parameter from
the drop-down list.
-
Double-click the Compare Value column.
The Variable Editor opens.
-
In the
Variable Editor, click the Accept list from file option
and perform the following steps to create a variable parameter.
The following image
shows the Variable Editor populated with the field values and selection
criteria required to create a variable parameter.
-
In the Variable Type drop-down list, click Single
Select.
-
In the Name input box, the field name (used to create the Accept
clause) appears as the name for the variable.
-
In the (optional) Prompt input box, type the text you want
used to prompt a user to select a value.
If no Prompt text is entered, the Name
in the preceding step is used.
-
From the Source File list, the Master File (used to create
the Accept clause) for the report is selected.
-
In the Values for Return Fields list, the field name in red
(used to create the Accept clause) is selected.
-
Click OK to save the variable parameter,
close the Variable Editor, and return to the Expression Builder window.
-
Click OK to
close the Expression Builder.
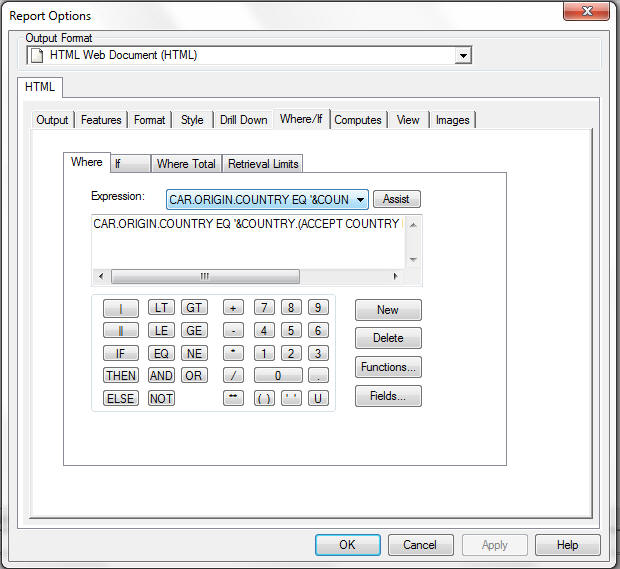
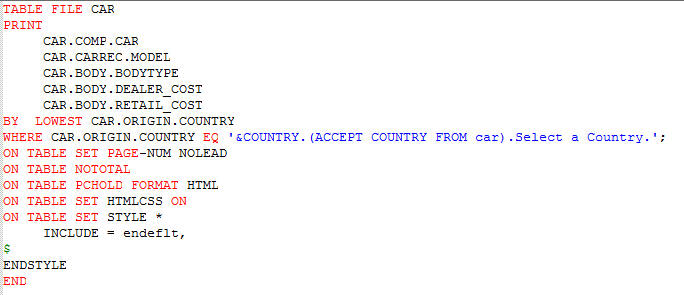
The following image shows the Report Options dialog box
populated with the Where clause created in the Expression Builder.
-
To verify
that the source code is correct and the resulting procedure will be
executed successfully, perform the following:
-
Click the Source tab below the Object
Inspector.
The following image shows the resulting
source code added to the procedure in the Where clause.
-
Click
the Run icon.
The following
image shows the new window that opens prompting you to select a
value from the list of valid Accept values for the variable you
created.
-
Select
a value from the drop-down list and run the WebFOCUS query.
The report output appears, as shown
in the following image.