Parameter values and input controls can be created with a dynamic
or static list of values:
xCreating a Static List of Values
When creating a list of static values, you can select
from the following options:
- Add new value
- Add ignore
value
- Add everything
value
- Use values from
procedure
- Use values from
external file
When the options are added to the Value list, the display text
can be customized, but the value cannot be changed.
You may create an unbound static parameter, an incoming static
parameter (a parameter that is bound to a control), or a control
that is bound to a static parameter. For details, see How to Add a New Static Value.
x
Reference: Properties and Settings (Incoming Static Parameter and Unbound Control)
The Properties and settings dialog box appears when creating
or editing a static value on the Parameters tab.
The
options available depend on the type of static value.
The following image is the Properties
and settings dialog box that appears for an incoming static parameter
(a parameter that is bound to a control), and an unbound control (a
control that is not bound to a parameter).
The Properties and settings dialog
box contains the following fields and options when Static is selected
as the Data type.
-
Data type
-
Determines whether values are obtained
from a static or dynamic list, an active
report, or Table of Contents.
Static. Uses
a static list of values you supply. A list of static values can
also be created in Report Painter. For
an example of importing static values that were created in Report
Painter, see Adding Static Field Values From Report Painter.
-
Static values
-
Is a list of supplied values for a static
list.
Value. The
value to be passed to the selected parameter.
Display. The text that represents
the value in the control the user views. Press the Ctrl + Shift
keys to add a value to the Display field.
Selected. The value to act as the default
value. If the control is multi-select, more than one value can be
selected.
New. Creates
a new value.
Delete. Deletes
a supplied value from the list.
Move Up. Moves the selected value up in the list.
Move Down. Moves the
selected value down in the list.
-
Send display value
-
Select this option to send the display
value, rather than the actual data, to the parameter. For more information,
see How to Send the Display Value for Static and Dynamic Controls.
The Send display value option appears when creating
an incoming static parameter (a parameter that is bound to a control),
or an unbound control (a control that is not bound to a parameter).
It is not available when creating an unbound static parameter.
-
Values are procedures names
-
Select this option to have a control populated with procedure
names, so that when a value is selected, that procedure executes.
The Value column is the procedure name itself and cannot be edited.
The Display column is editable.
For more information on
how to use the Values are procedures names option, see How to Use Procedure Names as Values.
x
Reference: Properties and Settings Dialog Box (Unbound Parameter)
The Properties and settings dialog box appears when creating
or editing a static value on the Parameters tab.
The options available depend on the type of
static value.
The following
image is the Properties and settings dialog box that appears when
adding a new unbound parameter.
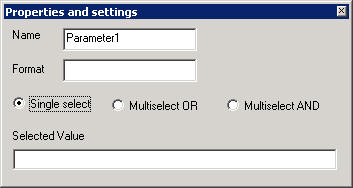
The Properties and settings dialog
box contains the following fields and options when adding an unbound
parameter with Single select. Single select is the default option
when adding a new parameter.
-
Name
-
The default name assigned to the parameter.
Optionally, you may enter a new name for the parameter.
-
Format
-
The Format field defines the format of
the parameter, such as A20, or D12.2.
This
field is optional. If this field is left blank, it automatically
applies the Alphanumeric format to the value field.
-
Selected Value
-
Enter the selected value to be assigned
to the parameter.
The Properties and settings dialog box contains the following
fields and options when adding an unbound parameter with Multiselect
OR or Multiselect AND, as shown in the image below.
-
Static values
-
Is a list of supplied values for a static
list.
Value. The
value to be passed to the selected parameter.
Display. The text that represents
the value in the control the user views. Press the Ctrl + Shift
keys to add a value to the Display field.
Selected. The value to act as the default
value. If the control is multi-select, more than one value can be
selected.
New. Creates
a new value.
Delete. Deletes
a supplied value from the list.
Move Up. Moves the selected value up in the list.
Move Down. Moves the
selected value down in the list.
x
Reference: Properties and Settings Dialog Box (Bound Parameter)
The Properties and settings dialog box appears when selecting
a bound parameter on the Parameters tab.
The Properties and settings dialog box for a parameter
is read-only and displays the values for the bound control.
The following image is the
Properties and settings dialog box that appears when selecting a
bound static parameter.
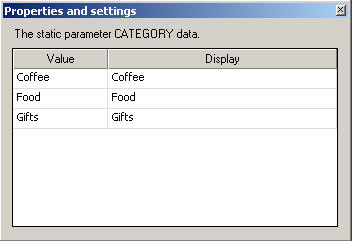
The Properties and settings dialog
box contains the following read-only values:
-
Value
-
Shows the selected value for the static
parameter data.
-
Display
-
Shows the static parameter display value.
x
Procedure: How to Add a New Static Value
The steps below describe how to manually add a new static
value.
You may create an unbound
static parameter, an incoming static parameter (a parameter that
is bound to a control), or a control that is bound to a static parameter.
-
Create
a new parameter.
-
Right-click anywhere on the Parameters tab and select Add
parameter.
The Properties and settings dialog box
opens.
-
Enter the parameter value information. Options are Single
select, Multiselect OR, and Multiselect
AND.
-
If using single value, select Single select.
Single select
is the default option when adding a new parameter.
-
If using a multiselect value, select Multiselect OR or Multiselect
AND.
The Value, Display, and Selected columns
appear.
-
Close the Properties and settings dialog box to create an unbound
parameter.
An unbound static parameter is useful
when passing a parameter value used on another page. You may also
bind the new parameter to a control to create an incoming parameter,
or bind a control to the parameter.
-
Bind
the new parameter to a control.
Binding a new parameter to a control creates
an incoming parameter. An incoming parameter is a static parameter
that is bound to a control. The parameter value will populate the
control.
-
Select the Design tab and create an
input control. For example, insert a list box or a drop-down list.
-
Click the Parameters tab.
The Properties and settings dialog
box appears for the control.
-
Close the Properties and settings dialog box.
Close this dialog
since you are populating the control with the parameter value, which
has already been created in step 1.
-
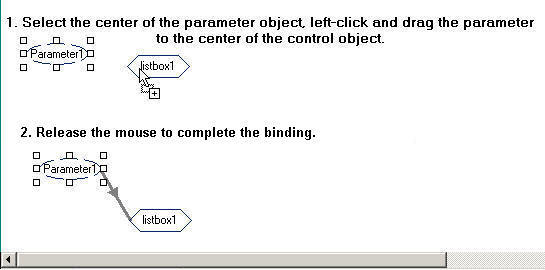
Select the center of the parameter name
object, left-click and drag the parameter to the center of the control
object, and release the mouse to complete the binding.
The following image is an example of
an incoming parameter. Notice the direction of the arrow.
-
To unbind the parameter, select the arrow head on the line,
so that the line is bold, right-click and select Break binding.
-
Create
a control that is bound to a parameter.
Create a control with static values and
bind the control to a parameter to populate the parameter with the
control values.
-
From the Design view of HTML Composer, select a control from
the Controls sub-menu of the Insert menu. For example, insert a
list box or a drop-down list.
The cursor changes into a crosshair.
-
Drag the crosshair to create the control and adjust it to the
size you want.
-
Click the Parameters tab.
The Properties and settings dialog
box appears for the control.
-
Select Static as the Data type.
Static is selected by default.
-
Create the parameter values for the control:
-
Close the Properties and settings dialog box to create the control
with static values.
-
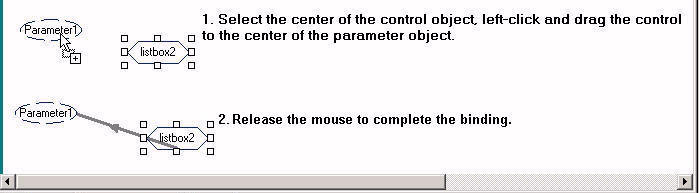
Bind the new control to a parameter: Select the center of the control
object, left-click and drag the control to the center of the parameter
object, and release the mouse to complete the binding.
The image below is an example of a
control that is bound to a parameter. Notice the direction of the
arrow.
-
To unbind the control, select the arrow head on the line, so
that the line is bold, right-click and select Break binding.
-
To change the default type of control, right-click the control object
on the Parameters tab or the Design tab and select Set
Control Type.
The options are Calendar, Check box,
Drop down list, Hidden, List box, Radio button, Text Area, Text
box, Single source Tree control, and Multi source Tree control.
-
To modify
the static value, right-click the control or parameter on the Parameters
tab, and select Properties and settings to
make your edits.
x
Reference: Adding Static Field Values From Report Painter
Instead of adding new static values, you may also import
static value parameters that you created from the Variable Editor.
Parameter values can be data values to limit your data or field
names to select the fields in your report. Both types of static
lists can be created in Report Painter. This example details how
to supply field values to a report through HTML Composer and Report
Painter.
For the purposes of this example,
use the CAR Master File (car.mas) that is supplied with Developer
Studio.
- From HTML
Composer, select New Report from the Insert
menu.
The cursor changes into a crosshair.
- Drag the crosshair
to create a report object and adjust it to the size you want.
- Right-click
the report object and select New Report.
The
Open dialog box appears.
- Select the car.mas Master
File and click Open.
Report Painter opens.
- From the Report
Painter Object Inspector, right-click Report Variables and select New
Report Variable Field.
The Variable Editor opens.
- Create a second
variable.
- Double-click &SORTVAR and &MEASURES from
the Report Variables in the Object Inspector.
The variables are
added to the report.
- Click &SORTVAR and
select By from the Columns toolbar.
Note: If the parameter is to be used as a
By field in a report, it must be the single-select variable type.
- Save and close
the report.
You are returned to HTML Composer. Since you are adding
a report with parameters, the New Parameters dialog box appears.
- From the New
Parameters dialog box:
- Select Double
list control from the Control Type list for MEASURES.
- Select Do
not create a form from the Parameter grouping options
drop-down list.
- Click OK to
close the New Parameters dialog box.
The
report and associated parameters are added as static field values.
You may rearrange or lengthen the controls in the layout.
- Save and run
the layout.
Select the static field values (By field and the associated
measures) and run the report.
x
Procedure: How to Add an Ignore Value
The add ignore value option sends _FOC_NULL to the server
at run time and is intended for use with complex applications. The
add ignore value option is available for Multiselect OR and Multiselect
AND static parameters.
-
From
HTML Composer, use controls to supply parameter values for a report.
A report with parameters
requires that you to select values (at run time) in order to generate
the output.
-
Click the Parameters tab.
The parameters associated with each control
can be controlled with the Parameters tab. The properties of a control
can be controlled with the Properties tab.
-
Select a multiselect control object from the Parameters tab.
The Properties and settings dialog box
opens.
-
Select Add
ignore value from the Static values drop-down list.
-
Optionally, select Send display value to
send the display value, rather than the actual data, for the parameter
values in the report.
-
Close the Properties and settings dialog box.
-
Run the
HTML page and select the Ignore All value
to ignore the parameter values.
Note: Sending _FOC_NULL to a procedure
will result in any clause of that procedure that uses that variable
to be ignored.
x
Procedure: How to Add an Everything Value
The add everything value option uses JavaScript to send
every value present in the parameter list to the server at run time.
The add everything value option is available for Multiselect OR
and Multiselect AND static parameters.
The add everything value option is not available for a Double
List Control.
-
From
HTML Composer, use controls to supply parameter values for a report.
-
Click
the Parameters tab.
-
Select a multiselect control object from the Parameters tab.
The Properties and settings dialog box
opens.
-
Select Add
everything value from the Static values drop-down list.
-
Optionally, select Send display value to
send the display value, rather than the actual data, for the parameter
values in the report.
-
Close the Properties and settings dialog box.
-
Run the
HTML page and click the Select All parameter
value to view all the parameter values.
x
Procedure: How to Use Values From a Procedure
This is the default option which populates the static list
with field names predefined in the procedure. The use values from
procedure option is available for Multiselect OR and Multiselect
AND static parameters, and when adding
static field values from Report Painter.
-
From
HTML Composer, use controls to supply parameter values for a report.
-
Click the Parameters tab.
-
Select a multiselect control object from the Parameters tab.
The Properties and settings dialog box
opens.
-
Select Use
values from procedure from the Static values drop-down
list.
The field names from the procedure appear
in the Properties and settings dialog box.
-
Optionally, select Send display value to
send the display value, rather than the actual data, for the parameter
values in the report.
-
Close the Properties and settings dialog box.
-
Run the
HTML page and select the parameter values from the procedure.
x
Procedure: How to Import Values From an External File
This option enables you to use a local external file to provide
values for the parameter. The import values from an external file
option is available for Multiselect OR and Multiselect AND static
parameters.
-
From
HTML Composer, use controls to supply parameter values for a report.
-
Click the Parameters tab.
-
Select a multiselect control object from the Parameters tab.
The Properties and settings dialog box
opens.
-
Select Use
values from external file from the Static values drop-down
list.
The Open dialog box appears.
-
Select
a text file from your local machine and click Open.
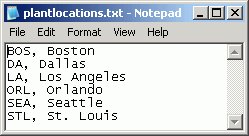
The external file can
be a comma-delimited file with single values on each line, or two
values per line.
For example, in the following
text file, BOS is the data value and Boston is
the display value.
The imported values are loaded
into the Static values area of the Parameters tab.
If there
is only one value on the line in the text file, the value will populate
both the data value and the display values.
-
Run the
HTML page to see the imported values for the selected parameter.
xCreating a Dynamic List of Values
Dynamic values are available by default if a parameter
used in the procedure is associated with the selected control. A
dynamic list retrieves values from a specified data source when
the request is run.
You may also create new dynamic
parameters by adding a filter to a report or graph component in
the layout. For details, see How to Create Dynamic Parameters by Adding a Filter.
x
Reference: Properties and Settings Dialog Box (Dynamic Values)
The Properties and settings dialog box appears when creating
or editing a dynamic parameter on the Parameters tab.
The following image is the Properties
and settings dialog box with a Dynamic Data type.
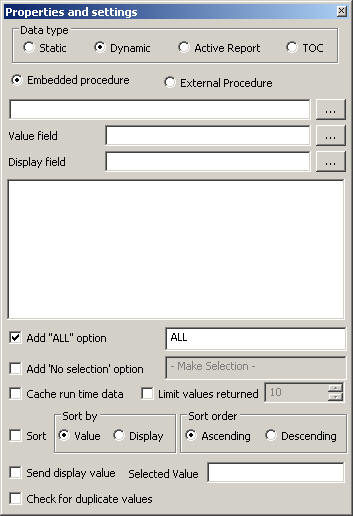
The Properties and settings dialog
box contains the following fields and options when Dynamic is selected
as the Data type:
-
Data type
-
Determines whether values are obtained
from a static or dynamic list, an active
report, or TOC.
Dynamic uses a list of values retrieved
from a selected data source when the request is executed. This is
the default if you use an Accept clause in a Master File to create
an amper variable parameter within a procedure. For more information, see How to Create a Dynamic Value.
-
Embedded procedure
-
Is the data source from which the values
will be retrieved.
-
External Procedure
-
Is the existing procedure that will be
called.
You may modify
the external procedure directly from the Properties and settings
dialog box on the Parameters tab. If you modify the request, you
can save the external procedure and overwrite the original request.
-
Value field
-
Is the data source field from which the
values will be retrieved.
-
Display field
-
Is the text that
represents the parameter value in the control the user views.
There should be a relationship
between the Value field and the Display field. The Display field
is user-friendly text corresponding to the Value field.
-
Source Code for the procedure
-
- When the
Value field is selected for an Embedded procedure, the corresponding
source code appears.
Tip: You may
manually edit the source code if you are familiar with WebFOCUS
syntax. For example, you may right-click and choose Select
a field from the data source to add to the request.
Or right-click and choose to Use the default request.
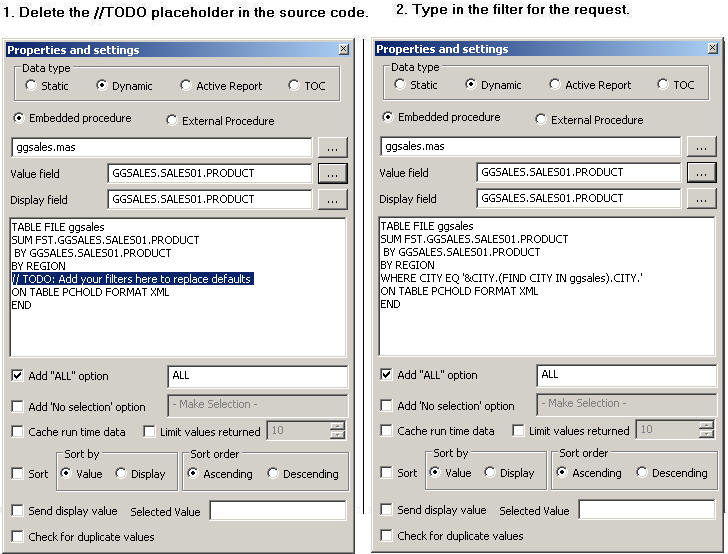
The source code
for an embedded procedure includes the line // TODO:
Add your filters here to replace defaults, as a placeholder
for you to enter filters, or WHERE clauses, for the request to resolve
at run time. If entering filters, only dynamic filters can be specified.
The //TODO line must remain in the source
code in order to resolve filters at run time. An example of this
is when filters are based on chains that have conditions. If you want
your own filters specified, then delete this line.
- When an external
procedure is selected, the corresponding source code appears.
Tip: You may manually edit the source
code if you are familiar with WebFOCUS syntax. For example, you
may right-click and choose Select a field from
the data source to add to the request. After editing the external
procedure that is associated with a control, right-click and choose Reload
external procedure to reload and display the new syntax in
the Properties and settings dialog box. Or right-click and choose
to Save external procedure. Saving the external
procedure overwrites the original requests.
-
Add "ALL" Option
-
Adds the option to select ALL data source
values to the control. Alternate text can be substituted for ALL
using the text field to the right. For more information, see Parameter Value List Options.
-
Add ‘No selection' option
-
Optimizes performance by populating a chain
one control at a time, instead of all the controls when the page
initially loads. Selecting the Add ‘No selection’ option enables
you to populate controls when necessary.
-
Cache run time data
-
When adding dynamic parameters to the HTML
page, input controls retrieve data through procedures. Select this
option to cache the run-time data for the selected input control.
This setting is off by default.
This setting overrides the Default caching option from
the HTML Page tab, which is located in the Developer Studio Options
dialog box. For more information about the HTML Page tab, see HTML Page Tab.
-
Limit values returned
-
Indicates that a specific number of field
values will be retrieved from the data source. The specific number
of fields is selected with the menu to the right.
-
Sort
-
Clicking Sort enables
you to set the sort order for displaying values in dynamic list
controls. This option is useful when you want to sort each control
independently of the others.
By default, the request retrieves dynamic display values
from the BY sort field in the request. The results display values
based on the value field.
-
Sort by
-
When Sort is enabled, you may sort the
display value by the Value field or the Display field selected from
the Properties and settings dialog box. The default is Value field.
-
Sort order
-
When Sort is enabled, you may select the
sort order as Ascending or Descending. The default sort order is
Ascending.
-
Send display value
-
Select this option to send the display
value, rather than the actual data, to the parameter. For more information,
see How to Send the Display Value for Static and Dynamic Controls.
-
Selected Value
-
Enter the value(s) to be selected as the
default value whenever the procedure is run. For more information,
see How to Use Selected Values as the Default Value.
-
Check for duplicate values
-
When creating a dynamic list of values
for a report, you may remove duplicate values from input controls.
For more information, see How to Check for Duplicate Values.
x
Reference: Properties and Settings Dialog Box (Bound Parameter)
The Properties and settings dialog box appears when selecting
a bound parameter on the Parameters tab.
The Properties and settings dialog box
for a parameter is read-only and displays the values for the bound
control.
The following
image is the Properties and settings dialog box that appears when selecting
a bound dynamic parameter.
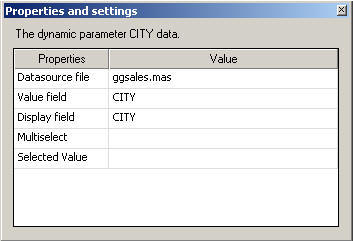
The Properties and settings dialog
box contains the following read-only values:
-
Datasource file
-
Shows the selected Master File for the
parameter data source.
-
Value field
-
Shows the value field for the dynamic parameter
data.
-
Display field
-
Shows the dynamic parameter display field.
-
Multiselect
-
Shows OR or AND, if there is a Multiselect
OR or Multiselect AND dynamic parameter.
-
Selected Value
-
Shows the selected value, if there is one
assigned to the variable.
x
Procedure: How to Create a Dynamic Value
The steps below describe how to create a dynamic list of
values.
You may need to create a dynamic
control that is bound to a parameter. Creating a control with dynamic
values and binding the control to a parameter will populate the
parameter with the control values.
-
From the Design view of HTML Composer, select a control from the
Controls sub menu of the Insert menu. For example, insert a list
box or drop-down list.
The cursor changes into a crosshair.
-
Drag the crosshair to create the control and adjust it to the
size you want.
-
Click the Parameters tab.
The Properties and settings dialog box opens.
-
Select Dynamic as the Data type.
The dynamic value options appear.
-
Create the dynamic values for the control.
-
If you are using an Embedded procedure to supply dynamic values,
follow the steps below.
- Select Embedded
procedure.
- Click the
Embedded procedure ellipsis button.
The Get source file dialog
box opens.
- Select the
Master File name and click Open.
- Click the
ellipsis button from the Value field.
The Object Inspector opens
with the field names from the selected Master File.
- Double-click
a field name to add it to the Value field.
Tip: You may also use the Object Inspector icons to select
a field and close the Object Inspector. The green icon is OK, the
red icon is Cancel, double-clicking a value will select the value
and close the dialog without using any button, and pressing the
Esc key will cancel the dialog without using any button.
The selected field is automatically added
to the Display field and the source code for the embedded procedure
appears.
- Optionally,
you may click the Display field ellipsis button to select a different field
name for the Display field.
- You may manually edit the source code
if you are familiar with WebFOCUS syntax. Right-click and choose Select
a field from the data source to add to the request.
For example, add an additional BY sort field to the request.

- To remove any syntax that you added, right-click
and select Use default request.
- The source code for an embedded procedure
includes the line // TODO: Add your filters here to replace
defaults, as a placeholder for you to enter filters,
or WHERE clauses, for the request to resolve at run time. If you
are entering filters, only dynamic filters can be specified. For
example, enter a filter for the CITY in the request.
The //TODO
line must remain in the source code in order to resolve filters
at run time. One example of this is when filters are based on chains
that have conditions. If you want your own filters specified, then
delete this line.
-
If you are using an External Procedure to supply dynamic values, follow
the steps below.
- Select External
Procedure.
- Click the
External Procedure ellipsis button.
The Get source file dialog
box opens.
- Select the
procedure (.fex) file name and click Open.
The
parameter names from the procedure are automatically added to the
Value field and Display field, and the source code for the external
procedure appears. For details, see Automatically Populating Fields With Dynamic Values.
- Optionally,
you may click the Value field and Display field ellipsis button
to select a different field name.
Tip: You
may also use the Object Inspector icons to select a field and close
the Object Inspector. The green icon is OK, the red icon is Cancel,
double-clicking a value will select the value and close the dialog
without using any button, and pressing the Esc key will cancel the
dialog without using any button.
Only the parameter names from the external
procedure will be available for selection.
- You may manually edit the source code
if you are familiar with WebFOCUS syntax. Additionally, you may
right-click and choose Select a field from
the data source to add to the request.
- If you modify the request that is associated
with a control, you can right-click and choose Reload
external procedure to reload and display the new syntax
in the Properties and settings dialog box. Or right-click and choose
to Save external procedure. Saving the external procedure
overwrites the original requests.

-
Optionally, select the Add "ALL" option to
add the select ALL data source values to the control.
-
Optionally,
select the Add 'No selection' option to optimize
performance by populating a chain one control at a time instead
of all the controls when the page initially loads.
-
Optionally, select the Cache run time data option
to cache the run time data for the selected input control.
-
Optionally,
select Limit values returned, and select
or type the number of field values you want to retrieve from the
data source in the box to the right of this option.
-
Optionally, click the Sort option to
enable and select the sort order options for displaying values in
dynamic list control.
-
Optionally,
select the Check for duplicate values option
to remove any duplicate value entries from the input control at
run time.
-
Close the Properties and settings dialog box to create the
control with dynamic values.
-
Bind the new control to a parameter. Select the center of the
control object, left-click and drag the control to the center of
the parameter object, and release the mouse to complete the binding.
The following image is an example of a
control that is bound to a parameter. Notice the direction of the
arrow.
-
To unbind the control, select the arrow head on the line, so
that the line is bold, right-click and select Break binding.
-
To change the default type of control, right-click the control
object on the Parameters tab or the Design tab and select Set
Control Type.
The options are Calendar, Check box, Drop
down list, Hidden, List box, Radio button, Text Area, Text box,
Single source Tree control, and Multi source Tree control.
-
To modify the dynamic value, right-click the control and select Properties
and settings to make your edits.
x
Procedure: How to Create Dynamic Parameters by Adding a Filter
You
may create new dynamic parameters by adding a filter to a report
or graph component in the layout.
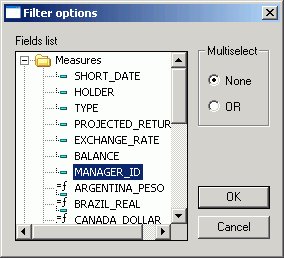
-
To create dynamic parameters for your report or graph in the Design
view, right-click the report or graph object and select Add
a filter from the context menu.
The Filter options dialog box opens.
-
Select the field to be used for the parameter, the Multiselect
option, and click OK.
The New Parameters dialog box
appears.
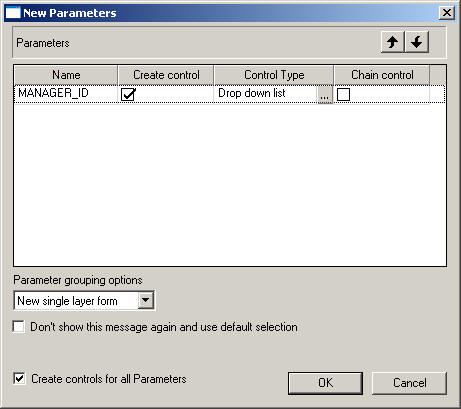
You may select
a control type for the parameter from this dialog box, or adjust
them later using the Properties and settings dialog box on the Parameters
tab.
If the New Parameters
dialog box does not appear, ensure that Show New Parameters
dialog is selected from the HTML Page tab. To access
the HTML Page tab, select Options from the
Window menu to open the Developer Studio Options dialog box. From
the Developer Studio Options dialog box, select the HTML Page tab.
-
Click OK to close the New Parameters
dialog box.
-
The filter appears above the report or graph object.
Repeat this procedure for each additional
parameter for the report or graph.
x
Procedure: How to Sort the Dynamic List of Values
This option is useful when you want to sort
each control independently of the others.
Note: If sort
options are not selected, the request retrieves dynamic display
values from the BY sort field in the request, and the results display
values based on the value field. Sort options are not selected by
default.
-
Select a dynamic control from the Parameters tab.
The Properties and settings dialog box
opens.
-
Select Sort to enable the sort options.
You may select the Sort by and Sort order
options for the control.
The following image are the sort
options that appear on the Properties and settings dialog box of
the Parameters tab, when a dynamic control is selected.

-
Select the Sort by options:
- Sort by Value
sorts the value by the field name from the Value field. This is
the default Sort by selection.
- Sort by Display
sorts the value by the field name from the Display field.
-
Select the Sort order options:
- Sort order
Ascending sorts the value from lowest to highest. This is the default
Sort order selection.
- Sort order
Descending sorts the value from highest to lowest.
-
Close the Properties and settings dialog box.
Tip: You
may repeat these steps and select sort options for each dynamic
control on the HTML page.
-
Run the HTML page to see the sort results.
x
Procedure: How to Check for Duplicate Values
When creating a dynamic list of values for a
report, you may remove duplicate values from input controls. This
is useful if you are using your own procedure that does not use
a structured data source.
The Check for duplicate values option is turned off
by default.
-
From HTML
Composer, create an input control with a dynamic list of values.
-
Select the
input control and click the Parameters tab.
The Properties and settings dialog box
opens for the input control.
-
Select the Check
for duplicate values check box.
The Check for duplicate values option is
only available when creating a dynamic list of values for an input
control.
-
Close the
Properties and settings dialog box to save your selection.
-
Save and
run the HTML page.
The input control removes duplicate
value entries.
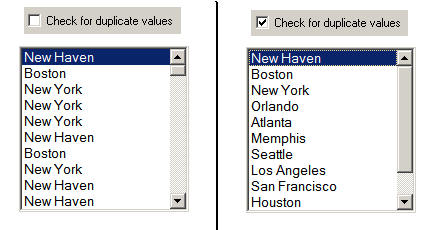
The following example shows
a list box with a list of city values. The
first list box shows the list of values with duplicate entries.
The second list box shows the list with duplicate values removed.
xUsing Custom Procedures to Retrieve Dynamic Values
You have the option to allow customized retrieval of
dynamic parameter values. By using a custom procedure, you can use
the FOCUS language to utilize temporary HOLD files, filtering, and
so on. This allows HTML Composer to better integrate with a multitude
of large and/or proprietary data sources that may require unique
retrieval methods. The procedure must meet the following criteria:
- The procedure
must return a name and value pair for each parameter value that
will populate the list. The first value is the submission value
which is passed to the control when you click the Submit button.
The second value is the display value which is what you will see
in the control. These two values can be the same or different.
- The procedure
must return the two data values on a single data line in XML format (PCHOLD
FORMAT XML).
Note: Different parameters in the same procedure
can use both this option and the data source method.
For chained controls, there are two options based on whether
caching is enabled:
- By default,
caching is not enabled. Each parameter control must be mapped to
its own procedure and the developer is responsible for writing filters
or WHERE criteria to properly filter the hierarchy of controls.
- If caching
is enabled for the parameter values, a single procedure can be used
to populate the controls of the chained variables. In this case,
HTML Composer writes the WHERE criteria.
For details about enabling caching options for chained controls,
see How to Enable Cache Processing for Chained Values.
Example: Retrieving Dynamic Parameter Values With One Value
The following example shows the same value being used
for the submission value and display value.
TABLE FILE GGSALES
PRINT DST.PRODUCT
BY PRODUCT
ON TABLE SET HOLDLIST PRINTONLY
ON TABLE PCHOLD FORMAT XML
END
The XML output is:
<?xml version="1.0" encoding="ISO-8859-1" ?>
- <fxf version="1.0" data="hold">
- <report records="4317" lines="10" columns="2" rows="10">
    <target format="" version="" type="" destination="HOLD" />
  - <column_desc>
      <col colnum="c0" fieldname="PRODUCT" alias="E01" datatype="char"
         width="16" focus_format="A16" description="Product name"
         accept="" help_message="" title="Product" within="" property=""
         reference="" valign="left" />
      <col colnum="c1" fieldname="PRODUCT" alias="E02" datatype="char"
         width="16" focus_format="A16" description="Product name"
         accept="" help_message="" title="Product" within="" property=""
         reference="" valign="left" />
    </column_desc>
  - <table>
    - <tr linetype="data" linenum="1">
        <td colnum="c0">Biscotti</td>
        <td colnum="c1">Biscotti</td>
      </tr>
    - <tr linetype="data" linenum="2">
        <td colnum="c0">Capuccino</td>
        <td colnum="c1">Capuccino</td>
      </tr>
    - <tr linetype="data" linenum="3">
        <td colnum="c0">Coffee Grinder</td>
        <td colnum="c1">Coffee Grinder</td>
      </tr>
    - <tr linetype="data" linenum="4">
        <td colnum="c0">Coffee Pot</td>
        <td colnum="c1">Coffee Pot</td>
      </tr>
Example: Retrieving Dynamic Parameter Values With Two Values
The following example shows two different field values
being used for the submission value and display value. In this case,
PRODUCT (Product Description) is used for the display value and
PCD (Product Code) is used as the submission value.
TABLE FILE GGSALES
PRINT DST.PRODUCT
BY PCD
ON TABLE SET HOLDLIST PRINTONLY
ON TABLE PCHOLD FORMAT XML
END
The XML output is:
<?xml version="1.0" encoding="ISO-8859-1" ?>
- <fxf version="1.0" data="hold">
  - <report records="4317" lines="10" columns="2" rows="10">
     <target format="" version="" type="" destination="HOLD" />
      - <column_desc>
        <col colnum="c0" fieldname="PCD" alias="E01" datatype="char"
           width="4" focus_format="A04"
            description="Product Identification code (for sale)" accept=""
           help_message="" title="Product ID" within=""
           property="" reference="" valign="left" />
        <col colnum="c1" fieldname="PRODUCT" alias="E02" datatype="char"
           width="16" focus_format="A16"
           description="Product name" accept="" help_message=""
           title="Product" within="" property="" reference=""
            valign="left" />
        </column_desc>
     - <table>
       - <tr linetype="data" linenum="1">
           <td colnum="c0">C141</td>
           <td colnum="c1">Espresso</td>
         </tr>
       - <tr linetype="data" linenum="2">
           <td colnum="c0">C142</td>
           <td colnum="c1">Latte</td>
         </tr>
       - <tr linetype="data" linenum="3">
           <td colnum="c0">C144</td>
           <td colnum="c1">Capuccino</td>
         </tr>
Note: The
procedure does not have to follow this FOCUS syntax exactly, but
the end result must be two values per data line in XML format.
Example: Retrieving Values for Chained Variables With Caching Disabled
In the following procedures, there are three parameters
(REGION, ST, CITY). Caching is disabled, so each parameter control
must be mapped to its own procedures.
Procedure 1 (REGION)
TABLE FILE GGSALES
PRINT DST.REGION
BY REGION
ON TABLE SET HOLDLIST PRINTONLY
ON TABLE PCHOLD FORMAT XML
END
Procedure 2 (ST)
TABLE FILE GGSALES
PRINT DST.ST
BY ST WHERE REGION EQ '®ION';
ON TABLE SET HOLDLIST PRINTONLY
ON TABLE PCHOLD FORMAT XML
END
Procedure 3 (CITY)
TABLE FILE GGSALES
PRINT DST.CITY
BY CITY WHERE REGION EQ '®ION'; WHERE ST EQ '&ST';
ON TABLE SET HOLDLIST PRINTONLY
ON TABLE PCHOLD FORMAT XML
END
Example: Retrieving Chained Variable Values With Caching Enabled
In the following example, caching is enabled, so a single
procedure is used to populate the controls. For details about caching
options, see How to Enable Cache Processing for Chained Values.
TABLE FILE GGSALES
PRINT DST.REGION DST.ST DST.CITY
BY REGION
BY ST
BY CITY
ON TABLE SET HOLDLIST PRINTONLY
ON TABLE PCHOLD FORMAT XML
END
The XML output is:
- <table>
 - <tr linetype="data" linenum="1">
     <td colnum="c0">Midwest</td>
     <td colnum="c1">IL</td>
     <td colnum="c2">Chicago</td>
     <td colnum="c3">Midwest</td>
     <td colnum="c4">IL</td>
     <td colnum="c5">Chicago</td>
   </tr>
xAutomatically Populating Fields With Dynamic Values
When the name of a dynamic parameter matches a corresponding
field name in a data source, HTML Composer automatically populates
the field name values for the parameter.
The data source is populated by a default based on the first
data source specified by a TABLE FILE or GRAPH FILE
command. The data source field is populated for the Value and
Display fields in the Properties and settings dialog box of the
Parameters tab (when Dynamic is selected as the Data type). This generates
a layout report that is ready to run as long as the parameter names
match the field names.
Example: Automatically Populating Fields With Dynamic Parameter Values
When the following report request is called from HTML
Composer with a push button control, the Properties and settings
dialog box for the PRODUCT parameter on the Parameters tab is automatically
populated to dynamically retrieve the values of the PRODUCT field.
TABLE FILE GGSALES
SUM UNITS
BY PRODUCT WHERE ( PRODUCT EQ '&PRODUCT.Product:.' );
END
xParameter Value List Options
When creating a static or dynamic list of values, you
may add an ALL value to the list of values and/or send the display
value in a parameter.
The ALL feature allows developers to
automatically add an ALL value to a list of values. An ALL value
does the following:
- For dynamic
parameters, the ALL feature sends a value of FOC_NONE to the reporting
server alerting the server to bypass or ignore the parameter altogether. Ignoring
the parameter would return all values in the data source.
- With static parameters, the ALL value
typically uses JavaScript to return all of the values displayed
in the list. This prevents you from having to select every value
in the list manually. When using the ALL feature with static parameters,
you can select from the following options:
-
Add ignore value. This
option sends FOC_NONE to the server at run time, alerting the server
to bypass or ignore the parameter altogether. It is intended for
complex applications.
-
Add everything value. This
option uses JavaScript to send every value present in the control
list to the server at run time. The Add everything value option
is only available with a Multiselect OR variable type.
When using a Dynamic or active report Data type, you may enter
the value(s) to be selected as the default value whenever the procedure
is run. For more information, see How to Use Selected Values as the Default Value.
Note: You may also enter the selected value
when adding a new unbound parameter on the Parameters tab. For more
information, see Adding a New Unbound Parameter.
x
Procedure: How to Send the Display Value for Static and Dynamic Controls
From HTML Composer, you may send the display value, rather
than the actual data, to the parameter. The display value can also
be used for headings and footings in the report output.
The Send display value option
appears when creating an incoming static parameter (a parameter
that is bound to a control), or an unbound control (a control that
is not bound to a parameter). It is not available when creating
an unbound static parameter.
-
From
HTML Composer, import or create a
report that contains a parameter.
When importing a report with parameters,
the New Parameters dialog box appears prompting you to create the
control type.
The report and control type is added to
HTML Composer.
-
To send
the display value for the parameter selection, select the control object
(for example, select listboxn) in the Design view and click
the Parameters tab.
The Properties and settings dialog box
opens.
Note: The
options available in the Properties and settings dialog box vary,
depending on the type of values (static or dynamic) you are creating.
-
For
a static list of values, the Value, Display, and Selected columns appear
on the Properties and settings dialog box.
- In the Display
column, enter the text that represents the parameter value that
the user views.
Repeat this step until the list contains all of
the values you want to include.
- Select Send
display value.
Tip: You
may also update the display values from the Variable Editor in Report
Painter.
- Optionally,
you may select values and click the Delete button
to eliminate any values, and use the up and down arrows to rearrange
the order of the values.
- Close the
Properties and settings dialog box.
For more information about
static values, see Creating a Static List of Values.
- Click the Design tab
to view the display values in the control object of HTML Composer.
-
For
a dynamic list of values, the Value field and the Display field
appear on the Properties and settings dialog box.
Sending the display
value for Dynamic values is only applicable if you are using a Data
source that contains both an internal data value and a field that
the internal data value maps to for display purposes.
-
If using an Embedded procedure to supply dynamic values, follow
the steps below.
- Select Embedded
procedure.
- Click the
Embedded procedure ellipsis button.
The Get source file dialog
box opens.
- Select the
Master File name and click Open.
- Click the
ellipsis button from the Value field.
The Object Inspector opens
with the field names from the selected Master File.
- Double-click
a field name to add it to the Value field.
The selected field
is automatically added to the Display field and the source code for
the embedded procedure appears.
- Optionally,
you may click the Display field ellipsis button to select a different field
name for the Display field.
- Optionally,
select Add "ALL" option to automatically add
an ALL value to a list of parameter values.
- Optionally, select Add
'No selection' option to optimize performance by populating
a chain one control at a time instead of all the controls when the
page initially loads.
- Ensure that Send
display value is checked.
Send display value is selected by default.
-
If using an External Procedure to supply dynamic values, follow the
steps below.
- Select External
Procedure.
- Click the
External Procedure ellipsis button.
The Get source file dialog
box opens.
- Select the
procedure (.fex) file name and click Open.
The
parameter names from the procedure are automatically added to the
Value and Display field, and the source code for the external procedure
appears.
- Optionally,
you may click the Value field and Display field ellipsis button
to select a different field name.
Note: Only
the parameter names from the external procedure will be available
for selection.
- Optionally,
select Add "ALL" option to automatically add
an ALL value to a list of parameter values.
- Optionally, select Add
'No selection' option to optimize performance by populating
a chain one control at a time, instead of all the controls when
the page initially loads.
- Ensure that Send
display value is checked.
Send display value is selected by default.
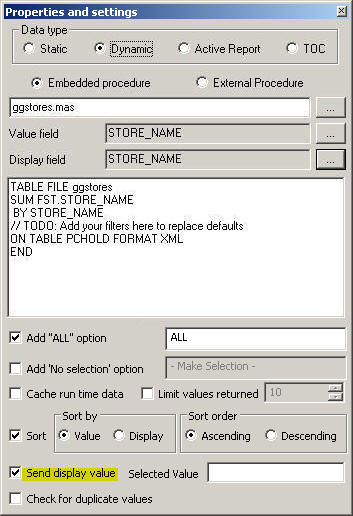
The following image is an example of the Properties
and settings dialog box with Send display value selected for a dynamic
value.
Tip: For
details about the //TODO line in the source code, see Creating a Dynamic List of Values.
- Close the
Properties and settings dialog box.
For more information about
dynamic values, see Creating a Dynamic List of Values.
- Click the Design tab
to view the display values in the control object of HTML Composer.
-
Optionally, you may add a heading
to the report to show the display value. Double-click the report
from HTML Composer to open and edit the report.
The report opens in Report Painter.
-
Manually add &Variable_TEXT to
the report heading or footing.
Note: If the report procedure uses
it, &Variable_TEXT will always be passed,
regardless of if Send display value is selected.
For example, the image below shows the
heading as Display Value: &STCD_TEXT, where Store Code (STCD)
is the variable name.
Tip: This is
different from adding the actual value from the data source, where
clicking the variable name would add <STCD to the report heading.
-
Save and close the report to return
to HTML Composer.
When you create the
Text variable (&Variable_TEXT), you are
not prompted to set a control type for this variable when returning
to HTML Composer, as no control type is needed.
-
Run
the HTML page.
-
Select
the parameter for the report and run the report.
The display value is shown in the report
heading.
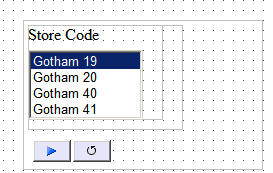
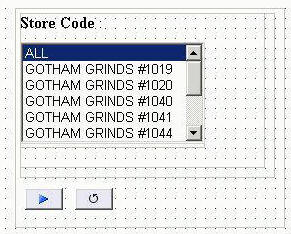
For example, in the image below,
Gotham 40 is selected as the Store Code and shows the display value
in the report heading. The actual value, R1040, is shown in the Store
ID column.
Note: HTML Composer passes &var_TEXT
if the report procedure uses it, regardless of whether the send
display value check box is checked or unchecked.
x
Procedure: How to Use Procedure Names as Values
The
Values are procedures names option lets you populate a control with
procedure names. When that procedure name is clicked, the procedure executes.
-
Create an
HTML page that contains a listbox, a push button, and a report.
Note: In this procedure a list box is used. However,
the following controls are also able to use the Values as procedures
names option: double list, drop-down, radio button, and check box.
-
Select the
list box to bring up the Properties and settings dialog box.
Note: If the Properties and settings dialog box
does not open, select View and click Properties
and settings.
-
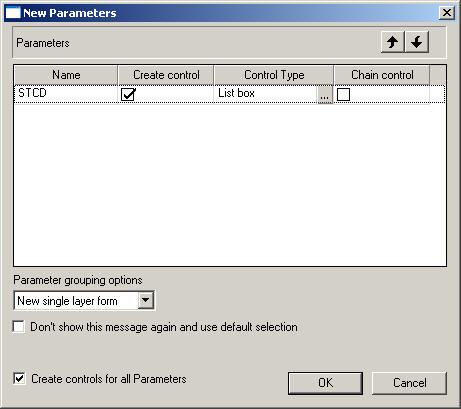
Select Static as
the Data type.
-
At the bottom
of the Properties and settings dialog box, select Values
are procedures names, as shown in the following image.
-
Click the New button
and select procedures from your directory, as shown in the following
image.
Note: You
can add multiple procedure names to the Properties and settings
dialog box by multiselecting procedures while in the Get source
file dialog box.
-
Once the
procedures has been added to the Properties and settings dialog
box, edit the display name of the procedures value by double clicking
the display contents if they are not highlighted already.
The following image shows the procedure values with new
display names.
-
Right-click
the button you created and click Create Hyperlink.
The Hyperlink Properties dialog box opens.
-
Create a
hyperlink that opens a selected procedure from a control in the report
frame created earlier.
-
For the Action, select Procedures from control from
the drop-down list.
This option coincides with the Values are procedures names
option found in the Properties and settings dialog box. This option
will point to an entire procedure for the hyperlink, rather than
a simple value. This option is only available when a control on
the HTML Page is using the Values are procedures names option.
-
Select listbox1 as the Source.
The source can be different if you use a different control.
For example, combobox1, customselect1, radio1, or checkbox1.
-
Select Frame as the Target Type.
You could also select New Window as
the target if you wanted the procedure to open in a new window.
-
Select report1 as the Target/Template Name.
The created hyperlink is shown in the following image.
-
Run the
page.
-
Select the
procedure from the listbox and click the button.
The report is run, as shown in the following image.
x
Procedure: How to Use Selected Values as the Default Value
When using a Dynamic or active report Data type, you may
enter the value(s) to be selected as the default value whenever
the procedure is run.
If you import a procedure
(.fex) that has a dynamic prompt value, then the input box is populated
with values retrieved from the data source. If the selected value
is available in the data source, the value(s) are selected by default.
If the selected value is not available in the data source, then
the value(s) that you entered are ignored and the first value retrieved
from the data source is selected.
-
From HTML Composer, import or create a
report that contains a parameter.
When importing a report with parameters,
the New Parameters dialog box appears prompting you to create the
control type.
The report and control type is added to
HTML Composer.
-
To enter the selected value to be used as the default value,
select the control object (for example, select listboxn)
in the Design view and click the Parameters tab.
The Properties and settings dialog box
opens.
Note: The
options available in the Properties and settings dialog box vary,
depending on the type of values (static or dynamic) you are creating.
-
For a dynamic list of values, the Value field and the Display
field appear on the Properties and settings dialog box.
-
If using an Embedded procedure to supply dynamic values, follow
the steps below.
- Select Embedded
procedure.
- Click the
Embedded procedure ellipsis button.
The Get source file dialog
box opens.
- Select the
Master File name and click Open.
- Click the
ellipsis button from the Value field.
The Object Inspector opens
with the field names from the selected Master File.
- Double-click
a field name to add it to the Value field.
The selected field
is automatically added to the Display field and the source code for
the embedded procedure appears.
- Optionally,
you may click the Display field ellipsis button to select a different field
name for the Display field.
- Optionally,
select Add "ALL" option to automatically add
an ALL value to a list of parameter values.
- Optionally, select Add
'No selection' option to optimize performance by populating
a chain one control at a time, instead of all the controls when
the page initially loads.
- Enter the
exact parameter value in the Selected Value input field, as it appears in
the data source.
Parameter values are
case-sensitive.
- Optionally,
you may enter more than one value by using a semicolon between the
values. For example, CA;GA.
You may enter
selected values with a semicolon (;) or a comma (,). Additionally, you
may also have embedded commas or semicolons in the data values.
If you have these embedded characters, you must enclose all of the
values in the input area in double quotation marks (" "). For example:
ENGLAND;ITALY
ENGLAND,ITALY
"ENGLAND","IT,ALY"
Note that even though one value in the
last set has the embedded comma, both values need to be enclosed
in double quotation marks.
- Close the
Properties and settings dialog box.
-
If using an External Procedure to supply dynamic values, follow the
steps below.
- Select External
Procedure.
- Click the
External Procedure ellipsis button.
The Get source file dialog
box opens.
- Select the
procedure (.fex) file name and click Open.
The
parameter names from the procedure are automatically added to the
Value field and Display field, and the source code for the external
procedure appears.
- Optionally,
you may click the Value field and Display field ellipsis button
to select a different field name.
Note: Only
the parameter names from the external procedure will be available
for selection.
- Optionally,
select the Add "ALL" option to automatically
add an ALL value to a list of parameter values.
- Enter the
exact parameter value in the Selected Value input field, as it appears in
the data source.
Parameter values are
case-sensitive.
- Optionally,
you may enter more than one value by using a semicolon (;) between
the values. For example, CA;GA.
You may
enter selected values with a semicolon (;) or a comma (,). Additionally, you
may also have embedded commas or semicolons in the data values.
If you have these embedded characters, you must enclose all of the
values in the input area in double quotation marks (" "). For example:
ENGLAND;ITALY
ENGLAND,ITALY
"ENGLAND","IT,ALY"
Note that even though one value in the
last set has the embedded comma, both values need to be enclosed
in double quotation marks.
- Close the
Properties and settings dialog box.
For more information about
dynamic values, see Creating a Dynamic List of Values.
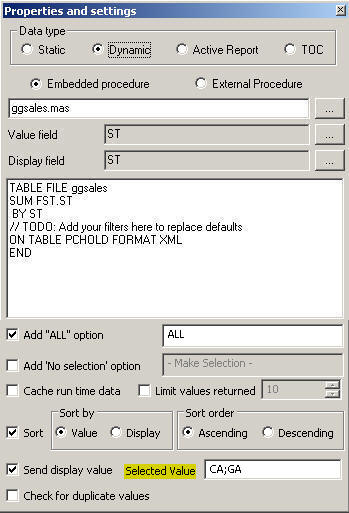
The following image is an example
of the Dynamic Data type Properties and settings dialog box, with
parameter values in the Selected Value field.
-
For an active report list of values, the Available active reports,
Menu Option Types, and Common Columns appear on the Properties and
settings dialog box.
- Select one
or more active reports from the list of Available active reports. The
selected report will be bound to the active report control in the
layout.
When an active report is selected, Refresh for active
reports is enabled by default.
- Select the
Menu Options Types for the active report control to sort, filter,
list or select columns. You can also change presentation styles
of the bound active report and the associated report and graph objects
synchronized to the active report.
- Optionally,
select the Add "ALL" option to automatically
add an ALL value to a list of parameter values.
- Enter the
exact parameter value in the Selected Value input field, as it appears in
the data source.
Parameter values are case-sensitive.
- Optionally,
you may enter more than one value by using a semicolon between the
values. For example, CA;GA.
You may enter selected values with a semicolon (;) or
a comma (,). Additionally, you may also have embedded commas or
semicolons in the data values. If you have these embedded characters,
you must enclose all of the values in the input area in double quotation
marks. For example:
ENGLAND;ITALY
ENGLAND,ITALY
"ENGLAND","IT,ALY"
Note that even though one value in the last
set has the embedded comma, both values need to be enclosed in double
quotation marks (" ").
- Close the
Properties and settings dialog box.
For more information about
active report values, see Creating Active Technologies Dashboards With HTML Composer.
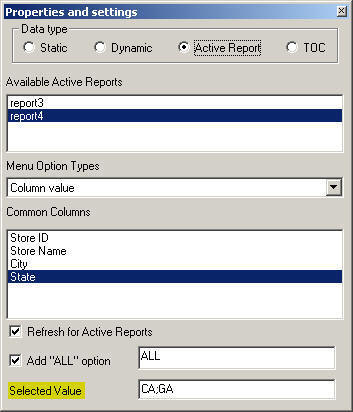
The following image
is an example of the active report Data type Properties and settings
dialog box, with parameter values in the Selected Value field.
-
For a single-select unbound parameter, the Selected Value input
field appears on the Properties and settings dialog box.
- Enter the
exact parameter value in the Selected Value input field, as it appears
in the data source.
Parameter values are
case-sensitive.
- Optionally,
you may enter more than one value by using a semicolon between the
values. For example, CA;GA.
You may enter
selected values with a semicolon (;) or a comma (,). Additionally, you
may also have embedded commas or semicolons in the data values.
If you have these embedded characters, you must enclose all of the
values in the input area in double quotation marks (" "). For example:
ENGLAND;ITALY
ENGLAND,ITALY
"ENGLAND","IT,ALY"
Note
that even though one value in the last set has the embedded comma,
both values need to be enclosed in double quotation marks.
- Close the
Properties and settings dialog box.
For more information about
single-select parameters, see Adding a New Unbound Parameter.
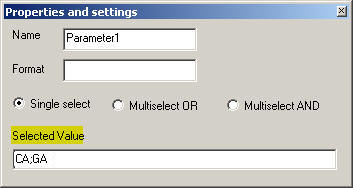
The following image is an example of the Single
select parameter Properties and settings dialog box, with parameter
values in the Selected Value field.
Even though it is a Single select parameter, multiple
values are specified and selected.
-
Run the
report.
The selected value, if available from the
data source, is automatically selected (highlighted) in the parameter
list.
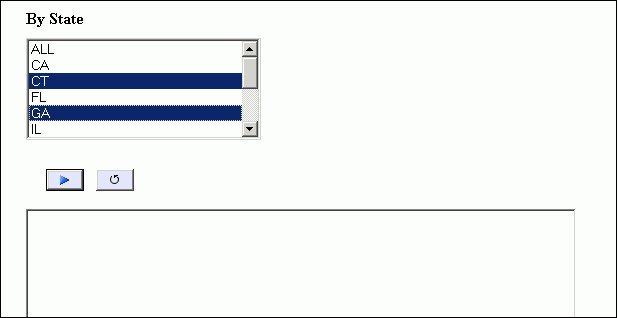
The example below shows CT, GA as the
selected values in the State parameter list in the report output.
-
Click
the Run button to run the report with the selected
value parameters.
The report output appears.
If the selected value is not available
in the report results, then the value that you entered is ignored
and the first value retrieved from the data source is shown.