ReportCaster Enhancements
ReportCaster is a scheduling and distribution application that
centralizes the execution and distribution of WebFOCUS reports,
the contents of URLs, and files. ReportCaster supports multiple
administrators and provides a single point of control for managing information
distribution within an organization.
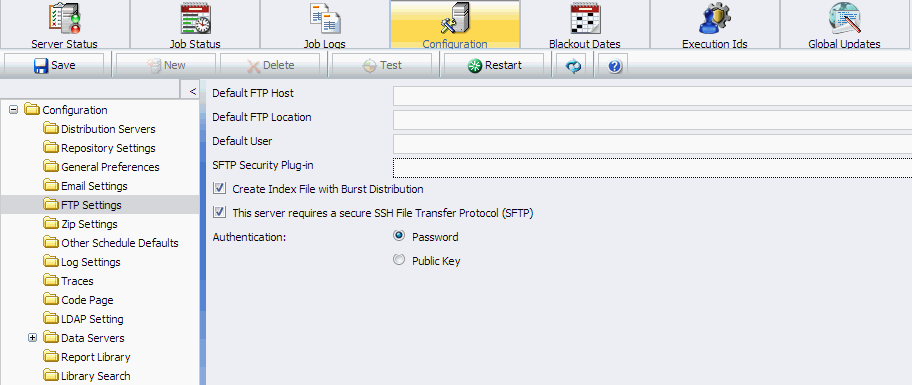
xEnhancement to FTP Server Settings
As of Release 8.0 Version 06, when configuring default
FTP server information in the ReportCaster Configuration tool, you
can specify that the FTP server requires a secure SSH File Transfer
Protocol (SFTP). When this setting is checked in the Configuration
tool, as shown in the following image, the setting will be checked
by default in the schedule tools.
xOverriding the Format Specified in the Procedure
As of Release 8.0 Version 04, users are no longer required to
specify a format when scheduling a procedure. If a format is not
specified in the schedule, the report output will be distributed
in the format specified by the PCHOLD statement in the procedure
or in the default online format (normally HTML). When scheduling
a Graph procedure (.fex) that contains a PCHOLD statement that uses
JPEG, GIF, PNG, or SVG, if you do not select a format in the schedule,
the output will be distributed in PNG format. If you require that
the output be distributed as a JPEG, GIF, or SVG file, specify that
format in the schedule. To do so, you can select the Override
the Format Specified in the Procedure check box on the
Task tab of the Basic Scheduling tool to specify a format other
than the one specified in the procedure. You can also make this
specification on the General tab of the Task dialog box in the Advanced
Scheduling tool, as shown in the following image.

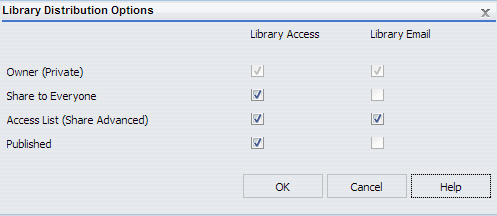
xAddition to Available Library Distribution Options
As of ReportCaster Release 8.0 Version 04, you can now select Published when
specifying Library Distribution Options in the ReportCaster Configuration tool.
Library Distribution Options enable you to select the Library Access
options and Email for Library options available to users in the
Basic Scheduling Tool and Advanced Scheduling Tool when distributing
scheduled output to the Report Library.
The following image shows the default settings for the ReportCaster
Library Distribution Options.
x
Procedure: How to Restrict Library Distribution Options
-
In the ReportCaster Configuration tab,
select the Report Library folder.
-
Click the icon to the right of the Library Distribution
Options field.
The Library Distribution Options dialog
box opens, as shown in the following image. By default, all options
are selected.
-
The following
Library Distribution Options are available.
Library Access. Designates
the options that appear in the Access Type drop-down menu in the
Basic Scheduling tool. Available options are:
-
Owner (Private). When selected,
the Owner (Private) option appears.
-
Share to Everyone. When selected,
the Share to Everyone option appears.
-
Access List (Share Advanced). When
selected, the Access List (Share Advanced) option appears.
-
Published. When selected, the Published
option appears.
Library Email. Designates who has access to the email notification
option, Send an Email after report procedure (FEX) saved to Library,
in the Basic Scheduling tool. Available options are:
-
Owner (Private). When
selected, the email notification option is available when the Access
Type, Owner (Private) is selected.
-
Share to Everyone. Disabled. Library
email notification is not available when the Access Type, Share
to Everyone is selected.
-
Access List (Share Advanced). When
selected, the email notification option is available when the Access
Type, Access List (Share Advanced) is selected.
-
Published. Disabled. Library email
notification is not available when the Access Type, Published is
selected.
Note: The
Library Email option is available only when the corresponding Library
Access option is selected.
-
Click OK to save the changes and
exit the Library Distribution Options dialog box. You can also click Cancel to
cancel the changes and exit the dialog box.
xUpdates to Email and FTP Distribution of HTML Reports
As of ReportCaster Release 8.0 Version 04, a new setting has
been added to the ReportCaster Configuration tool that enables the
use of a fully qualified FOCEXURL and FOCHTMLURL with Email and
FTP distribution. Specifically, when distributing HTML reports by
FTP or email, the scheduled report (.fex) must set a fully qualified
FOCEXURL and FOCHTMLURL for the report styling options defined below.
These reference the JavaScript components located on the web or
application server where the Client is configured. The Distribution
server will set a fully qualified FOCEXURL and FOCHTMLURL for FTP
distribution using the host name and port provided at installation
time. This can be overridden by setting these values in the scheduled
procedure. For example:
SET FOCEXURL='hostname:port/ibi_apps/'
SET FOCHTMLURL='hostname:port/ibi_apps/ibi_html'
Styling options include:
- Accordion reports
- Table of Contents (TOC) reports
- Peer Graphics/Data Visualization graphical reporting
- Multi-drill reports
- HFREEZE options
For more information, see the Developing
Reporting Applications manual.
xUniversal Profile Setting
As of ReportCaster Release 8.0 Version 04, you can now
specify that certain commands are to be run prior to the execution
of a scheduled job by using the Universal Profile setting in the
WebFOCUS Administration Console. For more information, see the WebFOCUS
Security and Administration manual.
xScheduling a Library Report as Published
ReportCaster has
been updated to allow you to schedule a library report as published.
You can also specify Private, Shared, or Shared with, as shown in
the following image.
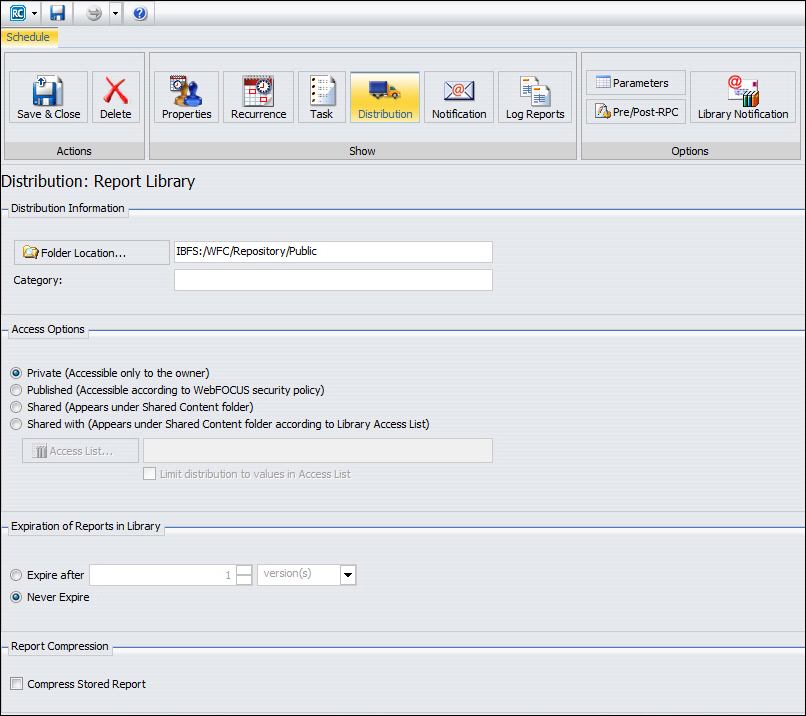
The following terms define the options available to you for scheduling
a library report, the labels for which have been modified.
-
Private (Accessible only to the owner). Only the
Owner of the schedule is authorized to access the Library report.
This is the default value.
-
Published (Accessible according to WebFOCUS security policy). All users
that are authorized to view the Library report in the folder location
it is stored in can access the report. The destination folder of
the Library Report must be a published folder and the schedule owner
must be authorized to publish content in this folder.
-
Shared (Appears under Shared Content Folder). All users
that are authorized to view the Library report in the folder location
it is stored in can access the report. The report appears under
a Shared Content folder.
-
Shared with (Appears under Shared Content folder according to Library Access List). Only
the groups or users defined in the Access List, and the owner of
the schedule, are authorized to access the report. The report appears
under a Shared Content folder.
Note: When the Access Option of an existing schedule is
changed, it will be applied to all versions of the private Library
report the next time a new version is distributed. Access options
specified in the Library schedule are not applied to published Library Reports.
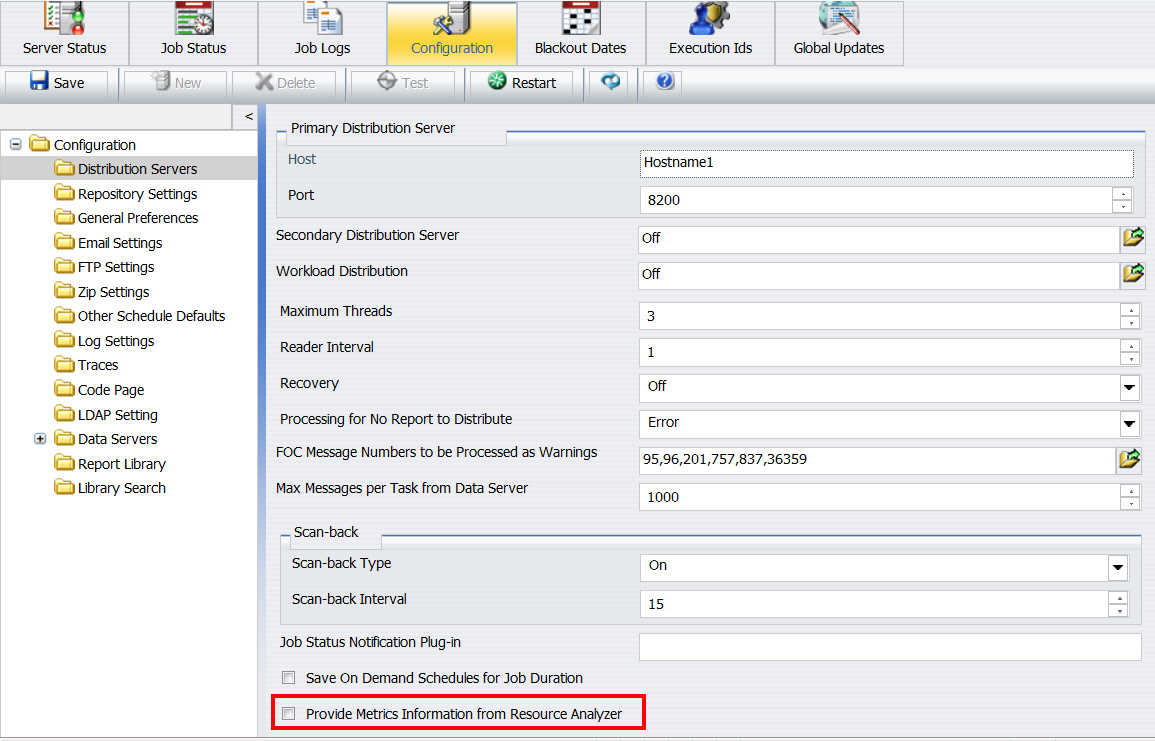
xCollection of DBMS Statistics
ReportCaster can
collect DBMS statistics from a Reporting Server that is running
Resource Analyzer and display the DBMS information in the schedule
log. To enable this feature, check the Provide Metrics Information
from Resource Analyzer check box on the Distribution Server Settings
dialog box, as shown in the following image.
xIntegration With WebFOCUS Client Security
ReportCaster is fully integrated with the WebFOCUS 8
Client Security Authorization implementation. Users, Groups, Schedules,
Distribution Lists, Access Lists, and Library Reports are stored
in the WebFOCUS Repository. Administration of group or user authorization
to access ReportCaster tools is controlled by the WebFOCUS Client
Security Authorization.
xAbility to Designate a Group Administrator
A user can be given the ability to manage the private
Schedules, Distribution Lists, and Access Lists of other users.
xSharing of Schedules, Distribution Lists, and Access Lists
Users can share Schedules, Distribution Lists, and
Access Lists with other groups and users they are authorized to
share with.
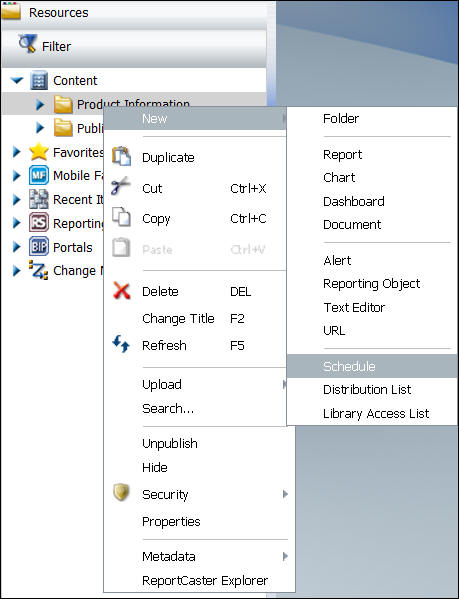
xAccess to ReportCaster Items From the Content Tree
ReportCaster items (Schedules, Distribution Lists, Access
Lists, and Library Reports) and tools are accessible from the tree,
which provides a single interface point of access to both Managed
Reporting and ReportCaster content and tools.
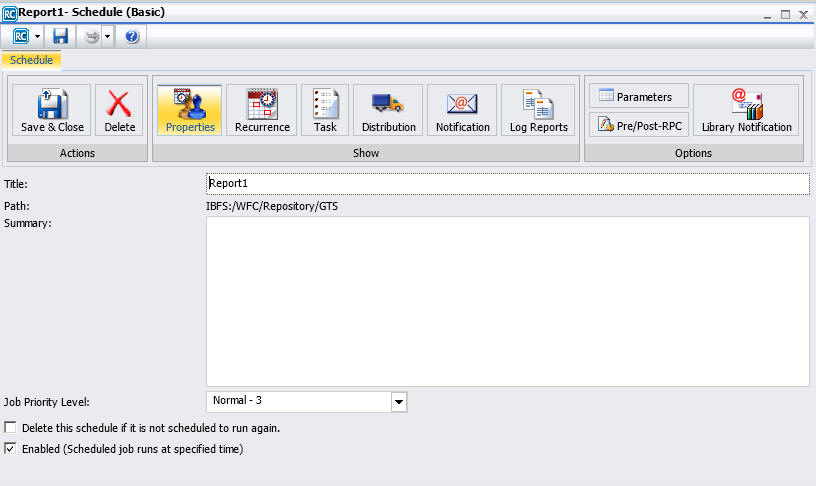
xTools With a Ribbon Look and Feel
The ReportCaster tools to create Schedules, Distribution
Lists, and Access Lists have been implemented as Rich Internet Applications
with a ribbon interface for ease of use and consistency with the
InfoAssist reporting tool, as shown in the following image.
xSubfolders in the Report Library
Report Library reports are stored in the WebFOCUS Repository,
which supports multiple folder levels. Library reports can be accessed
from a tree structure from the Business Intelligence Portal, Dashboard,
or Developer Studio Repository component. The ReportCaster Explorer
interface also provides a tree filtered by ReportCaster item type, which
includes Library and Watch List report filter options.
xBurst Support for Excel 2007 and 2010 Workbooks (XLSX)
The Burst Report option is supported for EXL07
- Excel 2007 (*.xlsx) format and requires the Release 7.7 Version
04 or higher Reporting Server. The burst feature enables you to
instruct the Reporting Server to create the report in sections so
that the sections can be distributed separately to different recipients
or locations.
x
You
can save a Library report to your machine using the Save
As context menu option that is available when a Library
report is selected from the Report Library Versions dialog box or
the ReportCaster Explorer tree. The Save As context
menu option downloads the Library report file to your machine. When the
file is downloaded, the Windows File Download dialog box displays,
with options to open, save, or cancel the file download. The following
image shows the file download for a PDF format Library report.
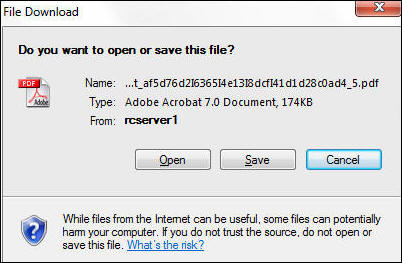
The Name value displayed in the Windows File Download dialog
box is the Library report name assigned when the report was distributed
to the Report library. You can change the Name value and select
the location in which to save the Library report in the Windows
Save dialog box that displays when the File Download Save option
is selected.
x
Procedure: How to Perform a Save As on a Library Report in the Business Intelligence Portal
-
From the BI Portal tree, select the
Library report that you want to save to your machine.
-
Right-click the Library report and select View, then Versions.
-
In the Report Library Versions dialog box, right-click
the Library report version you want to save and select Save
As.
The Windows File Download dialog box displays.
-
Click Save.
The Windows Save dialog box displays, from which you can
save the Library report to your machine.
x
Procedure: How to Perform a Save As on a Library Report in the ReportCaster Explorer
-
Open the ReportCaster Explorer.
-
From the toolbar, click the Change your filter button
and select Library Report.
Note: You can also select Watch List if you
have previously subscribed the Library report to your Watch List.
-
Select the folder in which the Library report is located
or select a folder on the path to the Library report and select
the List files in selected folder and subfolders toolbar
option.
-
In the right pane, select the Library report you want
to save to your machine.
The versions of the Library report list in the pane below
the Library report list.
-
Right-click the report version you want to save to your
machine and click Save As, as shown in the
following image.
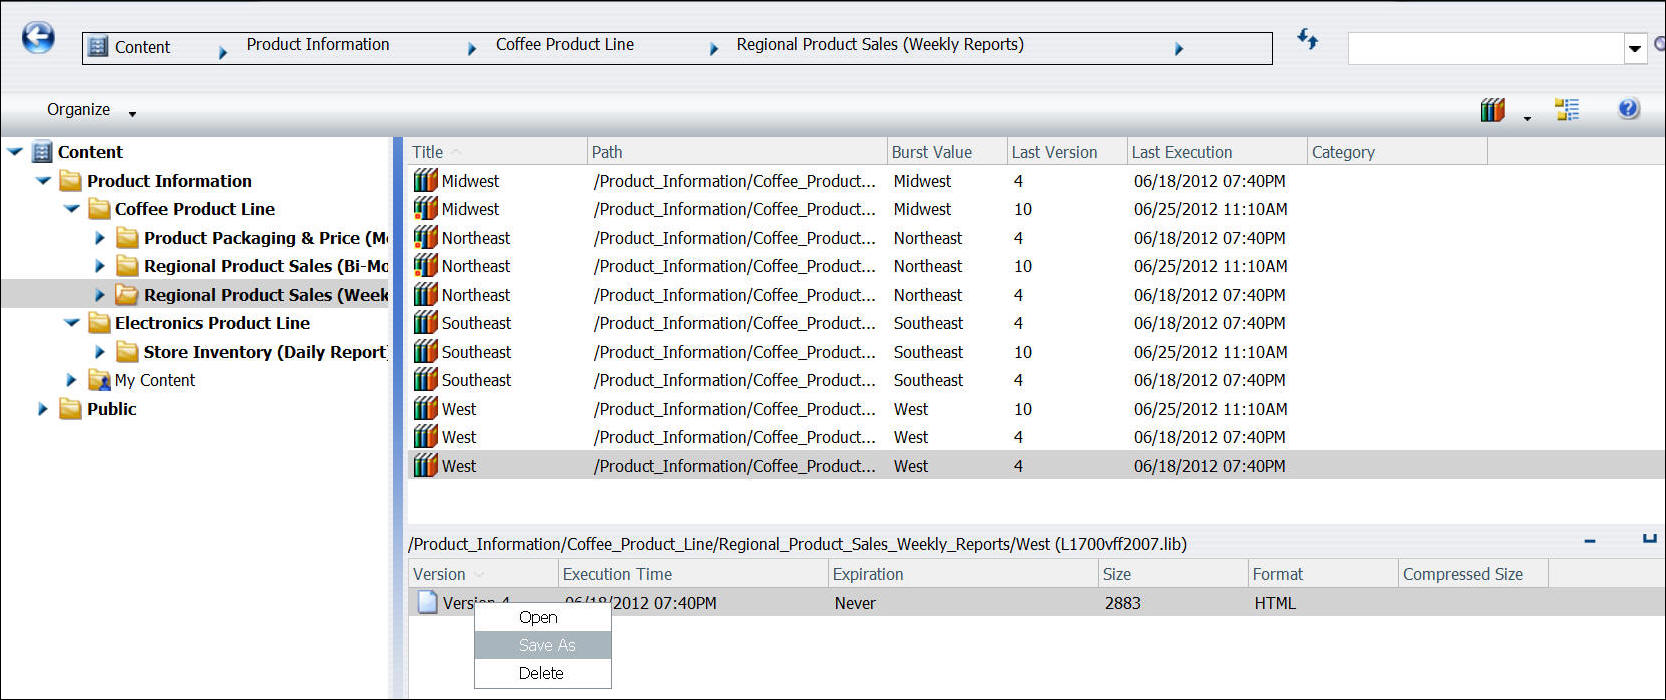
The Windows File Download dialog box displays.
-
Click Save.
The Windows Save dialog box displays, from which you can
save the Library report to your machine.