How to: |
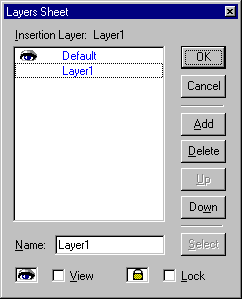
By default, all the controls on a form are placed on the same layer (the Default layer). If you are designing complicated forms with many controls, you can take advantage of the layering ability of the Form Editor.
At design time, you can create multiple layers and then assign different controls on the form to different layers. You can then hide a layer, which hides all the controls on that layer until you make it visible again. You can also lock a layer, which ensures that all controls on the layer cannot be changed. For run time, layers can be dynamically displayed or hidden using the SetLayer command.

 on the
Layout toolbar to open the Layers Sheet dialog box.
The new layer is added on top of the existing layers.
To make a layer active so that all new controls will be placed on this layer:
 on the
Layout toolbar to open the Layers Sheet dialog box.
 on the
Layout toolbar to open the Layers Sheet dialog box.
 on the
Layout toolbar to open the Layers Sheet dialog box.
 on the
Layout toolbar to open the Layers Sheet dialog box.
 on the
Layout toolbar to open the Layers Sheet dialog box.
 on the
Layout toolbar to open the Layers Sheet dialog box.
The SetLayer command allows layers to be set as visible or invisible at run time. The command can be used in a Maintain or JavaScript event. The syntax is
Maintain
Formname.SetLayer.("layername",n);JavaScript
setLayer.formname.("layername",n);where:
Is the name of the layer, enclosed in double quotation marks (“).
Possible values are:
To preset a layer before the form is run, you can use the SetLayer command with the Winform Show_inactive command:
Winform Show_inactive Form1;
Form1.SetLayer("Layer1”,1);Form1.SetLayer("Layer2”,0);Winform Show Form1;
This sets Layer1 as visible and Layer2 as invisible.
| WebFOCUS |