In this section: Reference: |
In Developer Studio, you can upload (import) external data files
for use in the WebFOCUS reporting tools. This functionality enables
you to easily create a WebFOCUS file description and data file for
use in your reporting application. The Upload Data File option is
available from the Master Files folder while developing
in the Projects or Data Servers areas, and also from the Repository
area when you right-click a folder.
Upload Data is also available from the Business Intelligence
Portal (BI Portal) and the Business Intelligence Dashboard (BI Dashboard).
When the following types of files are uploaded, a synonym is
created for each as part of the upload process:
-
Delimited flat files. Among
the file types you can upload are: txt, csv, ftm, dat, and tmp.
The Upload Data facility supports a wide range of delimiters and enclosure
options.
-
Excel Workbooks. You
can upload and create synonyms for multiple worksheets. The Upload
Data facility supports Named Ranges in Excel® worksheets.
-
XML files.
-
JSON files.
The Upload Data facility uses standard Reporting Server synonym
creation syntax. All data types are supported. You can upload large
data files and are not limited to java memory resources. The Upload
Data facility includes an interface for editing the resulting Master
File that allows users to easily set up field attributes. In addition,
you can open the synonym in the Synonym Editor which provides complete
editing facilities and error handling.
The applications that are available to the user are controlled
by user profiles. The Reporting Server provides additional privileges
to control user permissions.
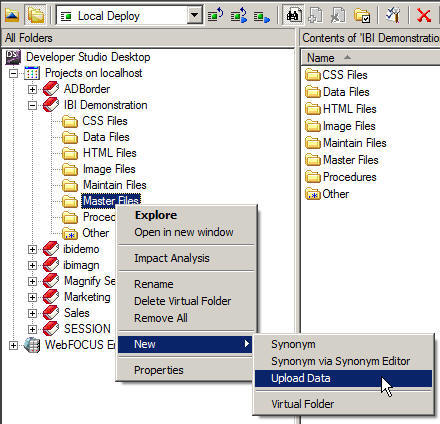
xStarting the Upload Process
In Developer Studio, right-click the Master
Files folder and select Upload Data from
the New menu.
In the BI Portal and BI Dashboard, the Upload Data tool is launched
by right-clicking a folder and selecting Upload/Data from the context
menu.
The following image is an example of
working in the Projects area of Developer Studio. Similar steps
are performed for working in the Data Servers area. As shown in
the following image, in the Repository area the option to Upload
Data is available from the folder level, and the option is controlled
by user privileges.
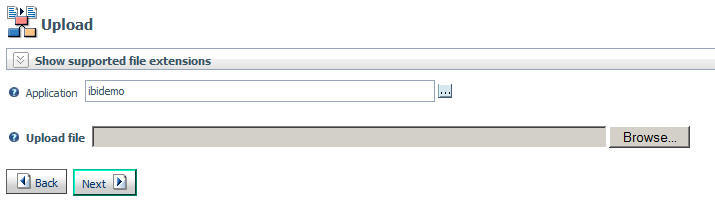
The Upload Data File dialog box opens,
as shown in the following image.
Note: When you upload the following types of files, a
synonym is created: delimited flat files (txt, csv, ftm, dat, tmp),
Excel Workbooks (xls, xlsx), XML files (xml), and JSON files (json).
- Select an application.
To change the selected application, click the ellipsis button next
to the Application field.
The applications listed are based on
applications the user is authorized to access. Server privileges
can be set to control user permissions such as the applications
they can see and write to. The baseapp application will be visible
if it exists on the server. The foccache application (used to store
user temporary files for the duration of the user web session) is
also visible by default.
- Select a file. Click
the Browse button to the right of the Select
a file field.
A Choose file dialog box
opens.
- Navigate to the file
location and select Open.
- Click Next.
The next page displayed depends on the
options and type of file you selected:
- If a synonym was
not created, a status screen displays indicating whether the upload
was successful. You can then upload another file, go back, or close
the Upload Data page.
- If a synonym was
created, the next screen lets you select parameters needed to create
the synonym. The screen displayed depends on the file type of the
file to be uploaded.
- Select an upload
type. The choices are to leave the file in its original format or
to upload to a relational DBMS, which is the default option if an
RDBMS is configured. For information about uploading to a relational
DBMS, see Uploading a File Into a Relational Data Source.
Select or enter values for the attributes needed to upload the
file and create the synonym, as described in one of the following
topics:
xUploading a Delimited Flat File
When you select a delimited file to upload, the Select
Synonym Candidates dialog box opens, as shown in the following image.

You can set the following attributes:
-
Record Specification.
- The Record delimiter identifies the separators between records
or data rows. The Valid values are Comma (,), which is the default,
Pipe (|), Space, and Type-in delimiter.
- Non-printable delimiter. Valid values are No (the default) or
Yes.
-
Field Specification.
- The Record delimiter
identifies the separators between records or data rows. The Valid
values are Comma (,), which is the default, Pipe (|), Space, and
Type-in delimiter.
- Non-printable delimiter.
Valid values are No (the default) or Yes.
- Header. Indicates
whether the file has a header record.
If you select Yes, the first
record is used to create the field names in the Master File. If
Header=No, Create Synonym assigns default field names (FIELD_1,
FIELD_2, ...).
- Enclosure. Identifies
the enclosure character for alphanumeric values.
- Record scan limit.
By default, all records are scanned to determine the lengths of
the columns. You can set a number of records to scan.
- Preserve format.
Indicates whether to preserve blank spaces and line feeds in the
data.
- Synonym name. By
default, the synonym name is the original file name.
- Application.
- Prefix. Assigns a
prefix to the synonym name.
- Suffix. Assigns a
suffix to the synonym name.
- Set MISSING=ON for
NULL value.
-
Extended data format attributes.
- CODEPAGE.
- Overwrite existing
synonyms. Check this box if you want to replace a previous synonym
with the same name with the one being created for this upload.
For information about completing the upload process, see Completing the Upload Process.
xUploading an Excel Workbook
When you select an Excel Workbook to upload, the Select
Synonym candidates for Excel dialog box opens, as shown in the following
image.
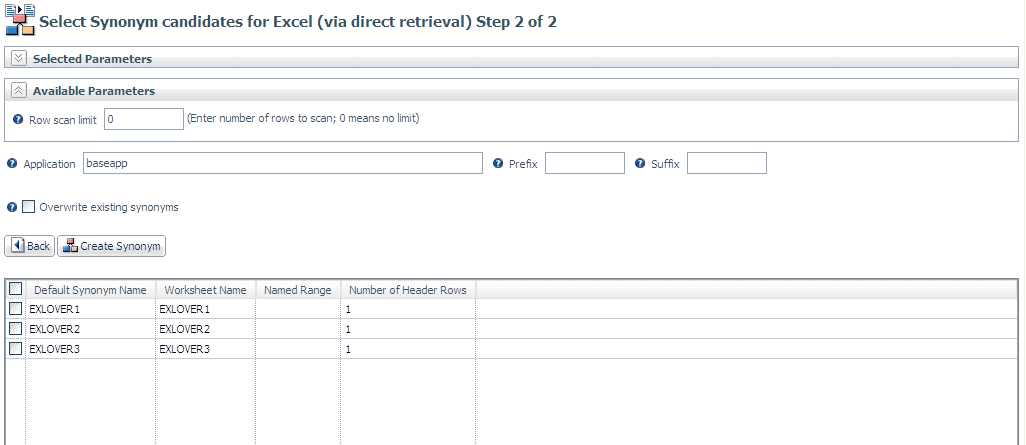
The table at the bottom of the page shows the worksheets available
in the selected Excel workbook. If any of the worksheets are empty
and selected, an error will display.
The column titled Number of Header Rows identifies
the number of header rows on the worksheet. If it is greater than
zero, the first row is used to create the field names in the Master
File. If the number of header rows is zero, Create Synonym assigns
default field names (FIELD_1, FIELD_2, ...).
You can set the following attributes:
-
Row scan limit. By
default it is zero (0), all rows are scanned to determine the column
lengths.
-
Application.
-
Prefix. Assigns
a prefix to the synonym name.
-
Suffix. Assigns
a suffix to the synonym name.
-
Overwrite existing synonyms. Check
this box if you want to replace a previous synonym with the same
name with the one being created for this upload.
Check the boxes next to the Worksheets you want to upload. The
default synonym name is the Worksheet name. If there is a named
range, it will be a candidate for a synonym separately, and the
synonym name will be the Worksheet name with the named range added.
For information about completing the upload process, see Completing the Upload Process.
x
When you select an xml file to upload, the Create Synonym
dialog box opens, as shown in the following image.
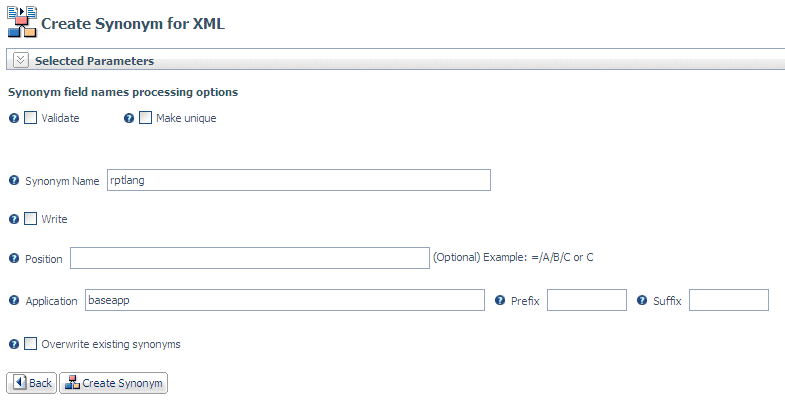
You can set the following attributes:
-
Validate. This
changes special characters to underscores and prevents the use of
reserved words in the resulting synonym.
-
Make unique. This
ensures that no duplicate names are created in the resulting synonym.
-
Synonym name. By
default, the original file name is entered.
-
Write. This
ensures strict schema compliance.
-
Position. Enter
the XPATH to element subtree on which the synonym will be based.
-
Application.
-
Prefix. Assigns
a prefix to the synonym name.
-
Suffix. Assigns
a suffix to the synonym name.
-
Overwrite existing synonyms. Check
this box if you want to replace a previous synonym with the same
name with the one being created for this upload.
For information about completing the upload process, see Completing the Upload Process.
x
When you select a JSON (JavaScript Object Notation)
file to upload, the following Create Synonym for JSON dialog box
opens, as shown in the following image.
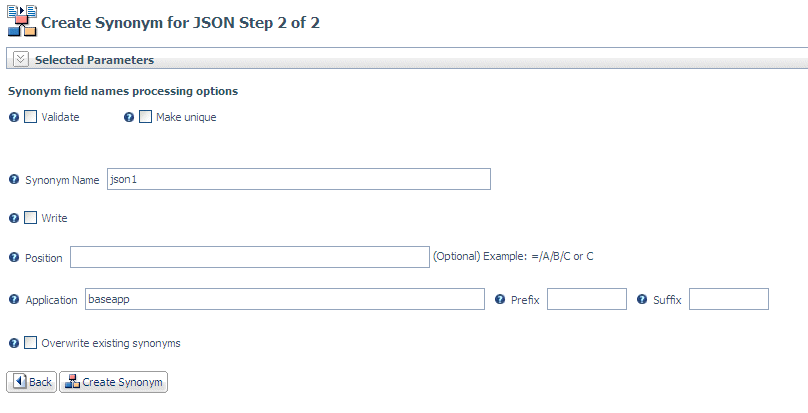
You can set the following attributes:
-
Validate. This
changes special characters to underscores and prevents the use of
reserved words in the resulting synonym.
-
Make unique. This
ensures that no duplicate names are created in the resulting synonym.
-
Synonym name. By
default, the original file name is entered.
-
Write. This
ensures strict schema compliance.
-
Position. Enter
the XPATH to element subtree on which the synonym will be based.
-
Application.
-
Prefix. Assigns
a prefix to the synonym name.
-
Suffix. Assigns
a suffix to the synonym name.
-
Overwrite existing synonyms. Check
this box if you want to replace a previous synonym with the same
name with the one being created for this upload.
For information about completing the upload process, see Completing the Upload Process.
xUploading a File Into a Relational Data Source
Uploading a file to an RDBMS provides very good performance
when reporting from a large uploaded file.
Note: Uploading a large file to an RDBMS may take a long
time, depending on the file size.
If you chose to upload into a relational
data source, the Select a File dialog box opens, as shown in the
following image.
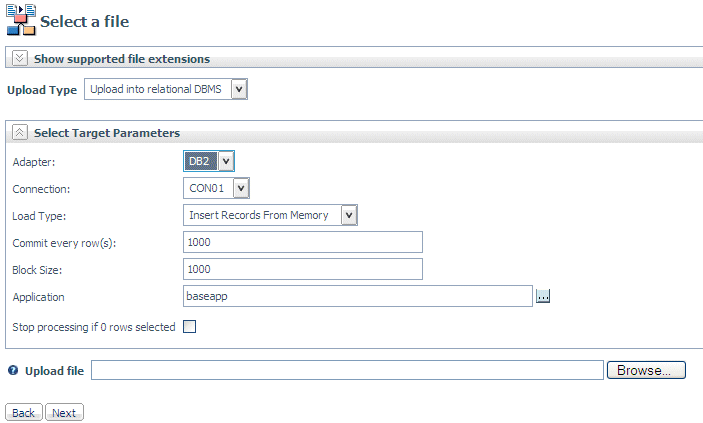
- Select a relational
adapter from the Adapter drop-down list.
- Select a connection
from the Connection drop-down list.
- Select an upload
type from the Load Type drop-down list. The choices are to insert data
from memory (the default) or to use a bulk load facility and upload
from a file.
- Enter a commit frequency.
By default, a commit will be issued every 1000 rows.
- Enter a block size.
By default, the block size is 1000.
- Select an application.
If you want to change the application in the Application text box,
click the ellipsis next to the box.
- To stop the upload
process when no rows will be uploaded, check the Stop
processing if 0 rows selected box.
- Browse to the file
you want to upload and click Open.
Note: The
file type must be valid for the RDBMS.
- Click Next.
The
next page that displays depends on the type of file you are uploading.
xCompleting the Upload Process
Click Create Synonym to upload
the file and create the synonym.
Three files are created in the selected Reporting Server application:
- Master File
- Access File
- Data file
You can upload another file or edit a synonym for the file just
uploaded. For information about editing the synonym, see Editing the Resulting Synonym.
xEditing the Resulting Synonym
To edit a synonym, click the
radio button next to the synonym name and click Edit
Selected Synonym.
The Quick Edit dialog box opens to the
Metadata tab, as shown in the following image.
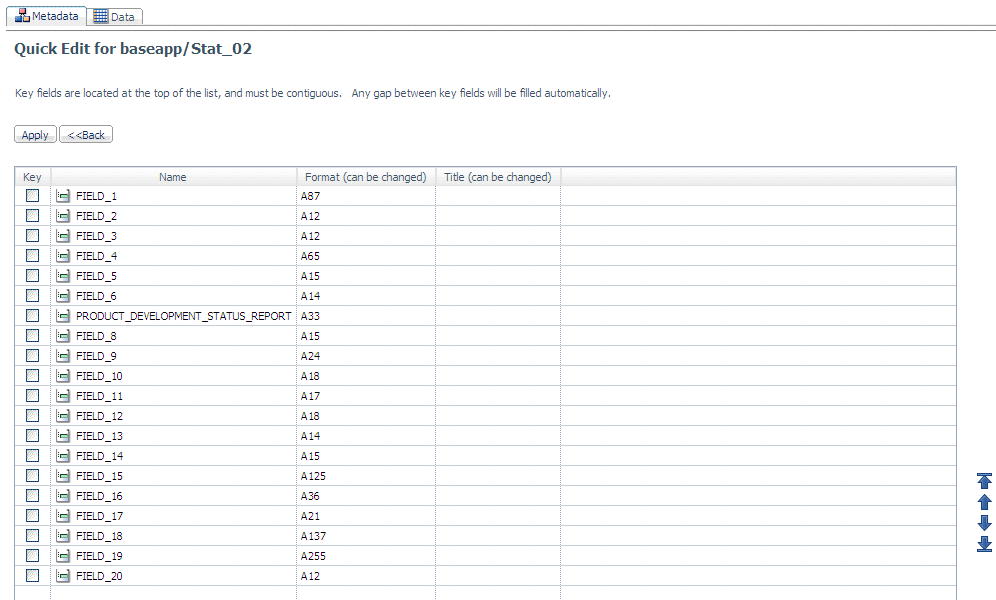
- You can edit the
field formats and titles by double-clicking the appropriate text box
and entering a new value.
- You can click the
Data tab to see the data in each field.
Click Apply to save your changes.
Synonyms are visible from the left frame.
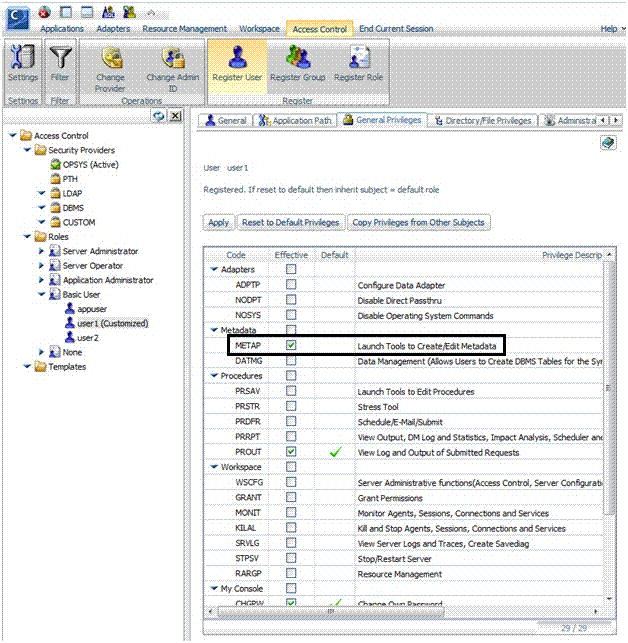
Users that have the METAP server privilege are allowed to edit Master
Files with the Create Synonym tools and customize fields, get sample
data and statistics, and perform all of the functions available
in the Synonym Editor:
x
Reference: Upload Data File Considerations
- The time required
to complete the upload depends on the machine configuration (for
example, type of processor, amount of memory, and speed). The Upload
utility has been tested with Excel files up to 60MB with 140K lines.
- If your input file
contains empty lines, such as a carriage return or a line feed character
at the end of the file, they will be preserved in the upload file.
- If your input file
contains any other empty lines, they will not get included in the uploaded
file.
- When uploading data
from an Excel spreadsheet:
- The data must be
arranged in an appropriate tabular format and the spreadsheet must
have the same type of data in each column and the same number of
fields in every row.
- Cells with formulas
and special characters are not supported. For example, if percentages
are used, the cells should be formatted using the percentage data
type and should not have the percentage special character "%" in
the cell.
- Files can reside
on the network, local machine and can be accessed using the drive
letter (for example, c:\) or a UNC path.
- The folder location
and file name can contain spaces.
- The file name can
be up to 64 characters.