Configuring WebFOCUS Pagelets for the PeopleSoft Enterprise Portal

In this section:

This section describes how to configure WebFOCUS Pagelets for the PeopleSoft Enterprise Portal.

Note: These instructions are for PeopleTools Version 8.52 using Oracle WebLogic Server as the application server. For PeopleTools Version 8.52 and 8.53 only Oracle WebLogic Server and IBM WebSphere Application Server are supported for the PeopleSoft Internet Architecture (PIA).

When logging on to the Oracle WebLogic Server, ensure you log on as the user who has ownership of the PS_HOME high-level directory structure. This assumes the JAR command is in your path and on Unix/Linux. For Windows, you must replace forward slashes (/) with back slashes (\), use the md command instead of mkdir, and so on.


Top of page

x
Deploy the Ops.War File

How to:

This section describes how to deploy the ops.war file.


x
Procedure: How to Deploy the Ops.War File
  1. From a command line, enter the following commands:
    cd $PS_HOME/webserv/yourdomain/applications/peoplesoft

    Note: The default for yourdomain is peoplesoft.

    mkdir ops.war
    cd ops.war
    jar xf /path_to_war/ops.war
    cd WEB-INF
    mkdir tld
    cd tld
    cp $PS_HOME/webserv/yourdomain/applications/peoplesoft/helloportletapp.war/WEB-INF/tld/portlet.tld
    cd $PS_HOME/webserv/yourdomain/applications/peoplesoft/ops.war/WEB-INF
  2. Edit the web.xml file.
  3. Remove the <display> line just after the <description> line.
  4. Insert the following syntax after the <description> line:
    <servlet>
    <description>Automated generated Portlet Wrapper</description>
    <display-name>report Wrapper</display-name>
    <servlet-name>report</servlet-name>
    <servlet-class>org.apache.pluto.core.PortletServlet</servlet-class>
    <init-param>
      <param-name>portlet-guid</param-name>
      <param-value>ops.report</param-value>
    </init-param>
    <init-param>
      <param-name>portlet-class</param-name>
      <param-value>org.springframework.web.portlet.DispatcherPortlet</param-value>
    </init-param>
    </servlet>
    <servlet>
    <description>Automated generated Portlet Wrapper</description>
    <display-name>defer-status Wrapper</display-name>
    <servlet-name>defer-status</servlet-name>
    <servlet-class>org.apache.pluto.core.PortletServlet</servlet-class>
    <init-param>
      <param-name>portlet-guid</param-name>
      <param-value>ops.defer-status</param-value>
    </init-param>
    <init-param>
      <param-name>portlet-class</param-name>
      <param-value>org.springframework.web.portlet.DispatcherPortlet</param-value>
    </init-param>
    </servlet>
    <servlet>
    <description>Automated generated Portlet Wrapper</description>
    <display-name>resource-tree Wrapper</display-name>
    <servlet-name>resource-tree</servlet-name>
    <servlet-class>org.apache.pluto.core.PortletServlet</servlet-class>
    <init-param>
      <param-name>portlet-guid</param-name>
      <param-value>ops.resource-tree</param-value>
    </init-param>
    <init-param>
      <param-name>portlet-class</param-name>
      <param-value>org.springframework.web.portlet.DispatcherPortlet</param-value>
    </init-param>
    </servlet>
  5. Insert the following syntax at the end of the file just prior to the </web-app> element tag:
    <servlet-mapping>
      <servlet-name>report</servlet-name>
      <url-pattern>/report/*</url-pattern>
    </servlet-mapping>
    <servlet-mapping>
      <servlet-name>resource-tree</servlet-name>
      <url-pattern>/resource-tree/*</url-pattern>
    </servlet-mapping>
    <servlet-mapping>
      <servlet-name>defer-status</servlet-name>
      <url-pattern>/defer-status/*</url-pattern>
    </servlet-mapping>
    <jsp-config>
     <taglib>
      <taglib-uri>http://java.sun.com/portlet</taglib-uri>
       <taglib-location>/WEB-INF/tld/portlet.tld</taglib-location>
     </taglib>
    </jsp-config>
  6. Create a file called weblogic.xml that contains the following syntax:
    <?xml version="1.0" encoding="ISO-8859-1" standalone="no"?>
    <weblogic-web-app xmlns="http://www.bea.com/ns/weblogic/weblogic-web-app">
    <description>ops Portlet Application</description>
      <container-descriptor>
        <servlet-reload-check-secs>15</servlet-reload-check-secs>
        <session-monitoring-enabled>true</session-monitoring-enabled>
      </container-descriptor>
      <context-root>/ops</context-root>
    </weblogic-web-app>
  7. From a command line, enter the following command:
    cd classes
  8. Edit the log4j.xml file.
  9. Replace the variable name for the log file path with the full path to your application server logs.

    Note: Do not use the $PS_HOME variable. For example:

    /psoft01/ps852p/psft/webserv/peoplesoft/servers/PIA/logs/ops.log

Top of page

x
Deploy the Opsgw.War File

How to:

This section describes how to deploy the opsgw.war file.


x
Procedure: How to Deploy the Opsgw.War File

This procedure uses an open directory for deploying the opsgw.war file.

  1. From a command line, enter the following commands:
    cd $PS_HOME/webserv
    mkdir ibi_apps.war
    cd ibi_apps.war
    jar xf /path_to_war/opsgw.war
    cd $PS_HOME/webserv/ibi_apps.war/WEB-INF/classes
  2. Edit the log4j.xml file.
  3. Replace the variable name for the log file path with the full path to your application server logs.

    Note: Do not use the $PS_HOME variable. For example:

    /psoft01/ps852p/psft/webserv/peoplesoft/servers/PIA/logs/ops.log
  4. From a command line, enter the following commands:
    cd $PS_HOME/webserv/ibi_apps.war/WEB-INF/lib
    cp $PS_HOME/webserv/yourdomain/applications/peoplesoft/ops.war/WEB-INF/lib/log4j-1.2.17.jar
    cd $PS_HOME/webserv/ibi_apps.war/WEB-INF
  5. Edit the web.xml file and update the <param-value> element tag for the target server URL.
  6. Log on to the Oracle WebLogic Server console.
  7. Click Deployments.
  8. Click Lock & Edit in the upper-left corner.
  9. Click Install.
  10. Navigate to the $PS_HOME/webserv directory and select the ibi_apps.war file.
  11. Click Next in the three dialogs that follow.
  12. Select No, I will review the configuration later and then click Finish.
  13. Click Activate Changes in the upper-left corner.
  14. Under Deployments select the ibi_apps check box, click Start, then Servicing all requests.

Top of page

x
Updating the PeopleSoft Internet Architecture Enterprise Application

How to:

This section describes how to update the PeopleSoft Internet Architecture (PIA) enterprise application.


x
Procedure: How to Update the PeopleSoft Internet Architecture Enterprise Application
  1. Edit the applications.xml file, which is located in the following directory:
    $PS_HOME/webserv/peoplesoft/applications/peoplesoft/META-INF/
  2. Enter the following section at the end of the file just prior to the </application> element tag:
    <module>
      <web>
        <web-uri>ops.war</web-uri>
          <context-root>/ops</context-root>
      </web>
    </module>
  3. Edit the portletentityregistry.xml file, which is located in the following directory:
    $PS_HOME/webserv/yourdomain/applications/peoplesoft/pspc.war/WEB-INF/data/
  4. Add the following section at the end of the file prior to the </portlet-entity-registry> element tag.

    Note: In the following syntax, the application ID is set to 3. if you have the default version of the file, then this setting is fine and the last application ID should be set 2. If you have made any modifications to the file, then ensure that the application ID is set to the next number.

    <application id="3">
      <definition-id>ops</definition-id>
      <portlet id="1">
        <definition-id>ops.resource-tree</definition-id>
      </portlet>
      <portlet id="2">
        <definition-id>ops.report</definition-id>
      </portlet>
      <portlet id="3">
        <definition-id>ops.defer-status</definition-id>
      </portlet>
    </application>

Top of page

x
Recycling the Application Server

Restart the Oracle WebLogic Server domain following the instructions in your PeopleSoft documentation.


Top of page

x
Adding the Pagelets to the Main Page

How to:

This section describes how to add the Pagelets to the main page.


x
Procedure: How to Add the Pagelets to the Main Page
  1. Open your web browser and log on to your PeopleSoft application.
  2. Navigate to PeopleTools, Portal, Structure, and then Content.
  3. Select Portal Objects, Pagelets, and then Portal Demo.
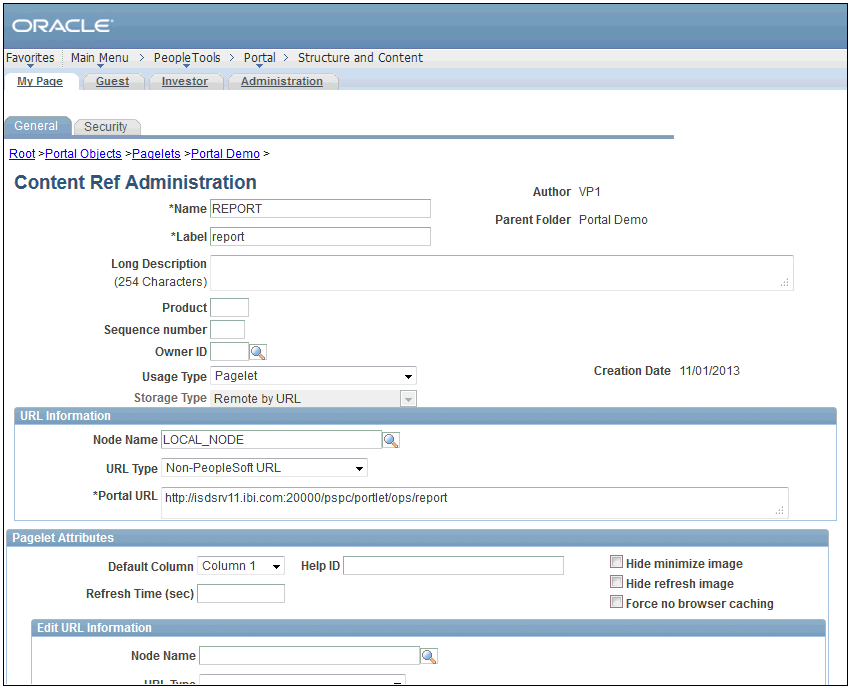
  4. Select Add Content Reference and then specify information for the corresponding fields, as listed in the following table.

    Parameter

    Value

    Report Pagelet

    Name

    REPORT

    Label

    report

    Usage Type

    Pagelet

    Node Name

    LOCAL_NODE (use the search button)

    URL Type

    Non-Peoplesoft URL

    Portal URL

    http://host.domain.com:port/pspc/portlet/ops/report

    Deferred Status Pagelet

    Name

    DEFERSTATUS

    Label

    defer-status

    Usage Type

    Pagelet

    Node Name

    LOCAL_NODE (use the search button)

    URL Type

    Non-Peoplesoft URL

    Portal URL

    http://host.domain.com:port/pspc/portlet/ops/defer-status

    Resource Tree Pagelet

    Name

    RESOURCETREE

    Label

    resource-tree

    Usage Type

    Pagelet

    Node Name

    LOCAL_NODE (use the search button)

    URL Type

    Non-Peoplesoft URL

    Portal URL

    http://host.domain.com:port/pspc/portlet/ops/resource-tree

    For example:

  5. Click Save after each Pagelet is configured.
  6. Click Portal Demo at the top of the page.

    The Portal Demo page opens.

  7. On the bottom of the Portal Demo page click Save.
  8. Select My Page and then Content.
  9. Under Portal Demo, select report, defer-status, and resource-tree.
  10. Click Save.

    The configured Pagelets are displayed.


WebFOCUS