Chaining Controls on the Parameters Tab
Chaining enables you to associate two or more related
values. When you chain controls together, chained values are filtered
as selections are made to each parameter control. For example, if
you chain the PLANT parameter to the STATE parameter, only PLANT
values for the currently selected STATE value will be available
instead of all the plants in the data source. Each time a selection
is made, all chained controls that come after will be dynamically
updated. Chaining also enables you to add, remove, and reverse the
order of controls in the chain.
Values are processed with a caching mechanism that gathers all
of the necessary values prior to loading the page. This method automatically
combines all of the necessary requests into a single HTTP request
and maps the result sets to the appropriate controls, greatly reducing
the load time involved with sending multiple requests for data.
x
Procedure: How to Chain Controls on the Parameters Tab
-
Create an HTML page using input controls to supply parameter
values.
For details, see Using Input Controls to Supply Parameter Values.
-
Click
the Parameters tab.
-
Select the center of the control object, left-click and drag
the control to the center of the next control object in the chain,
and release the mouse to complete the link.
Repeat this step for each link in the chain.
Tip: Optionally,
you may use the Positioning toolbar to add and remove controls to
a chain. Both chaining options (drag and drop and the chaining icons)
work in conjunction with each other. If you create a chain by one
method, you can remove the chain by using the other method, and
vice versa. For more information about chaining icons, see Positioning Toolbar.
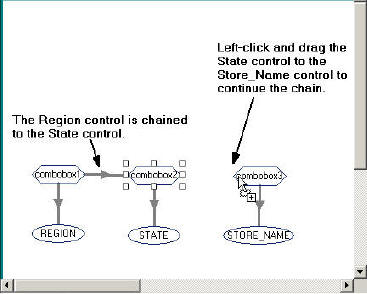
The image below is an example of chained controls.
Notice the direction of the arrows.
- The Region control
starts the first link in the chain, chained to the State control.
- The State control
starts the second link in the chain, and is being chained to the Store_Name control.
Tip: You
can also reverse the order of controls in the chain. For details,
see How to Reverse the Order of Chained Controls.
-
Optionally, apply condition settings to the chain to determine
how parameters are populated.
If using static controls, you must apply conditions for
each link in the chain. Conditions need to be created for each value
of the control chained from, and those values must be mapped to
the correct value(s) that will be displayed in the control that it
is being changed to.
For details about conditions, see Applying Conditions to a Chain.
x
Procedure: How to Remove a Link in the Chain
To
remove a link in the chain on the Parameters tab:
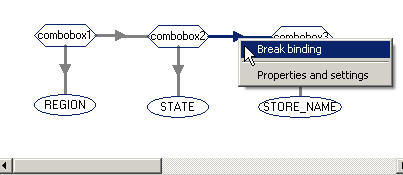
- Select the
arrow head on the line so that the line is bold.
- Right-click
and select Break binding.
Repeat this step
for each link in the chain that you want to break.
Tip: Optionally,
you may use the Positioning toolbar to add and remove controls to
a chain. Both chaining options (drag and drop and the chaining icons)
work in conjunction with each other. If you create a chain by one
method, you can remove the chain by using the other method, and
vice versa. For more information about chaining icons, see Positioning Toolbar.
x
Procedure: How to Reverse the Order of Chained Controls
To
reverse the order of chained controls on the Parameters tab:
-
Select the arrow head on the line so that the line is bold,
right-click and select Break binding.
-
Select the center of the control object, left-click and drag
the control to the center of the next control object in the chain,
and release the mouse to complete the link.
Notice the direction of the arrow between the control objects.
You may reverse the direction of the link in the chain or reverse
the order of the chain by changing the direction of each link.
-
If reversing the direction of a link in the chain, click and
drag the control object in the desired order.
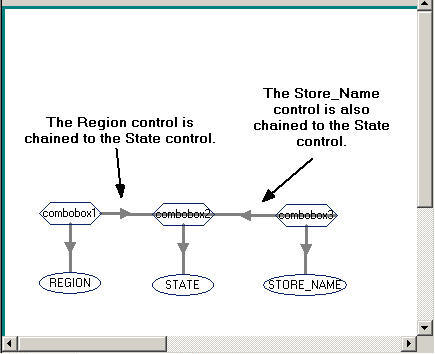
For example, in the image below:
- The Region
control starts the first link in the chain, chained to the State control.
- The Store_Name
control starts the second link in the chain, also chained to the State
control.
Note: Conditions are needed in order
to make Region disappear from the chain, and to make Store_Name
control State. For details about conditions, see Applying Conditions to a Chain.
-
If reversing the order of a chain, click and drag the control objects
in the desired order.
Tip: In some scenarios, when reversing the order
of chained values, you may want to move the controls from the default
location on the Parameters tab so that you can better see the direction
of the chain. Moving objects on the Parameters tab will not affect
the Design view of your layout.
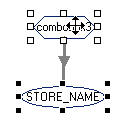
- Press the Shift key
and select the control object and bound parameter to move the objects
as a set.
- Chain the
control objects together.
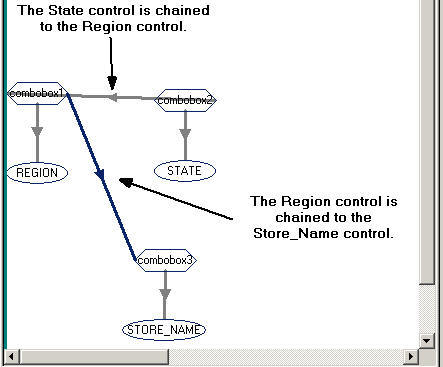
For example, in the following image, the State control
starts the first link in the chain, chained to the Region control.
The Region control starts the second link in the chain, chained
to the Store_Name control.
-
Optionally, apply condition settings to the chain to determine
how parameters are populated.
For details about conditions, see Applying Conditions to a Chain.