The following is a summary of steps that you will complete in the example. You can modify the steps for your own application requirements. The specified file locations are the Windows file locations used in this procedure.
|
Step |
File Name |
File Location | |
|---|---|---|---|
|
1 |
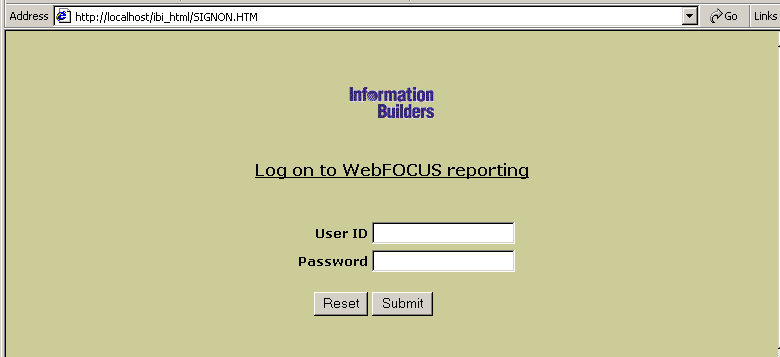
Create an HTML logon page. A cookie is created after successful logon, containing the user ID (IBIC_user) entered on the page. |
SIGNON.HTM |
WebFOCUS80\ibi_apps\ibi_html |
|
2 |
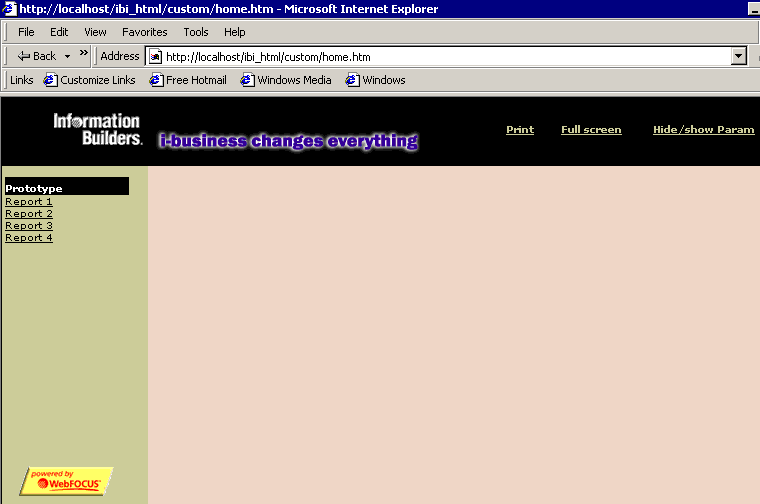
Create a home page with a frameset that displays custom menu options and a report when run. |
HOME.HTM |
WebFOCUS80\ibi_apps\ibi_html |
|
3 |
Create the frame pages. |
MENU.HTMLOADMEM.HTMWELCOME.HTM |
WebFOCUS80\ibi_apps\ibi_html |
|
4 |
Modify the file CGIVARS.WFS to assign the value of the user ID to a Dialogue Manager amper variable. |
CGIVARS.WFS |
ibi\WEBFOCUS80\client\conf\etc |
|
5 |
Create a user data source that contains user names and their allowed menu options. |
USERLST.MASUSERLST.DAT |
srv80\ggdemo |
|
6 |
Create a menu data source that identifies and supplies a label for all available menu options, the location of the file accessed by an option, and the target frame for the output of an option. You can customize the contents of this file for your application. |
MENULST.MASMENULST.DAT |
srv80\ggdemo |
|
7 |
Create a procedure that generates a custom menu for a user. |
FHSUB.FEX |
srv80\ggdemo |
|
8 |
Create an HTML display page on which the custom menu is displayed. |
SUBMENU.HTM |
srv80\ggdemo |
|
9 |
Create the forms that call the report selections on the menu. |
1MYGRAPH.THM2MYGRAP.HTM |
WebFOCUS80\ibi_apps\ibi_html |
|
10 |
Create the procedures that generate the user-specific reports. |
FHSUB.FEX |
srv80\ggdemo |
Note:
- Procedures used by the WebFOCUS Reporting Server to create output, and HTM files in which the output is embedded, must be accessible to the WebFOCUS Reporting Server.
- Launch pages, menus that request reports, and images are stored in the WebFOCUS Client on the web server.
The following file is named SIGNON.HTM. Modify the lines in bold to apply to the web server at your site.
SIGNON.HTM:
<html>
<head>
<meta http-equiv="Content-Language" content="nl-be">
<meta http-equiv="Content-Type" content="text/html;
charset=windows-1252">
<meta name="GENERATOR" content="Microsoft FrontPage 4.0">
<meta name="ProgId" content="FrontPage.Editor.Document">
<title>Please Identify yourself!</title>
</head>
<body stylesrc="submenu.htm" bgcolor="#CECF9C">
<p> </p>
<form method="POST" action="/ibi_apps/WFServlet"
name="Signon">
<table border="0" width="100%" height="112">
<tr>
<td width="66%" height="19" align="right" colspan="2">
<p align="center"><img border="0"
src="http://localhost/ibi_apps/ibi_html/IB_LOGO.GIF"></p>
<p align="center"> </td>
</tr> <tr>
<td width="66%" height="19" align="right" colspan="2">
<p align="center"><b><u><font face="Verdana" size="3">Log on to
WebFOCUS reporting</font></u></b></p>
<p align="center"> </td>
</tr>
<tr>
<td width="31%" height="19" align="right"><font face="Verdana"
size="2"><b>User ID</b></font></td>
<td width="35%" height="19"><input type="text" name="IBIC_user"
size="20"></td>
</tr>
<tr>
<td width="31%" height="18" align="right"><font face="Verdana"
size="2"><b>Password</b></font></td>
<td width="35%" height="18"><input type="password"
name="IBIC_pass" size="20"></td>
</tr> <tr>
<td width="31%" height="57">
<p align="right"><input type="reset" value="Reset"
name="B2"></td>
<td width="35%" height="57"><input type="submit" value="Submit"
name="B1"></td>
</tr>
</table>
<p> </p>
<p> </p>
<p> </p>
<p> </p>
<p> </p>
<input type="hidden" name="IBIWF_action" value="WF_SIGNON">
<input type="hidden" name="IBI_random" value=''>
<input type="hidden" name="WF_SIGNON_MESSAGE"
value="http://localhost/ibi_apps/IBI_HTML/HOME.HTM">
</form>
<p> </p>
</body>
</html>The following is the SIGNON.HTM page when accessed in the web browser.
In this example, you create the home page with a frameset. The following HTML files supply the content for each frame used: MENU.HTM (banner frame), LOADMEN.HTM (contents frame), and WELCOME.HTM (query frame).
The following file is named HOME.HTM. Modify the lines in bold to apply to the web server at your site.
HOME.HTM:
<html>
<head>
<meta http-equiv="Content-Type" content="text/html;
   charset=windows-1252">
<title>Webfocus Reporting</title>
<meta name="GENERATOR" content="Microsoft FrontPage 4.0">
<meta name="ProgId" content="FrontPage.Editor.Document">
<meta name="Microsoft Border" content>
<meta base href="http://localhost/">
</head>

<frameset id="header" rows="68,*" framespacing="0" border="0"
   frameborder="0">
<frame name="banner" scrolling="no" noresize target="contents"
   src="MENU.HTM" marginwidth="0" marginheight="0" NOBORDER>
 <frameset id="bodypart" cols="146,*">
 <frame name="contents" target="main" src="LOADMEN.HTM"
    scrolling="auto" marginwidth="3" marginheight="11">
   <frameset id="querypart" rows="80,*">
   <frame name="QueryFrame" src="WELCOME.HTM" target="bottom"
      marginwidth="0" marginheight="0" scrolling="no" noresize>
   <frame name="ReportFrame" src="WELCOME.HTM" scrolling="auto"
      noresize marginwidth="12" marginheight="1" target="_self">
   </frameset>
 </frameset>
 <noframes>
  <body>
  <p>This page uses frames, but your browser doesn't support them.</p>
  </body>
 </noframes>
</frameset>
</html>
-
The
following file is named MENU.HTM. It supplies the content for the
top frame (banner). Modify the lines in bold to apply to the web
server at your site.
MENU.HTM:
<HTML>
<HEAD>
<meta base href="http://localhost/ibi_apps/ibi_html" target="contents">
<TITLE>The JavaScript Menu Object</TITLE>
<script language="Javascript"><!---
function doprint()
{
 parent.document.frames.bodypart.all("Reportframe").focus();
 window.print();
}
function Show_query()
{
 if (parent.frames('QueryFrame').document.title == 'Query')
 {
  x=parent.frames('QueryFrame').document.all('Query').offsetHeight-10;
  parent.document.all("header").all("bodypart").all("QueryPart")
  .rows=x+",*";
 }
}

function Hide_A_query()
{
 if (parent.document.all("header").all("bodypart").all("QueryPart")
  .rows =='0,*')
 {
  resize()
 }
 else
 {
  parent.document.all("header").all("bodypart").all("QueryPart")
  .rows='0,*';
 }
}

function resize(){
var
x=parent.frames('QueryFrame').document.all('Query').offsetHeight-10;
parent.document.all("header").all("bodypart").all("QueryPart")
.rows=x+",*";
}
The following code validates the query.
function dovalidation(Checktype){
  var boodschap=''
  var frm=parent.frames('QueryFrame').frminput

// Check Required !!!
  for (x=0;x<Checktype.length;x++) {
  if (Checktype[x][2]=='R') {
     if (frm.elements(Checktype[x][0]).value == '') {
       boodschap=boodschap + '"'+Checktype[x][1]+'" is mandatory ! \n'
   }  }   }
// End Check Required
  if (boodschap != '') {return boodschap};
// Check Type !!!
  for (x=0;x<Checktype.length;x++)
  {
    if (Checktype[x][3]=='N')
    {
      var anum=/(^\d+$)|(^\d+\,\d+$)/
      if (anum.test(frm.elements(Checktype[x][0]).value))
      {
    if ((Checktype[x][4] > frm.elements(Checktype[x][0]).value) ||
       (Checktype[x][5] < frm.elements(Checktype[x][0]).value))
    {
    boodschap=boodschap+'"'+Checktype[x][1]+'" must be within range
    ('+Checktype[x][4]+'-'+Checktype[x][5]+')! \n';
    }
    else
    {}
      }
      else
      {
      boodschap=boodschap+'"'+Checktype[x][1]+'" must be a number !
       \n';
      }
    }
    else
    {
      if (Checktype[x][3]=='T')
      {
    if (frm.elements(Checktype[x][0]).value.length < Checktype[x][4]
      ||
        frm.elements(Checktype[x][0]).value.length > Checktype[x][5])
{ boodschap=boodschap+'"'+Checktype[x][1]+'"length must be within range ('+Checktype[x][4]+'-'+Checktype[x][5]+')! \n'; } } else { if((Checktype[x][3]=='D')&&(frm.elements(Checktype[x][0]).value.length > 0)) { var dateStr = frm.elements(Checktype[x][0]).value; var datePat = /^(\d{1,2})(\/|-)(\d{1,2})\2(\d{2}|\d{4})$/; // To require a 4 digit year entry, use this line instead: // var datePat = /^(\d{1,2})(\/|-)(\d{1,2})\2(\d{4})$/; var matchArray = dateStr.match(datePat); if (matchArray == null) { boodschap=boodschap+'"'+Checktype[x][1]+'" is not a valid date! \n'; return boodschap; } day = matchArray[1]; month = matchArray[3]; year = matchArray[4]; if (month < 1 || month > 12) { boodschap=boodschap+'"'+Checktype[x][1]+'" :month must be between 1 and 12.'; return boodschap; } if (day < 1 || day > 31) { boodschap=boodschap+'"'+Checktype[x][1]+'" :day must be between 1 and 31.'; return boodschap; } if ((month==4 || month==6 || month==9 || month==11) && day==31) { boodschap=boodschap+'"'+Checktype[x][1]+'" : month '+month+' does not have 31 days!'; return boodschap; } if (month == 2) { var isleap = (year % 4 == 0 && (year % 100 != 0 || year % 400 == 0)); if (day>29 || (day==29 && !isleap)) { boodschap=boodschap+'"'+Checktype[x][1]+'" : February ' + year + 'does not have ' + day + ' days!'; return boodschap; } } } } } } return boodschap } function breakout() { mywindow=window.open("","Titel","scrollbars=yes,status=no"); mywindow.location.href=parent.frames('ReportFrame').location.href; } //--> </script> <style fprolloverstyle>A:hover {color: #FFFF00; font-family: Verdana; font-size:8pt; font-weight: bold} </style> <base target="contents"> </HEAD> <BODY style="font-family: Verdana; font-size: 8pt" class="regular" bgcolor="#000000" link="#CECF9C" vlink="#CECF9C" alink="#CECF9C"> <table border="0" width="600" bgcolor="#000000" cellspacing="0" cellpadding="0" bordercolor="#000000" height="62"> <tr> <td> </td> <td width="57" align="center" height="1"> <p align="center"><font color="#CECF9C" size="1"> <b> <a href='javascript:void 0' onclick='doprint();'>Print</a> </b></font> </td> <td width="86" height="1" align="center"> <p align="center"><font color="#CECF9C" size="1"> <b><a href='javascript:void 0' onclick='breakout();'> Full screen</a></b></font> </td> <td width="138" align="center" height="1"> <p align="center"><font color="#CECF9C" size="1"> <b><a href='javascript:void 0'onclick='Hide_A_query();'> Hide/show Param</a></b></font> </td> </tr> </table> </BODY> -
The
following file is named LOADMEN.HTM. It supplies the content for
the left-hand frame (contents). Modify the lines in bold to apply
to the web server at your site.
LOADMEN.HTM:
<html> <head> <title>Welcome text</title> <SCRIPT LANGUAGE="JavaScript"> <!-- function loadmenu() { IBI_random=Math.random()*Math.random()*Math.random()*100 ; loadurl="http://localhost/ibi_apps/ WFServlet?IBIF_ex=fhsub&IBI_random="+IBI_random parent.frames[1].location.href=loadurl } // --> </SCRIPT> </head> <body bgcolor="#E0E0BE" onload="loadmenu()"> <p align="center">Loading Menu ....</p> <p align="center">Stand by ..</font></p> </SCRIPT> </body> </html> -
The following file is named WELCOME.HTM.
It provides the initial blank frame that will be replaced by report
output. No modification is required.
WELCOME.HTM:
<html>
<head>
<meta http-equiv="Content-Language" content="nl-be">
<meta http-equiv="Content-Type" content="text/html;
charset=windows-1252">
<meta name="GENERATOR" content="Microsoft FrontPage 4.0">
<meta name="ProgId" content="FrontPage.Editor.Document">
<title>Welcome text</title>
<base target="_self">
</head>
<body bgcolor="#E0E0BE"></body>
</html>
The following is an example of modifying the SITE.WFS files.
-
Open
the file SITE.WFS, located by default as follows
Windows: drive:\ibi\WEBFOCUS80\client\conf\etc
UNIX: /ibi/WEBFOCUS80/client/conf/etc
z/OS: /ibi/WEBFOCUS80/client/conf/etc
Note: At many locations, developers will not have access to the .WFS files on the web server. Contact your systems administrator or other appropriate staff.
-
In IBICOMMD.WFS,
add the following lines after the code <ifndef>EDACS3... <endif>:
<sendvar>
RUSER=&IBIC_user
<endsendvar>
If you are modifying SITE.WFS, add these lines after the comment.
This step will send the user ID to a Dialogue Manager variable named &RUSER, which will be used for selecting menu options in the FHSUB procedure.
- Save the file and exit.
The following Master File for the user data source is named USERLST.MAS. This file must be created in the WebFOCUS Reporting Servers search path, either the APP PATH or EDAPATH in EDASPROF.PRF. For details, see WebFOCUS Application Logic.
FILENAME=USERLST, SUFFIX=FIX,
 SEGNAME=USERLST,SEGTYPE=S0,$
   FIELD=USER ,ALIAS=USER, USAGE=A8  , ACTUAL=A8  ,$  user ID
   FIELD=MKEY ,ALIAS=MKEY, USAGE=A2  , ACTUAL=A2  ,$  menu key
   FIELD=DUMM ,ALIAS=DUMM, USAGE=A70 , ACTUAL=A70 ,$  filler
The data source is USERLST.DAT:
CEO     01
ADMIN   02
The user ID CEO has access only to menu option 01. The user ID ADMIN has access to menu option 02.
The following Master File for the menu data source is named MENULST.MAS:
FILENAME=MENULST, SUFFIX=FIX,
 SEGNAME=TCSTAB04,SEGTYPE=S0,$
  FIELD=MKEY , ALIAS=MKEY,  USAGE=A2  ,  ACTUAL=A2  , INDEX=I ,$ menu key
   FIELD=RAP  , ALIAS=RAP ,  USAGE=A25 , ACTUAL=A25 ,$  menu text
   FIELD=HTM  , ALIAS=HTM ,  USAGE=A35 , ACTUAL=A35 ,$  HTML page
   FIELD=FRM  , ALIAS=FRM ,  USAGE=A12 , ACTUAL=A12 ,$  target frame
   FIELD=DUMM , ALIAS=DUMM ,  USAGE=A6  , ACTUAL=A6  ,$   filler
The data source is MENULST.DAT:
01REPORT1                 ibi_apps/ibi_html/1myqrap.htm        QueryFrame
02REPORT2                 ibi_apps/ibi_html/2myqrap.htm        QueryFrame
The following file is named FHSUB.FEX. The JOIN command associates users with their permitted menu options. The DEFINE command dynamically defines the hyperlinks that will appear on the custom menu.
The value for the Dialogue Manager variable &RUSER is passed to the procedure by the <sendvar> block in the file SITE.WFS.
Modify the lines in bold to apply to your site.
-************************************************************************
-* Calling from : LOADMEN.htm
-* Files called : sub.htm
-* Used &VARS   : &RUSER -> Web user ID (IBIC_user or equivalent)
-* Files used   : MENULIST.DAT -> fixed file with menu items
-*                USERLST.DAT  -> fixed file with users and privileges
-* Files created: rlist.htm -> temporary file with menu list
-*                H1.FOC    -> temporary file used in JOIN
-************************************************************************
-************************************************************************
-* Change these for customization:
-* &HOMEURL : web server URL
-* &LSTDIR  : Location of userlst.dat and menulst.dat
-* &LSTDIR  : Location of rlist.htm
-************************************************************************
-*SET &ECHO=ALL;
-SET &HOMEURL='HTTP://localhost/';
-SET &LSTDIR='drive\IBI\APPS\GGDEMO\';
-SET &EDAHTMDIR='drive\IBI\APPS\GGDEMO\';
-SET &USERDAT='&LSTDIR.EVAL' || 'userlst.dat' ;
-SET &MENUDAT='&LSTDIR.EVAL' || 'menulst.dat' ;
-SET &LISTLOC='&EDAHTMDIR.EVAL' || 'rlist.htm' ;
-SET &RUSERL=&RUSER.LENGTH;
-SET &OLENGTH='A' || &RUSERL.EVAL;
-SET &UPUSER=UPCASE(&RUSERL.EVAL,'&RUSER.EVAL','&OLENGTH.EVAL');
FILEDEF USERLST DISK &USERDAT.EVAL
FILEDEF MENULST DISK &MENUDAT.EVAL
FILEDEF RLIST   DISK &LISTLOC.EVAL
-RUN
-************************************************************************
-* This code creates temporary file containing all menu items
-* with index on MKEY fields needed in JOIN.
-************************************************************************
TABLE FILE MENULST
PRINT *
ON TABLE HOLD AS H1 FORMAT FOCUS INDEX MKEY
END
-RUN
-************************************************************************
-* This will build the HTML syntax needed for dynamic user menu
-* with selection on user ID.
-************************************************************************
JOIN MKEY IN USERLST TO ALL MKEY IN H1 AS A
DEFINE FILE USERLST
TAGP1/A25='<TR> <TD WIDTH="100%" >' ;
TAGP2/A150=
 '<A HREF='  || '&HOMEURL.EVAL' || HTM ||
 ' TARGET="' || FRM || '" ONCLICK="Prepare();" >' ;
TAGP3/A80='<FONT SIZE="1" COLOR="#000000" >'|| RAP ||
'</FONT></A></TD></TR>';
END
TABLE FILE USERLST
PRINT TAGP1 TAGP2 TAGP3
WHERE USER EQ '&UPUSER.EVAL';
ON TABLE HOLD AS RLIST FORMAT ALPHA
END
-RUN
-************************************************************************
-* This will call the HTM file that contains the !IBI.FIL syntax.
-************************************************************************
-HTMLFORM SUBMEN
The HTML display page is called by the procedure, and must be accessible by the WebFOCUS Reporting Server. In Windows and UNIX, the extension is always .HTM.
The following file is named SUBMEN.HTM. It is merged with the report output generated by the procedure FHSUB. Modify the lines in bold to apply to the web server at your site.
<html>
<head>
<meta http-equiv="Content-Language" content="nl-be">
<meta http-equiv="Content-Type" content="text/html;
charset=windows-1252">
<meta name="GENERATOR" content="Microsoft FrontPage 4.0">
<meta name="ProgId" content="FrontPage.Editor.Document">
<title>Submenu</title>

<SCRIPT LANGUAGE='JavaScript'>
<!-- shields up!

function Prepare () {
parent.document.all("header").all("bodypart").all("QueryPart")
 .all("Reportframe").src="welcome.htm"
parent.document.IBI_random=Math.floor((Math.random()*100000));
}

function Hide_query()
{
parent.document.all("header").all("bodypart").all("QueryPart")
 .rows="26,*";
parent.document.all("header").all("bodypart").all("QueryPart")
 .all('QueryFrame').src='welcome.htm';
}

function set_rand()
{
parent.document.IBI_random=Math.floor((Math.random()*100000));
}
//  -->
</SCRIPT>

<style fprolloverstyle>A:hover {color: #808000; font-size: 10pt;
  font-family: Verdana; font-weight: bold}
</style>
<meta base href="http://localhost/ibi_apps/ibi_html" target="main">
<base target="main">
</head>

<body style="font-family: Verdana; font-size: 8pt" bgcolor="#CECF9C"
  onload="set_rand()">
<table border="0" width="100%" cellspacing="0" cellpadding="0">
<tr>
<td width="100%" bgcolor="#000000">
<p align="left"><b><font size="1" color="#FFFFFF">Prototype
</font></b>
</td>
</tr>
!IBI.FIL.RLIST;
<tr>
<td width="100%"><font size="1" color="#CECF9C">.</font></td>
</tr>
</table>
<p> </p>
<p> </p>
<p> </p>
<p> </p>
<p> </p>
<p> </p>
<p align="center"><img border="0" src="http://localhost/ibi_apps/ibi_html/
template/powered.gif" align="baseline"></p>
</body>
</html>
-
The
following file is named 1MYQRAP.HTM. No modification is required.
The file must be stored in the WebFOCUS Client under the directory ibi\WebFOCUS80\ibi_apps\ibi_html.
1MYQRAP.HTM:
<html>
<head>
<title>Query</title>
<meta name="Microsoft Border" content>
</head>
<body name="test" topmargin="1" style="font-family: Verdana;
  font-size:8pt" bgcolor="#D8D9B0" onload="resize()">

<DIV  ID="Query" style="width: 713; height: 159">
<script Language="JavaScript">
<!--

function Form1_Validator(theForm){
  var boodschap = ''
  var terug = true
//
//Checktype[[Fieldname,Text, Required, Type,rangefrom,rangeto]]
//   Type=(T,N,D), T -> Rangefrom & rangeto = length, N > range= real
     range !!! - Daterange not yet supported
//
  var Checktype=[[],[]];
//
// End of Validation definition
//
//
  parent.frames("Reportframe").document.write('<br><p align="center">
  <b><font face="Verdana" size="2">Please Wait...<BR>WebFocus is
    working for you</font></b></p>');

fun1()
  return (terug)
}
function Hide_query() { parent.document.all("header").all("bodypart").all("QueryPart") .rows="26,*"; } function resize(){ var x=document.all("Query").offsetHeight-10; parent.document.all("header").all("bodypart").all("QueryPart") .rows=x+",*"; } function checkaction(){ if (parent.document.all("header").all("bodypart").all("QueryPart").rows == '26,*') { resize() } else { parent.document.all("header").all("bodypart").all("QueryPart") .rows='26,*'; } } function fun1() { document.frminput.IBI_random.value=Math.floor((Math.random()*100000)); } //--></script> <form method="GET" action="/ibi_apps/WFServlet" style="font-weight:bold" name="frminput" onsubmit="return Form1_Validator(this)" target="ReportFrame"> <input type="hidden" name="IBIF_ex" value="REPORT1"> <input type="hidden" name="IBI_random" value=""> <table name="tble" border="0" width="759" cellspacing="1" style="font-family:Verdana; font-size: 8pt" height="94"> <tr> <td width="759" align="right" bgcolor="#CFD09F" colspan="4" height="11"> <p align="left"><font face="Verdana" size="1"><u><b> Please provide Parameters for Report 1 </b></u></font> </td> </tr> <tr> <td width="82" align="right" bgcolor="#D8D9B0" height="25"> <font face="Verdana" size="1">Variable 1 </font></td> <td width="212" bgcolor="#D8D9B0" height="25"> <font face="Verdana" size="1"> <select size="1" name="AMP_VAR1" style="font-family:Verdana; font-size: 8pt"> <option value="ACTION">ACTION</option> <option value="MYSTERY">MYSTERY</option> <option value="CLASSIC">CLASSIC</option> <option value="CHILDREN">CHILDREN</option> <option value="MUSICALS">MUSICALS</option> </select></font></td> <tr> <td width="70" align="right" bgcolor="#D8D9B0" height="1"> <p></p> </td> <td width="104" bgcolor="#D8D9B0" height="27"> <font face="Verdana" size="1"> <input type="submit" value="Run" name="B1"></font> </td> </tr> </table> </form> </DIV> </body> </html> -
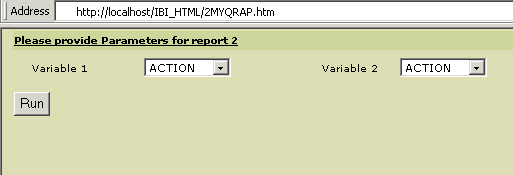
The following file is named 2MYQRAP.HTM.
No modification is required.
2MYQRAP.HTM:
<html> <head> <title>Query</title> <meta name="Microsoft Border" content> </head> <body name="test" topmargin="1" style="font-family:Verdana; font-size:8pt" bgcolor="#D8D9B0" onload="resize()"> <DIV ID="Query" style="width: 713; height: 159"> <script Language="JavaScript"> <!-- function Form1_Validator(theForm){ var boodschap = '' var terug = true // //Checktype[[Fieldname,Text, Required, Type,rangefrom,rangeto]] // Type=(T,N,D), T -> Rangefrom & rangeto = length, N > range= real range !!! - Daterange not yet supported // var Checktype=[[],[]]; // End of Validation definition parent.frames("Reportframe").document.write('<br> <p align="center"><b><font face="Verdana" size="2">Please Wait...<BR>WebFocus is working for you</font></b></p>'); fun1() return (terug) } function Hide_query() { parent.document.all("header").all("bodypart").all("QueryPart") .rows="26,*"; } function resize(){ var x=document.all("Query").offsetHeight-10; parent.document.all("header").all("bodypart").all("QueryPart") .rows=x+",*"; } function checkaction() { if (parent.document.all("header").all("bodypart").all("QueryPart") .rows =='26,*') { resize() } else { parent.document.all("header").all("bodypart").all("QueryPart") .rows='26,*'; } } function fun1() { document.frminput.IBI_random.value=Math.floor((Math.random()*100000)); } //--></script> <form method="GET" action="/ibi_apps/WFServlet" style="font-weight: bold" name="frminput" onsubmit="return Form1_Validator(this)" target="ReportFrame"> <input type="hidden" name="IBIF_ex" value="REPORT2"> <input type="hidden" name="IBI_random" value=""> <table name="tble" border="0" width="759" cellspacing="1" style="font-family:Verdana; font-size: 8pt" height="94"> <tr> <td width="759" align="right" bgcolor="#CFD09F" colspan="4" height="11"> <p align="left"><font face="Verdana" size="1"> <u><b>Please provide Parameters for Report 2</b></u></font> </td> </tr> <tr> <td width="82" align="right" bgcolor="#D8D9B0" height="25"> <font face="Verdana" size="1">Variable 1 </font></td> <td width="212" bgcolor="#D8D9B0" height="25"> <font face="Verdana" size="1"> <select size="1" name="AMP_VAR1" style="font-family:Verdana; font-size: 8pt"> <option value="ACTION">ACTION</option> <option value="MUSICALS">MUSICALS</option> <option value="CLASSIC"> CLASSIC</option> <option value="CHILDREN">CHILDREN</option> <option value="FOREIGN">FOREIGN</option> <option value="MYSTERY">MYSTERY</option> </select></font></td> <td width="82" align="right" bgcolor="#D8D9B0" height="1"> <font face="Verdana" size="1">Variable 2</font> <td width="212" bgcolor="#D8D9B0" height="25"> <font face="Verdana" size="1"> <select size="1" name="AMP_VAR2" style="font-family:Verdana; font-size: 8pt"> <option value="ACTION">ACTION</option> <option value="MUSICALS">MUSICALS</option> <option value="CLASSIC"> CLASSIC</option> <option value="CHILDREN">CHILDREN</option> <option value="FOREIGN">FOREIGN</option> <option value="MYSTERY">MYSTERY</option> </select></font></td> </tr> <tr> <td width="70" align="right" bgcolor="#D8D9B0" height="1"> <p></p> </td> <td width="104" bgcolor="#D8D9B0" height="27"> <font face="Verdana" size="1"> <input type="submit" value="Run" name="B1"></font></td> </tr> </table> </form> </DIV> </body> </html>
The following is the 1MYQRAP.HTM page when accessed in the web browser.

The following is the 2MYQRAP.HTM page when accessed in the web browser.
The following file is named REPORT1.FEX.
DEFINE FUNCTION SUBTRACT (VAL1/D8, VAL2/D8) SUBTRACT/D8.2 = VAL1 - VAL2; END TABLE FILE MOVIES PRINT TITLE LISTPR IN 35 WHOLESALEPR AND COMPUTE PROFIT/D8.2 = SUBTRACT(LISTPR,WHOLESALEPR); BY CATEGORY WHERE CATEGORY EQ '&_VAR1'; ON TABLE HOLD FORMAT HTMTABLE AS REPORT1 END -HTMLFORM BEGIN <HTML> <BODY> <H2>MOVIE SALES PROFIT</H2> <!--WEBFOCUS TABLE REPORT1> <HR> <P>Parameters selected </P> <UL> <LI> CATEGORY: &_VAR1 <LI> CURRENT DATE : &DATEDMYY <LI> CURRENT TIME : &TOD <LI> CURRENT USER : &RUSER </UL> </BODY> </HTML> -HTMLFORM END
Note: The HTML comment line must be closed with the ---> characters or a single > character and should not have any other HTML tags within it.