Setting Up a WebFOCUS Environment
A WebFOCUS environment
consists of a web server, a WebFOCUS Client, and Reporting Servers.
To add a WebFOCUS environment,
you specify a web server that includes host name and port number.
The HTML alias/context root is needed for Developer Studio to access
the WebFOCUS Client to determine if the environment is available
and retrieve basic information, such as release information. Depending
on the web server authentication, information may need to be provided
in the Web Authentication component. Depending on the security configuration
of WebFOCUS the Developer Studio user may to sign in so user permissions
can be validated, or sign on will be used to access information that
is secured, such as the Reporting Servers.
You can add new WebFOCUS environments
and edit existing environments in Developer Studio using the WebFOCUS Environment Properties dialog
box. This lets you create and manage environments, such as development,
test, and production instances. An environment
can be on the same machine as Developer Studio or elsewhere in your
enterprise. One environment can be set as the development environment
and is used in the Projects area of Developer Studio. By default,
Project-based development is done on the local machine (localhost).
Once a WebFOCUS environment is defined, you can tell Developer Studio
to perform Project-based development on a remote machine instead
of localhost.
Note: An environment can be set as the Development Environment
if its configuration allows project development.
xWorking With Environment Properties
When you set up access to WebFOCUS environments,
your settings are retained when you restart or even reinstall Developer Studio. WebFOCUS environment settings are
normally stored in the following location for XP:
drive:\Documents and Settings\user_id\
     Application Data\Information Builders\wfscom.xml
where:
- user_id
Is your logged on Windows ID.
For Windows 7:
drive:\Users\user_id\
     AppData\Roaming\Information Builders\wfscom.xml
where:
- user_id
Is your logged on Windows ID.
Note:
- This file
and directory may not be visible by default. To see this directory,
open Windows Explorer, click Tools, choose Folder
Options, and select the View tab.
Then, select Show hidden files and folders and
click OK.
- If an existing wfscom.xml existed and
had a localhost environment, the existing localhost environment
gets updated with settings based on the installation and configuration
options selected during the installation. If localhost did not exist,
it is created with settings based on the installation and configuration
options selected during installation.
- If file wfcom.xml
is removed, a new file with default settings for "localhost" environment will
get created when Developer Studio restarts.
- User IDs and
passwords stored in wfscom.xml are encrypted to keep them confidential.
- WebFOCUS environment properties
apply to your current Developer Studio configuration. It will
not impact other users or the WebFOCUS configuration.
x
Procedure: How to Add a WebFOCUS Environment
-
Select the File menu and choose Show
Environments. The Environments List dialog box opens,
as shown in the following image.
This
dialog box lists all WebFOCUS Environments
defined for Developer Studio. If you previously
installed Developer Studio, WebFOCUS Environments
may already be defined. Otherwise, only the localhost environment
appears. To edit an existing environment, click Properties.
Tip: You
can also add a WebFOCUS Environment by right-clicking WebFOCUS Environments on
the Developer Studio Explorer and
selecting Add. An environment can be set
as the Development Environment if its configuration allows project
development.
-
Click
the Add button.
The WebFOCUS Environment
Properties dialog box opens, as shown in the following image. At
the top part of the dialog box is the Description text box followed
by the Environment Settings section, which contains a series of
buttons that each represents a component in a
WebFOCUS environment. At the bottom
part of the dialog box are fields to set up a connection to the
web server (Host Name, Protocol, Port, and options to set if Web
Authentication is used).
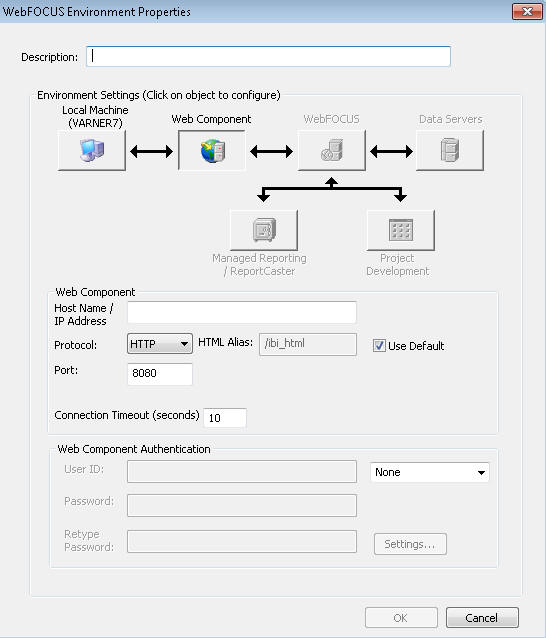
Use
the WebFOCUS Environment Properties
dialog box to define which components make up the environment. You
can optionally enter authentication information for components that
require logon credentials.
-
On the top of the window, type a Description for the WebFOCUS environment. This description
will appear in the Developer Studio Explorer
under WebFOCUS Environments.
The following image shows the top area of this screen.
This area contains a series of buttons that each represents a component
in a WebFOCUS environment.
The Web Components button is selected by default. The Project Development button is only available
in the full edition of Developer Studio.
Note: The
description cannot contain special characters, such as ., /, \,
?, *, and others. A message with characters not allowed will display
if one of the restricted characters is detected during validation.

-
On the bottom of the Web Components page, specify the information
needed to access the web server.
For some environments, once you specify the web server,
all other settings default. If the WebFOCUS environment
you are accessing does not use default settings or components require
authentication, click the appropriate button in the top pane to provide
parameters. The sections that follow explain the parameters available
for each component.
Note:
WebFOCUS
environment properties
must be entered in a specific order. For example, if web server
security is enabled, you cannot set the WebFOCUS Client Path until you have
provided valid web server credentials. Similarly, you cannot retrieve
a list of Reporting Servers until you have provided a valid WebFOCUS Client Path. As you select a component button in the
dialog box, Developer Studio ensures that it has
the necessary information before it displays the properties of that
component in the lower part of the dialog box. If the required information
is not available, you will not be able to proceed to the next component
or save the environment.
x
Local Machine properties are optional. You can select
the Local Machine button to indicate whether
to cache files when accessing a WebFOCUS environment.
The following image shows the WebFOCUS Environment Caching section
of the WebFOCUS Environment Properties
dialog box.
In caching, copies of files or information stored on a remote
machine are temporarily stored on your local Developer
Studio machine. Developer Studio then
works with the locally stored files. Caching speeds Developer Studio performance because remote machines are not accessed
and queried every time you request information. This is especially
useful when accessing mainframes or when a network connection is
slow. However, caching should not be used when multiple developers
are working with the same files because the possibility exists that you
may overwrite the changes made by the other developer. By default,
caching is not enabled.
Two properties are available:
-
Cache remote directory and file information. This
option caches information about files stored on the WebFOCUS environment. This does not
actually cache files, only information about them. If selected, Developer Studio does not re-query the Reporting Server every time
it needs a list of files stored on the server.
-
Enable file content caching. This
option caches files normally stored on the server. Developer Studio only retrieves files once and then when you wish to
read or edit them, it uses a cached copy. Be aware that when you
edit a cached file, the edited cached file is returned to the server
and replaces the actual file on the server.
Developer Studio retrieves information and files the first time you request
them and then caches them locally. Developer
Studio then uses
the cached copies until Developer Studio is restarted or you
click the Clear buttons for each level. You
can perform a manual refresh and clear all cache files by clicking View,
then Refresh, or by pressing F5. Refresh
is performed for the area that is selected in the Explorer when
you perform this action.
Note:
- If you create
a new synonym, you must manually perform a refresh to view the new
files in the Developer Studio Explorer
when caching is enabled.
- You cannot
use the caching options for the local development environment if
the Source Control feature is enabled.
x
The Web Components button
is selected by default when you create a new environment or edit
an existing one. Web Component properties specify how Developer Studio accesses
the web server. The web server must be identified before any other components.
The following image shows the Web Server section of the WebFOCUS Environment Properties dialog
box.

The following properties are available:
x
When you click the WebFOCUS Client button, Developer Studio makes a connection to your web server to retrieve
information about the WebFOCUS environment. Therefore,
you must first specify Web Component properties and your web server
must be running. The following image shows the WebFOCUS Client section of the WebFOCUS Environment Properties dialog
box.
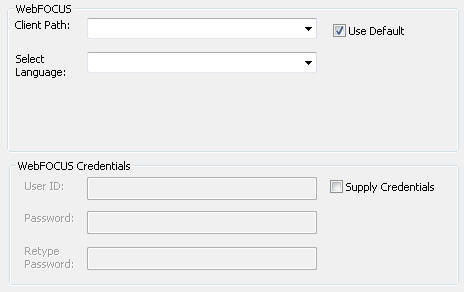
Note: If the Client Path field is empty and the Use Default
option is selected, there is a problem connecting to the WebFOCUS Client. Ensure your web
server is started and that you typed the correct properties on the
Web Components page. If you cannot connect, contact your WebFOCUS administrator.
The following properties are available:
-
Client Path.
This
specifies how calls are made from Developer
Studio to the web
server. By default, when you add a new WebFOCUS environment, it
is set to use the WebFOCUS Servlet with the default ibi_apps context
path:
/ibi_apps/WFServlet
If the WebFOCUS environment uses a non-default
context path, Developer Studio should be able to detect the custom
context path that is used. If it does not display properly, uncheck
the Use Default option and enter the correct name.
If the Client Path is incorrect for the
environment, you receive an error that the WebFOCUS Client cannot
get accessed using the provided Client Path. If you do not know
your path, ask your WebFOCUS administrator or check the WebFOCUS Administration
Console of the environment to which you want to connect. The Client Path
settings for the environment are located under Utilities and Client
Selection.
-
Select Language. This
specifies the GUI language that is used when Developer Studio connects to a remote
utility (Managed Reporting, HTML tools). When a multi-language master
file is used, this setting specifies the language titles in reports.
-
Supply Credentials. You can check
this box and type a WebFOCUS User ID and Password.
These credentials will be used for future connections to the WebFOCUS environment.
When the correct WebFOCUS Client Path is
provided, you can specify properties for the remaining component.
xManaged Reporting/ReportCaster Properties
This option is enabled only when
connecting to a WebFOCUS 7.x environment.
If you plan to work with Managed Reporting (MR) and/or ReportCaster, you can optionally select
the Managed Reporting/ReportCaster button. This allows
you to set logon credentials or change the default Managed Reporting
repository.
The following image shows the
Managed Reporting Repository section of the WebFOCUS Environment
Properties dialog box.
The following properties are available:
-
Path. This
lets you specify a non-default Managed Reporting repository. For
a default Managed Reporting repository, the Path field is empty
and the Use Default check box is selected. Your WebFOCUS administrator may instruct you to deselect the Use Default
check box and enter a path, for example:
e:\user_test\basedir01
/usr/user_test/basedir01
You
will not see a value in this field when Use Default is checked,
because it is not currently possible for WebFOCUS to detect the list of potential repositories
on the web server.
Note: ReportCaster
only supports the Managed Reporting Repository as defined in the WebFOCUS
Client Configuration file MR_BASE_DIR.
-
Supply Credentials. If
required, you can check this box and type a Managed Reporting/ReportCaster logon. Developer Studio will automatically use this logon each time it accesses
Managed Reporting or ReportCaster. If
this is blank, Developer Studio prompts you for the
logon when it requires access to Managed Reporting or ReportCaster.
Note: If
your WebFOCUS administrator has integrated MR authentication with
web server authentication, do not supply MR credentials here. They
will be picked up from the web server component properties.
x
This object allows you to see Reporting Servers that
are configured with the working WebFOCUS environment. This information
is secure and users will be prompted to sign in to WebFOCUS in order
to access this information. From this area, you can add a user Id/password
to be used when connecting to a specific Reporting Server.
The following image shows the WebFOCUS Data Servers section of the WebFOCUS Environment Properties dialog
box.
The following property is available:
-
Supply Credentials. If
checked, you can type a WebFOCUS Server ID and password for
the server highlighted in the list. Clicking Set stores
the credentials with the environment properties, and the ID entered
is shown next to the server in the list. The credentials are checked
the next time you use a feature on that server, not when you click
the Set button.
xProject Development Properties
Note: These properties only apply to self-service
application development, and when performing project development.
This object allows you to see Reporting Servers that are configured
with the working WebFOCUS environment. This information is secure
and users will be prompted to sign in to WebFOCUS in order to access
this information.
If you use remote Project-based development and your remote environment
has multiple WebFOCUS Reporting Servers, click the Project
Development button to specify which server to use when
processing requests. This server is referred to as the Project Development Server.
The Project Development Server and the WebFOCUS Client must be installed
on the same machine or use the same Application Root directory (APPROOT
directory) as each other.
The following image shows the Project Development Server section
of the WebFOCUS Environment Properties dialog box.
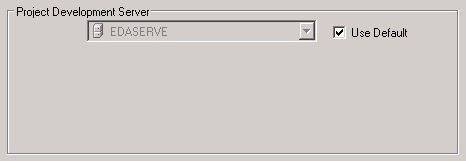
The following property is available:
-
Project Development Server. This
specifies which server to use for Project Development. All servers
defined in the WebFOCUS Client appear in the drop-down list.
xChanging the Development Environment
To use remote Project-based development, you must change
the development environment. If you do not plan to use remote Project-based
development, you can skip this procedure.
After you set up connections to WebFOCUS environments, you can
add, edit, and delete files on remote machines through the WebFOCUS
Environments folders. However, you may want to use the organizational
tools available in the Projects folders to manage applications on remote
machines. This is known as remote Project-based development and
it allows developers on different desktops to share files and work
on the same application.
Remote Project-based development requires that all WebFOCUS components
in the remote environment reside on the same machine as each other
or if installed on different machines, they have the required configuration
to allow Project development. For Project development, the remote
WebFOCUS environment must have the same Application Root directory (APPROOT
directory) for its WebFOCUS Reporting Server and WebFOCUS Client.
You can change the development environment using the Environments
List.
x
Procedure: How to Change the Development Environment
-
Select File and then Show
Environments to bring up the Environments List, as shown
in the following image.
Note: If
an environment appears as unavailable, click Refresh
Status.
-
Select the WebFOCUS Environment that you wish to use for Project-based
development.
-
Click Set Development Environment.
-
Click OK.
The
Developer Studio Explorer now shows Projects on the WebFOCUS environment
you chose. Resources will be stored on the remote machine. If multiple
Reporting Servers are defined, reports are run using the Reporting
Server that is set for project development in this environment.