In this section: How to: Reference: |
WebFOCUS Maintain makes it easy for you to add Java applets
to your forms. Java applets are included in your project as
resources. Resources are part of your project, but
you do not edit them directly using the Maintain Development
Environment. However, WebFOCUS Maintain will take care of deploying
them to the correct location so that your application will run
properly.
When you define a Java applet as a resource to your project,
you can define some or all of its parameters and default values
for these parameters. Often, Java applets are accompanied by a
text file documenting the names and default values of these parameters.
When you place a Java applet control on your form, you can
assign new values to these parameters. You can also dynamically
define new parameters or change the values of existing parameters
during run time.
Note: If your Java applet involves using other Java
classes, you must either package the applet with these classes,
or inform your end users to include the location of these classes
in their CLASSPATH. See the documentation for Internet Explorer
for more information.
x
Procedure: How to Place a Java Applet on Your
Form
-
Select
the Java applet control
 in
the Controls palette.
-
Draw
a rectangle on your form to define the approximate size and location
of your Java applet.
The Parameters dialog box opens.
-
Select
a Java applet from the list of available Java applets in your project.
Note: The list will contain only those Java
applets actually in use by your project, not all Java applet
files located in your project directory.
If
the Java applet you want is not part of your project, click
New to open the Resource Wizard.
See How to Add a Java Applet to Your Project
as a Resource for more information.
-
If necessary,
specify new parameter values for the Java applet. You can
use the parameters and default values you specified when you
added the resource to your project, or you can override these
parameters. If a control provides no value for a parameter,
the parameter is ignored.
-
Click
OK.
-
If necessary,
readjust the size and placement of your Java applet.
-
Give
your Java applet a more meaningful name than JavaAppletn.
This is optional, but recommended.
x
Procedure: How to Add a Java Applet to Your Project
as a Resource
-
In the
Parameters dialog box, click New.
WebFOCUS Maintain opens the Resource Wizard,
a series of windows that guide you through adding a Java Applet
to your project.
-
Enter
the path to the Java applet. If you prefer to browse for the
Java applet, click the ellipsis button
 .
.
Note: Be sure to use the correct case when
specifying your Java applet name. As a rule, the .class extension
should be lowercase.
Optionally, add a
description for the Java applet.
Then click
Next.
-
Specify
parameters and, optionally, default values for the Java applet. You
do not have to define all of the Java applet parameters, just
the ones that you want to supply values for in your application!
Then click Next.
-
Specify
a unique name for your Java applet.
Then click Finish.
-
You
may see a dialog box informing you that WebFOCUS Maintain needs
to make a copy of the Java applet in the project directory.
Click OK.
x
Syntax: How to Change Java Applet Parameters
Dynamically at Run Time
To
change the name of a Java applet parameter or add a new parameter,
use the following syntax:
Form.JavaApplet.params(n).Name="name"
To
change the value for a Java applet parameter, use the following
syntax
Form.JavaApplet.params(n).Value="value"
where:
- Form
-
Is the name of the form the Java applet control
is residing on.
- JavaApplet
-
Is the name of the Java applet control (not
the Java applet).
- n
-
Is the position of the parameter in the list
of parameters defined to WebFOCUS Maintain.
x
Reference: Parameters Dialog Box
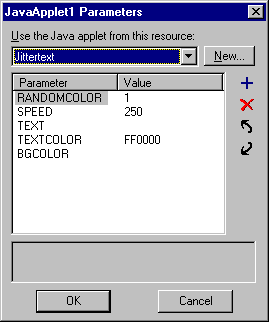
You use
the Java Applet Parameters dialog box to define the behavior
of a Java applet control that you have placed on your form.

This
dialog box contains the following elements:
-
Use the Java applet from this resource
-
Contains a list of Java applet resources that
are included in this project.
-
New
-
Opens the Resource Wizard, where you can migrate
or link to a new Java applet.
-
Parameters
-
Contains a list of the parameters for this
Java applet.
-
Value
-
Contains the default value for the parameters
listed. You can override these values if you wish.
-

-
Enables you to edit the default value for the
selected parameter.
-

-
Deletes a default value for the selected parameter.
-

-
Moves a selected parameter up in the list of
parameters.
-

-
Moves a selected parameter down in the list
of parameters.
x
Reference: Enter a Parameter Dialog
Box
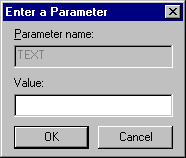
You use
the Enter a Parameter dialog box to define parameters for
Java Applets, and to assign values to parameters when you
place Java applets on your forms.
You
also use the Enter a Parameter dialog box to define amper
variables and values when defining a WebFOCUS report as a
web link. For more information, see Defining Events and Event Handlers.
You also use the Enter a Parameter
dialog box to define parameters and values for a CGI or ISAPI
program that you are defining as a web link. For more information,
see How to Use the URL Wizard to Define an HTTP Web Link.

This
dialog box has the following components:
-
Parameter name
-
If you are defining parameters for a Java applet,
WebFOCUS report, or CGI or ISAPI program, enter its name
here. Usually, Java applets come with text documentation that lists
the names of the parameters.
If you are
assigning a new value to a parameter for a Java applet control,
you cannot edit this value.
-
Default value/Value
-
If you are defining parameters for a Java applet,
enter the default value here.
If you are assigning
a new value to a parameter for a Java applet control, enter the
new value here.
xChanging Java Applet
Properties
When you select your Java applet, you will see a
list of Java applet properties in the property sheet. Changing these
properties will change what your Java applet looks like and
what it does at run time.
Many of the styling properties can also be changed using
a Cascading Style Sheet. For more information on Cascading Style
Sheets, see Using Cascading Style Sheets.
Choose your property based on the task you wish to perform:
If you want to change the name of the Java applet that identifies it to the procedure, use
the (Name) Property. For more information, see the (Name) Property.
If you want to change the Java applet or if you want to change the values for Java applet parameters, use
the Applet Property to open the Parameters Dialog Box.
If you want to change the size of the location or size of the Java applet, use a
style sheet or resize the Java applet directly in the form. You
can also use the Bottom Property, Left Property, Right Property, and Top Property.
If you want to add a border to the Java applet, use a
style sheet or the Border Property to turn the Java applet borders on and off. The BorderColor Property allows
you to determine the color of the border. The BorderWidth Property allows
you to determine the width of the border.
If you want to make the image inactive or make it invisible, use
the Enabled Property to determine whether the Java applet is active
or not. If the Java applet is inactive, nothing will happen when
the end user clicks it. You can also use the Visible Property to determine
whether the Java applet is visible to the end user or use a style
sheet. For information, see the Enabled Property and the Visible Property.
If you want to change what the cursor looks like when it is on top of the Java applet, use
the CursorPointer Property or
use a style sheet.
If you want to display a tooltip when the cursor is on the top of the Java applet, use
the ToolTipText Property.
If you want to assign a help topic to the Java applet, use
the Help Property. For more information, see Assigning Help to Your Forms and
Controls.
If you want to move the Java applet to another layer, use
the Layer Property. For more information, see Layering Controls.
If you want to control the display order of the Java applet when more than one control is overlaid, use
the Zindex Property. For more information, see the ZIndex Property.
Note: Internet Explorer 7 or equivalent is required.
 in
the Controls palette.
 .
.


