Applying Database Administrator Security
In this section: How to: Reference: |
You can secure Master Files on a file-by-file basis.
For each data source, security can be maintained at two different
levels.
-
Database Administrator Level. You
specify the Database Administrator (DBA) password for the data source.
The DBA has unlimited access to the Master File and data source
and can set up or change security restrictions for individual users. Only the Database Administrator can encrypt
(scramble) or decrypt (unscramble) a data source. For more information,
see Encrypting and Decrypting a Master File.
-
User Level. You
specify the DBA and user passwords for the data source. The user
password represents a user who has access to that data source. When
you specify a user password, you must also set at least the type
of file access: read, write, read/write, or update. Security for
each user can be further limited by restricting access to segments,
fields, or field values. For more information, see Restricting Access to Segments, Fields, Field Values, and Noprint. Once a user
password has been established, you can apply the same restrictions
to multiple users. For more information, see Applying Security Restrictions for Multiple Users.
Note: You cannot specify a Database Administrator (DBA)
password during the Create Synonym process. You must use the Synonym
Editor.
When security is specified, the Database Administrator or user,
must enter a password to get access to the data source. When the
DBA or user no longer needs access to the data source, you can delete
their security.
Before adding any type of security to a data source, the Database
Administrator must be aware of certain DBA guidelines. See DBA Guidelines.
x
Procedure: How to Set Up Security for the Database Administrator
-
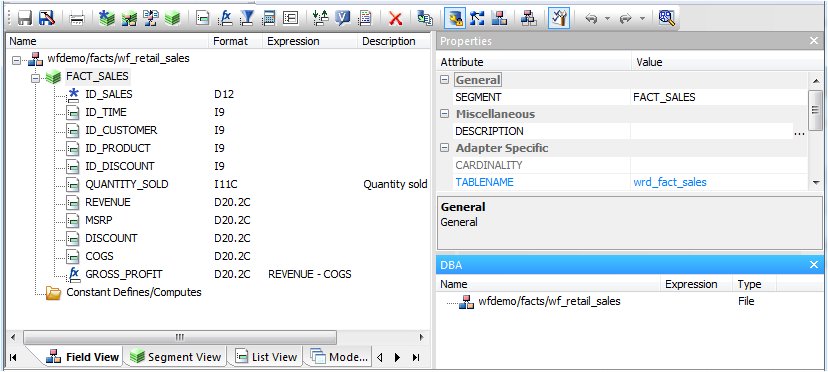
In the Synonym Editor, click DBA from the Tools menu
or click the DBA
 button
from the Synonym toolbar.
button
from the Synonym toolbar.
The DBA
pane opens in the workspace, as shown in the following image.
-
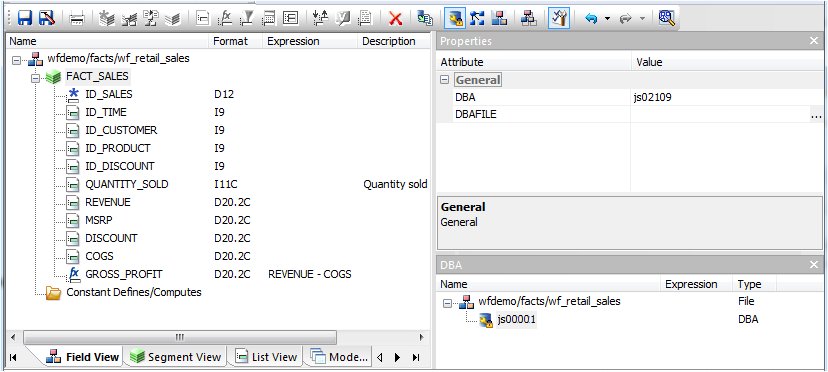
Right-click
the file name in the DBA window and select Insert,
then DBA.
A default DBA password will be created for the Master
File. You can change this value, delete it, add users to specify
file restrictions, or add file names to specify data source-specific
restrictions to the current data source. You can also specify a separate
DBA file that contains DBA security restrictions.
Note: When
the password is created and the cursor is in that field, you can
right-click and use the edit options to undo, select all, cut, copy,
paste, or delete the password.
x
Procedure: How to Set Up Security for the User
-
In the DBA pane, right-click the DBA
icon to insert user restrictions or specify a DBA file.
-
Once you
add a user you can continue to insert file access restrictions by
right-clicking the user field and selecting insert.
-
Select the
type of access: Read, Write, Read/Write, or Update.
-
Specify
the type of restriction for each option: Restriction to Field, Value,
Segment, Noprint, or Same Restriction.
Note: The Same Restriction option is activated
when there are multiple users.
-
Click OK to
save the Master File with the user password and restrictions.
x
Reference: DBA Guidelines
You
can ensure that the security restrictions you place on Master Files
are correct by adhering to the following guidelines:
- Every file
with access limits must have a DBA password.
- No segment,
field, or field value restrictions may be specified at the Database Administrator
level. The Database Administrator should have unlimited access to
the data source and all cross-referenced data sources.
- Once security
restrictions have been applied, the Database Administrator should conduct
thorough testing of every restriction before the data source is
used. It is particularly important to check field values to make
sure they do not contain errors. If they are in error, user access
to the field data will be unnecessarily restricted.
- All groups
of cross-referenced data sources must have the same security restrictions.
- You must have a DBA password to encrypt
and decrypt or restrict existing data sources.
- The Database
Administrator can change any type of security restriction.
- Access levels
affect the fields users can access. The Database Administrator must consider
what commands each user will need. If a user does not have access
rights, that user will receive a message.
x
The
following options are available from the DBA pane when the DBA password
is selected.
-
DBA password
-
By default, the DBA password is the same as the user ID used
to connect to the reporting server. Using the Rename option from
the DBA password Context menu, you may enter a different password
of up to sixty-four characters. This is the password of the DBA
who will be creating and maintaining the current data source. The DBA has full access to the data source
and the corresponding Master File, controls the access rights of
other users, and has encryption privileges. See Encrypting and Decrypting a Master File.
-
DBAFILE
-
Select the name of the Master File that contains your DBA
security restrictions. Other Master Files can use the DBA security
restrictions in this Master File.
-
Insert Filename
-
Enter the name of the Master File to which user security
will be applied. This option is used to add data source-specific
restrictions to the current data source. It includes a FILENAME
attribute for the selected Master File. The FILENAME attribute in the
referenced Master File must be the same as the FILENAME attribute
in the DBA section of the current data source.
-
Insert Users
-
Enter the names (up to sixty-four characters) of users whose
access rights will be granted for the current data source.
-
File Access
-
For user access, select one of the following options:
- Choose Read for
full viewing rights.
- Choose WRITE to
permit additions or changes to the data source.
- Choose READ/WRITE for
both of the above.
- Choose UPDATE to
permit changes to field values.
-
Restrictions: Segment, Field, Value, Noprint, Same
-
When the file access is selected, continue to select the
type of restriction you wish to apply.
- Choose Segment to
grant access to all or individual segments.
- Choose Field to
grant access to all or individual fields.
- Choose Value to
limit access to values that meet a test condition. See Restricting Access to Segments, Fields, Field Values, and Noprint.
- Choose Noprint to
specify fields you do not want to display in a report.
- Choose Same to
apply the same restrictions as other users that are already set
up.
-
Access Restrictions
-
-
User. Is the
user name written to the Master File.
-
Name. Is the
name of the Master File component selected (for example, the segment
or field name).
-
Access. Is
the type of access restriction.
-
Restrict. Is
an option for File access restriction.
-
Value. Is
the value for which to restrict access.
xSelecting the Type of Access
When you assign a user password, the type of file
access and access restrictions options are available.
You must specify at least the type of access the user is permitted
to have for the data source. The type of file access can be specified
in the File Access group on the DBA pane. In this group, there are
four file access options:
-
Read. Allows
the user only to read (to view) the data source.
-
WRITE. Allows
the user only to write (add or to make changes) to the data source.
-
READ/WRITE. Allows
the user to read and write to the data source.
-
UPDATE. Allows
the user to update (make changes to) existing field values.
The type of file access determines what a user can do to the
entire data source:
xRestricting Access to Segments, Fields, Field Values, and Noprint
You can restrict access to segments, fields, field values,
and Noprint fields in a Master File by specifying access restrictions
for a user. When you specify what is to be restricted, such as segment,
field, or value, you can then specify the type of access that will be
restricted.
Right-click the file access restriction and select the Segment, Field,
or Value, or Noprint option
from the Context menu.
-
Segment. You
specify the type of access for individual segments, as shown in
the following image.

The
following image illustrates how a user can change a segment name.

-
Field. You
specify the type of access for individual fields.
-
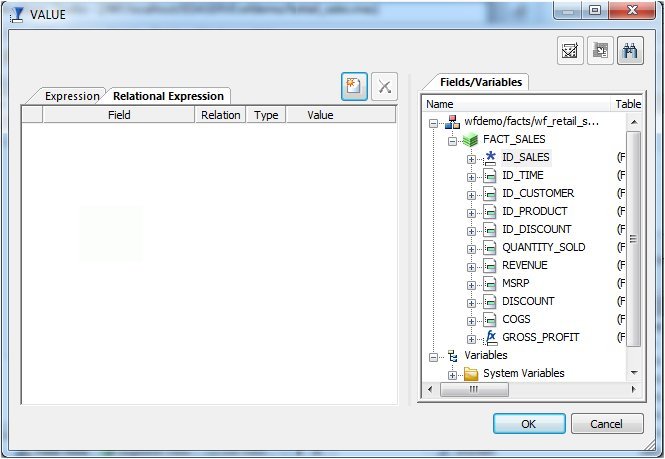
Value. You
specify the type of access (read or write) and the test condition.
The user is restricted to using only those values that satisfy the
test condition.
The following image illustrates how to change
a field name used in a value field.

The
following image illustrates how to create a condition. This dialog
box is presented after pressing the ellipsis next to the value field.
-
Noprint. You
can also specify not to display the data in that field using Noprint.
If you specify Noprint for a field, the data will appear as blanks
for alphanumeric format or zeros for numeric format whenever the
user tries to retrieve it.
xApplying Security Restrictions for Multiple Users
You can specify restrictions for one user and apply
the same restrictions to other users. This helps when you want to
set the same restrictions for a group of users.
x
Procedure: How to Apply Previously Defined Restrictions to Another User
-
In the DBA
pane, right-click the DBA password and select Insert,
then User.
-
Right-click
the newly added user and select Insert to
specify the desired type of access restriction you would like to
apply.
Available access types are Write Access, Read/Write
Access, and Update Access.
-
Right-click
an access type and select Insert, then Same
Restriction.
Note: The Same Restriction option is only
available when there are multiple users. A drop-down combo box is
activated in the Properties pane with a NAME attribute.
-
Click
the arrow on the drop-down combo box next to the NAME attribute in
the Properties pane, and then select the user with the security
restrictions that would apply to the new user.
Security restrictions from the user selected in the
drop-down combo box are applied to the new user. You can apply the
security restrictions to other users by repeating steps 1 to 4.
Note: You
must have created at least one user security restriction to apply security
restrictions to multiple users.
xDeleting a DBA or User Password
You can delete a DBA password or security for a user
when it is no longer needed.
x
Procedure: How to Delete a User Password
-
On
the DBA pane, select the user password you wish to delete.
-
Right-click
and select Delete or press Delete on
the keyboard.
If you
delete the user based upon whom you have assigned security restrictions
for other users, you must reset security restrictions for all users
attached to the user you deleted.
x
Procedure: How to Delete a DBA Password
Deleting
a DBA password will delete all user security for that data source.
On
the DBA pane select the DBA password, then right-click and select Delete or
press Delete on the keyboard.
All security
information is removed.
xEncrypting and Decrypting a Master File
You may use the Encrypt and Decrypt attributes from
the Synonym Editor to scramble and unscramble some or all of the
contents of a data source. When you encrypt Master Files, they are
secure from unauthorized examination.
Encryption at the data source level scrambles the entire contents
of that Master File so it is unreadable. When you encrypt a Master
File, you can decrypt it. Decrypting unscrambles the contents to
its readable state.
Before you can encrypt or decrypt any Master File, you must specify
the DBA password. If you do not specify a DBA password, you will
not be able to encrypt or decrypt the file.
x
Procedure: How to Encrypt a Master File
-
In the
Synonym Editor, select DBA from the Tools
menu or click the DBA
button
from the Synonym toolbar.
The DBA pane opens.
-
Create
and save the Master File with the DBA password.
-
From
the Synonym Editor Field View tab, select a segment from the Master
File hierarchy (left pane).
The values for the selected segment appear in the Properties
pane on the right.
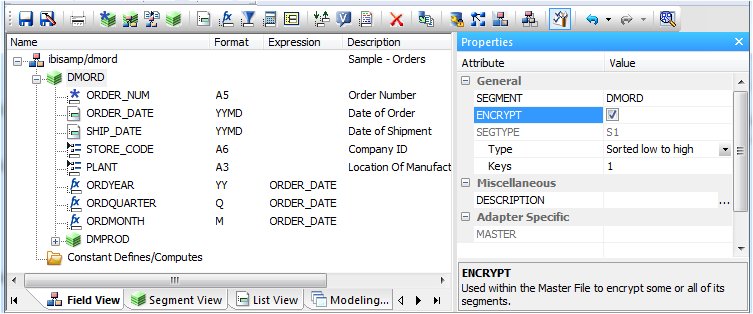
-
Select
the ENCRYPT check box.
-
Click Save from
the File menu to encrypt the Master File.
x
Procedure: How to Decrypt a Master File
-
At the
encrypted segment level in the Master File hierarchy, clear the ENCRYPT attribute.
-
Click Save from
the File menu to decrypt the Master File.