Step 3: Partition the Project Files

In this section:

How to:

Reference:

After creating a deployment scenario, you define the details of that scenario by identifying project files for distribution to target servers in a WebFOCUS environment.

This topic applies to deployment scenarios that you created in Step 2: Create a Deployment Scenario. It does not apply to the supplied scenario Local Deploy. Developer Studio uses Local Deploy to prepare files for Maintain and to run on a local server. This option is visible only after you create the first deployment scenario. Do not modify or remove Local Deploy.


Top of page

x
Procedure: How to Partition the Project Files
  1. Open the Deploy folder for the project. Right-click the deployment scenario that you are defining, and select Open.
  2. The left window pane displays information about the individual files that are visible from the project search path.

    The icons next to some files are unavailable. This indicates that the files are available, but not active for your project. You can click the binoculars icon to show the files that you added to your project and hide the inactive files. However, you can deploy even the files that you did not add to your project.

    The value of Assigned is No if the file has not been assigned to a server for deployment. Assigned is Yes if you have assigned the file to a server for deployment.

    Note: If you cannot see the value in the Assigned column or the full application path in the Location column, drag your cursor to the right to expand the Application Files window.

  3. The right window pane displays the environments you have identified and optionally configured to accept project files.

    For a web server, you can create one or more subfolders on the deployment path. For example, you might separate HTML files from image files by creating an individual folder, or central location, for each type:

    1. Select and right-click the current web server deployment path (for example, WEB/APPROOT/Sales).
    2. Select New Folder from the shortcut menu. At the cursor location in the entry field, enter the name of the new folder.

      Note: You must design the application properly in order to take advantage of a multi-level directory structure on the deployment environment.

  4. In the right pane, open the environment on which you are partitioning the files. In the following example, the Test Environment includes a web server and a server node that can be used for deployment.
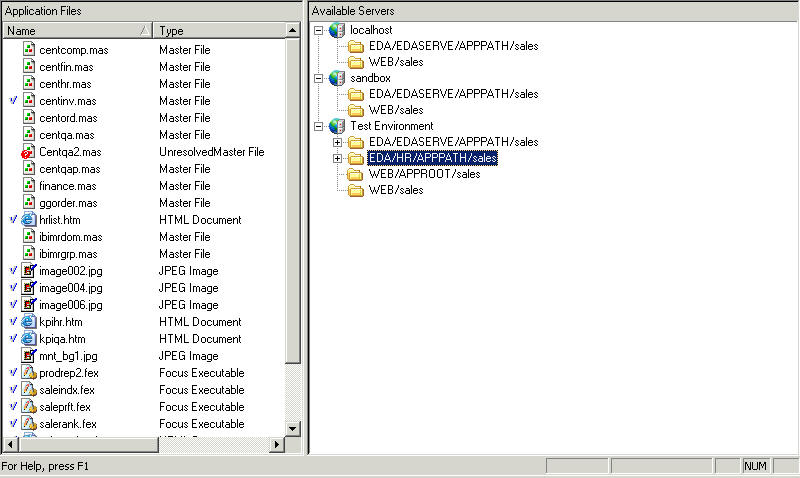
    In the example:

    • The web server is defined by the node WEB, followed by the descriptive name APPROOT and the name of the directory that will be created when the files are deployed (sales).
    • A WebFOCUS Reporting Server is defined by the node EDA and the name of the server (for example, EDASERVE), followed by the descriptive name APPPATH and the name of the directory that will be created when the files are deployed (sales).

    The developer selected NONE as the default partition environment when creating the new deployment scenario. For an example of the window that opens when you select a default partition environment, see Working in a Default Partition Environment.

  5. Drag one or more files from the left window pane and drop them into the right window pane on the applicable server.

    See Guidelines for Deploying Files for information that will help you deploy files to the applicable server.

    To remove a partitioned file from the right window pane, right-click it and select Remove.

    In this example, the file named launch_qty.htm is an HTML page from which a user can run a report named stockqty.fex. To partition these files appropriately, you would drag launch_qty.htm to the web server, and stockqty.fex to the WebFOCUS Reporting Server.

    On the toolbar, these buttons enable you to do the following while you remain in the Scenario Editor:

    Name

    Button

    Description

    Deploy scenario

    Deploys

    Deploys (moves) the files to the servers based on the partitioning defined in the current deployment scenario.

    Deploy and run scenario

    Deploy and run scenario

    Deploys the files to the servers and then runs the starting object defined in the current deployment scenario.

    Run scenario

    runs starting object

    Runs the starting object defined in the current deployment scenario.

    Displays all files in the project path

    displays available items

    Displays available items in the project path. The icons next to some files are unavailable. This indicates that the files are available, but not active for your project. You can click the binoculars icon to show the files that you added to your project and hide the inactive files. However, you can deploy even the files that you did not add to your project.

    These buttons are also available on the toolbar in the Explorer.

  6. When you have finished partitioning files, choose one of the options in step 5 or close the window. You can perform any of the options in step 5 outside the Scenario Editor. See Step 4: Deploy the Project Files.

Top of page

x
Reference: Guidelines for Deploying Files

Top of page

x
Working in a Default Partition Environment

How to:

In this example, the developer selected the Test Environment as the default partition environment when creating the deployment scenario.

Developer Studio automatically partitions the .jpg and .htm files to the web server, and the .fex files to the WebFOCUS Reporting Server, as shown in the following image.

Files in the Name display field that have a check check icon icon next to them have been partitioned.


x
Procedure: How to Modify Properties of Partitioned Files
  1. In the Scenario Editor, right-click a file that has been assigned to a server in the Available Servers window and select Properties, as shown in the following image.

    Scenerio Editor Diagram

  2. Click the Advanced tab to see the following two options:
    • Always deploy this file.

      or

    • Never deploy this file.
  3. Choose one of the options. They are unchecked by default.

    Always deploy this file. Use this option when Smart Deploy is in effect to designate specific files to be deployed even though they have not changed since the last deployment. You can use this option for a file that has not changed, but references another file that has been assigned to a different server within the scenario.

    For example, if Smart Deploy is enabled and a WebFOCUS Maintain procedure with forms has not changed since the last deployment, by default, it would not be redeployed. But if a new web server has been assigned for a web-based file that is used by one of the Maintain forms, the Maintain file (.mnt) with the form needs to be updated with the new URLs. In this case, you would select this option for the .mnt file, so that the form would be generated with the new web server information.

    The following are examples of other situations when you might want to use this option:

    • When script files are embedded in Maintain forms rather than linked, and changes are made to the script code, but not to the Maintain procedure and forms.
    • When CALLed or EXECed procedures are assigned to different WebFOCUS servers since the last deployment, but the calling procedure has not changed.

    Never deploy this file. Use this option when you do not want to deploy a file, but information about the assigned server location is needed by other files in the application.

    In WebFOCUS Maintain applications, this option is useful when web-based files already reside on the target web server and you do not need to edit files there or do not have write access. The correct URLs will be used in the forms, without writing the web resource files to the web server.

If you are also using Smart Deploy, you need to assign the Always deploy files option to any .mnt files that have not changed but have associated forms that need to reference the new web server location.


Top of page

x
Setting Running Paths

How to:

You can set the execution search path for a deployed application on a Reporting Server. The Reporting Server will use the path specified to locate the resources for that application.

This feature is useful if you set up common resources shared by multiple applications. It allows you to point a server to a common location to find the resources it needs to run a specific application.


x
Procedure: How to Set Running Paths
  1. In the Scenario Editor, expand a WebFOCUS environment under Available Servers in the right pane. Then, select and right-click a WebFOCUS Environment.

    Select Set Server Paths from the shortcut menu. The Set Running Paths for Server dialog box opens, as shown in the following image.

    Set Running Paths for Server Diagram

  2. The Available Paths list box displays the application directories you can add to the execution search path for the current application.

    Select a directory or directories and click Add, or click Add All to include all directories in the execution search path.

    You can also use the Remove and Remove All buttons to make the desired assignments.

  3. In the Additional Path field, optionally enter another path to add to the execution search path.
  4. Click OK to close the dialog box.

WebFOCUS