In this section: Reference: |
The Alert feature requires the
following components:
-
WebFOCUS Reporting Server. This server is responsible
for processing the procedure, accessing and retrieving the requested
data, and creating the report when the Alert test is triggered (true).
-
Managed Reporting. This environment is used to create
and manage Alerts.
An Alert consists of the following:
An Alert test is required to check whether or not a set of defined
test conditions (rules) is met (true or false). An Alert test can
be a WebFOCUS Test, which is a simple TABLE request that
you create to define the condition to test for. Alternatively, an
Alert test can be a Test for File Existence, which checks
for the existence of a file that is accessible to the WebFOCUS Reporting
Server to which the Alert test is submitted. The file does not need
to be in the APP PATH. It just needs to be in a location where it
can be found by the Reporting Server.
Note: The Test for File Existence file does not
need to be an actual file with an extension. Testing for the existence
of a folder is also valid.
If the Alert test is triggered (true) and returns records, the
Alert result request is processed. You have the option of creating
the result report or selecting an existing Managed Reporting report
you are authorized to run.
Alerts Created in Developer Studio. If you select WebFOCUS Test in
Developer Studio, you are prompted to create the Alert test using
the reporting tool. You can also choose the Editor. If you select
the Editor, be sure to keep the TABLE request simple. The TABLE
request should only contain the fields to evaluate the condition
and an ON TABLE HOLD statement. When you save the request, it is
validated to ensure you have included the ON TABLE HOLD statement.
You can create the Alert result or select an existing Managed
Reporting report.
Considerations: One consideration when creating an Alert
is the flexibility of editing the Alert result. It is recommended
that you select an existing report for the Alert result request,
as it is available to edit, run interactively, or schedule independently
of the Alert. If you create the Alert result using Developer Studio
within the Alert Wizard, you need to use the Alert Wizard and select
the open option again to edit the request, because the Alert test
and the report to be run are contained within the Alert procedure.
Once an Alert is created using the browser or Developer Studio,
it is stored in the WebFOCUS Repository.
x
Reference: Alert Test Sample Code Created in Developer Studio With the
Editor
In
the sample code that follows, an Alert test is created with the Editor
and a report to be executed is created with Report Painter. To keep
the sample code simple, styling and report options, such as report
headings and conditional styling, are not included in this request.
Notice
that after the first TABLE request there is a –IF statement that
checks if the number of lines in the report is equal to zero (–IF
&LINES EQ 0). This checks to see if the Alert should be triggered
(true).
If the number of lines is greater than zero, then
there are records that satisfy the Alert test and the report is
executed. This test condition determines if the second TABLE request, to
execute the report, should be triggered (true).
The following is the Alert test sample
code:
-* Created by Alert Wizard
-* version 1.0
-* start of the test report
TABLE FILE CENTINV
SUM CENTINV.INVINFO.QTY_IN_STOCK
BY CENTINV.INVINFO.PRODCAT
BY CENTINV.INVINFO.PRODTYPE
BY CENTINV.INVINFO.PRODNAME
BY CENTINV.INVINFO.PROD_NUM
WHERE CENTIV.INFO.QTY_IN_STOCK LT 5000;
ON TABLE HOLD
END
-* end of the test report
-* start of the test
-RUN
-IF &LINES EQ 0 GOTO ALERTEXIT;
-* end of the test
-* start of the output report
TABLE FILE CENTINV
PRINT
     CENTINV.INVINFO.QTY_IN_STOCK
     CENTINV.INVINFO.PRODCAT
     CENTINV.INVINFO.PRODTYPE
     CENTINV.INVINFO.PRODNAME
     CENTINV.INVINFO.PROD_NUM
WHERE CENTIV.INFO.QTY_IN_STOCK LT 5000;
ON TABLE SUBHEAD
“Products with Inventory Below 5000”
ON TABLE SET PAGE-NUM NOLEAD
ON TABLE NOTOTAL
ON TABLE PCHOLD FORMAT HTML
ON TABLE SET HTMLCSS ON
END
-* end of the output report
-* start of the options
-* end of the options
-ALERTEXIT
-* End Alert Wizard
x
Authorized users can run an
Alert test interactively and optionally schedule it to be distributed
by ReportCaster.
The following image shows basic Alert processing.
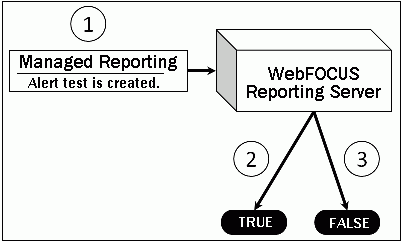
- The Managed Reporting developer, using Alert Assistant or
the Alert Wizard, creates an Alert test and designs the report to
be run if the Alert condition is true.
- If the Alert test is true, the WebFOCUS Reporting Server runs
the Alert result.
- If the Alert test is false, the Alert result is not run.
The following image shows scheduled Alert processing.
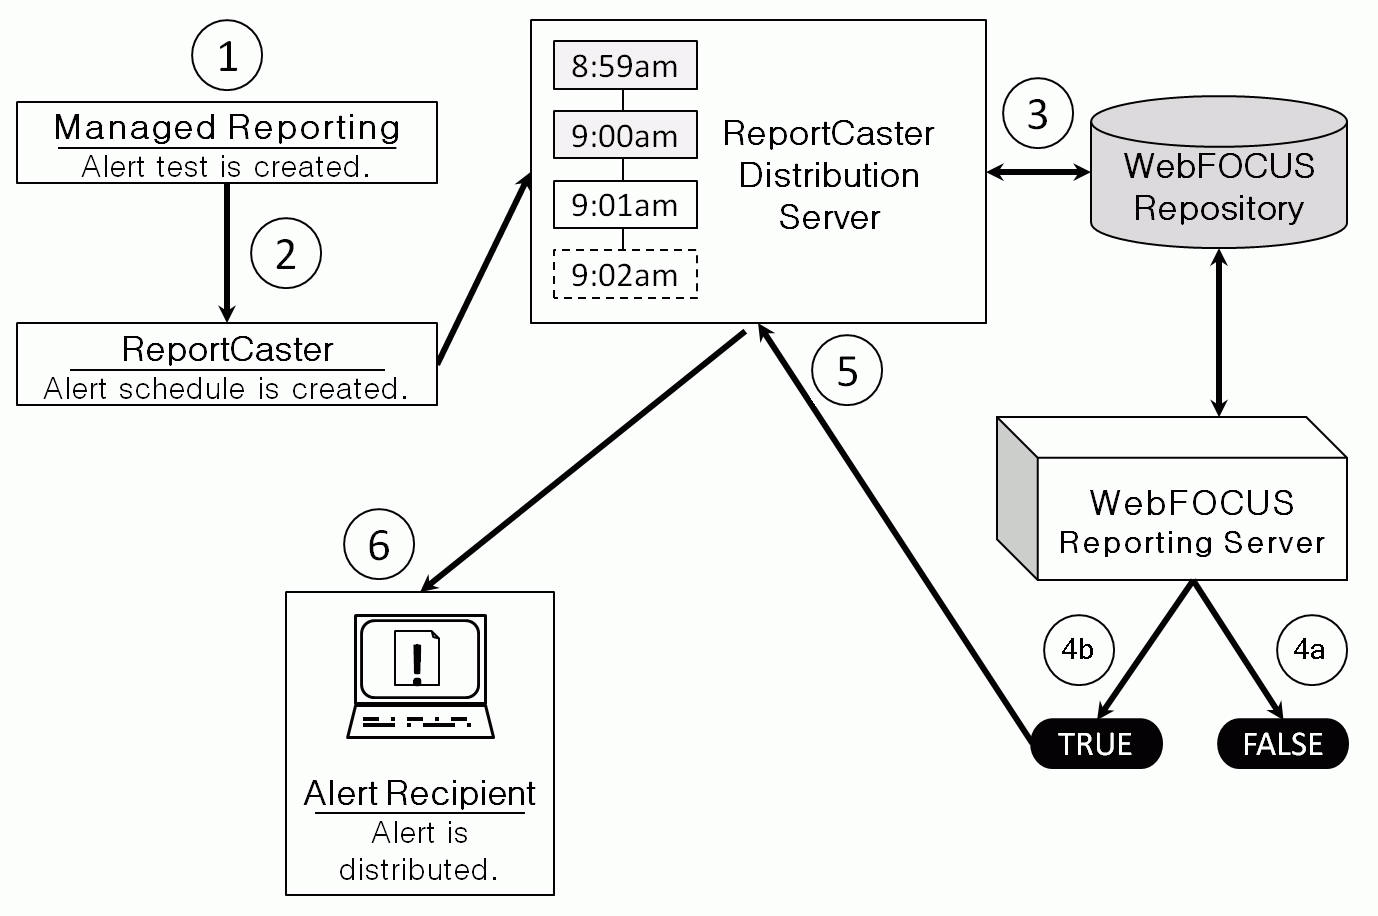
- The Managed Reporting developer, using Alert Assistant or
the Alert Wizard, creates an Alert test and designs a report to
be run if the Alert condition is true.
- If desired, an Alert schedule is created using ReportCaster.
- The ReportCaster Distribution Server checks for scheduled jobs
in the WebFOCUS Repository.
- When the ReportCaster Distribution Server processes a scheduled
Alert procedure, it is submitted to the Reporting Server to evaluate
if the Alert test is true.
- If the Alert test is false, the
Alert is returned to the queue for the next scheduled time.
- If the Alert test is true, the Reporting Server runs the Alert
result and returns the results to the ReportCaster Distribution
Server. The ReportCaster Distribution Server distributes the Alert
result to the recipients, as specified in the schedule.
- The ReportCaster Distribution Server
distributes the Alert result to the specified recipients, and allows
you to specify various scheduling options.
- The report is received by the recipient.