Managing a Project With Source Control
In this section: Reference: |
Developer Studio supports the following third-party source code
management products:
- Microsoft Team Foundation Server
- Microsoft Visual SourceSafe
- Subversion
- CVS
- ClearCase
- SourceGear Vault
- Aldon LM(e)
- ChangeMan DS
- PVCS Version Manager from Merant and Perforce
- Perforce
Source code management (called source control in Developer Studio),
provides version control for your individual and multi user application
resources, allowing multiple users to work on the same files. A
source control product manages access to source code and keeps track
of all code changes.
Developer Studio provides access to basic source control functions
through menu options in the Developer Studio Explorer, which is
the Developer Studio user interface for accessing files. If your
site has installed a supported source control product, you can track the
history of project code without leaving your development environment.
Source control is available from the Projects area in the Developer
Studio Explorer, when performing local, stand-alone development,
or remote project development against a central WebFOCUS repository.
This feature is also available when working from the Managed Reporting
area of Developer Studio.
The WebFOCUS Developer Studio Source Control feature uses the
Source Code Control API (SCC API) that is utilized by the most popular
Version Control Systems (VCS) on the market. The SCC API is an industry
standard specification for Version Control Systems (VCS) connectivity
defined by Microsoft.
x
Reference: Requirements for Source Control
- The client
software for the Version Control System (VCS) that is used must
be installed on the computer where Developer Studio is installed.
The Version Control System (VCS) database can reside anywhere on
the network and on any platform.
- The required
client software can be installed after the Developer Studio installation.
- Multiple Version
Control System (VCS) client software can be installed and the developer
can select the provider they want to use. From the Developer Studio
main menu, select Window and then Options.
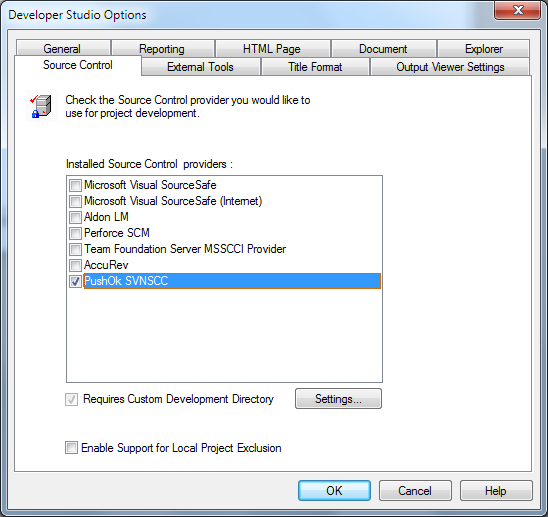
When the Developer Studio Options dialog box opens, click the Source
Control tab. Select the required system based on the
detected Source Control Systems.
x
When you start Developer Studio, it checks your system
to determine if a supported source control product is installed.
If Developer Studio detects a supported product, it enables optional
use of that product for the management of Developer Studio application
resources.
x
Procedure: How to Determine if Source Control is Enabled
-
In the
Developer Studio Explorer, select Options from
the Window menu.
-
From
the Developer Studio Options dialog box, select the Source
Control tab.
The source control system or systems detected
by Developer Studio during startup are listed.
Note: If no systems are detected this
tab indicates that no Source Control providers are available.
-
If more
than one system is listed, check the one you want to use, and click OK.
Otherwise, Developer Studio will use the
system that is listed and checked by default.
Note: If you do not want to use the
Source Control feature, uncheck the selected system.
-
Click Cancel to
close the dialog box and return to Developer Studio Explorer.
x
Procedure: How to Access Source Control Options
You can implement source control on a Project or in the
Managed Reporting area while selecting a folder or file under the
top level Content folder. Developer Studio writes information regarding
source control in the .gfa file of the project when you select the
option Add to Source Control. For Managed
Reporting, information is stored in the WebFOCUS database.
The following information pertains to using Source Control
from the Projects area. For more information on using source control
from the Managed Reporting environment, see How to Use Source Control From Managed Reporting.
Depending
on the way you access a source control option, that option is applied
to a Developer Studio project (GFA), or to a single file or multiple
files, if selected. A project refers to an entire folder with all
its contents (files).
If an object is selected
(for example, a project or file), a source control option is applied to
that object.
Access source
control options in one of the following ways:
- Click the Source
Control button
 on the toolbar.
- Select Source
Control from the menu bar.
- Select and
right-click Projects on localhost, (or the WebFOCUS
environment name that you are using), and select Source Control from
the context menu.
- Select and
right-click a project in the Projects area, and then select Source
Control from the context menu.
- Select and
right-click a virtual folder under a project, and then select Source
Control from the context menu.
- Select and
right-click a file in a virtual folder, and then select Source Control from
the context menu.
x
Procedure: How to Use Source Control From Managed Reporting
From the Managed Reporting area of Developer Studio, shown
as Content in the explorer tree, you can add folders to the Version
Control System (VCS) database by creating a new project for the
selected folder.
Note: The
examples and images in this procedure use Microsoft Visual SourceSafe.
The connection process and creation of the project
on the Version Control System (VCS) database vary by product.
-
Select
specific files from a Managed Reporting folder, or select a folder
to add all files for that folder to the Version Control System (VCS) database.
-
Click
the Add to Source Control icon
 in the
toolbar. Individual files or folders can be added using the right-click context
menu or the Source Control icon in the toolbar.
in the
toolbar. Individual files or folders can be added using the right-click context
menu or the Source Control icon in the toolbar.
You are prompted to connect to the Version
Control System (VCS) database, as shown in the following image.
-
Log
on to the Version Control System (VCS) database as follows:
-
In the Username field, type a valid user name for the Version
Control System (VCS) database.
-
In the Password field, type a valid password for the Version Control
System (VCS) database.
-
In the Database field, type the full path of the Version Control System
(VCS) database. You can also click Browse to navigate
to the location of the Version Control System (VCS) database.
-
Click OK.
Once authentication is successful,
the Add to SourceSafe Project window opens, as shown in the following
image.
-
Select
the project directory and the project name. For project name, it is
recommended that you use the name provided by Developer Studio to
avoid mapping issues between the Managed Reporting folder name and
the Version Control System (VCS) project. It also helps developers
match and identify the projects.
You can:
- Create the
project at the root of the database. To do this, select the root of
the tree "$/", provide a project name, and click OK.
- Optionally,
organize projects to have the same structure as in the Object Explorer
area of Developer Studio. For example, when the root of the tree
is selected, you can type WebFOCUS Environments, click Create,
select the WebFOCUS Environments folder,
and type a new name in the project field for the Environment name
before clicking Create. This creates a subfolder
under WebFOCUS Environments with the name you typed. Select the Environment
name, type the project name for the folder, and click OK.
-
If this
is a new project, a message appears asking whether you want to create
the project. Click Yes.
A window opens that shows the files that
will be added to the Version Control System (VCS) project you created,
as shown in the following image.
-
Click OK.
The files and their Source Control status
are visible in Developer Studio, as shown in the following image.
x
Procedure: How to Check Files In and Out of Source Control Product
To check out file(s), select the required file(s), right-click
the selection, and select Check Out. A window
with the files requested opens, as shown in the following image.
To check in file(s), select the required
file(s), right-click the selection, and select Check
In.
x
Procedure: How to View Source Control Options
You can view file properties
or perform other tasks available from the Source Control menu.
-
Right-click
a file that is added to Source Control.
-
From
the context menu, select Source Control and
click the required option (for example, Source Control Properties).

x
Reference: Current Limitations for Source Control
Files are not secured for updates when accessed outside
of Developer Studio. To ensure files are not overwritten, all developers
must use Developer Studio as their development tool.
x
Reference: Source Control Icons
The following table describes how Developer Studio uses
the icons to indicate the status of a file in regard to source control.
|
Status
|
Description
|
|---|
|

|
The file has been added to source control.
|
|

|
The file has been checked out of the source control
database for editing.
|
|

|
The file has been added to source control.
The current Developer Studio project is sharing it with another
Developer Studio project that has been added to source control.
|
|

|
The file has been checked out of the source control
database for editing. The current Developer Studio project is sharing
it with another Developer Studio project that has been added to
source control.
|
|

|
The file is being shared with another Developer Studio
project. It has been checked out by the other project.
|
|

|
The file has not been added to source control, or
has been added and then removed.
|
x
Procedure: How to Restore Write Access to a Single File
-
In the
Developer Studio Explorer, select and right-click the file. Select Properties on
the context menu.
-
On the
General tab on the File Properties dialog box, click the Read-only check
box to remove the check mark.
-
Click OK to
close the dialog box.
In the Developer Studio Explorer, notice that the attribute
R (read-only) has been removed from the file.
x
Procedure: How to Restore Write Access to a Project
-
Select
and right-click the project.
-
Select Properties on
the context menu.
-
On the
General tab, in the properties dialog box, click the Read-only check
box to remove the check mark.
-
Click OK to
close the dialog box.
In the Developer Studio Explorer, notice that the attribute
R (read-only) has been removed from the project.
xUsing Microsoft Team Foundation Server as the Source Control Product
This section describes the requirements needed in order
to use and set Microsoft Team Foundation Server as a source control.
Developer Studio 8 and higher supports Microsoft Team Foundation
Server as a source control provider. Information Builders has tested
and certified Microsoft Team Foundation Server 2012.
x
Microsoft Team Foundation Server Requirements
In order to use Microsoft Team Foundation Server as a source
control provider with Developer Studio, you must have the Microsoft
Visual Studio® Team Foundation Server 2012 MSSCCI Provider 32-bit
plug-in installed. The plug-in is available through the Microsoft website.
You can run the MSSCCI software using the following environments:
- Windows 7, Windows XP Service Pack 2, Windows Server 2008
R2, or Windows Server 2003 Service Pack 1.
- Microsoft Visual Studio Team Foundation Server 2005, 2008, 2010,
or 2012.
Microsoft Visual Studio Team Explorer can also be installed on
the same machine as Developer Studio so that you can compare files
and perform other tasks such as manage team projects.
x
Procedure: How to Set Microsoft Team Foundation Server as the Source Control Provider
-
While in Developer Studio, click Window,
and select Options.
The Developer Studio Options dialog box opens.
-
Select the Source Control tab.
-
Select the Team Foundation Server MSSCCI Provider check
box from the list of available Source Controls.
Once the Team Foundation Server MSSCCI Provider option
is selected, Microsoft Team Foundation Server is used as your source
control provider.
Note: The Team Foundation Server
MSSCCI Provider check box is selected by default if the Microsoft
Team Foundation Server is the only source control you have installed.
xUsing Subversion (SVN) as the Source Control Product
This section describes the relationship between Subversion
(SVN) and WebFOCUS applications accessed and created by Developer
Studio and provides recommendations regarding the configuration
of Subversion and Developer Studio.
Subversion does not have native support for the SCC API, however,
there are software vendors that provide SCC API plug-ins to allow
development tools such as Developer Studio to access the Subversion
repositories and use functions that are available from Subversion.
The Subversion (SVN) requires that a third-party product (plug-in)
is used to provide the SCC Compliance that is used by Developer
Studio to connect to the Version Control System (VCS) repository.
Note: Although you may use any Subversion plug-in
as your Source Control, this section is specific to PushOk SVN configuration.
You will have to setup and configure the PushOk SVN plug-in and
specify the PushOk SVN Proxy properties.
x
Procedure: How to Start the Subversion (SVN) Configuration Tool
-
Install the PushOk SVN plug-in.
-
From the start menu, select SVNSCC from
the PushOk Software menu.
-
Select Configure plugin from
the SVNSCC submenu, as shown in the following image.
The
PushOk Subversion (SVN) Proxy properties dialog box appears.
x
Procedure: How to Set the Subversion (SVN) User Options
When
you start the Subversion (SVN) Configuration tool, the PushOk SVN
Proxy properties dialog box appears. Use the configuration tabs
to set the recommended Subversion user options.
-
The SVN executables tab enables you to set tools
used by the SVN SCC API to expose standard functionality such as
running differences, repository viewers, O/S integration tools,
and so on.
- Type or select an SVN GUI
viewer application in the GUI executable field. Since the PushOk
SVN SCC client does not provide its own stand-alone viewer, you
can specify a viewer by passing it to the current connection string.
This is necessary in the case that you would want to use a GUI application
instead of the command line to query the SVN repository.
Note: If
before installing the plug-in you have TortoiseSVN installed on your
machine, PushOk SVN SCC plug-in installer will detect it and populate
this field for you.
- Select a Diff/merge tool.
PushOk SVN
offers the possibility to use its internal comparison tool by selecting the SVN
conflict editor (built-in) option in the Diff/merge
box. You may also specify an external tool from this field.
- Select the Conflicts resolving tool.
When checking in a file and the conflicts cannot be resolved, a
resolving visual tool is shown as set here. This can be provided
by PushOk SVN or it can be provided externally.
- Select a file viewer tool from the Viewing field.
The
following image is an example of the SVN executables tab on the PushOk
SVN Proxy properties dialog box.
-
The SVN options tab enables you
to specify how files are treated by Subversion and how the status
of these files are reported.
Note: It
is recommended to set the following SVN options, as they appear
in the image below, in order to avoid conflicts.
-
The Known
lists tab enables you to administer the SVN connection
strings to be used by the PushOk SVNSCC client, and to add or remove
SVN modules (directories under the SVN repository) and tags.
-
To Add a new SVN connections string:
- Select Known Roots from the
Select list type drop-down list.
- Type the SVN string value in the input field under the List
section.
- Click Add.
The string is
added to the List section box.
The
following image is an example of the Known lists tab on the PushOk SVN
Proxy properties dialog box.

xUsing CVS as the Source Control Product
This section describes the relationship between CVS
and WebFOCUS applications accessed and created by Developer Studio
and provides recommendations regarding the configuration of CVS
and Developer Studio.
The CVS requires that a third-party product (plug-in) is used
to provide the SCC Compliance that is used by Developer Studio to
connect to the Version Control System (VCS) repository.
Note: Although you may use any CVS plug-in,
this section is specific to a product provided by PushOk.
You will have to setup and configure the PushOk CVS Plug-in and
specify the PushOk CVS Proxy properties.
x
Procedure: How to Start the CVS Configuration Tool
-
Install the PushOk CVSSCC NT plug-in.
-
From the start menu, select CVSSCC NT from the
PushOk Software menu.
-
Select Configure plugin from the
CVSSCC NT submenu.

The
PushOk CVS Proxy properties dialog box appears.
x
Procedure: How to Set the CVS User Options
When you start the CVS Configuration tool, the PushOk
CVS Proxy properties dialog box appears. Use the configuration tabs
to set the recommended CVS user options.
-
The Files Types tab enables you to specify how
different file types are treated, as shown in the following image.
To enforce a certain behavior for
a certain file type, enter the extension in the appropriate column
to add or remove text files, binary files, or unicode files.
-
The CVS executables tab enables you to specify custom
applications to be used with the plug-in.
- It is recommended to leave the use
specified option unchecked so that PushOk CVS acts as
the CVS client. This allows for more functionality than the regular
freeware CVS client.
- Type or select a CVS GUI viewer application in the GUI executable
field. This is necessary when you want to use a GUI application
instead of the command line to query the CVS repository.
Note: PushOk CVS does not come with a built-in
CVS GUI interface.
- Select a Diff/merge tool.
Note: PushOk
CVS comes with a built-in Diff/merge tool, however, it sometimes
behaves unexpectedly.
- Select a file viewer tool from the Viewing field.
Note: PushOk CVS provides a built-in file viewer
but you may also specify a custom tool.
The following
image is an example of the CVS executables tab on the PushOk CVS
Proxy properties dialog box.
-
The CVS options tab enables you
to specify how files are treated by CVS and how the status of these
files are reported.
Note: It is recommended to set the following CVS options, as
they appear in the image below, in order to avoid conflicts.
-
The Known lists tab enables you
to administer the CVSROOT strings to be used by the PushOk CVSSCC
client, and to add or remove CVS modules (directories under the
CVS repository) and tags.
-
To Add a
New CVSROOT String:
- Select Known
Roots from the Select list type drop-down list.
- Type the CVSROOT string in the input field under the List section.
- Click Add.
The string is added to
the List section box.
Note: Repeat this step for adding
multiple strings.
- Select the string that you want to use as your default and click Set As
Default.
The string will be marked with the (Default)
suffix and will be used in future operations with your integrated
development environment (in this case, Developer Studio).
-
To Add New Projects:
Although most of the projects (modules)
will be done from the integrated development environment, PushOk
CVS allows you to add new projects.
The
following image is an example of the Known lists tab on the PushOk CVS
Proxy properties dialog box.
-
The Server options tab enables you to specify how the
connection to the server is being handled.
The
following image is an example of the Server options tab on the PushOk
CVS Proxy properties dialog box.
xUsing ClearCase as the Source Control Product
In this section: How to: Reference: |
This section describes the relationship between ClearCase
and WebFOCUS applications accessed and created by Developer Studio
and provides recommendations regarding the configuration of ClearCase
and Developer Studio.
x
ClearCase Setup Requirements
ClearCase requires setting up a development view to
access files that are under ClearCase management. The following
views are available:
-
Snapshot Views denote a physical location on a hard drive.
Note: Some of the user interface requests are
available through the Windows Explorer ClearCase context menu.
-
Dynamic Views are client logical views of a VOB. VOB is
a repository for storing versioned projects and metadata.
Note: Through
Windows Explorer, limited operations are allowed to be performed
on the set of exposed files. For instance, a checked in file under
ClearCase control cannot be removed using Windows Explorer commands
or other Windows API call. The same thing is true for changing the
Read-Only flag.
Snapshot Views work while disconnected from the network. Views
are updated when you perform manual requests. However, this can
cause views to become out of date. The file loaded during checkout
may not necessarily be the latest version in the VOB.
Dynamic Views are always up to date and require that you are
connected to the network. If you are not connected, network issues
will arise while attempting to use Developer Studio, ClearCase Explorer,
or even Windows Explorer, as the Dynamic view will not be loaded.
To use the Developer Studio Source Control feature with ClearCase,
you must associate the WebFOCUS applications (residing in a local
or remote WebFOCUS Environment) to a ClearCase view.
Note: Other Source Control systems support the concept
of Current Working Directory, which is an ad hoc association of
a local directory to a Source Controlled project or directory. In
other words, an SCC project or directory could be associated with
any physical, reachable location, where all SCC operations will
take place. For ClearCase, only the designated view is the one to
be recognized by ClearCase as the location (physical or virtual)
where the SCC operations could take place.
From Developer Studio, applying a Source Code Control operation
on a file found on a remote WebFOCUS Environment involves an HTTP
copying from the WebFOCUS application to the view directory, or
the other way around. Depending on the view type, these operations could
also involve modifying file attributes or timestamps.
Tip: Since the view is just a file transfer
place between the ClearCase system and the WebFOCUS application,
some problems arise with the Snapshot Views as files added to the
view may be out of date, or may already be checked in by another developer.
Given all these limitations, Dynamic Views are recommended.
x
Procedure: How to Set ClearCase User Options
It is recommended to set the following ClearCase user options
for easier operation.
-
From
the ClearCase Explorer Tools menu, select ClearCase Options from
the Options submenu.
-
In the
Check In/Add to Source Control section of the Operations tab, select
the Use original checkout information and Preserve
file modification time options.
-
In the
Check Out section of the Operations tab, select the Preserve
file modification time option.
Note: Other options can be customized, as necessary.
The following image is the ClearCase
Explorer with these default options set.
x
Reference: ClearCase Notes and Recommendations
The
following notes and recommendations should be taken into consideration
when using ClearCase as the Source Control.
- Parallel development
(multiple checkouts of the same file) is supported by ClearCase
and automatic merge technology is available from ClearCase.
Note: ClearCase
can handle most merging aspects. There are, however, cases in which
conflicts may arise that will require intervention by the developer.
To avoid issues that may occur as a result of merging, single stream
development is recommended.
- Developers
working with WebFOCUS files and applications must be aware that
this behaves like a shared file system. Any modification of a WebFOCUS
file could be seen by all other developers using that specific file.
Working with the file is taking place at the WebFOCUS location where
that file resides. The Source Code Control system just imposes restrictions
on accessing that specific file.
xSetting Up Developer Studio With ClearCase, CVS, Subversion (SVN), or ChangeMan DS
After ClearCase, CVS, Subversion (SVN), ChangeMan DS,
or any other required client software is installed and configured,
there are several steps involved in setting up Developer Studio
to work with your Source Control provider. You must set the Developer
Studio Source Control options and validate and configure the Source
Control variable in the WebFOCUS Client Configuration file.
x
Procedure: How to Set the Developer Studio Source Control Options
-
When
Developer Studio starts, it checks to see if any supported Version
Control Systems are available.
If supported systems are detected, they will be visible
in the Developer Studio Options dialog box, in the Source Control
tab. The product will activate Source Control commands in the main
menu, context menu, toolbar, and the Developer Studio Explorer.
The following image is an
example of the Developer Studio Options dialog box with the Source
Control tab selected. The PushOK source control
is selected.
Note: If
more than one version control system is detected, you must specify which
version control system to use.
-
Select
the Requires Custom Development Directory option
to enable the Settings button.
-
Click
the Settings button.
The SCC Development Folders dialog box appears.
Note: There
may be a delay before the next dialog box is shown.
-
From
the SCC Development Folder dialog box, type or select a directory in
the Default Development Directory field.
-
Note when using ClearCase: This
directory should be an existing directory inside a Dynamic view.
To avoid errors, it is recommended that you browse to select the
development directory. The directory specified in the Development
Directory will be used as the root directory for all ClearCase local operations.
-
Note when using CVS: This
is the directory where all CVS file transfers will take place before
or after the CVS actions files can be copied to or from their real
location in this directory.
-
Note when using Subversion (SVN): This
is the directory where Subversion (SVN) will store the files specified
in the Source Control Directory. By default, the value is the directory
specified in the Default Development Directory.
-
Note when using ChangeMan DS: This
is usually a directory on the local PC where the development work
takes place and it is used to store files that are checked in and
out of the version control systems repository.
The following image is an
example of the SCC Development Folders dialog box with the Default
Development Folders Directory selected.
-
Click OK to
save and close the SCC Development Folders dialog box.
After setting the Developer Studio Source
Control Options, a validation message appears, as shown in the following
image.

x
Reference: Validating the Source Control Variable in WebFOCUS
Version
Control products that require a Development Directory (for example,
ClearCase, CVS, Subversion, ChangeMan) need to also have a Source
Control variable set in the WebFOCUS Client of the WebFOCUS Environment
that is used for development. This variable, SCC_NAME,
is used by the WebFOCUS Developer Studio Source Control feature
to identify the development environment.
When specifying values for the variable
SCC_NAME:
- The variable
is usually set to the name of the machine (it should be different than
the SCC_NAME of all other systems that contribute files to the Source
Control repository). An example of using the machine host name would
be SCC_NAME=dev-server-1.
- The value needs
to be unique for every WebFOCUS environment accessing the same Source
Control repository, and the name should not contain spaces or any
of the following special characters:
/ \ " ' ? : *
< > | .
Note: Avoid changing
the value once files have been added to the Source Control repository.
If you need to change the value, either all files will have to be
added to the repository again, or the repository will need to be
changed to be consistent with the new value. This is because the
SCC_NAME value is used to establish the file identity in the repository.
Changing the value will require that all files are added to the
repository again or that the repository be changed to be consistent
with the new value.
x
Procedure: How to Set the SCC_Name Variable in the WebFOCUS Client
You may set
the Source Control variable from the WebFOCUS Administration Console
or by manually adding it to the WebFOCUS Client configuration file.
-
From
the WebFOCUS Administration Console, click General under
the Configuration section.
-
Identify the development environment for the Source Control
in the SCC_NAME field.
Note: By default, there is no value set for this field.
-
Provide a name for the SCC_Name variable.
-
Click Save to save the Client Settings.
The following image is an example of the WebFOCUS
Administration Console showing the SCC_NAME Field.
Note: If
the unique identity of the environment cannot not be established
based on the SCC_NAME, then the HTML Alias can
be used as an alternative. The HTML Alias is also useful when more
than one WebFOCUS environment is set up on the same server. This
enables you to specify which WebFOCUS Environment is to be used.
For all other cases, HTML Alias does not need to be altered.
x
This topic describes the source
control options available from Developer Studio.
Note: These options depend on
the Version Control System (VCS) utilized.
x
Select this option to view a
file without changing it. This option retrieves the latest version
of the selected file and provides you with a read-only copy.
If you attempt to make changes, they
are not saved.
x
To make changes to a file in source control, you must
first check it out of the database.
The Check Out option retrieves the latest version of the selected
file and allows you to edit it. Source control removes the attribute
R (read-only) from a checked out file.
A file that has been checked out displays the description Checked
Out in the Developer Studio Explorer.
x
Select this option to return a checked out file to the
source control database. Source control stores any changes made
to the file in the database.
x
Select this option to reverse a check out and cancel
any changes made to a file in your working area.
x
Before you can add Developer Studio files to source
control, you must have a source control project in which to place
them. Therefore, to implement source control, the first option that
you will usually choose is Add to Source Control.
When you add a Developer Studio project (GFA) to Microsoft Visual
SourceSafe for example, SourceSafe creates a corresponding project
(folder) in which to store the files that get sourced, using the
same name as the Developer Studio project. A project refers to an entire
folder with all its contents (files).
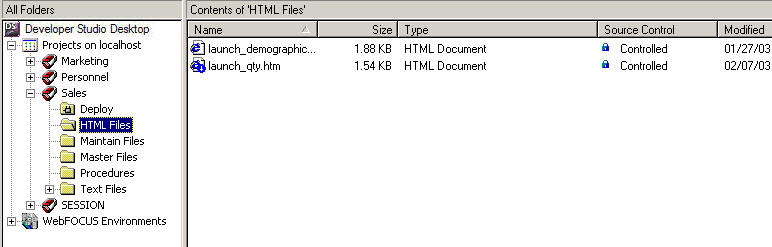
A file added to source control displays the description Controlled
in the Developer Studio Explorer.
In this example, the HTML files have been added to source control.
x
Remove From Source Control
Select this option to remove a file from the source
control database.
A file that has been removed from the database, or one that has
not been added to the database, displays the description Not Controlled
in the Developer Studio Explorer.
x
Select this option to view information about a file,
such as version history, date of creation or modification, and other
details.
x
Select this option to display the differences between
a local copy of a file and the copy stored in the database.
x
Source Control Properties
Select this option to view or edit certain file properties.
For example, you can view the checkout status (including the user,
date of checkout, and version), comments, and other file properties.
x
Share From Source Control
Select this option when you are working in a Developer
Studio project and wish to use files from a different Developer
Studio project that has been added to the source control database.
A file that is shared with another project displays the description
Controlled & Shared or Checked Out & Shared in the Developer
Studio Explorer.
A shared file that is checked out by one project displays the
description Exclusive Checked Out & Shared in the other project.
x
Select this option to refresh the display of file status
in the Developer Studio Explorer.
x
This option opens the source control product. It is
available in one of the following ways:
- Click the Source
Control button on the toolbar and select Source
Control from the drop-down menu.
- Select Source
Control on the menu bar and select Source
Control from the drop-down menu.
x
Unbind From Source Control
Select this option to disassociate a Developer Studio
project from source control. Developer Studio removes the information
regarding source control from the .gfa file of the project (it added
the information when you selected Add to Source Control).
This feature is available from the Source Control option on the
menu bar or the Source Control menu when you select and right-click Projects
on localhost.
x
Select this option to create a local Developer Studio
project (GFA) based on a project in the source control database.
It enables a developer to get a project that has already been created
and added to source control by another developer.
It is available from the Source Control option on the menu bar
or the Source Control menu when you select and right-click Projects
on localhost.
x
Reference: Notes for Using Microsoft Visual SourceSafe as the Source Control Product
- When you add
a Developer Studio project to Microsoft Visual SourceSafe, that
project is assigned to a corresponding SourceSafe project. If one
Developer Studio project shares files from a second Developer Studio
project, you must also add the second project to SourceSafe. For
example, if a Developer Studio project named Sales uses files from
baseapp, you must add the baseapp project to SourceSafe. If you
do not, the shared files cannot be managed by source control.
- When you add
files to Visual SourceSafe, SourceSafe assigns the attribute read-only
(R) to them. When you check out a file, SourceSafe removes the read-only
attribute to allow edits to the file.
When you remove files from
SourceSafe, SourceSafe retains the read-only attribute originally
assigned. You must manually change the attribute to restore write
access. For more information, see How to Restore Write Access to a Single File and How to Restore Write Access to a Project for instructions.
- To use source
control effectively, you must be familiar with the specific source control
product that you have and its database structure. Your source control administrator
can give you information on the setup at your site.