How to: |
When data is being created for integration with Visual Discovery AE using WebFOCUS, the Visual Discovery AE (VISDISAE) output format must be set. The procedures in this section describe how to create an Application Directory folder on the WebFOCUS Reporting Server and create data for WebFOCUS Visual Discovery AE projects using WebFOCUS InfoAssist.
Note: Data can also be created using WebFOCUS Developer Studio. For more information, see the WebFOCUS Developer Studio documentation related to this topic.
Creating an application directory allows you to create a target location for data files that are generated by the VISDISAE output format, which are used by WebFOCUS Visual Discovery Workbench AE and WebFOCUS Visual Discovery Server AE. This target location is recommended to be outside of the WebFOCUS installation folder structure, since WebFOCUS Visual Discovery Server AE may not always be installed on the same machine as WebFOCUS.
-
Create a project folder on your local drive. For example:
C:/visdisproj
- Open the WebFOCUS Reporting Server Web Console.
-
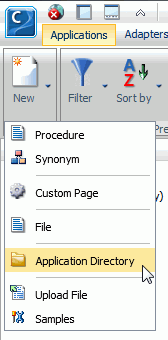
In the Applications tab, click New and Application
Directory, as shown in the following image.
The Create New Application dialog box opens in the workspace area, as shown in the following image.
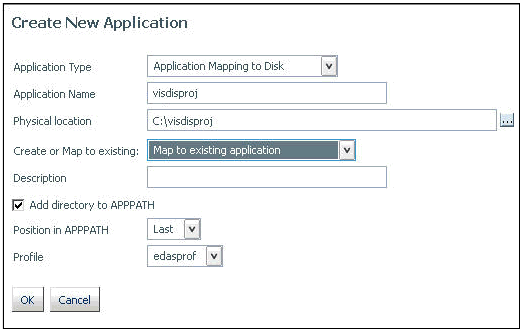
- Enter a unique name in the Application Name field (for example, visdisproj).
- Enter the path to the project folder that was created in step 1 in the Physical location field, or click the browse button to navigate to this location.
- Select Map to existing application from the Create or Map to existing drop-down list.
-
Select the Add directory to APPPATH check
box and then click OK.
This directory can now be used to store the data file(s) generated with FORMAT VISDISAE. This is recommended since the data file generated by FORMAT VISDISAE will typically be stored on its own in a directory accessible from WebFOCUS Visual Discovery Server AE.
For more information on creating application directories, see the Developing Reporting Applications documentation.
- Open the WebFOCUS BI Portal.
- Create a new folder (for example, visdisproj) under the Public folder.
-
Right-click the visdisproj folder,
select New, and then click Report from
the context menu.
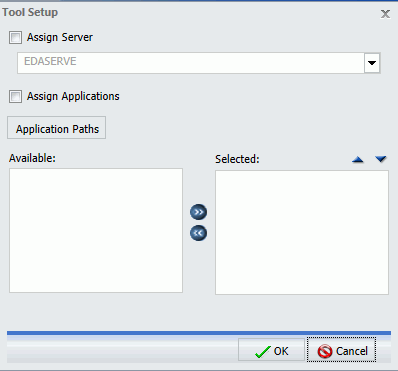
The Tool Setup dialog box opens, as shown in the following image.
-
Select a server (for example, EDASERVE), assign the applications,
and then click OK.
WebFOCUS InfoAssist opens and displays the Select a data source dialog box opens, as shown in the following image.
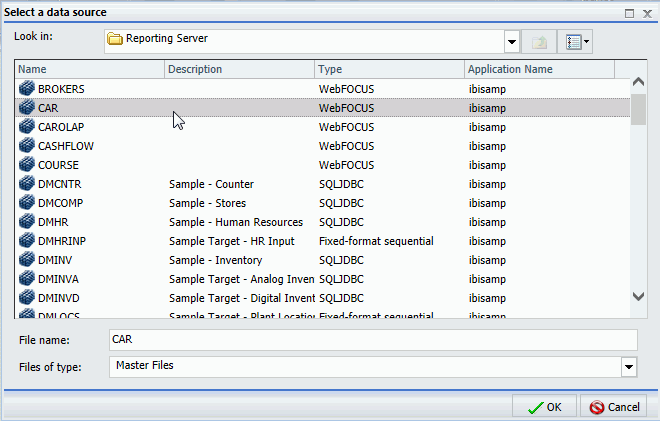
- Select the CAR Master File from the list of data sources and click OK.
-
Drag and drop the following fields (as dimensions) from
the Data pane to the Live Preview pane:
- COUNTRY
- CAR
- MODEL
-
Drag and drop the following fields (as metrics) from
the Data pane to the Live Preview pane:
- DEALER_COST
- RETAIL_COST
- SALES
- MPG
Note: Data must be laid out as one set of column titles and the corresponding data values for each column. Therefore, ACROSS statements are not recommended and special consideration is required when using FOR, OVER, and other similar statements.
-
Click the Format tab and select Visual
Discovery AE as the Output Type, as shown in the following
image.

Note: Although dates are not used in this example, it is important to note that data in a Date field must be specified in the MM/DD/YYYY format. For more information on specifying data in any other format, see Formatting Date Fields.
-
Set the destination for the output by performing the
following steps:
-
From the File drop-down menu, click Select
a location and format.
The Select a location and format dialog box opens, as shown in the following image.
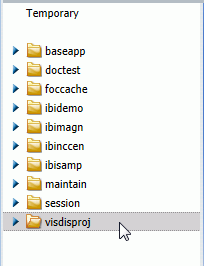
- Select the folder you created previously in the WebFOCUS Reporting Server (for example, visdisproj), which is located outside the IBI directory structure.
-
Select to save as a physical
file:
- Enter carvisdisae in the
File name field, as shown in the following image.

- Select Visual Discovery AE (*.txt) as the format from the drop-down list and click Save to save the destination output settings.
- Enter carvisdisae in the
File name field, as shown in the following image.
-
From the File drop-down menu, click Select
a location and format.
- Save and run this WebFOCUS procedure.
-
Navigate to the folder you created previously (for example,
visdisproj), which is located outside the IBI directory structure,
where the output of the carvisdisae.fex procedure is saved.
A corresponding text file for the procedure is now available. For example:
visdisproj\carvisdisae.txt
This is a tab-delimited text file where column titles are listed on the first row and data appears on every subsequent row.
- Close the carvisdisae.txt file, the folder, and WebFOCUS InfoAssist.
Note: Data can also be created using WebFOCUS Developer Studio, using a similar procedure as the one described above. For more information, see the WebFOCUS Developer Studio documentation related to this topic.