Creating a RIA With the HTML Composer
You may apply a RIA theme to an existing page in the
HTML Composer. You may also change RIA themes for a page. RIA themes
are only available for pages created without using a template.
Note: Applying a RIA theme to an existing page overwrites
your current HTML page. You should make a copy of your original
HTML file if you do not wish to overwrite it.
x
Procedure: How to Apply a RIA Theme
By
applying a RIA theme to an existing non-RIA page, you convert the
HTML page to a RIA.
Tip: This procedure also applies
to changing between RIA themes on a page.
-
Open an
existing HTML file in the HTML Composer.
-
Select DOCUMENT from
the Properties window drop-down list.
The available properties for the document object appear.
-
Select a
theme from the RIA Theme drop-down list.
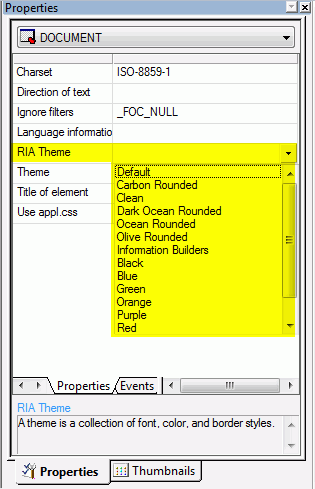
The RIA theme is applied to all components on the
page. You may need to resize some of your components.
-
Save and
run the HTML page to see the RIA.
Note: You cannot revert your page back from RIA.
Create a copy of your HTML page if you do not wish to overwrite
it, or close the page without saving.
The following image shows a RIA theme that was applied
to an existing page.
Optionally,
you may want to animate objects and add RIA components (windows/accordion
controls) to the existing page to further graphically enhance your
page. See How to Create a RIA Page for details.
x
Procedure: How to Create a RIA Page
This
procedure describes how to create a RIA page, add RIA components,
and animate objects on the page.
-
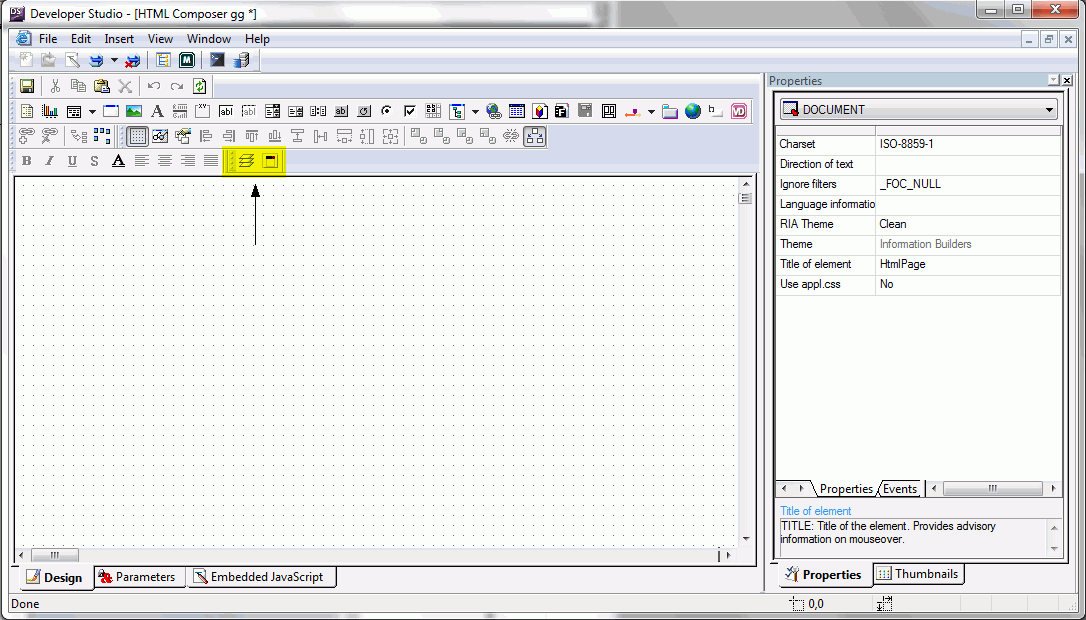
Create a
new HTML file with the HTML Composer.
-
Select DOCUMENT from
the Properties window drop-down list.
The available properties for the document appear.
-
Select a
theme from the RIA Theme drop-down list.
The RIA Components toolbar is added to the HTML Composer.
-
Add objects
to the layout, such as buttons and images, from the Components toolbar.
-
Optionally,
add RIA specific objects to the layout, such as windows and accordions,
from the RIA Components toolbar.
Note: These additional controls are optional to
enhance the development of your page and are not required. Your
page is a RIA once you apply a RIA theme. For details about how
to add these components, see How to Add a RIA Window Component and How to Add a RIA Accordion Control Component.
-
Set the
animation properties for the objects with the Animation Properties
dialog box.
For descriptions of the available animation properties,
see Animation Properties Dialog Box.
-
Save and
run the HTML page to see the RIA.
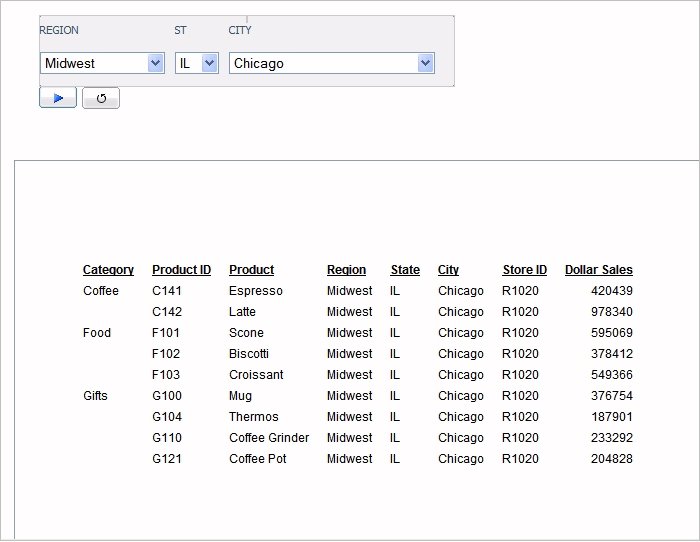
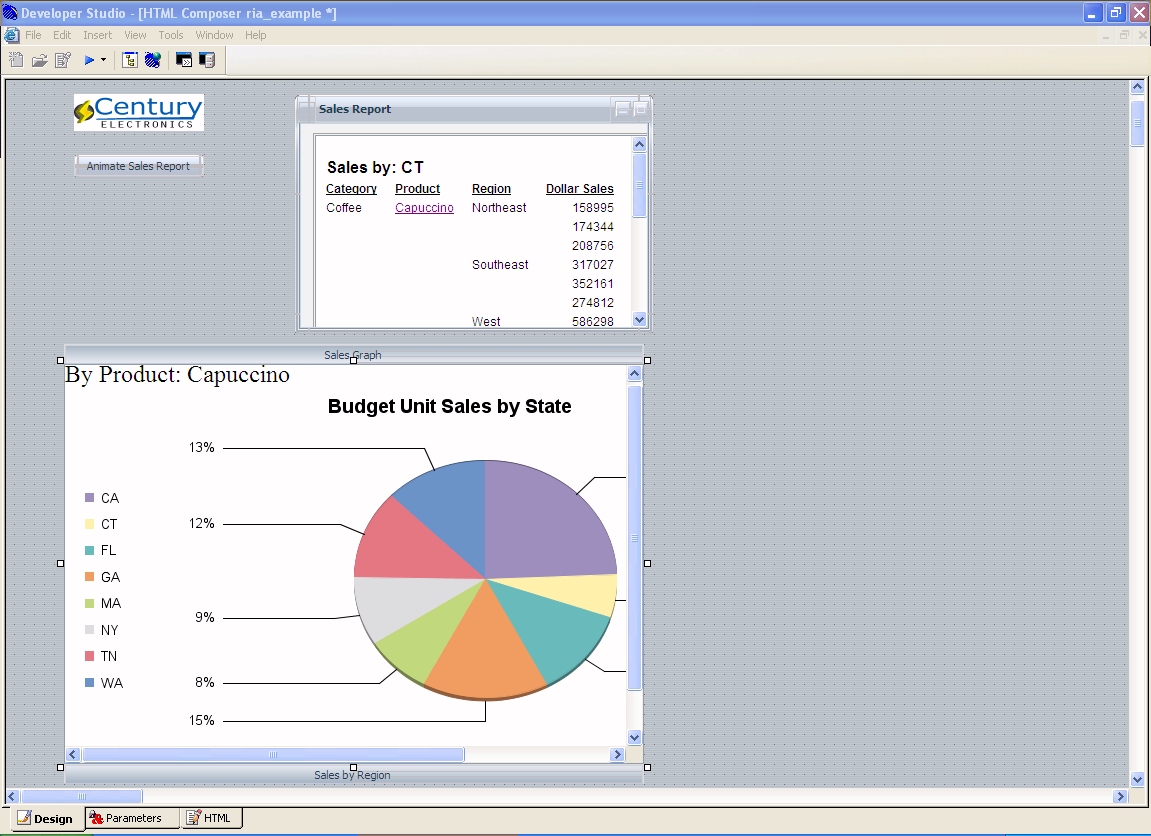
In
the following example, the RIA shows the following:
- An HTML page with
an image.
- A push button that,
when clicked, animates the Sales Report window.
- An accordion control
that shows a Sales Graph on one page.
- A report with controls
to supply incoming parameter values on the Sales by Region page.
Click
the title of the accordion pages to switch between pages. For step-by-step instructions
on how to create this example, see Usage Notes and RIA Example.
x
Procedure: How to Add a RIA Window Component
A
window component behaves as a parent component, enabling you to
add children, such as a report or graph, within the window. The
window object can be animated, moved, or resized at run time.
-
Select the
Window button from the RIA Components toolbar.
The cursor changes into a crosshair.
-
Click and
drag the crosshair to create the window and adjust it to the size
you want.
A window component is created in the layout and assigned
the name window(n), where n is a number.
-
Add an object,
as a child, within the window component.
Note: Report, graph, and frame objects are added
as children of the RIA component. The role of a child indicates
that they are grouped within the selected component and function
inside of that component.
To add objects as a child of a window component:
- Select an object
from the Components toolbar from the Design tab of the HTML Composer.
- Left-click and drag
the selected object component from the toolbar inside of the RIA component.
Tip: If
you have other objects on your Design canvas, you may press and hold
the Alt key, left-click, and drag that object onto a RIA parent
component.
- Release the mouse
and resize the object inside your component.
For example,
to create a report that runs within a window, drag a report from
the Components toolbar into the window object on the Design tab,
release the mouse, and resize the report object within the window
component. Note that all the report options and properties are available
from the right-click context menu of the report, within the window component.
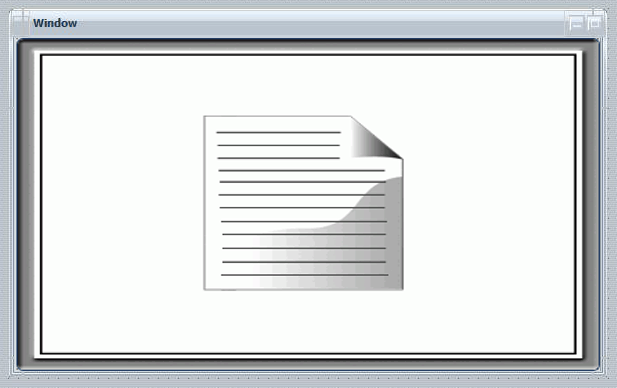
-
You can
automatically resize a report, graph, or frame to take up the entire
window or accordion page by selecting True for
the Auto Fit property field of the Properties window, as shown in
the following image.
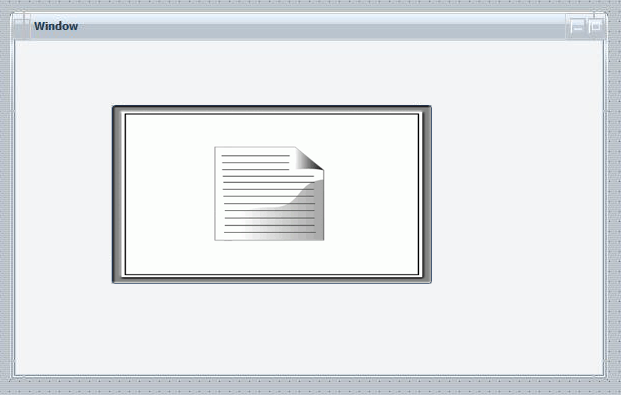
The
following image shows the design time view of a report that has
been automatically resized to take up the entire window. This property
carries through to run time so when the window is resized, the report
will resize with it.
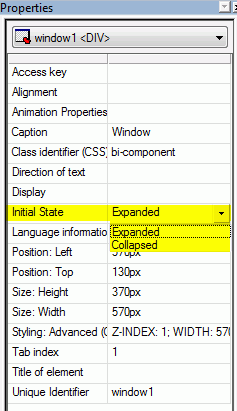
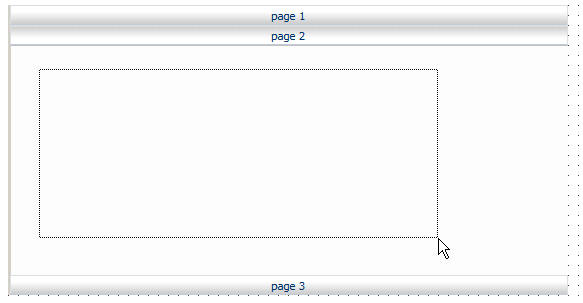
-
You can
choose whether the window starts expanded or collapsed by using
the Initial State option, located in the Properties window. The
two options are Expanded and Collapsed. Expanded sets the window
to be expanded at run time and is set by default. Collapsed sets
the window to be collapsed at run time. The following image shows
this property on the Property window.
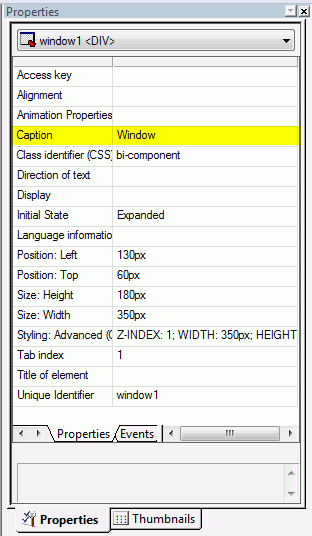
-
You may
rename the default window title by typing text in the Caption properties
field of the Properties window.
-
You may
animate the window component itself, and any child object within
the window. Select the object and set the animation properties from
the Properties window for the location, size, and opacity. For details
about animation properties, see Applying Animation Properties to the RIA.
x
Procedure: How to Minimize the Size of a Window Control
Minimize
and restore buttons on a window control enable you to minimize the
size of a window to show just the title bar or to restore the window
back to its original size.
-
Click the minimize button
on the control, as shown in the following image.
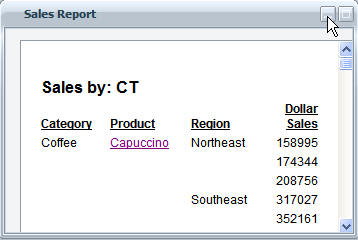
The window will collapse to show just the title bar, as
shown in the following image.

-
To restore
the size of the window, click the restore button
on the control, as shown in the following image.

The image is restored to its original size.
x
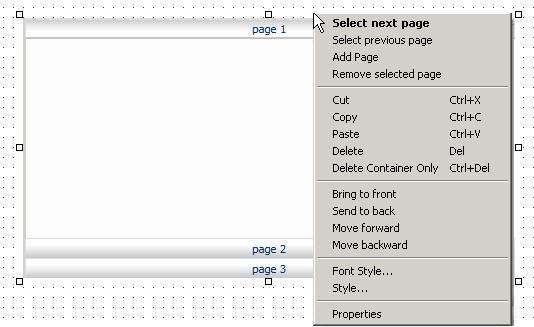
Procedure: How to Add a RIA Accordion Control Component
An
accordion control behaves as a parent component, enabling you to
create multiple pages within the control that you can scroll through,
each containing objects as children. An accordion control can be
animated at run time.
-
Select the
Accordion Control button from the RIA Components toolbar.
The cursor changes into a crosshair.
-
Click and
drag the crosshair to create the accordion control and adjust it
to the size you want.
An accordion control with three pages is created by default
and assigned the name accordion(n), where n is
a number.
-
You may
add and remove pages from the accordion control by using the right-click
context menu when the accordion component is selected.
-
Add objects,
as children, to the accordion control page.
Note: Report, graph, and frame objects are added
as children of the RIA component. The role of a child indicates
that they are grouped within the selected component and function
inside of that component.
To add objects as a child within the selected page
of the accordion control:
- Select an object
from the Components toolbar from the Design tab of the HTML Composer.
- Left-click and drag
the selected object component from the toolbar inside of the RIA component.
Tip: If
you have other objects on your Design canvas, you may press and hold
the Alt key, left-click, and drag that object onto a RIA parent
component.
- Release the mouse
and resize the object inside your component.
For example, to create
a graph that runs within an accordion page, drag a graph from the
Components toolbar into the selected accordion page on the Design
tab, release the mouse, and resize the graph object within the accordion
component. Note that all the graph options and properties are available
from the right-click context menu of the graph, from within the
accordion component.
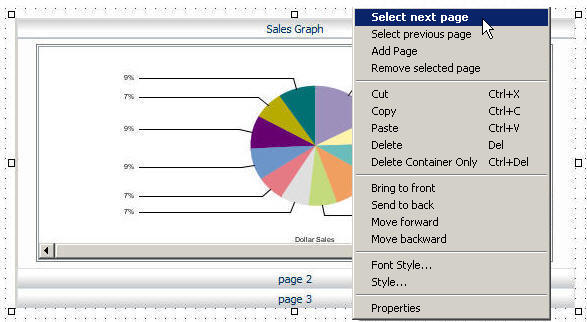
-
Add objects
to other pages within the accordion control. Right-click the accordion
component and choose Select next page from
the context menu.
Tip: Double-clicking within an accordion control
closes the selected page and opens the next page of the accordion
control.
The next page in the accordion control is selected.
Insert and resize objects, such as reports, graphs, and frames,
within the selected page of the accordion component.
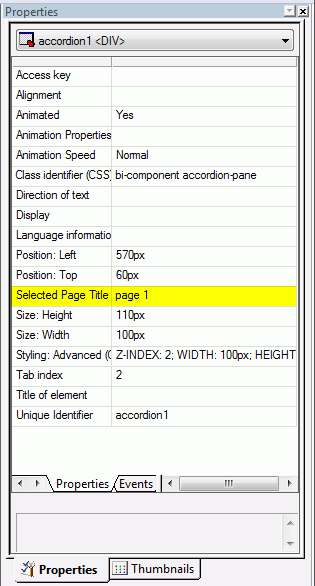
-
You may
rename the page titles by typing text in the Selected
Page Title properties field of the Properties window.
-
To change
the name of a different accordion page, right-click the accordion
component and choose Select next page from
the context menu.
The next page in the accordion control is selected.
Type the name for the page in the Selected Page Title properties
field in the Properties window.
Tip: Repeat this action
(right-click the accordion component and choose Select
next page from the context menu) multiple times to get
to the desired page of the accordion. Optionally, double-clicking
within an accordion control closes the selected page and opens the
next page of the accordion control.
-
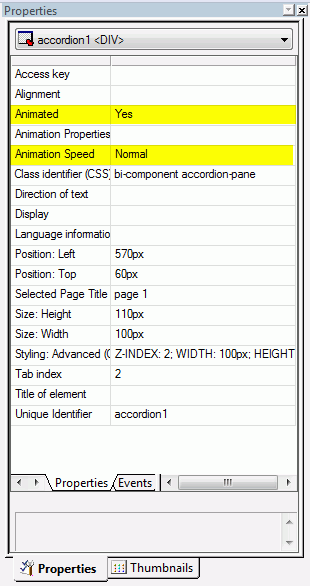
You may
set the accordion control properties, specific to the behavior of
accordion page speed in the RIA, by turning the animation on or
off, and by setting the animation speed for switching between pages.
The accordion page speed properties are Animated and Animation
Speed in the Properties window when an accordion component is selected.
- Animated is set to
Yes. The accordion control animation speed is turned on by default,
enabling you to set the animation speed for switching between accordion
pages. The default speed is Normal.
Selecting No turns off the
animation speed for the accordion control, ignoring the Animation
Speed setting, and displaying the default speed in the RIA.
- Animation Speed is
set to Normal by default. The animation speed indicates the speed
for switching between pages in an accordion control. You may select
from Very Slow, Slow, Normal, Fast, Very Fast.
The animation speed
is only applied if Animation is set to Yes.
The following image shows an accordion control with
the default animation and animation speed properties.
-
You may
animate the accordion component itself, and any child object within
the accordion pages. Select the object and set the animation properties
from the Properties window for the location, size, and opacity.
For details about animation properties, see Applying Animation Properties to the RIA.
Note: These location, size, and opacity animation
properties are not the same as the accordion Animated and Animated
Speed properties, which are specific to accordion page speed in
the RIA.
xApplying Animation Properties to the RIA
Adding animation properties to the RIA enables you to
create visual effects and animated movement for your web application.
The Animation Properties dialog box is available from the Properties
tab of the Properties window in the HTML Composer. By default, the
location, size, and opacity animation options are not enabled for
objects on an HTML page.
You may apply animation properties to the RIA with the Animation
Properties dialog box in the HTML Composer.
Note: Animation properties are disabled for all objects
by default, with the exception of the accordion page speed options.
x
Reference: Animation Properties Dialog Box
The Animation
Properties dialog box enables you to set the Location Animator,
Size Animator, and Opacity Animator options for RIA objects on the
HTML page.
Note: The
Animation Properties option is only available from the Properties window
if a RIA theme is enabled for the page. You may set animation properties
for all objects on the page, such as reports, graphs, buttons, windows,
and accordions.
Click the Animation Properties ellipsis
button from the Properties window in the HTML Composer.
The
Animation Properties dialog box opens, as shown in the following
image.
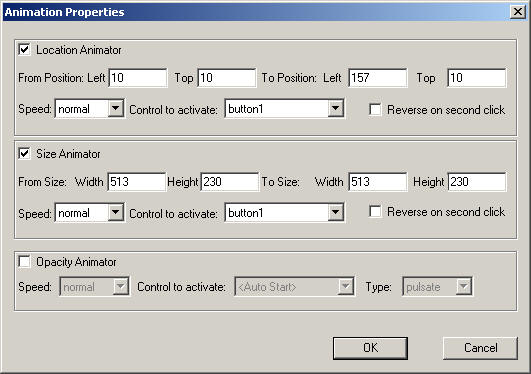
-
Location Animator
-
The Location Animator options set up the location animation
for an object. The animator is then instructed to move objects from
one point to another in the RIA, based on the control action, or
automatically, after the page fully loads.
-
From/To Position Left/Top
-
The From and To Position indicates the starting position
and ending position for the location animation event.
Note: It
is suggested to keep the From Position Left/Top values the same
as the current position on the layout, otherwise it will jump to
the From Position Left/Top when the animation starts.
-
Speed
-
Controls the acceleration and deceleration of the animation.
Options range from slowest to fastest, with normal being the default
selection.
-
Control to activate
-
Indicates the event that will start the animation. The default
is Auto Start, which starts the animation automatically. Otherwise,
you may select another object from the drop-down list to identify
another control that will be used to start the animation, like a
button for example.
-
Reverse on second click
-
Indicates that on a second click of the control to activate,
the animation should be executed in reverse.
-
Size Animator
-
The Size Animator options set up the width and height animation
for the object. This enables an object to grow or shrink in size
when the animation is selected.
-
From/To Size Width/Height
-
The From and To Size indicates the starting size of the object
and the ending size it will be after the animation event is executed.
-
Speed
-
Controls the acceleration and deceleration of the animation.
Options range from slowest to fastest, with normal being the default
selection.
Note: The location and size animation take
the same amount of time to complete. They will be synchronized if
used in conjunction with each other.
-
Control to activate
-
Indicates the event that will start the animation. The default
is Auto Start, which starts the animation automatically. Otherwise,
you may select another object from the drop-down list to identify
another control that will be used to start the animation, like a
button for example.
-
Reverse on second click
-
Indicates that on a second click of the control to activate,
the animation should be executed in reverse.
-
Opacity Animator
-
The Opacity Animator options set up the opacity animation
for the objects. Setting the opacity enables you to fade RIA components
on your page.
-
Speed
-
Controls the acceleration and deceleration of the animation.
Options range from slowest to fastest, with normal being the default
selection.
-
Control to activate
-
Indicates the event that will start the animation. The default
is Auto Start, which starts the animation automatically. Otherwise,
you may select another object from the drop-down list to identify
another control that will be used to start the animation, like a
button for example.
-
Type
-
Sets the type of background opacity. Options are pulsate,
blink, fadeIn, and fadeOut, with pulsate being the default selection.