Applying Conditions to a Chain
A chain contains conditions for each link in the chain.
The conditions are linked to the values being selected in the control
object. You may apply multiple conditions to one link. The properties
and settings for the condition describe how the link should behave.
The following options are available:
- Apply Actions for
the links on the chain.
- Apply the Values
compare operator for the condition.
- Apply Selected
values with a Multiselect operator for
the condition.
- Apply the Resolves
parameter values for the condition.
- Apply the Parameter’s
compare operator for the condition.
If using static controls, you must apply conditions for each
link in the chain. Conditions need to be created for each value
of the control chained from, and those values must be mapped to
the correct value(s) that will be displayed in the control that
it is being changed to.
x
Reference: Properties and Settings Dialog Box (Conditions)
The
Properties and settings dialog box appears when creating a condition
for a chain link on the Parameters tab. A chain contains conditions
for each link in the chain.
The conditions are linked to the
values being selected in the control object. The properties and
settings for the condition inherit the values of the prior bound
control and provide additional condition settings. This section
describes the additional condition settings.
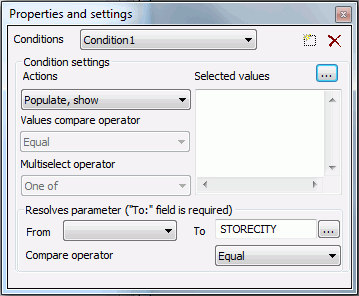
The
Properties and settings dialog box contains the following fields
and options when creating a condition:
-
Conditions
-
The conditions list enables you to create multiple conditions
for the link. Default is the only initial
condition.
- To create
a new condition, click the New icon. Conditionn is
created, where n is the number, and added to the Conditions
drop-down list. You may type in a unique condition name, choose Selected
values, and set the condition settings.
- Click the Delete icon
to remove the selected condition from the list. Note that the Default condition
name cannot be deleted.
-
Actions
-
Select an action for the chain link to control. The options
offer variations to populate, show, hide, execute, and select the
values. The list of available options are:
-
Populate, show. Populates
the control and displays it at run time. This is the default action
for all conditions.
-
Populate, hide. Populates
the control and does not display it at run time.
-
Populate with alternate, show. Populates
the control with alternate values derived from a procedure, or value
list, that is not the default and displays the control at run time.
-
Populate with alternate, hide. Populates
the control with alternate values derived from a procedure, or value
list, that is not the default and does not display the control at
run time.
-
Show. Shows
the control but does not populate it.
-
Hide. Hides
the control but does not populate it.
-
Execute. Executes
the bound object. For example, if you bind a control to a Submit
button and change the value in the control at run time, the report/graph
automatically executes when you change the value, without having
to click the Submit button.
-
Select. Selects
the bound object. For example, if you bind a control to a tab item
and select a value in the control at run time, the bound object
(the tab item) is automatically selected as the active tab on the page.
-
Values compare operator
-
Values compare operator provides chaining logic scenarios
to include such options as Equal, Not Equal, Greater Than, Less
Than, and so on. This option sets the condition for how to populate
the control being linked to.
Equal is the default Values
compare operator.
-
Selected values
-
Selected values enable you to provide the values used in
the condition. When creating a new condition, the Selected values
section is activated. You may type selected values in the input
box or click the ellipsis button to select values from the list.
The
list of values that appears is based on the values of the prior
bound control in the chain.
When selected values are entered,
the Multiselect operator field is activated.
-
Multiselect operator
-
The Multiselect operator options are activated when selected
values are entered for the condition. Options are One
of or All of. One of is based
on one of the values shown in the Selected values, being selected
in the prior control, in the chain. All of is based on the value
of all of the Selected values, being selected in the prior control,
in the chain.
One of is the default multiselect operator.
-
Resolves parameter (“To: field is required”)
-
From. The From field specifies where to get the value
used in the To field, if the control being chained from is a map
or activeX control.
-
To. The To field is used to dynamically generate the
selection list used to populate the control being chained to. This
field displays the parameter whose value will drive the condition
evaluation. The parameter name linked to the prior control in the
chain is displayed by default. The ellipsis button provides a pop-up
dialog of the other parameter values (from the report) to be resolved.
-
Parameter's compare operator
-
The Parameter’s compare operator provides chaining logic
scenarios to include such options as Equal, Not Equal, Greater Than,
Less Than, and so on. This sets the compare operator to populate
the control.
Equal is the default Parameter's compare operator.
For
details about the Properties and settings dialog box options for
Data type values, see Properties and Settings (Incoming Static Parameter and Unbound Control) or Properties and Settings Dialog Box (Dynamic Values).
x
Procedure: How to Create a New Condition
-
Insert a report with parameters in the HTML Composer.
For details about creating parameters, see Creating Parameter Values.
-
Click and drag control objects on the Parameters tab to create
a chain.
Chains are represented by lines connecting control objects
on the Parameters tab.
Chaining controls will populate parameters with values
at run time, based on values selected in prior controls on the chain.
For details about chaining controls, see Chaining Controls on the Parameters Tab.
-
Click a link in the chain.
The Properties and settings dialog box opens showing the
bound control values and the Default condition
settings for the link in the chain.
-
Click the New icon to create a multiple condition
for the chain.
Conditionn is created, where n is the number,
and added to the Conditions drop-down list, and the Selected values
section is activated. You may type in a unique condition name.
-
You may type in a unique condition name, choose Selected values,
and set the condition settings for the new condition.
-
Optionally, you may click the Delete button
to remove the selected condition from the list.
Note:
Default, the initial condition, cannot
be deleted.
-
Close the Properties and settings dialog box.
x
Procedure: How to Select the Action for a Condition
-
Insert a report with parameters in the HTML Composer.
For details about creating parameters, see Creating Parameter Values.
-
Click and drag control objects on the Parameters tab to create
a chain.
Chains are represented by lines connecting control objects
on the Parameters tab.
Chaining controls will populate parameters with values
at run time, based on values selected in prior controls on the chain.
For details about chaining controls, see Chaining Controls on the Parameters Tab.
-
Click a link in the chain.
The Properties and settings dialog box opens showing the
bound control values and the condition settings for the link in
the chain.
-
Select the action for the condition from the Actions drop-down
list. For example, to hide the control being chained to, select Hide.
Populate, show is the default option.
-
Close the Properties and settings dialog box.
When
running the HTML page, the action for the chained control is applied.
x
Procedure: How to Select the Values Compare Operator for a Condition
-
Insert a report with parameters in the HTML Composer.
For details about creating parameters, see Creating Parameter Values.
-
Click and drag control objects on the Parameters tab to create
a chain.
Chains are represented by lines connecting control objects
on the Parameters tab.
Chaining controls will populate parameters with values
at run time, based on values selected in prior controls on the chain.
For details about chaining controls, see Chaining Controls on the Parameters Tab.
-
Click a link in the chain.
The Properties and settings dialog box opens showing the
bound control values and the condition settings for the link in
the chain.
-
Select the chaining logic for the parameter being chained to,
in the condition, from the Values compare operator drop-down list.
Equal is the default option.
-
Close the Properties and settings dialog box.
The
compare operator is applied to the value selected.
x
Procedure: How to Apply Selected Values With a Multiselect Operator to a Condition
-
Insert a report with parameters in the HTML Composer.
For details about creating parameters, see Creating Parameter Values.
-
Click and drag control objects on the Parameters tab to create
a chain.
Chains are represented by lines connecting control objects
on the Parameters tab.
Chaining controls will populate parameters with values
at run time, based on values selected in prior controls of the chain.
For details about chaining controls, see Chaining Controls on the Parameters Tab.
-
Click a link in the chain.
The Properties and settings dialog box opens showing the
bound control values and the condition settings for the link in
the chain.
-
Click the New icon to create a multiple condition
for the chain.
Conditionn is created, where n is the number,
and added to the Conditions drop-down list, and the Selected values
section is activated. You may type in a unique condition name.
-
You may type selected values in the input box or click the
ellipsis button to select values from the list.
The list of values that appears is based on the values
of the prior bound control in the chain.
Tip: You may
also use the pop-up icons to select a field and close the pop-up
dialog. The green icon is OK, the red icon is Cancel, double-clicking
a value will select the value and close the dialog without using
any button, and pressing the Esc key will cancel the dialog without
using any button.
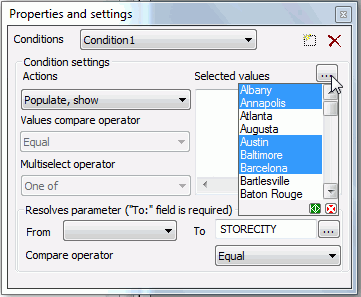
When selected values are entered, the Multiselect
operator field is activated.
-
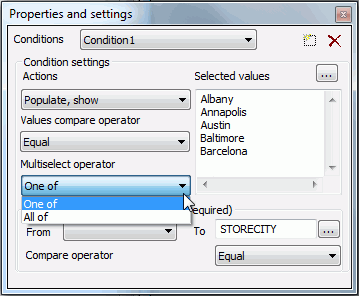
Select the chaining logic for the selected values from the Multiselect
operator drop-down list.
-
One
of is based on one of the values shown in the Selected
values, being selected in the prior control, in the chain. This is
the default selection.
-
All
of is based on the value of all of the Selected values,
being selected in the prior control, of the chain.
-
Close the Properties and settings dialog box.
The
selected values and multiselect operator are applied to the condition.
Example: Using the All Of Multiselect Operator
The
following example shows how to use the All Of multiselect operator
when you perform conditional chaining. In this example, listbox2
is chained to the multiselect listbox1. The listbox2 is conditionally
chained to be shown if all of the selected values in listbox1 meet
the listed criteria. If all of the selected values do not meet the
criteria, listbox2 will be hidden.
- Create the HTML page.
- Select the HTML
Files folder from your project in the Developer Studio
Explorer.
- Right-click and select New,
then HTML File.
The Add HTML File dialog
box opens.
- Type allof_example in
the File name text box and click Open.
The
Template selector opens.
- Click Cancel to
create a blank HTML page without using a template.
The HTML Composer
opens.
- Add a multiselect
list box to the canvas, dynamically populated using the Car data source.
- From the Insert menu,
select Controls, then List Box.
The
cursor changes into a crosshair.
- Click and drag the
crosshair to create a list box and adjust it to the size you want.
- Select Properties
and Settings from the View menu.
The Properties and
settings dialog box appears.
- Select the Dynamic radio
button for the Data type.
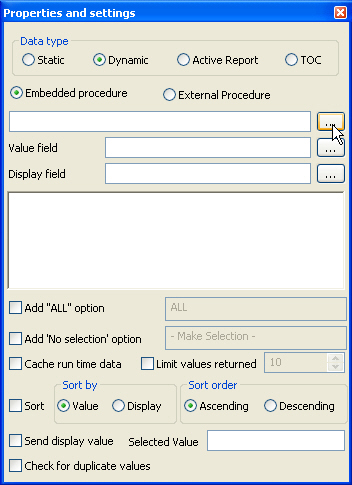
- Select the ellipsis
button from the Embedded procedure field, as shown in the following
image.
- Select the car Master
File from the Get source file dialog box and click Open.
- Select the ellipsis
button from the Value field.
- Select SEATS from
the drop-down menu.
- Set the Default selection
property to No.
- Set the Multiple
property to Multiple from the Properties
pane.
The listbox1 is now a multiselect list box.
- Add a second list
box to the canvas, dynamically populated using the Car data source.
- From the Insert menu,
select Controls, then List Box.
The
cursor changes into a crosshair.
- Click and drag the
crosshair to create a list box and adjust it to the size you want.
- Select Properties
and Settings from the View menu.
The Properties and
settings dialog box appears.
- Select the Dynamic radio
button for the Data type.
- Select the ellipsis
button from the Embedded procedure field.
The Get source file
dialog box appears.
- Select the car Master
File and click Open.
- Select the ellipsis
button from the Value field.
- Select CAR from
the drop-down menu.
- Chain the list boxes.
- Select listbox1 on
the canvas.
Resizing anchors appear around the list box.
- Hold down Ctrl and
select listbox2.
Resizing anchors appear around both list boxes.
- Select Add to current
chain from the Utilities toolbar, as shown in the following image.

- Set conditions for
the chain.
- Click the Parameters tab.
- Right-click the arrow
connecting listbox1 to listbox2 and select Properties
and Settings.
The Properties and settings dialog box
appears.
- For the Default condition,
set Actions to Hide.
- Press the New Condition
button to create a new condition.
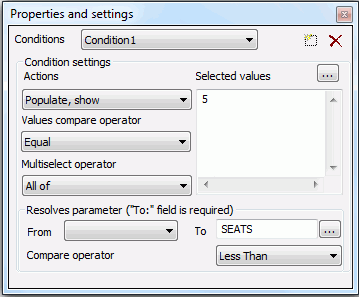
- For the new condition,
set the properties as follows:
- Selected values:
5
- Actions: Populate,
show
- Values compare operator:
Less Than
- Multiselect operator:
All of
- Run the page.
There
is no default selection for listbox1 and by default listbox2 is
not displayed when the page is first run. Select any single value
less than 5 fulfills the condition set in step 5 and listbox2 is
shown. Selecting 2 and 4 also fulfills the condition, all of the multiselected
values are less than 5 and listbox2 is shown. Selecting 2 and 5,
4 and 5, or 2, 4, and 5 does not fulfill the condition, all of the
multiselected values are not less than 5 and listbox2 remains hidden.
The
following image shows all of the selected values meeting the condition
and, as a result, listbox2 is shown.

The
following image shows all of the selected values failing to meet
the condition and, as a result, listbox2 is hidden.

x
Procedure: How to Resolve Parameters for a Condition
It is
recommended that you populate the controls first, before chaining.
When you populate first certain information is obtained that
allows the determination of the best choice for Resolves
parameter. If you chain first and then populate,
the information cannot be obtained because the chaining is already
established. If you chain first, you must manually
set Resolves parameter.
-
Insert a report with parameters in the HTML Composer.
For details about creating parameters, see Creating Parameter Values.
-
Click and drag control objects on the Parameters tab to create
a chain.
Chains are represented by lines connecting control objects
on the Parameters tab.
Chaining controls will populate parameters with values
at run time, based on values selected in prior controls on the chain.
For details about chaining controls, see Chaining Controls on the Parameters Tab.
-
Click a link in the chain.
The Properties and settings dialog box opens showing the
bound control values and the condition settings for the link in
the chain.
-
Click the Resolves parameter ellipsis
button to select a parameter name to resolve. If a custom procedure
that has a filter (or filters) populates the control, the values
list shows the parameters from the filters. If a data source populates
the control, the values list shows all of the fields from the data
source shown in the Object Inspector.
The value in the Resolves parameter field should be either:
- The field name that
limits the values for the next control in the chain, if a data source
populates the control.
- The parameter name
from the procedure, if a procedure populates the control.
In
most cases, this value will be populated by default and will not
need to be changed.
Tip: You may also use the pop-up
icons to select a field and close the pop-up dialog. The green icon
is OK, the red icon is Cancel, double-clicking a value will select
the value and close the dialog without using any button, and pressing
the Esc key will cancel the dialog without using any button.

-
Close the Properties and settings dialog box.
The
parameter value is resolved in the chain if no filter is specified.
x
Procedure: How to Select the Compare Operator for the Parameter
An
example of when to apply chaining logic is when a form offers two
lists of dates so that you can select a FROM/TO date range. By chaining
these parameters together and applying the Greater than parameter
compare operator, this ensures that when a date is selected for
the FROM parameter, only dates that follow the FROM date display
in the TO date control, eliminating the possibility of selecting
an invalid date range.
-
Insert
a report with parameters in the HTML Composer.
For details about creating parameters, see Creating Parameter Values.
-
Click and drag control objects on the Parameters tab to create
a chain.
Chains are represented by lines connecting control objects
on the Parameters tab.
Chaining controls will populate parameters with values
at run time, based on values selected in prior controls on the chain.
For details about chaining controls, see Chaining Controls on the Parameters Tab.
-
Click a link in the chain.
The Properties and settings dialog box opens showing the
bound control values and the condition settings for the link in
the chain.
-
Select
the chaining logic option from the Parameter's compare
operator drop-down list. This sets the compare operator
to populate the control.
Equal is the default option.
-
Close the Properties and settings dialog box.
The
compare operator is applied to the parameter selected.
x
Procedure: How to Enable Cache Processing for Chained Values
You
may enable cache processing for chained values in two ways:
- Enable the
caching option for the HTML page and all objects on the page.
- Enable cache
run time data for a dynamic control or a condition.
A chain contains
conditions for each link in the chain. The conditions are linked
to the values being bound to the control object. If you change the
options for the condition, it will also be applied to the control,
and vice versa.
Caching options are turned off
by default.
-
To enable caching options for all objects on the HTML page:
-
To enable caching options for a dynamic control or condition:
A chain contains conditions for each link in the chain.
The conditions are linked to the values being chained to the control
object. If you change the options for the condition, it will also
be applied to the control, and vice versa.
-
For a dynamic control:
- Create a
dynamic input control to supply parameter values.
For details
about creating dynamic values, see Creating a Dynamic List of Values.
- Select the
dynamic control object from the Parameters tab.
The Properties
and settings dialog box opens, showing the dynamic control options.
- Select Cache
run time data to cache the run time data for the selected
input control.
Note: This setting overrides the Default
caching option from the HTML Page tab.
- Close the
Properties and settings dialog box.
- Select the
center of the control object, click and drag the control to the
center of the next control object, and release the mouse to complete
the binding of the chain.
When binding controls, the conditions
inherit the values set in the dynamic control properties and settings.
-
For a dynamic condition:
When running the HTML page, data for the chained
value is cached to improve performance.
Example: Chaining Controls in the HTML Composer
The
following example shows how to create a report of the Gotham Grinds
product sales for each category within each Region, State, and City.
Several
chaining conditions will be created:
- A chain consisting
of the Region, State, and City controls.
The values for the Region
control populate the State control with the associated values, and
the values for the State control populate the City control with
the associated values.
- Multiple
conditions for links in the chain.
Conditions indicate that when
Region is Southeast, the State control is hidden and the dependent
City Values for Southeast are shown in the City control.
- Create the
HTML page.
Tip: The Gotham Grinds Sales data source (ggsales.mas)
is available from the ibisamp Applications on localhost folder of
Developer Studio. You may copy this source file to the project directory
of your choice.
- Select the HTML
Files folder from your project in the Developer Studio
Explorer.
- Right-click
and select New/HTML File.
The Add HTML
File dialog box opens.
- Type chaining_example in
the File name text box and click Open.
The
HTML Composer opens.
- Create the
Gotham Grinds sales report.
- Select New
Report from the Insert menu.
The cursor changes into
a crosshair.
- Click and
drag the crosshair to create a reporting object and adjust it to
the size you want.
- Double-click
the report placeholder.
The Open dialog box appears.
- Select the ggsales Master
File and click Open.
The Report Painter
opens showing the field names for the ggsales data source.
- Select By from
the Columns toolbar and double-click the following field names: CATEGORY,
PCD, PRODUCT, REGION, ST, CITY, STCD.
- Insert your
cursor after the Store ID field in the Report Painter canvas and select Sum from
the Columns toolbar.
- Double-click DOLLARS to
add it to the report.
- Create a
list of parameters for the Region, ST, and City fields. These are
the values you will be able to select when you run the report on
the HTML page.
- Click the Where/If button
from the Columns toolbar.
The Report Options dialog box opens
at the Where tab.
- Click Assist.
The
Expression Builder opens.
- Create a
parameter for Region.
- Create a
parameter for ST from the Expression Builder.
- Create a
parameter for City from the Expression Builder.
- Click OK to
close the Expression Builder.
- Click OK to
close the Report Options dialog box.
- Select Close from
the File menu to close the Report Painter.
- When you
are prompted to save your changes, click Yes.
You
are returned to the HTML Composer and the New Parameters dialog
box appears.
- Click OK to
automatically add your parameter controls to the HTML page.
- Chain the
controls to associate dependent values.
- Click the Parameters tab.
When
a control is automatically added to the layout with the New Parameters dialog
box, it is associated (bound) to a parameter. The control object
is bound to the parameter object, which means that the control will
populate the parameter.
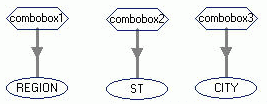
In this example, the Region, ST, and
City controls are not chained to each other and thus have no dependencies.
If you run this report as is, no HTML output would appear since
the controls do not know how to associate the related values.
- Select the
center of the REGION control object, left-click
and drag the REGION control to the center
of ST control object, and release the mouse
to complete the link.
- Select the
center of the ST control object, click and drag
the ST control to the center of CITY control
object, and release the mouse to complete the link.
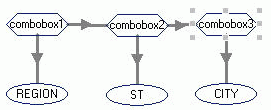
Now the Region,
ST, and City controls are chained to each other. The Region control
starts the first link in the chain, chained to the ST control. The
ST control starts the second link in the chain, chained to the City
control.
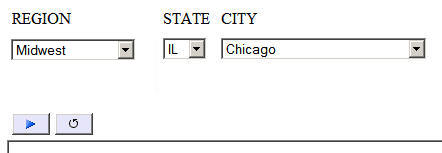
If
you run this page, the values for the Region control populate the
ST control with the associated values, and the values for the ST
control populate the City control with the associated values.
- Create a
condition for the ST control to be hidden if the Region is Southeast.
- Click the
first link in the chain.
The Properties and settings dialog box
opens showing the bound control values for the Region control. Accept
the default condition settings:
- Actions is Populate,
show.
- The Value
compare operator and Parameter’s compare operator is Equal.
- The multiselect
operator is One of.
- Resolves
parameter is REGION.
- Click the New icon
to create multiple conditions for this chain link.
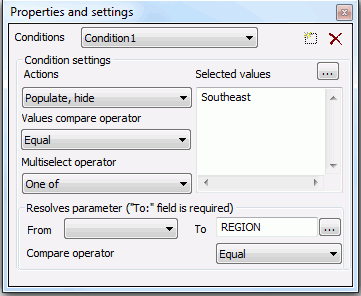
Condition1
is created and the Selected values section is activated. Set the following
options to hide the ST control if Region is Southeast.
The following image shows
the condition settings to hide the result of values (the list of
State values) when Region is equal to Southeast.
- Create a
condition to populate the City control with the dependent City values,
when the State control is populated with States from the Southeast
Region.
- Click the
second link in the chain.
The Properties and settings dialog box
opens showing the bound control values for the State control. Accept
the default condition settings:
- Actions is Populate,
show.
- The Value
compare operator and Parameter’s compare operator is Equal.
- The multiselect
operator is One of.
- Resolves
parameter is ST.
- Click the New icon
to create multiple conditions for this chain link.
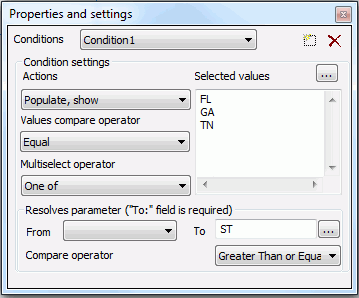
Condition1
is created and the Selected values section is activated. Set the following
options to supply the City values when the States are FL, GA, TN
(from the Southeast Region).
The
following image shows the condition settings that the dependent
City values will honor when the ST values are FL, GA, and TN.
- Close the
Properties and settings dialog box.
- Run the HTML
page.
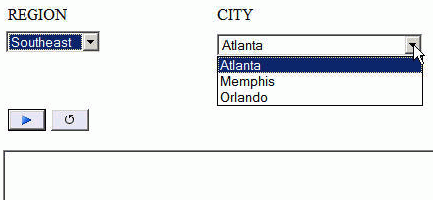
When Region is Southeast, the State control is
hidden and the dependent City Values for Southeast are shown in
the City control.
