Creating Strategy and Risk Objects
PMF provides a strategy management system that allows
you to arrange and organize metrics into business strategies. You
can link and align metrics to various business goals, projects,
and themes. You can also assign a weight to an individual metric, that
is, set its priority compared to other metrics.
Once you perform the preceding tasks, you can present and interpret
the objects through various perspectives and business views, as
appropriate for different business roles inside an organization,
or outside.
PMF supports several types of objects, including perspectives,
objectives, compound objectives, risks, and consequences. On the
legend on a Strategy Map, a user can click a type to highlight that
specific type. For example, a user can click Risk on
the legend to highlight only the risk objects on the Strategy Map.
This capability supports a live discussion about the risk performance
of a business strategy.
xCreating or Editing a Perspective
A perspective indicates a high-level classification
for types of objectives. It is a container that holds objectives.
You can display a perspective for any scorecard, both on a scorecard
view and in the Strategy Map.
To create a perspective, you will use the New Perspective panel
on the Author tab. To edit a perspective, you will use the Edit
Perspective panel.
x
Procedure: How to Create a Perspective
-
In the Author tab, click the Perspectives panel button
in the left pane.
-
Click the New button.
The following image shows the New Perspective panel that
opens, with sample values in the fields.

-
Complete
the fields on the New Perspective panel, as described in the following
table.
|
Field
|
Description
|
|---|
|
Perspective Name
|
Type a name for the new perspective. The
maximum number of characters is 50.
|
|
Description
|
Type a brief description of the perspective.
The maximum number of characters is 1024.
|
|
Owner
|
From the drop-down menu, click the ID of
the owner of the perspective. The default value is the ID of the owner
that is logged on.
|
-
After you
have supplied the values on the panel, click Save.
x
Procedure: How to Edit an Existing Perspective
-
In the Author
tab in PMF, click the Perspectives panel
button.
-
Click the
name of the perspective that you want to edit.
-
On the Edit
Perspective panel that opens, edit the perspective as desired. The
fields are the same as those on the Create Perspective panel.
-
Optionally,
click the Adjust Objective Weights button
to set the priority of individual objectives that are linked to
the perspective.
The following image shows the Objective Weights panel,
with sample values.

-
In the panel, drag the sliders to re-assign the weights, or
type the weighting percentage in the input field.
Tip: Typed percentages are recognized when you move
the mouse off the input field and click it.
Notice that the
weights are automatically balanced across all the objectives.
If
you do not want to balance a particular objective as you drag the
sliders or type percentages, click the Lock icon
to the left of the objective to lock the weight of that objective.
The
Total Weighting Percentage is displayed at the bottom of the weights column
as a guideline when you make percentage adjustments.
-
At any time, optionally click Re-balance weights
to assign an equal percentage to all objectives.
-
Click Save on the panel when you have adjusted
the weights as desired.
-
Click Perspective to return to the Edit Perspective
panel.
-
Click Save on
the Edit Perspective panel when you have finished making changes.
xCreating or Editing an Objective
An objective relates to a high-level goal for business
action. An objective is designed to be specific, measurable, action-oriented,
results-driven, and time-based (SMART).
To create an objective, you will use the New Objective panel
on the Author tab. To edit an objective, you will use the Edit Objective
panel.
x
Procedure: How to Create an Objective
-
In the Author
tab in PMF, click the Objectives panel button.
-
Click New.
The following image shows the New Objective panel that
opens.

-
Complete
the fields on the New Objective panel, as described in the following
table.
|
Field
|
Description
|
|---|
|
Name
|
Type a name for the new objective. The maximum number
of characters is 50.
|
|
Report
|
From the drop-down menu, click the type
of view on which the objective appears.
|
|
Object Type
|
Leave the default value, Objective.
|
|
Description
|
Type a brief description of the objective.
The maximum number of characters is 1024.
|
|
Subjective Comments
|
Type information about the
objective that helps you use it in your authoring tasks. The maximum
number of characters is 1024.
|
|
Owner
|
From the drop-down menu, click the ID of
the owner of the objective. The default value is the ID of the owner that
is logged on.
|
-
After you
have supplied the values on the panel, click Save.
x
Procedure: How to Edit an Existing Objective
-
In the Author
tab in PMF, click the Objectives panel button.
-
In the Objectives
tree on the left, locate and click the name of the objective that
you want to edit.
-
On the Edit
Objective panel that opens, edit the objective as desired. The fields
are the same as those on the Create Objective panel. The name of
the associated scorecard, perspective, and theme is shown in the
respective field, if applicable.
-
Optionally,
click the Link/Unlink Measures button to
modify the list of measures that are linked to the objective. The
Link Measures to Objective panel opens.
-
To link a measure to the objective, locate the measure in the
Measures Available to be Linked section of the panel. Select the Link? check
box.
You can link more than one measure by selecting all the
applicable check boxes.
-
To unlink a measure associated with the objective, locate the measure
under Measures Currently Linked. Select the Unlink? check
box for the measure.
-
Click Save to make the changes to the list
of measures that are linked to the objective.
-
Click Objective to return to the Edit Objective
panel.
-
Optionally,
click the Adjust Measure Weights button to
set the priority of individual measures that are linked to the objective.
Tip: You can also click this button on the Link
Measures to Objective panel.
It is strongly recommended that
you adjust the weighting of measures if you change linking relationships,
as described in step 4. If you do not adjust weighting, metric totals may
be inaccurate.
-
On the Measure Weights panel that opens, drag the sliders to
re-assign the weights, or type the weighting percentage in the input field.
Tip: Typed percentages are recognized when you move
the mouse off the input field and click it.
Notice that the
weights are automatically balanced across all the measures.
If
you do not want to balance a particular measure as you drag the
sliders or type percentages, click the Lock icon
to the left of the measure to lock the weight of that measure.
The
Total Weighting Percentage is displayed at the bottom of the weights column
as a guideline when you make percentage adjustments.
-
At any time, optionally click Re-balance weights
to assign an equal percentage to all measures.
-
Click Save on the panel when you have adjusted
the weights as desired.
-
Click Objective to return to the Edit Objective
panel.
-
Click Save on
the Edit Objective panel when you have finished making changes.
xCreating or Editing a Compound Objective
A compound objective enables you to link multiple causative
objectives into a grouping that you can place on a Strategy Map.
When included on a dashboard, a view, or a Strategy Map, a compound
objective displays the aggregate values of the contributing objectives.
To create a compound objective, you will use the New Compound
Objective panel on the Author tab. To edit a compound objective,
you will use the Edit Compound Objective panel.
You can also edit an individual objective that is linked to a
compound objective.
To link individual objectives to a compound objective, use the
standard linking function on the Strategy Map.
The following image shows a compound objective, named Blended
Profit Goal, on a Strategy Map. Two objectives are linked to the
compound objective. They are Profit up 20 Pct and Margin up 10 Pct.

x
Procedure: How to Create a Compound Objective
-
In the Author
tab in PMF, click the Objectives panel button.
-
Click Compound.
The following image shows the New Compound Objective panel
that opens, with sample values in the fields.

-
Complete
the fields on the New Compound Objective panel, as described in
the following table.
|
Field
|
Description
|
|---|
|
Name
|
Type a name for the new compound objective.
The maximum number of characters is 50.
|
|
Report
|
From the drop-down menu, click the type
of view on which the compound objective appears.
|
|
Object Type
|
Leave the default value, Objective.
|
|
Description
|
Type a brief description of the compound
objective. The maximum number of characters is 1024.
|
|
Subjective Comments
|
Type information about the
compound objective that helps you use it in your authoring tasks.
The maximum number of characters is 1024.
|
|
Owner
|
From the drop-down menu, click the ID of
the owner of the compound objective. The default value is the ID
of the owner that is logged on.
|
-
After you
have supplied the values on the panel, click Save.
x
Procedure: How to Edit an Existing Compound Objective
-
In the Author
tab in PMF, click the Objectives panel button.
-
In the Compound
Objectives tree on the left, locate and click the name of the compound
objective that you want to edit.
-
On the Edit
Compound Objective panel, edit the compound objective as desired.
The Adjust Objective Weights button enables you to set
the priority of individual objectives that are linked to the compound
objective.
- Click Adjust
Objective Weights to open the Objective Weights panel
for the compound objective.
- Drag the sliders
to re-assign the weights, or type the weighting percentage in the
input field.
Tip: Typed percentages are recognized when
you move the mouse off the input field and click it.
Notice
that the weights are automatically balanced across all the contributing objectives.
If
you do not want to balance a particular objective as you drag the
sliders or type percentages, click the Lock icon
to the left of the objective to lock the weight of that objective.
The
Total Weighting Percentage is displayed at the bottom of the weights
column as a guideline when you make percentage adjustments.
- Optionally, click Re-balance
weights to assign an equal percentage to all objectives.
- Click Save on
the panel when you have adjusted the weights as desired.
- Click Compound to
return to the Edit Compound Objective panel.
-
Click Save on
the Edit Compound Objective panel when you have finished making changes.
x
Procedure: How to Edit an Individual Objective That Is Linked to a Compound Objective
-
In the Author
tab in PMF, click the Objectives panel button.
-
In the Compound
Objectives tree on the left, expand the node for the compound objective
to which the individual objectives are linked.
-
In the tree,
locate and click the name of the individual objective that you want
to edit.
-
On the Edit
Objective panel that opens, edit the objective as desired.
-
Click Save on
the panel when you have made your edits as desired.
xCreating or Editing a Risk
A risk describes an area that you are measuring that
represents a specific problem, or threat, to your enterprise. Risks
can be placed on the Strategy Map and you have the ability to link
different metrics to each risk.
To create a risk, you will use the New Risk panel on the Author
tab. To edit a risk, you will use the Edit Risk panel.
To link individual risks to a consequence, use the standard linking
function on the Strategy Map, as described in Drawing the Strategy Map.
x
Procedure: How to Create a Risk
-
In the Author
tab in PMF, click the Risks panel button.
-
Click New.
The following image shows the New Risk panel that opens.

-
Complete
the fields on the New Risk panel, as described in the following table.
|
Field
|
Description
|
|---|
|
Name
|
Type a name for the new risk. The maximum
number of characters is 50.
|
|
Report
|
From the drop-down menu, click the type
of view on which the risk appears.
|
|
Object Type
|
Leave the default value, Risk.
|
|
Description
|
Type a brief description of the risk. The
maximum number of characters is 1024.
|
|
Subjective Comments
|
Type information about the
risk that helps you use it in your authoring tasks. The maximum
number of characters is 1024.
|
|
Owner
|
From the drop-down menu, click the ID of
the owner of the Risk. The default value is the ID of the owner
that is logged on.
|
-
After you
have supplied the values on the panel, click Save.
x
Procedure: How to Edit an Existing Risk
-
In the Author
tab in PMF, click the Risks panel button.
-
In the Risks
tree on the left, locate and click the name of the risk that you
want to edit.
-
On the Edit
Risk panel, edit the risk as desired. The fields are the same as
those on the New Risk panel. The name of the associated scorecard,
perspective, and theme is shown in the respective field, if applicable.
-
Optionally,
click the Link/Unlink Measures button to
modify the list of measures that are linked to the risk. The Link
Measures to Risk panel opens.
-
To link a measure to the risk, locate the measure in the Measures
Available to be Linked section of the panel. Select the Link? check
box.
You can link more than one measure by selecting all the
applicable check boxes.
-
To unlink a measure associated with the risk, locate the measure
under Measures Currently Linked. Select the Unlink? check
box for the measure.
-
Click Save to make the changes to the list
of measures that are linked to the risk.
-
Click Risk to return to the Edit Risk panel.
-
Optionally,
click the Adjust Measure Weights button to
set the priority of individual measures that are linked to the risk.
Tip: You can also press this button on the Link
Measures to Risk panel.
It is strongly recommended that you
adjust the weighting of measures if you change linking relationships,
as described in step 4. If you do not adjust weighting, metric totals may
be inaccurate.
-
On the Measure Weights panel that opens, drag the sliders to
re-assign the weights, or type the weighting percentage in the input field.
Tip: Typed percentages are recognized when you move
the mouse off the input field and click it.
Notice that the
weights are automatically balanced across all the measures.
If
you do not want to balance a particular measure as you drag the
sliders or type percentages, click the Lock icon
to the left of the measure to lock the weight of that measure.
The
Total Weighting Percentage is displayed at the bottom of the weights column
as a guideline when you make percentage adjustments.
-
At any time, optionally click Re-balance weights
to assign an equal percentage to all measures.
-
Click Save on the panel when you have adjusted
the weights as desired.
-
Click Risk to return to the Edit Risk panel.
-
Click Save on
the Edit Risk panel when you have finished making changes.
xCreating or Editing a Consequence
A consequence enables you to link multiple causative
risks into a grouping that you can place on a Strategy Map. When
included on a dashboard, a view, or a Strategy Map, a consequence
displays the aggregate values of the contributing risks.
To create a consequence, you will use the New Consequence panel
on the Author tab. To edit a consequence, you will use the Edit
Consequence panel.
To link individual risks to a consequence, use the standard linking
function on the Strategy Map.
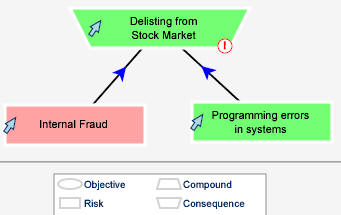
The following image shows a consequence, named Delisting from
Stock Market, on a Strategy Map. Two risks are linked to the consequence.
They are Internal Fraud and Programming errors in systems.
x
Procedure: How to Create a Consequence
-
In the Author
tab in PMF, click the Risks panel button.
-
Click Consequence.
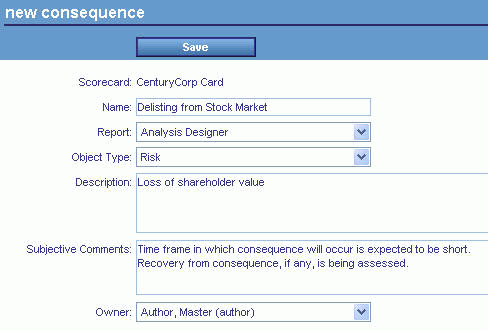
The following image shows the New Consequence panel that
opens, with sample values in the fields.
-
Complete
the fields on the New Consequence panel, as described in the following
table.
|
Field
|
Description
|
|---|
|
Name
|
Type a name for the new consequence. The maximum
number of characters is 50.
|
|
Report
|
From the drop-down menu, click the type
of view on which the consequence appears.
|
|
Object Type
|
Leave the default value, Risk.
|
|
Description
|
Type a brief description of the consequence.
The maximum number of characters is 1024.
|
|
Subjective Comments
|
Type information about the
consequence that helps you use it in your authoring tasks. The maximum
number of characters is 1024.
|
|
Owner
|
From the drop-down menu, click the ID of
the owner of the consequence. The default value is the ID of the owner
that is logged on.
|
-
After you
have supplied the values on the panel, click Save.
x
Procedure: How to Edit an Existing Consequence
-
In the Author
tab in PMF, click the Risks panel button.
-
In the Consequences
tree on the left, locate and click the name of the consequence that
you want to edit.
-
On the Edit
Consequence panel, edit the consequence as desired.
The Adjust Risk Weights button enables you to set the priority
of individual risks that are linked to the consequence.
- Click Adjust
Risk Weights to open the Risk Weights panel for the
consequence.
- Drag the sliders
to re-assign the weights, or type the weighting percentage in the
input field.
Tip: Typed percentages are recognized when
you move the mouse off the input field and click it.
Notice
that the weights are automatically balanced across all the contributing risks.
If
you do not want to balance a particular risk as you drag the sliders
or type percentages, click the Lock icon
to the left of the risk to lock the weight of that risk.
The
Total Weighting Percentage is displayed at the bottom of the weights
column as a guideline when you make percentage adjustments.
- Optionally, click Re-balance
weights to assign an equal percentage to all risks.
- Click Save on
the panel when you have adjusted the weights as desired.
- Click Consequence to
return to the Edit Consequence panel.
-
Click Save on
the Edit Consequence panel when you have finished making changes.
xDeleting a Strategy or Risk Object
The procedure for deleting a strategy or risk object
is the same for every type of object. To delete an object, you will
use the Edit panel on the Author tab.
x
Procedure: How to Delete a Strategy or Risk Object
-
In the Author
tab in PMF, click the panel button that opens the navigation tree
for the strategy or risk object that you want to delete.
-
Locate and
click the name of the object.
The Edit panel for the object opens.
-
Click the Delete button
on the Edit panel.
In the following image, the cursor points to the Delete
button on a sample Edit Perspective panel.

After
you click Delete, PMF prompts you to confirm
the deletion of the object.
-
Click OK to
proceed with the deletion.