Creating a Welcome Screen Using the Menu Control
Instead of bringing your end users directly into your
FanClub application, it is nice to display a welcoming screen that
gives them an idea of the kinds of things your application will
do.
In this section, you will create such a screen. You will also
learn how to use the Maintain Development Environment menu control
to place a menu bar on your form.
x
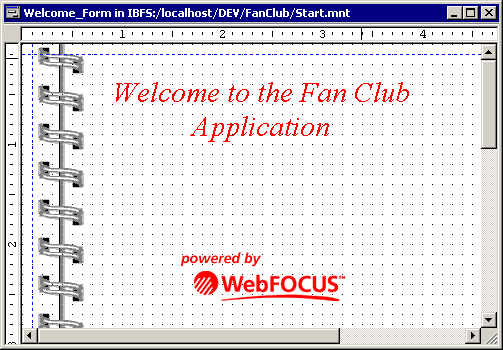
Procedure: How to Create a Welcome Screen
-
Create
a new form in the Start procedure.
-
Name
the form Welcome_Form, and give it the title Welcome to the WebFOCUS
Fan Club.
-
Make
the background image Spiralbg.
-
Click
the Text
 control
and draw a rectangle at the top of your form.
control
and draw a rectangle at the top of your form.
-
Type
the text, Welcome to the FanClub Application.
-
In the
properties tab, specify the font as Times New Roman, Italic, 22 point.
Specify the ForeColor as Red.
-
Add the
image webfocus1.gif to the bottom of your form.
This
provides a basic Welcome Screen to greet the user, but it does not
give the user much to do. To provide the user with a more meaningful
welcome screen, you can create a menu bar that will allow your user
to take advantage of your entire application.
x
Procedure: How to Create a Menu Bar
-
From
the Controls Palette, select the Menu
 control.
-
Draw
a rectangle on your form in order to create a menu bar.
-
Name
the menu bar WelcomeMenu.
-
In the
Properties tab, change Orientation to Vertical. Because you will be
specifying fairly long menu options, a vertical menu bar will be
more practical.
-
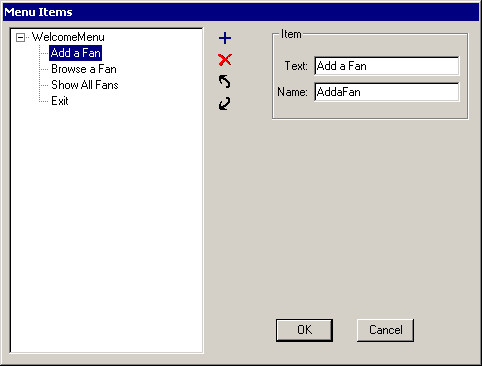
Double-click
the menu bar to open the Menu Items dialog box.
-
Create
three more menu items on your form by selecting WelcomeMenu and
clicking the New
 button
three times.
button
three times.
-
Change the text of the menu items as
follows:
- Menu1 to Add a Fan
- Menu2 to Browse
a Fan
- Menu3 to Show
All Fans
- Menu4 to Exit
Notice
that when you type in the Text box, WebFOCUS Maintain echoes what
you type in the Name box, minus the spaces. Leave the names as WebFOCUS
Maintain types them.
-
Press Enter or
click OK when you have finished adding all
of the menu items.
-
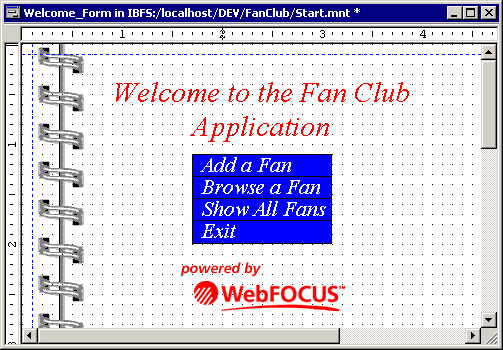
In the
Properties tab, change the properties for the WelcomeMenu control.
For example:
- Set BackColor
to blue.
- Set ForeColor
to white.
- Set Font to
Times New Roman, Italic, 16pt.
- Set BackColorOver
to light blue.
- Set ForeColorOver
to yellow.
Your
form should look similar to the following:
xAssigning Event Handlers to a Menu Item
After you place a menu bar on your form, WebFOCUS creates
click events that correspond to menu items. Each event is named ClickMenuItem,
where MenuItem is the name of each menu item you created.
If you select the WelcomeMenu and select
the Events tab in the Property sheet, you will see the four events
that correspond to the items you specified for your menu.
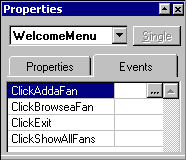
You can now assign event handlers to these events.
x
Procedure: How to Assign Event Handlers to a Menu Item
-
Select
the WelcomeMenu menu bar, then in the Property
sheet, select the Events tab.
-
Double-click
the ClickAddaFan event to open the Event
Handler editor.
-
Assign
Form1 to this event by dragging Form1 from the Project Explorer into
the Event Handler. Select Show a Form from
the pop-up menu.
-
In the
Events tab, double-click the ClickBrowseaFan event.
-
Assign
the function GetFans and the form ShowFan to this event (drag them
both from the Project Explorer as well).
-
Double-click Click
Exit in the Events tab.
-
The Exit
option should close the application. Assign Close application to
this event.
(You are not going to assign ShowAllFans in this section.)

-
Close
the Event Handler editor and save your changes.
xMopping Up: Adjusting the Application Flow of Forms
Before you can deploy and run the FanClub application,
you must adjust the navigation of forms in the application. Currently,
Form1 is the first form displayed to the end user. You must change
this to Welcome_Form. Also, Form1 has an Exit button that closes
the application.
x
Procedure: How to Adjust the Application Flow of Forms
Change
this to a Back button that will just close Form1.
-
In the
Project Explorer, open the Top function. This actually opens the
entire Start procedure in the Procedure Editor with your cursor
in the Top function.
-
Delete
the line
Winform Show FORM1;
-
Use the
Language Wizard to add the following code in its place:
Winform Show WELCOME_FORM;
-
Close
the Procedure Editor.
-
Open
Form1.
-
Select ExitButton and
change its name to BackButton.
-
Change
the text from Exit to Back.
-
Open
the Event Handler editor, delete the existing event handler for Click,
and assign the event to Close form.

-
Close
the Event Handler editor.
-
Delete
the Show Fans button.
-
Deploy
and run your application.
-
When
you are done, close your application by clicking Exit and
closing Internet Explorer.