Edit boxes and multi-edit boxes enable end users
to view, enter, and edit data for a stack or user-defined field.
Edit boxes allow only single lines of text, while multi-edit
boxes allow multiple lines.
xChanging Edit or Multi-Edit Box Properties
When you select your edit box or multi-edit box,
you will see a list of edit box or multi-edit box properties in
the property sheet. Changing these properties will change what
your edit box or multi-edit box looks like and what it does
at run time.
Many of the styling properties can also be changed using
a Cascading Style Sheet. For more information on Cascading Style
Sheets, see Using Cascading Style Sheets.
Choose your edit box property or multi-edit box property based
on the task you wish to perform:
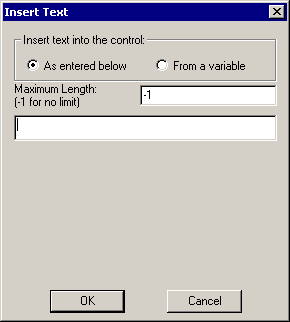
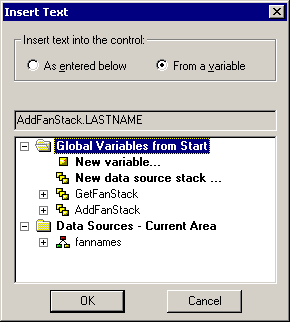
If you want to change the contents of the edit box of multi-edit box, use the
Text Property to open the Insert Text dialog box. For more information,
see the Insert Text Dialog Box.
If you want to change the name of the edit box or multi-edit box that identifies it to the procedure, use
the (Name) Property. For more information, see the (Name) Property.
If you want to change the size or location of the edit box or multi-edit box, use
the Bottom Property, Left Property, Right Property, Top Property,
or use a style sheet. For more information, see the Bottom Property, Left Property, Right Property, and Top Property. You can also
move or resize the edit box or multi-edit box directly in the form.
If you want to change the color of the edit box or multi-edit box, use
the BackColor Property to determine the color of the box, the ForeColor
Property to determine the color of the text in the box, or use a
style sheet. For more information, see the BackColorOver Property and
theForeColor Property.
If you want to change the font in the edit box or multi-edit box, use
a style sheet or use the Font Property. For more information, see
the Font Property.
If you want to change the case of text entered in the edit box or multi-edit box before being returned to the bound variable, use
the CaseStyle Property. For more information, see the CaseStyle Property.
If you want to display only asterisks instead of actual characters when an end user enters information into an edit box, use
the Password Property. This property does not apply to multi-edit
boxes. For more information, see the Password Property.
If you want to make the contents of the edit box or multi-edit box read-only, use
the ReadOnly Property. You can accomplish this by disabling the
Enable property, but this method does not dim the control. For more
information, see the ReadOnly Property.
If you want to remove the border or add a border to the edit box or multi-edit box, use
the Border Property.
If you want to make the edit box or multi-edit box inactive or make it invisible, use
the Enabled Property to determine whether the edit box or multi-edit
box is active or not. If the edit box or multi-edit box is inactive,
it will be dimmed out and nothing will happen when the end user
clicks it. You can also use the Visible Property to determine whether
the edit box or multi-edit box is visible to the end user or use
a style sheet. For information, see the Enabled Property and
the Visible Property.
If you want to change what the cursor looks like when it is on top of the edit box or multi-edit box, use
the CursorPointer Property or use a style sheet. For more information,
use the CursorPointer Property.
If you want to display a tooltip when the cursor is on the top of the edit box or multi-edit box, use
the ToolTipText Property. For more information, see the ToolTipText Property.
If you want to assign a help topic to the edit box or multi-edit box, use
the Help Property. For more information, see Assigning Help to Your Forms and
Controls.
If you want the end user to be able to tab to the edit box or multi-edit box, use
the Tabstop Property. For more information, see the Tabstop Property.
If you want to move the edit box or multi-edit box to another layer, use
the Layer Property. For more information, see Layering Controls.
If you want to enable automatic validation of data formats at run time, use the IBIValidation Property.
If you want to control the display order of the combo box or list box when more than one control is overlaid, use
the Zindex Property. For more information, see the ZIndex Property.
Note: Internet Explorer 7 or equivalent is required.
xUsing Prompted Edit Boxes
A prompted edit box consists of two
controls grouped together: an edit box and a text control describing
the edit box.
WebFOCUS Maintain generates prompted edit boxes for you automatically
during the following situations:
- When you drag
a data source stack from the Project Explorer into the Form Editor.
WebFOCUS Maintain displays the Select Stack Columns dialog box
where you specify which columns in the data source stack you want
to create prompted edit boxes for.
- When you drag
a data source stack column from the Project Explorer into the
Form Editor.
- When you drag
a variable from the Project Explorer into the Form Editor.
- When you drag
a segment from a data source in the Project Explorer into the
Form Editor. WebFOCUS Maintain displays the Select Segment Fields
dialog box to prompt you for the fields you want to create prompted
edit boxes for and what the data source will be.
- When you drag
a data source field from the Project Explorer into the Form
Editor. The data source for the edit box will be the data source
field in the Current Area.
Tip: We recommend that
you not use this method for generating prompted edit fields.
Data source stacks are a superior way of accessing and manipulating
data source values, and they function more intuitively than
the Current Area.
If you want to change the properties
for either the edit box or the text control separately, select
the prompted edit box. Then select either the edit box or
the text control in the drop-down list of grouped controls
in the property sheet.
For more information on grouping controls, see Grouping Controls.
WebFOCUS Maintain includes a special alignment command for
aligning prompted edit boxes along the left sides of the edit
boxes. For more information, see How to Align Prompted Edit Boxes Along the Left Sides of the Edit Boxes.
x
Reference: Select Stack Columns Dialog Box
When you
drag a data source stack from the Project Explorer into the
Form Editor, WebFOCUS Maintain displays the Select Stack Columns
dialog box. You use this dialog box to determine which columns
in the data source stack to create prompted edit boxes for.
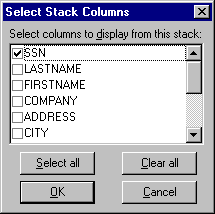
This dialog box has the following options:
-
Select columns to display from this stack
-
Select the columns in this data source stack
that you want to display on your form. Clear the columns you
do not want to display.
-
Select all
-
Selects all the columns in the data source
stack.
-
Clear all
-
Clears all the columns in the data source
stack.
x
Reference: Select Segment Fields Dialog Box
When you
drag a segment from a data source in the Project Explorer
into the Form Editor, WebFOCUS Maintain displays the Select
Segment Fields dialog box. You use this dialog box to determine
which fields in the data source segment WebFOCUS Maintain should
create prompted edit boxes for and what their data source
should be.
When
you finish specifying information in this dialog box and click
OK, WebFOCUS Maintain will do
the following:
- Create prompted
edit boxes for the data source fields you select here to the Form
Editor.
- If you created
a new data source stack, add the data source stack to the
list of data source stacks in the procedure that the form is in.
- Add the data
source you specified to the procedure, if it is not already
part of it.
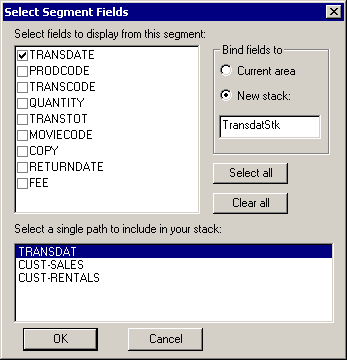
This dialog box has the following options:
-
Select fields to display from this segment
-
Select the fields in this data source segment
that you want to display on your form. Clear the fields you
do not want to display.
-
Select all
-
Selects all the fields in the segment.
-
Clear all
-
Clears all the fields in the segment.
-
Bind fields to
-
Select Current Area to
specify that the data source for the edit fields will be
the Current Area.
Select New
stack to specify that the data source for the edit
fields will be the data source stack you specify here. WebFOCUS
Maintain suggests a name for this data source stack, but you can
type another name here.
Note:
- We recommend that you not use the Current Area. Data
source stacks are a superior way of accessing and manipulating data
source values, and they function more intuitively than the
Current Area.
- You cannot enter the name of a data source stack that
already exists. If you want to use an existing data source stack
as the data source for your prompted edit fields, click
Cancel and drag the data source
stack you want from the Project Explorer into the Form Editor.
-
Select a single path to include in your stack
-
Enables you to select all of the fields in
a single segment of a hierarchical database. (If you have a flat
file or relational database this enables you to select all
of the fields.)
 or Multi-edit
box control
or Multi-edit
box control  in the
Controls palette.
in the
Controls palette.