This procedure will copy the Master File description template for the Fixed File adapter to point to a new file repository, index the content of those files, and monitor those directories for any changes.
-
Create a new application mapping named myappmapexample.
- Log on to the Reporting Server console.
- Select Applications.
-
Right-click Application Directories in the
left pane, select New, and then Application Directory.
The Create New Application pane opens.
- Select Application Mapping to Disk from the Application Type drop-down menu.
- In the Application Name field, enter myappmapexample.
-
Select a physical location. For this example, use \ibi\apps\ibisamp.
Note: It is important to note that for file indexing to work, this directory must also be a virtual path. For more information, see the Magnify Security and Administration manual.
-
Uncheck the Add directory to APPPATH check
box.
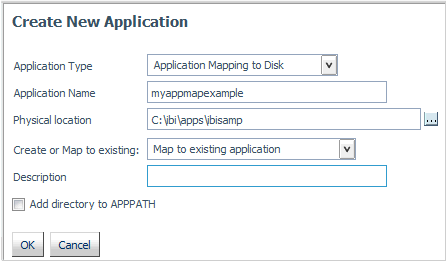
- Click OK.
-
In the Reporting Server console, create the myfileindexing synonym:
- Select Applications if it is not already selected.
- From the ibisamp directory, right-click the filtmntr.mas file and select Open.
-
Click the console icon and select Save As,
as shown in the following image.
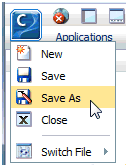
- Use the Save in drop-down menu to navigate to the ibisamp folder.
- Save the file as myfileindexing
-
Expand the Variables folder.
- Double-click the &&FL_DIRECTORY variable, enter myappmapexample in the Default field, and click Apply. This is the same value as the APP MAP name set in step 1e.
- Double-click the &&FL_POLLING variable, enter '1' in the Values field, and click Apply.
- Double-click the &&FL_TIMEOUT variable, enter '2' in the Values field, and click Apply.
- Save and close the Master File.
-
In the Reporting Server console, create the file indexing procedure:
- Right-click the ibisamp folder and select New, then Procedure.
-
Paste in the code in the attached
file.
Note:
- You may have to change the CONNECTION_ATTRIBUTES and BASEURL accordingly.
- You may need to change the ROOT_DOS_PATH and ROOT_WEB_PATH DEFINE fields to accommodate the known base system and virtual path of the files being evaluated.
- This file will read a directory's file list and pass it to this procedure where the file system path is replaced by its URL path.
- Magnify will use the URL to access the file via HTTP protocol and index the content found.
- Save the procedure as myfileindexing.
- Add a new index to the collections_myexample.xml file. For more information, see How to Add Indexes to the Collections Drop-down Menu and How to Create a Customized Collection Configuration.
-
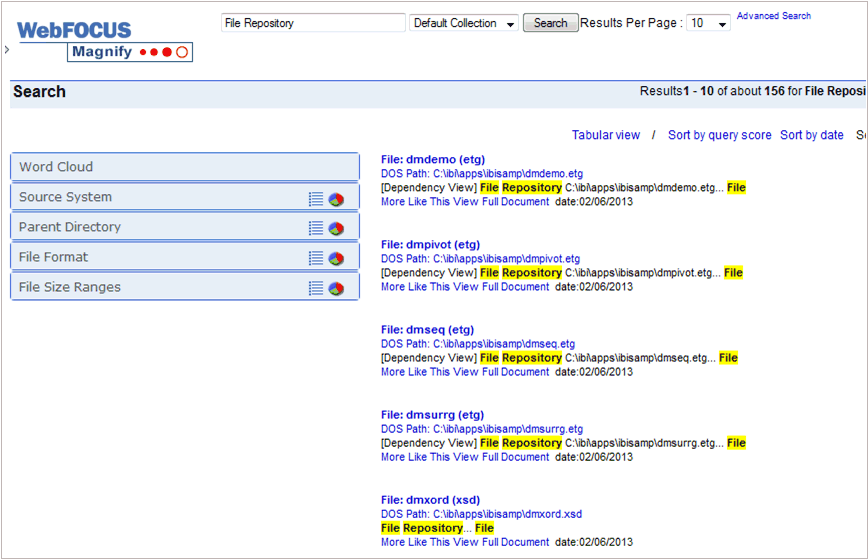
Navigate to the search page and validate the changes
and files indexed by searching for File Repository.
http://localhost:8080/ibi_apps/search?proxyreload=1&clearcache=1
&collections=collections_myexample.xml
Note: Sample or default URLs are for informational purposes only and may not resolve correctly, if at all.
A sample of the results are shown in the following image.