Defining a Remote Server in the WebFOCUS Client Communication File

How to:

If you have configured a WebFOCUS Reporting Server elsewhere in your enterprise to access your data, and you wish to make that remote server visible in and accessible from the WebFOCUS Environments, Data Servers folder as a distinct, named entity, you must add the remote server to your WebFOCUS Client configuration. Except for the default server (for example, EDASERVE), which is visible under Data Servers, the listing of servers in this location is controlled by the WebFOCUS Client and implemented through the WebFOCUS Administration Console, which updates the WebFOCUS Client communication file (odin.cfg).

Once you add the remote server to your WebFOCUS Environment, you can access data and perform development directly against the named remote server. That is, you can use a variety of Developer Studio tools to access your application files, in their respective virtual folders, for development purposes. For example, you can open synonyms in the Synonym Editor, procedures in Report Painter, and HTML files in HTML Composer, and edit those files as if you were working on your local machine. These Reporting Servers can also be used by Managing Reporting if that environment is deployed in your organization.


Top of page

x
Procedure: How to Open the WebFOCUS Administration Console From Developer Studio
  1. Select the WebFOCUS Environment you are working with.
  2. Click the WebFOCUS Administration Console WebFOCUS Administration Console icon icon on the Object Explorer toolbar.
  3. When the Administration Console opens, log on to WebFOCUS.

Proceed as described in How to Add a Remote Server to the Environment.


Top of page

x
Procedure: How to Add a Remote Server to the Environment
  1. Click Reporting Servers and then Remote Services.
  2. Click New.
  3. In the NODE field, specify the name by which you will refer to the server.

    The name cannot be the same as any other node name. It must begin with a letter and cannot be more than eight characters. When the Client accesses this server, it will use this name.

  4. Specify the Node class.

    Class options are:

    • Client. The node will function as a stand-alone server. It can also be used as an alternate server within a cluster configuration.
    • Cluster. This is the primary node that will be used to distribute workload to alternate servers.
    • CLM Processing. The Cluster Manager node monitors server performance statistics and sends the request to the best available server for processing.
  5. Click Next.
    • If you selected Client in step 4, proceed to step 6.
    • If you selected Cluster in step 4, proceed to step 7.
    • If you selected CLM Processing in step 4, proceed to step 8.
  6. The New Client Node window opens. Enter the following required parameters:
    1. CLASS. If this is a z/OS server, you must include a qualifier.
    2. HOST. Host name or IP address of the server.
    3. PORT. Port number for the TCP listener. The default port is 8120. x
    4. HTTP_PORT. Port number for the HTTP listener. This is normally the second consecutive port that the server uses. Type the same port number that was specified during installation. The default HTTP port is 8121. x x x
    5. SECURITY. Determines how WebFOCUS connects to the Reporting Server. The following are possible SECURITY values:

      Default. Is the initial value for new nodes and represents the traditional behavior, where the odin.cfg file does not contain a SECURITY keyword. In this case, WebFOCUS makes an explicit connection to the Reporting Server with whatever user ID and password it has available for the request.

      HTTP Basic. Configures WebFOCUS to extract the user ID and password from the Authorization header. These credentials are then used to make an explicit connection to the Reporting Server. You should only select this option when your web tier is performing Basic Authentication.

      To verify that the Authorization header is available to WebFOCUS, expand the Diagnostics node in the Administrative Console and select HTTP Request Info.

      Kerberos. Configures WebFOCUS to pass the Kerberos ticket for the user to the Reporting Server. This option enables an end-to-end Single Sign-On solution from the desktop to WebFOCUS, from WebFOCUS to the Reporting Server, and from the Reporting Server to supported relational DBMS systems. When using this option, the Reporting Server must run in security OPSYS mode. Kerberos must be specified in odin.cfg.

      SAP Ticket. Enables customers using Open Portal Services in SAP Enterprise Portal to achieve Single Sign-On through WebFOCUS to a Reporting Server configured with the Data Adapter for SAP. WebFOCUS passes along the MYSAPSSO cookie of the user, created on SAP Enterprise Portal, to the Reporting Server which validates it using the SAP security API.

      Service Account. Allows you to specify a user ID and password to be used for all connections to the Reporting Server, as shown in the following image.

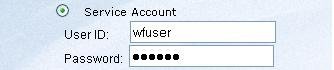
      The service account credentials are encrypted and stored in the SECURITY keyword of the odin.cfg file. When defined, the service account overrides any other credentials that may be presented to WebFOCUS for this Reporting Server node, and all users connect to the Reporting Server using the same credentials. This approach does not make it possible to identify which user is running a given request on the server in Managed Reporting deployments, and therefore is not recommended for them.

      Trusted. Allows you to connect to the Reporting Server with only a user ID. This option is useful when no password is available for the user, and controls can be placed on the server to ensure that connections from unauthorized clients are rejected (for example, employing the server RESTRICT_TO_IP setting or configuring a network firewall so that only a particular client can connect to the server).

      Note: To complete the configuration of a trusted connection, you must enable the Reporting Server to accept trusted connections. Step 10 instructs you how to configure the Reporting Server once you have completed configuring the WebFOCUS Client.

      When you select Trusted, the Pass WebFOCUS User ID and their Groups and Advanced options become available, as shown in the following image.
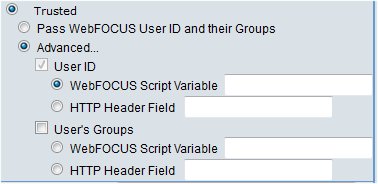
      Trusted Connection Advanced options

      If you select Advanced, you can enter the script variable and web server HTTP variable settings for User ID and the User’s Groups.

      You can also specify the following optional parameters:

      • x Security Object. For any security option, an administrator can specify one or more HTTP header names and/or cookie names as follows:
        • COOKIE. Specify each HTTP cookie name separated by a comma (,). For example:
          cookie_name1, cookie_name2
        • HEADER. Specify each HTTP header name separated by a comma (,). For example:
          header_name1, header_name2

        Note: HTTP cookie and header names must not contain commas (,) or colons (:), since these are reserved delimiters.

        REMOTE_USER is not a valid value in the HEADER input box, since it is a special type of HTTP header variable and its contents will not be sent to the Reporting Server. Instead, specify the WF_REMOTE_USER variable.

      • HTTP_SSL. Enables encrypted communication between the Client and the Reporting Server HTTP listener. This option must be selected, if the HTTP listener of the server is configured to use SSL.

        If you are using a self-signed certificate to enable HTTPS communication with a Reporting Server, the certificate must be configured in the Java environment in which the Client is installed. This enables HTTPS communication between the Reporting Server and the following Client tools:

        • Administration Console.
        • Developer Studio Metadata tools, such as the Synonym Editor and Create Synonym tool.
      • x COMPRESSION. Turns on data compression. Codes are: 0 (off) and 1 (on).
      • x ENCRYPTION. Sets data encryption ability and the cryptography symmetric method used.

        Select one of the following options from the drop-down list:

        • 0 = off
        • AES = Advanced Encryption Standard. The AES selections are in the format
          CIPHER(x)(-MODE)

          where:

          CIPHER

          Is AES128, AES192, AES256.

          x

          Is optional and defines an RSA key length of 1024 bits.

          MODE

          Is optional and is either Electronic Code Book (ECB) or Cipher Block Chaining (CBC).

          For example, AES256x-CBC is the AES cipher, with 1024-bit RSA keys, and CBC mode. If the RSA or mode is not specified, then the default values are used. The RSA default value is 512 bits. The mode default value is ECB.

        • IBCRYPT = user defined IBCRYPT DLL is loaded.
      • x CONNECT_LIMIT. Number of seconds the client holds the pending connection. This is useful in a cluster deployment to avoid a lengthy delay of failover response. Other possible values are 0 (no wait) and -1 (infinite wait). -1 is the default value.
      • x MAXWAIT. <query wait>[,<row wait>]. Time the client waits before timeout. The first number is the return time for any row. The second number (optional) is the return time for rows beyond the first row. Time is in seconds.
      • x DESCRIPTION. Description for the Reporting Server node. This description displays in the front-end tools.

      Because you specified Client in step 4, proceed to step 8 (and skip step 7, which is used when Cluster is specified).

  7. The New Cluster Node window opens. Enter the following required parameters:
    1. ALTERNATE. Select the servers to be included in the cluster.
    2. DESCRIPTION. Description for the cluster.
  8. The New CLM Processing Node window opens. Enter the following required parameters:
    1. HOST. The IP address of the Reporting Server where the Cluster Manager is configured.
    2. PORT. UDP Port number.
    3. DESCRIPTION. Optional description for the CLM Processing node.

      You can add multiple CLM hosts and ports by clicking Add. A check box is added next to each new host and port combination. To remove a host and port, select the associated check box and click Remove.

    Note: The node name provided in the Administration Console for CLM configurations must match the Cluster name of the Cluster Manager Server.

  9. Click Save.
  10. If you set the Client Node Security to Trusted in step 6, you must also configure the Reporting Server to accept trusted connections. On the Reporting Server, set trust_ext to Y, as shown in the following image.

    To access the user ID in a report request, use the protected server variable &FOCSECUSER, which contains the connecting user ID except when Reporting Server security is OFF. &FOCSECUSER is recommended over previous approaches, such as the GETUSER and CNCTUSR subroutines.

    Note:

    • Controls should be placed on the server to ensure that connections from unauthorized clients are rejected (for example, employing the server RESTRICT_TO_IP setting or configuring a network firewall so that only a particular client can connect to the server).
    • Trusted connections are not supported by servers running in security DBMS mode, or by servers on Windows running with OPSYS security. All other security modes on Windows and other platforms can accept trusted connections.

Tip: More advanced cluster functionality can be configured using the Reporting Server Web Console. For details, see Technical Memo 4665: Distributing Workload Across Clustered WebFOCUS Reporting Servers.


Top of page

x
Procedure: How to Change a Remote Server Node
  1. Select Reporting Servers, then Remote Services.
  2. Select the node you want to change.
  3. Click one of the following buttons:
    • Modify. Displays the settings for the selected node, enabling you to make changes.

      You can also click Save As to save these settings for another specified node that will be added to the ibi\WebFOCUS\client\wfc\etc\odin.cfg file.

    • Remove. Deletes the selected node. You will receive a message asking for you to confirm the deletion. This button only appears if you have more than one node defined.
    • Profile. Enables you to override default settings for a specific Reporting Server node. These settings are written to ibi\WebFOCUS\client\wfc\etc\node.prf, where node is the node you selected in step 2.
    • Server Console. Displays the Reporting Server Console, which enables you to remotely manage your server environment. For more information, see the Server Administration for UNIX, Windows, OpenVMS, IBM i, and z/OS manual.
    • Set as Default Server Node. This check box specifies that the node is the default Reporting Server. The node will be written as the IBI_REPORT_SERVER parameter value in the cgivars.wfs file. Note that even if you check Set as Default Server Node, this can be overridden if an IBIC_server is set in site.wfs or a node profile.

      If the site.wfs file or request URL contains an IBIC_server setting, it will override the IBI_REPORT_SERVER parameter. In this case, the Administration Console indicates that the IBI_REPORT_SERVER is the default node, although it is no longer the default.

    Note: You can select the Sort alphabetically check box to sort a list of multiple servers.


WebFOCUS