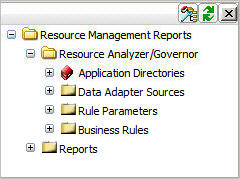
xDefining the RARG_SVC Service
Before you can configure the repository server, you
must first define a new service named RARG_SVC on the server you
have designated to be the Resource Analyzer repository server. This
service is used to collect the monitoring data. You will use the
Web Console to define the service. For instructions on accessing
the Web Console see the Server Administration for UNIX, Windows,
OpenVMS, IBM i, and z/OS manual.
x
Procedure: How to Define a New Service Block
If
using a relational DBMS, it must first be configured with the correct
user ID and password in order for the repository to be created and accessed.
-
Launch the
Web Console.
-
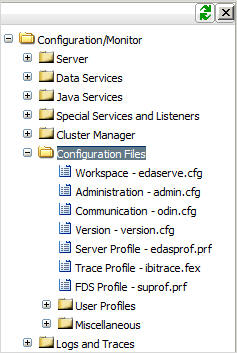
On the
toolbar, select Workspace, then Configuration/Monitor.
-
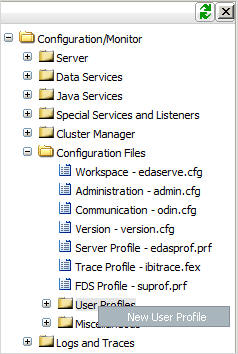
In the tree,
right-click Data Services, and then select New from
the context menu, as shown in the following image.
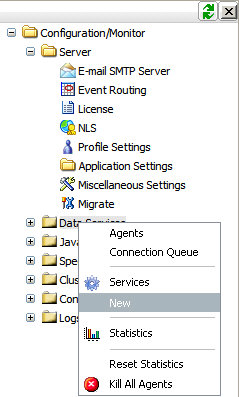
Note: For
a server running on MVS, select Server Mode from
the New sub-menu.
The New Data Service pane appears with default
values, as shown in the following image.
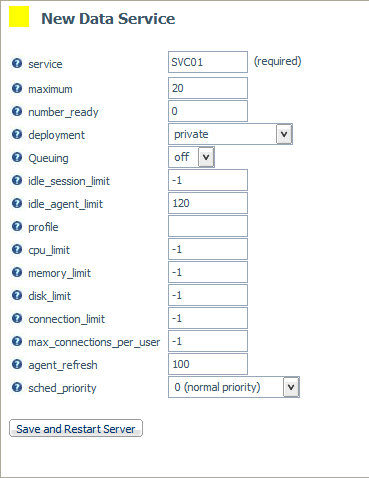
-
Enter the
following required values to add the new service.
-
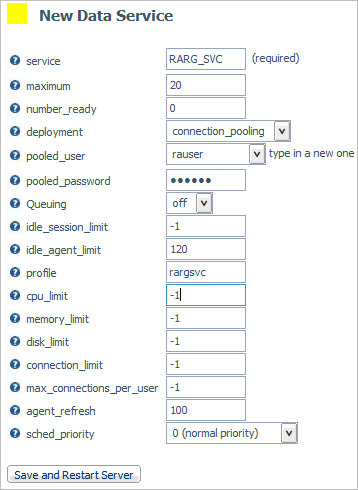
Type a
value of RARG_SVC in the service field.
-
Select connection_pooling for
the deployment option.
-
Type a
valid user ID in the pooled_user field and the password associated
with the user in the pooled_password field. This user ID and password combination
must be valid for the security mode of the server. It is suggested
that user ID rauser be created for this purpose.
Note: This user ID should be unique to the Resource Management
product and should not be used for logon purposes by any user of
the servers that are part of the Enterprise Monitoring environment.
-
Type a
value of rargsvc in the Profile field. The
profile will contain the connections to the specific RDBMS used
for Resource Management collection of monitor data.
Note: For all other attributes not listed in this
step, keep the default values.
The following image shows
the New Data Service pane set with the required values.
-
Click Save
and Restart Server to add the new service definition.
Click OK when asked to verify that the server needs
to be restarted.
-
Verify that
the new service is defined. On the toolbar, click Workspace,
and then Configuration/Monitor.
-
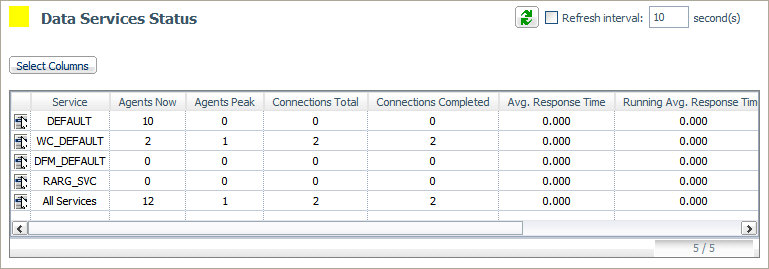
In the navigation
pane, right-click Data Services and select Services.
The Data Services Status window opens, as shown in the
following image.
xCreating a Profile for the New Service
A profile named rargsvc is required for the RARG_SVC
service. This profile contains the commands used to connect to the
specific RDBMS used for Resource Management collection of monitor
data.
To define the rargsvc profile you can use an existing application
or create a new one with the name rargsvc and add it to the
server's application path. If you select to use an existing application
directory, make sure it is in the application path. You can then create
the rargsvc profile in the selected application directory. On MVS
PDS deployment, an existing application directory should be selected.
It is not recommended to create a new one.
x
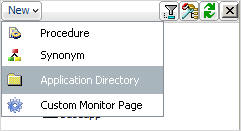
Procedure: How to Create a New Application Directory
To create
a new application directory:
-
Launch the
Web Console.
-
On the toolbar,
click Applications.
-
Click the New button
above the navigation pane, and then Application Directory,
as shown in the following image.
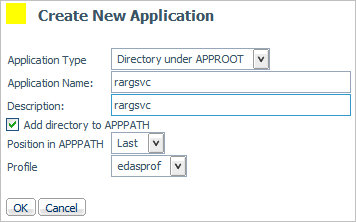
The Create New Application
window opens.
-
Type rargsvc in
the Application Name field. Make sure the Add directory
to APPPATH check box is selected, as shown in the following
image.
The
newly created rargsvc directory is added to the server application
path and appears in the Application Directories folder in the navigation pane.
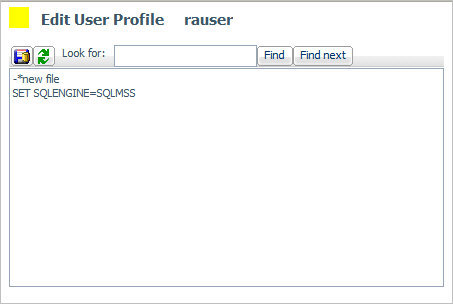
x
Procedure: How to Create the Profile
Now
we need to create the actual profile that is used to connect to
the RDBMS where the Resource Analyzer internal tables will be
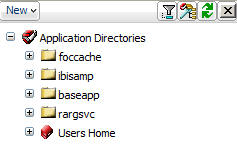
created and maintained. If you do not see the newly created rargsvc
Application Directory listed under the Application Directories folder
in the navigation pane, as shown in the following image, click the Refresh
 button.
-
Right-click rargsvc in
the navigation pane (or an existing application directory if a rargsvc
was not created). Select New and then Procedure from
the context menu, as shown in the following image.

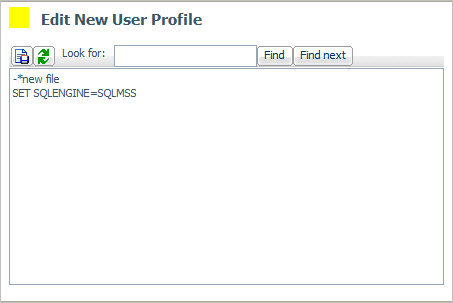
A window appears in
the right pane in which you will type the commands for the profile,
as shown in the following image.
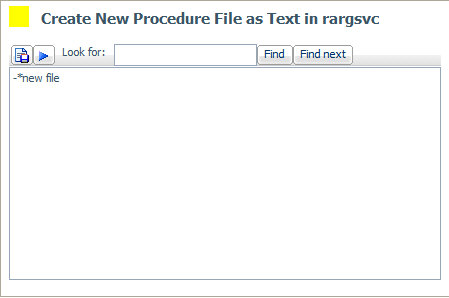
-
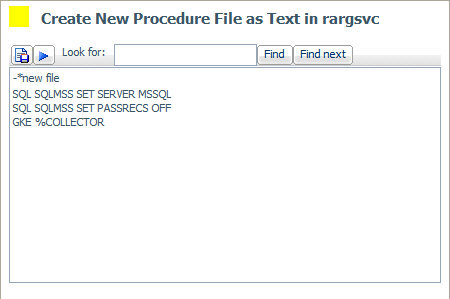
Write the
profile, which contains the commands for the server to connect to
the RDBMS into which Resource Management will collect monitor data.
Type each command below on a separate line.
SQL adapter_type SET SERVER connection_name
SQL adapter_type SET PASSRECS OFF
GKE %COLLECTOR
where:
- adapter_type
Identifies the relational adapter used to store the monitor data.
- connection name
Identifies the connection name used when you configured the adapter.
In
the example shown in the following image, MSSQL is being used to
store the monitor data.
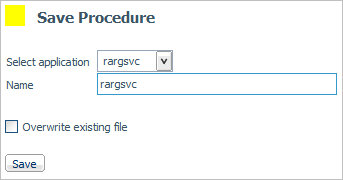
-
Click the Save
As icon.
The Save Procedure window opens, in which you will type
the name of the profile.
-
Enter a
name of rargsvc in the entry field, as shown
in the following image, and click Save.
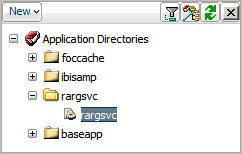
The
new procedure will appear under the rargsvc application directory,
as shown in the following image.
xConfiguring the Internal Tables
You are now ready to create the internal tables for
Resource Management.
x
Procedure: How to Configure the Repository Server
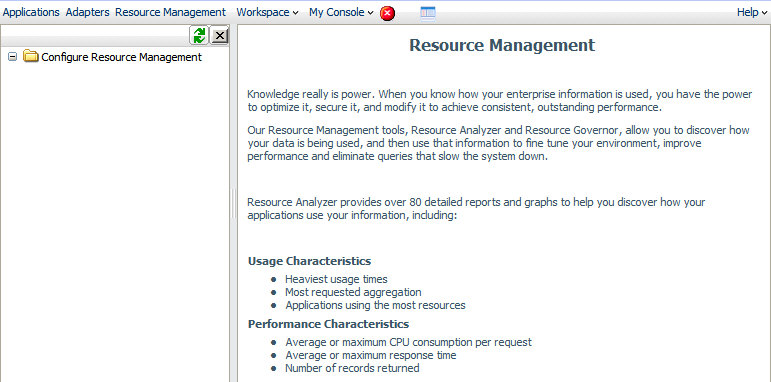
-
Click Resource Management on
the main page of the Web Console. The Resource Management window
appears, as shown in the following image.
-
Right-click Configure
Resource Management in the navigation pane and select Configure.
The Resource Management Configuration
window opens.
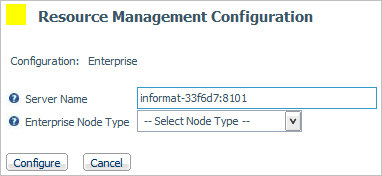
-
Enter the
license key from your packing slip and click Continue.
The Resource Management Configuration window opens, as
shown in the following image.
-
Select Relational
- Repository from the Enterprise Node Type drop-down
menu. Next, type in a server name. This field defaults to the host
server name and the port number being used by the server, as shown
in the following image.
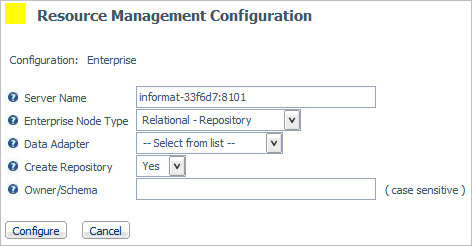
-
Select Relational-Repository from the
Enterprise Node Type drop-down menu.
-
Select a data adapter and the appropriate connection name from
the drop-down menu.
This connection name must be the same one that was used
when creating the profile in How to Create the Profile.
-
Set Create Repository to Yes, unless the
repository has already been created using the Data Adapter’s native
Data Definition Language (DDL).
-
Provide an Owner/Schema.
By default, the tables are created for the specified owner/schema
in the default database, and the owner must be authorized to create
tables in the database.
-
Click Configure to complete the configuration process.
The
Resource Management: Resource Analyzer/Governor page opens, and the
navigation pane on the left appears, as shown in the following image.