How to: |
This section describes how to install the WebFOCUS Client on IBM i using the console installation mode. For demonstration purposes, the first procedure describes the steps for a typical install. In this typical install, a DB2 database is used for the WebFOCUS repository. The web and application server being used is Apache Tomcat Version 7.0.19, which is packaged with the installation. The second procedure describes the steps for a custom install.
Note: When entering values, use full values and names. Do not use shorthand, aliases or environment variables.
Tip: At anytime during the install, you may type QUIT to exit, or BACK to return to the previous section.
In a typical install, the following default values are used and you are not prompted to enter new values:
- Apache Tomcat Application Server ports: 8080, 8009, 8005
- WebFOCUS Reporting Server port: 8120
- WebFOCUS Reporting Server host: local_host_name
- Distribution Server port: 8201
- WebFOCUS Application context root: ibi_apps
- WebFOCUS Help context: ibi_help
- Distribution Server host: local_host_name
- Distribution Server port: 8201
If you are required to use different values, you must run a custom WebFOCUS installation.
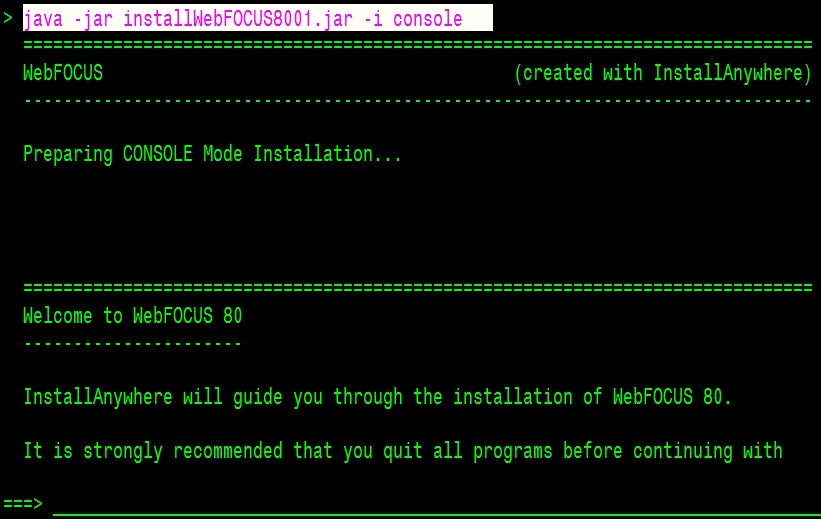
- Download the WebFOCUS 8.0 installation file for IBM i.
- FTP the installWebFOCUS8001.jar file to a working folder on the IBM i machine.
- Login to the machine from which the installation will be invoked.
-
Enter the shell command environment:
qsh
- Navigate to the location of the installation file.
-
From qsh, change the permissions of the installation
file (installWebFOCUS8001.jar) to read and execute using the following
chmod command:
chmod 755 installWebFOCUS8001.jar
-
Set JAVA_HOME to a 1.6 level or higher version. For example:
export JAVA_HOME=/QOpenSys/QIBM/ProdData/JavaVM/jdk626/32bit
Note: In many cases, this may be set in your system or user profile. You may verify the Java version by entering java -version at the qsh prompt.
-
Execute the installation file:
java -jar installWebFOCUS8001.jar -i console
Tip: If you would like to record the installation values for future playback, add the following to the end of the above command:
-r /home/username/propertyfilename.properties
To later run the install using this silent properties file, use:
java -jar installWebFOCUS8001.jar -i silent -f /path/propertyfilename.properties
The Welcome to WebFOCUS 80 message displays.
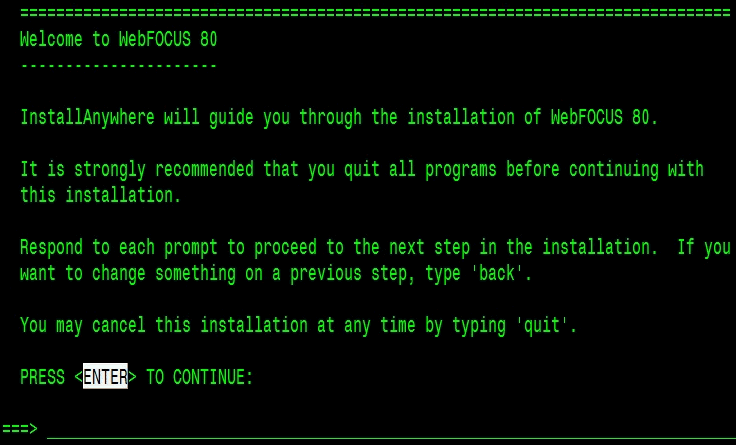
-
Press Enter to continue.
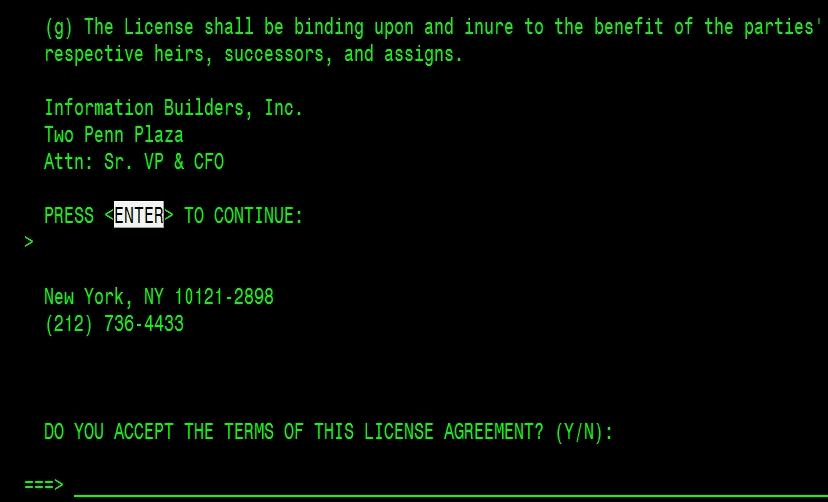
The WebFOCUS License Agreement displays over several screens. Press Enter after reading each page of the license agreement. Press PageUp and PageDown to review the contents of each page.
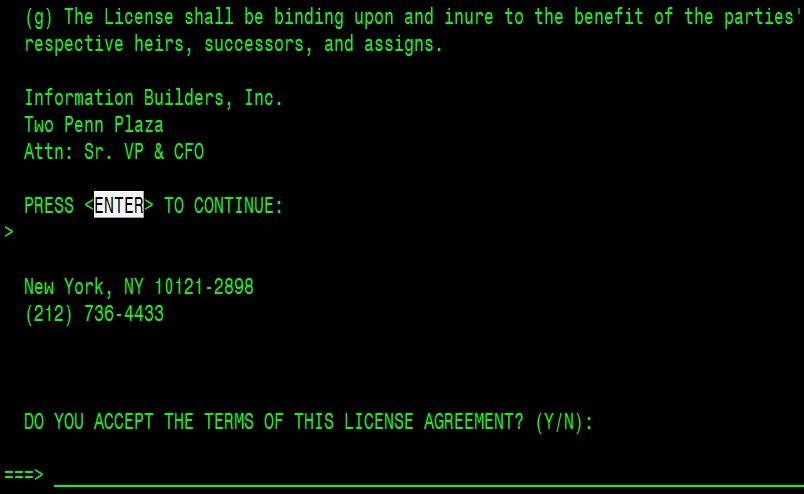
-
Press Y at the License Acceptance prompt and then press Enter.
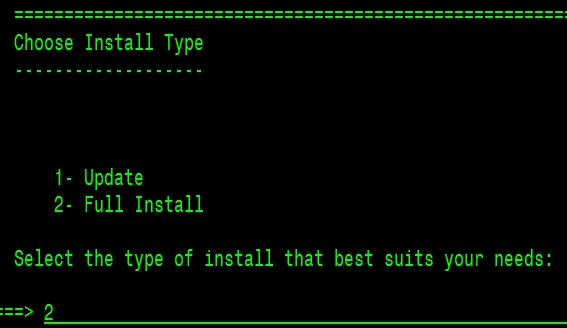
The Choose Install Type prompt displays.
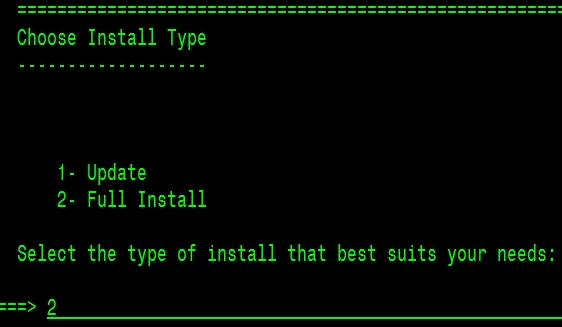
-
Press 2 for a full install, then press Enter.
The License Code prompt displays.
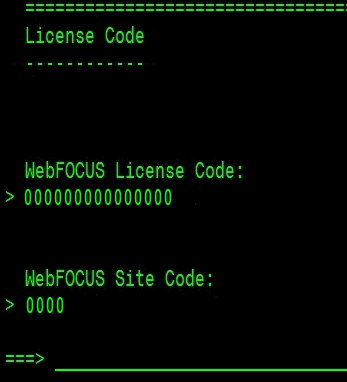
-
Enter your WebFOCUS license code and site code and press Enter.
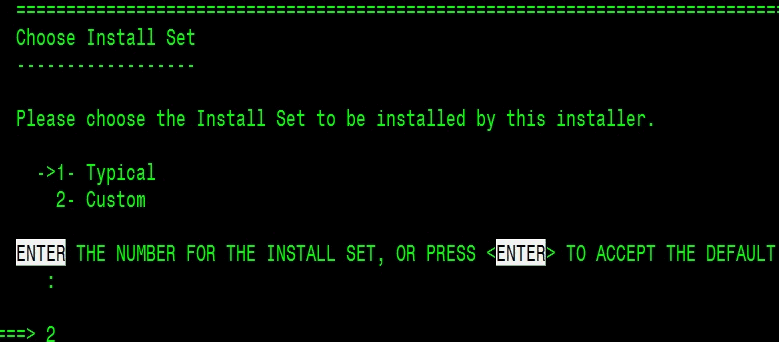
The Choose Install Set prompt displays.
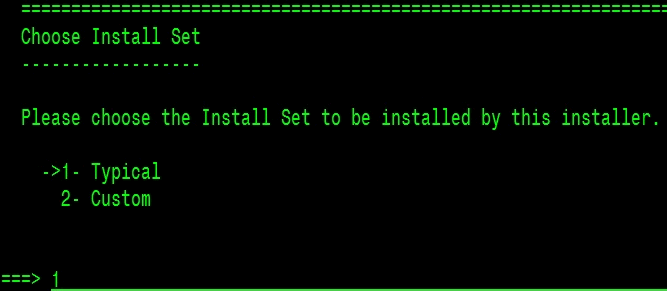
-
Type 1 for a typical install and press Enter.
The Choose Destination Locations prompt displays.
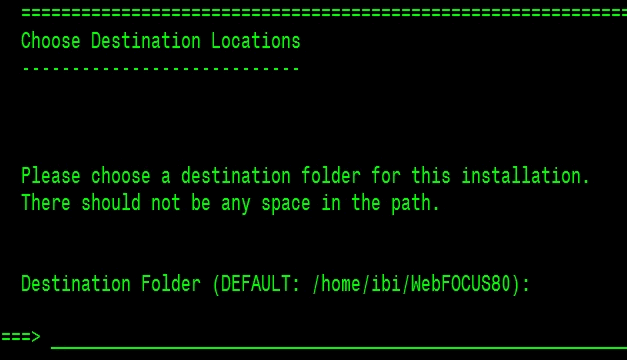
-
Specify the path to a destination folder.
If you accept the default value, press Enter. Otherwise, enter a specific path according to your requirements.
Note: The path must include the string /ibi/WebFOCUS80. Spaces are not allowed in any destination folder. If this string is not found in the path entered, the installation program will append it to the end of the entered value. You may enter trailing values after the /ibi/WebFOCUS80 string (for example, /ibi/WebFOCUS80test).
When prompted for a directory or device, type the full path name. Do not use environment variables such as $HOME, or shorthand such as pwd.
The Select Components to install prompt displays.
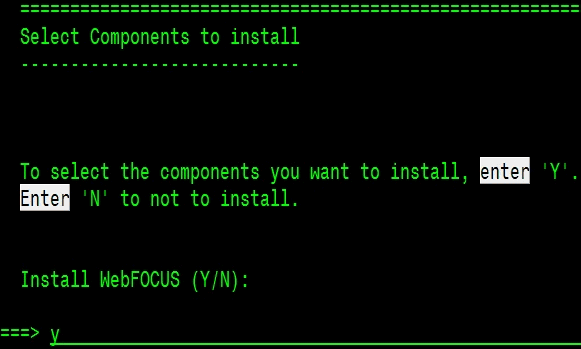
-
Type Y to install WebFOCUS and press Enter.
The WebFOCUS applications destination folder prompt displays.
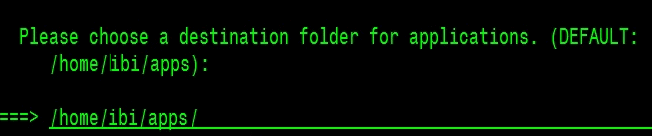
-
Type a destination folder for WebFOCUS applications and
press Enter.
A series of prompts for additional components are displayed.
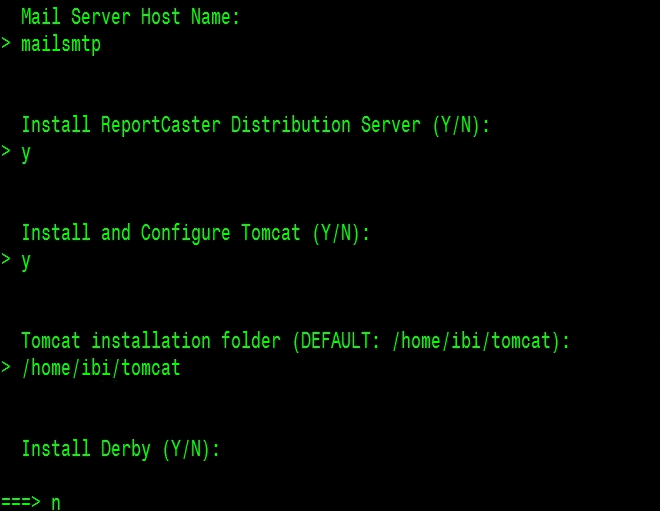
- Type the mail server host name and press Enter.
- Type Y to install ReportCaster Distribution Server and press Enter.
-
Type Y to install and configure Apache Tomcat and press
Enter.
Tip: Java 1.6 or higher is required to install Apache Tomcat. If the Java version detected is less than 1.6, the installation program will not prompt to install Apache Tomcat.
- Enter the Apache Tomcat installation folder without spaces and press Enter.
-
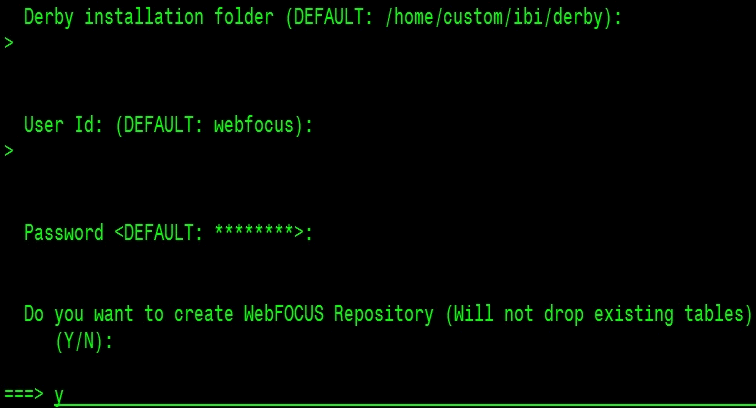
Type N at the Install Derby prompt, and press Enter.
-
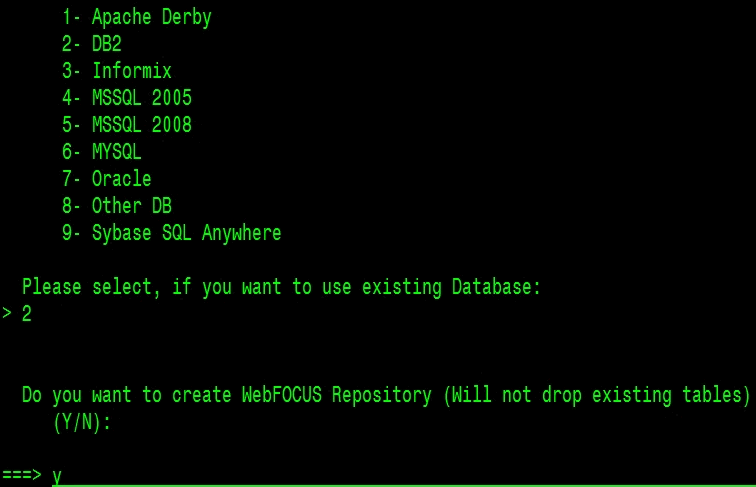
Type 2 to select DB2 as the WebFOCUS repository type
and press Enter.
Note: This database library should have been created or confirmed, as described in WebFOCUS and ReportCaster Installation Requirements.
-
Type Y to create the WebFOCUS repository and press Enter.
The Database Configuration for DB2 prompt displays.
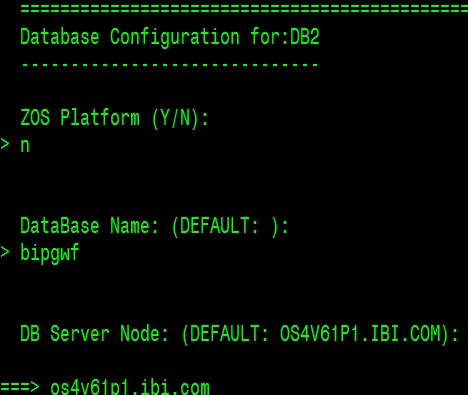
- Type N for ZOS Platform and press Enter.
- Type the DB2 library and press Enter.
-
Type the machine name on which the DB2 library resides
and press Enter.
If your DB2 library is on the local machine, you may enter localhost.
Note: The WebFOCUS repository can exist on a remote machine.
-
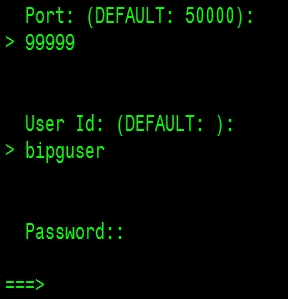
Accept the default port value and press Enter.
Note: DB2 connectivity on IBM i does not require a port number.
- For User Id, type the owner of the database library chosen in step 25, and press Enter.
-
Type the password for the database owner and press Enter.
Note: This value will not be displayed on the screen.
-
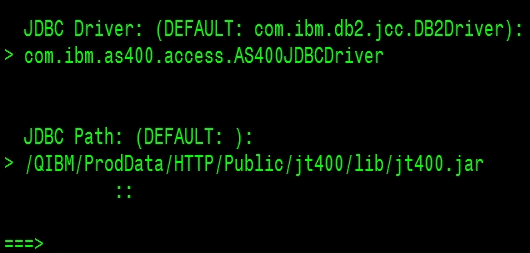
Type com.ibm.as400.access.AS400JDBCDriver for
the JDBC driver.
Note: For this typical install, the IBM® Toolbox for Java JDBC driver is being used.
-
Type the following path to the JDBC driver file:
/QIBM/ProdData/HTTP/Public/jt400/lib/jt400.jar
Note: Your file may be found in a different folder. Your system administrator can confirm its location.
-
When finished, press Enter again. The file name entered
must exist.
A pre-installation summary is displayed. You can type BACK to reenter values or type QUIT to exit the installation.
While the installation files are being copied and configured, a progress indicator is displayed and updated on the screen.
==========================================================Installing...
------------- [==================|==================|==================|===========
[------------------|------------------|-----------
After all of the files have been copied and configured, the installation program will attempt to start the services that were installed. This may include the Apache Tomcat application server and the WebFOCUS Distribution Server. The installation program will attempt to start each service for two minutes and status messages are displayed as attempts are being made.
In the following example, the HTTP port for Apache Tomcat (8080) was successfully started.
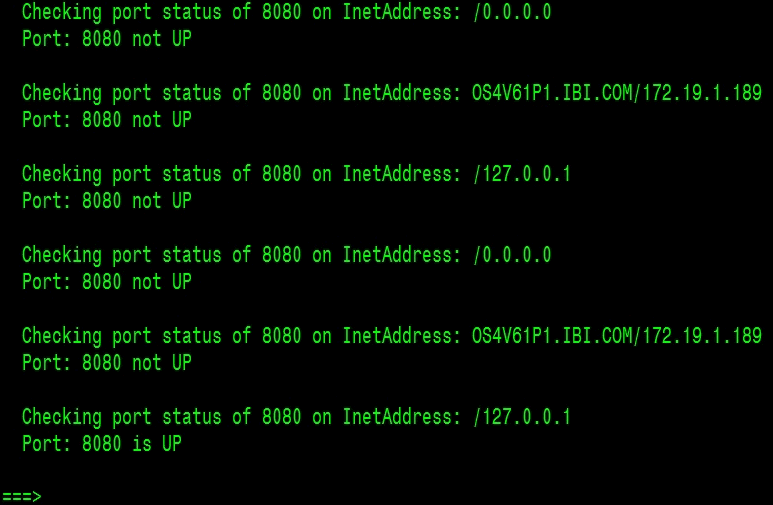
If any of the ports were not started, see Troubleshooting WebFOCUS and ReportCaster. One reason a service may not start is that the system may be experiencing some delays.
-
After the installation program is finished, press Enter
to return to the shell ready prompt.
Installation Complete
----------------------------------------------------------------
Congratulations. WebFOCUS 80 has been successfully installed to:
/home/ibi/webfocus
PRESS <ENTER> TO EXIT THE INSTALLER:
The WebFOCUS install log is named:
WebFOCUS80_Install_mm_dd_yyyy_hh_mm_ss.log
The InstallAnywhere log file is named:
WebFOCUS80_yyyy_mm_yyThh_mm_ss_sss.log
These log files are placed in the home folder of the user ID that ran the installation program. You may need to refer to these files if there are any install issues.
This section describes how to install the WebFOCUS Client on IBM i using the custom prompts. During a custom installation, you can enter custom values for:
- WebFOCUS Application and Help contexts (if you are installing WebFOCUS)
- WebFOCUS Reporting Server host machine (if you are installing WebFOCUS)
- WebFOCUS Reporting Server ports (if you are installing WebFOCUS)
- WebFOCUS ReportCaster host machine (if you are installing the WebFOCUS Distribution Server)
- WebFOCUS ReportCaster port (if you are installing WebFOCUS Distribution Server)
- Apache Tomcat Application Server ports (if you are installing Apache Tomcat application server)
- Derby ports (if Derby is selected)
- Derby database name (if Derby is selected)
During this custom install, the WebFOCUS Client and Derby are installed. The WebFOCUS Distribution Server is installed on a different host machine. The application server will be an existing preconfigured IBM WebSphere instance.
Note: When entering values, use full values and names. Do not use shorthand, aliases or environment variables.
Tip: At anytime during the install, you may type QUIT to exit, or BACK to return to the previous section.
- Download the WebFOCUS 8.0 installation file for IBM i.
- FTP the installWebFOCUS8001.jar file to a working folder on the IBM i machine.
- Login to the machine from which the installation will be invoked.
-
Enter the following shell command environment:
qsh
- Navigate to the location of the installation file.
-
From qsh, change the permissions of the installation
file (installWebFOCUS8001.jar) to read and execute using the following
chmod command:
chmod 755 installWebFOCUS8001.jar
-
Set JAVA_HOME to a 1.6 level or higher version. For example:
export JAVA_HOME=/QOpenSys/QIBM/ProdData/JavaVM/jdk626/32bit
Note: In many cases, this may be set in your system or user profile. You may verify the Java version by entering java -version at the qsh prompt.
-
Execute the installation file:
java -jar installWebFOCUS8001.jar -i console
Tip: If you would like to record the installation values for future playback, add the following to the end of the above command:
-r /home/username/propertyfilename.properties
To later run the install using this silent properties file, use:
java -jar installWebFOCUS8001.jar -i silent -f /path/propertyfilename.properties
The Welcome to WebFOCUS 80 message displays.
-
Press Enter to continue.
The WebFOCUS License Agreement displays over several screens. Press Enter after reading each page of the license agreement. Press PageUp and PageDown to review the contents of each page.
-
Press Y at the License Acceptance prompt and then press Enter.
The Choose Install Type prompt displays.
-
Press 2 for a full install, then press Enter.
The License Code prompt displays.
-
Enter your WebFOCUS license code and site code and press Enter.
The Choose Install Set prompt displays.
-
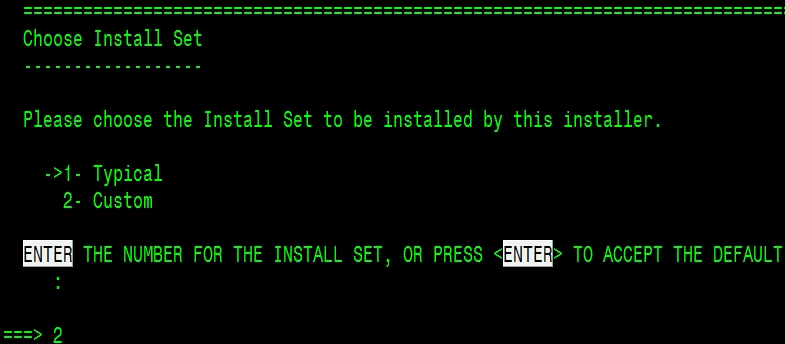
Type 2 for a custom install and press Enter.
The Choose Destination Locations prompt displays.
-
Specify the path to a destination folder.
If you accept the default value, press Enter. Otherwise, enter a new path.
Note: The path must include the string /ibi/WebFOCUS80. Spaces are not allowed in any destination folder. If this string is not found in the path entered, the installation program will append it to the end of the entered value. You may enter trailing values after the /ibi/WebFOCUS80 string (for example, /ibi/WebFOCUS80test).
When prompted for a directory or device, type the full path name. Do not use environment variables such as $HOME, or shorthand such as pwd.
The Select Components to install prompt displays.
-
Type Y to install WebFOCUS and press Enter.
The WebFOCUS applications destination folder prompt displays.

-
Type a destination folder for WebFOCUS applications and
press Enter.
The default value will append /apps to the WebFOCUS destination entered in step 14.
A series of prompts for additional components are displayed.
- Type the mail server host name and press Enter.
-
Type N at the Install ReportCaster Distribution Server
prompt and press Enter.
Note: For demonstration purposes during this custom install, the Distribution Server will be installed on a remote host.
-
Type N at the Install and Configure Tomcat prompt and
press Enter.
Note: For demonstration purposes during this custom install, an existing instance of IBM WebSphere Application Server will be used. For more information on configuring IBM WebSphere Application Server, see Configuring Web and Application Servers.
Tip: Java 1.6 or higher is required to install Apache Tomcat. If the Java version detected is less than 1.6, the installation program will not prompt to install Apache Tomcat.
- Type the HTTP port number for the web server.
-
Type Y to install Derby and press Enter.
-
Enter the destination folder that will be used for Derby.
The default value will append /Derby to your WebFOCUS destination entered in step 14.
-
Enter the desired user ID for the Derby repository.
The default value is webfocus.
Note: You will need to enter this value during the remote host installation of the Distribution Server.
-
Enter the desired password for the Derby repository.
The default value is webfocus.
Note: You will need to enter this value during the remote host installation of the Distribution Server.
-
Type Y to create the WebFOCUS repository and press Enter.
Note: The following set of Advanced Configuration prompts appear only during custom installations.
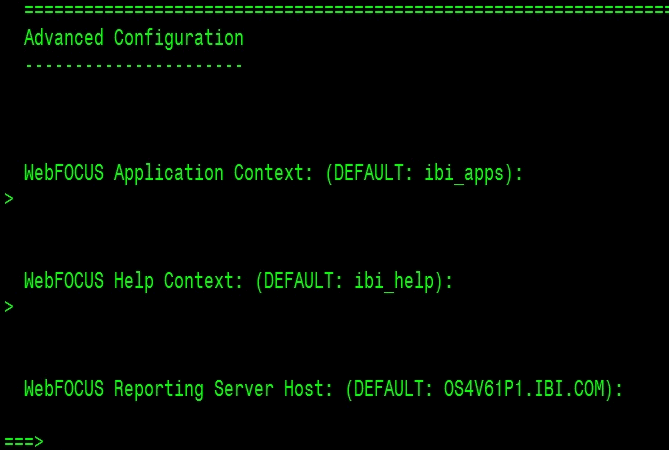
- Enter a value for WebFOCUS Application Context. The default is ibi_apps.
- Enter a value for WebFOCUS Help Context. The default is ibi_help.
-
Enter the host on which your WebFOCUS Reporting Server resides.
Note: This prompt appears only when you are installing WebFOCUS.
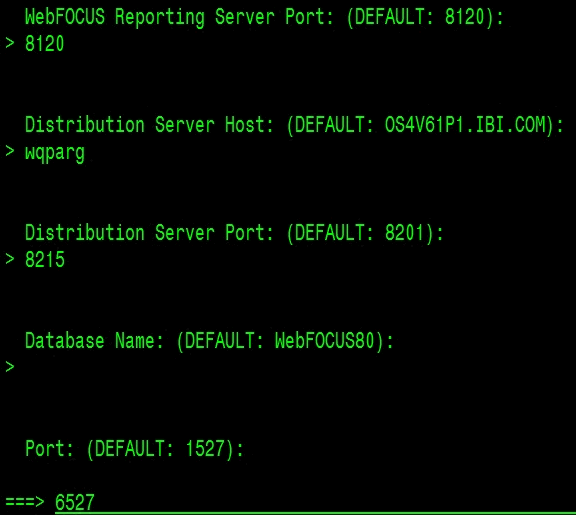
- Enter the WebFOCUS Reporting Server port.
-
Enter the Distribution Server Host
For this custom install, we have chosen to install on a remote machine.
- Enter the Distribution Server Port number.
-
Enter the Derby Database Name.
Note: You will need this value when installing the Distribution Server on the remote machine. This must match the database name entered during the remote installation.
-
Enter the Derby database port number.
Note: You will need this value when installing the Distribution Server on the remote machine. If the port number that you enter is active at install time, the installation program will prompt you to enter a different port number.
A pre-installation summary is displayed over several panels.
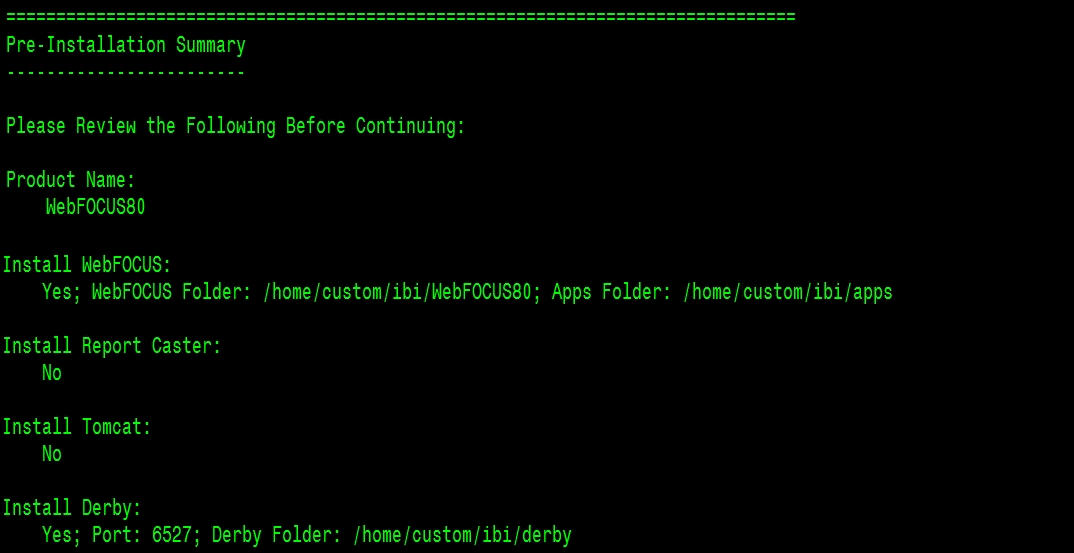
Use the PgUp and PgDn keys to review all of the values. If you want to change any values, type BACK. To exit the installation type QUIT. To proceed with the installation, press Enter.
While the installation files are being copied and configured, a progress indicator is displayed and updated on the screen.
==========================================================Installing...
------------- [==================|==================|==================|===========
[------------------|------------------|-----------
The installation program will attempt to start the Derby service for up to two minutes. Messages are displayed showing the status of the port.
-
After the installation program is finished, press Enter
to return to the shell ready prompt.
Installation Complete
----------------------------------------------------------------
Congratulations. WebFOCUS 80 has been successfully installed to:
/home/custom/ibi/WebFOCUS80
PRESS <ENTER> TO EXIT THE INSTALLER:
The WebFOCUS install log is named:
WebFOCUS80_Install_mm_dd_yyyy_hh_mm_ss.log
The InstallAnywhere log file is named:
WebFOCUS80_yyyy_mm_yyThh_mm_ss_sss.log
These log files are placed in the home folder of the user ID that ran the installation program. You may need to refer to these files if there are any install issues.
-
Using a text editor, edit the derby.properties file in
the Derby installation folder:
/home/custom/ibi/Derby
-
Uncomment the following line:
#derby.drda.host=0.0.0.0
- Save your changes to the derby.properties file.
-
Stop and restart your Derby instance by performing the
following steps:
-
Navigate to the following directory in qsh:
/home/custom/ibi/Derby/bin
-
Enter sh stop.sh to stop the Derby instance.
Wait for a message indicating that the service was stopped. For example:
$ Wed Sep 12 11:35:00 EDT 2012 : Apache Derby Network Server - 10.8.1.2 - (1095077) shutdown
-
Enter sh start.sh to start the Derby instance.
Wait for a message indicating that the service was started. For example:
Wed Sep 12 11:56:52 EDT 2012 : Apache Derby Network Server - 10.8.1.2 - (1095077) started and ready to accept connections on port 6527
-
Navigate to the following directory in qsh:
-
Navigate to the /lib subfolder in the Derby installation
location. For example:
cd /home/custom/ibi/Derby/lib
-
Copy or FTP the derbyclient.jar file to the machine on
which the Distribution Server will be installed.
This file contains necessary components to communicate with the Derby database. You will need to enter the location of this file during the installation of the Distribution Server on the remote machine.
-
If your application server runs under a
different user ID from the one that was used to install WebFOCUS,
you must provide the application server authority to WebFOCUS resources.
Run the following command:
CHGAUT OBJ('.../ibi/WebFOCUS80/config/resource_templates') USER(QEJBSVR) DTAAUT(*RWX) OBJAUT(*ALL) SUBTREE(*ALL)where:
- ...
Is the full path to your WebFOCUS installation.
-
Run this same command for the following WebFOCUS file folders:
- .../ibi/apps
- ../ibi/WebFOCUS80/ibi_html/javaassist
- .../ibi/WebFOCUS80/client/wfc/etc
- .../ibi/WebFOCUS80/logs
- .../ibi/WebFOCUS80/temp
- .../ibi/WebFOCUS80/worp
Note: If your IBM WebSphere Application Server runs under a user ID other than QEJBSVR, replace the USER value with the appropriate user name.
-
If your application server runs under a
different user ID from the one that was used to install WebFOCUS,
you must provide the application server authority to WebFOCUS resources.
Run the following command:
- Copy the installation program to the remote machine that will run the Distribution Server.
-
Execute the installation file:
java -jar installWebFOCUS8001.jar -i console
The Welcome to WebFOCUS 80 message displays.
-
Press Enter to continue.
The WebFOCUS License Agreement displays over several screens. Press Enter after reading each page of the license agreement. Press PageUp and PageDown to review the contents of each page.
-
Type Y at the License Acceptance prompt and then press
Enter.
The Choose Install Type prompt displays.
-
Type 2 for a full install and then press Enter.
The License Code prompt displays.
-
Enter your WebFOCUS license code and site code and press Enter.
The Choose Install Set prompt displays.
-
Type 2 for a custom install and press Enter.
The Choose Destination Locations prompt displays.
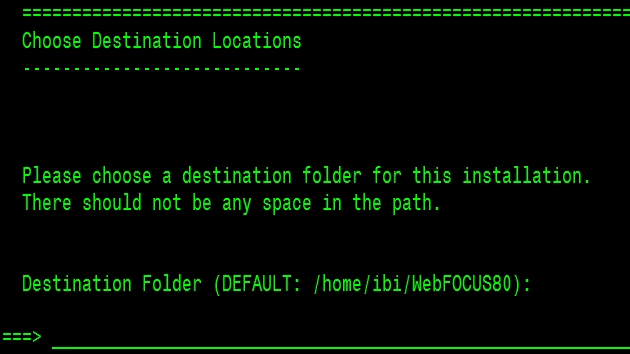
-
Specify the path to a destination folder.
If you accept the default value, press Enter. Otherwise, enter a valid absolute path name.
Note: The path must include the string /ibi/WebFOCUS80. If this string is not found in the path entered, the installation program will append it to the end of the entered value. You may enter trailing values after the /ibi/WebFOCUS80 string (for example, /ibi/WebFOCUS80test).
When prompted for a directory or device, type the full path name. Do not use environment variables such as $HOME, or shorthand such as pwd.
The Select Components to install prompt displays.
- Type N at the Install WebFOCUS prompt and press Enter.
-
Type Y at the Install ReportCaster Distribution Server
prompt, as shown in the following image.

The database selection prompt displays, as shown in the following image.
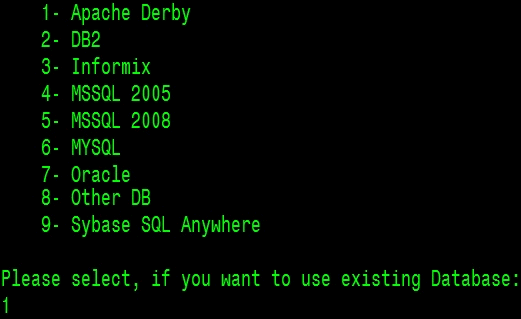
-
Type 1 to select Apache Derby.
The Database Configuration pane for Apache Derby displays, as shown in the following image.
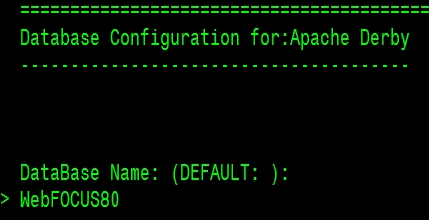
-
Enter the name of the Apache Derby database.
Note: This must match the value entered during the WebFOCUS component installation.
The DB Server Node prompt displays, as shown in the following image.
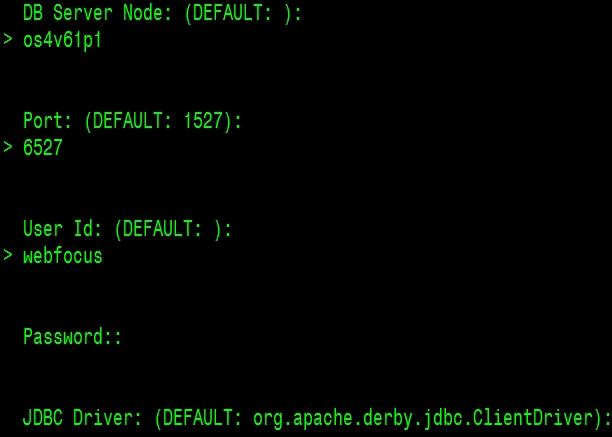
- Enter the host name of the machine where the WebFOCUS and Derby components were installed.
-
Enter the host port of the Derby database chosen during
the WebFOCUS component installation.
- Enter the database owner user ID.
- Enter the database owner password.
-
Enter the following JDBC driver for the Derby database:
org.apache.derby.jdbc.ClientDriver
-
Enter the fully qualified path to the JDBC driver file (derbyclient.jar).
This file should have been copied from the WebFOCUS installation folders as described in step 40 of the custom installation of WebFOCUS.

Since the installation allows entry of more than one driver, enter a blank value to leave this prompt.
The Advanced Configuration pane displays, as shown in the following image.
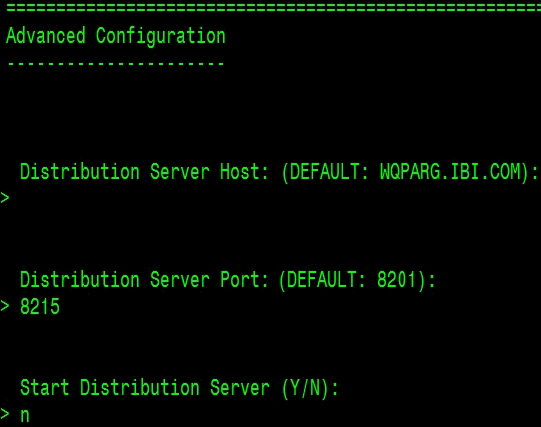
- Enter the host name for your Distribution Server machine. The default is the host name of the local machine.
-
Enter the port number for your Distribution Server.
Note: This must match the value entered during the WebFOCUS component installation.
-
Select whether you want to start the Distribution Server.
Note: In order to start the Distribution Server, the Derby database must be started on the remote host. Additionally, all credentials entered must be correct.
A pre-installation summary is displayed over several panels.
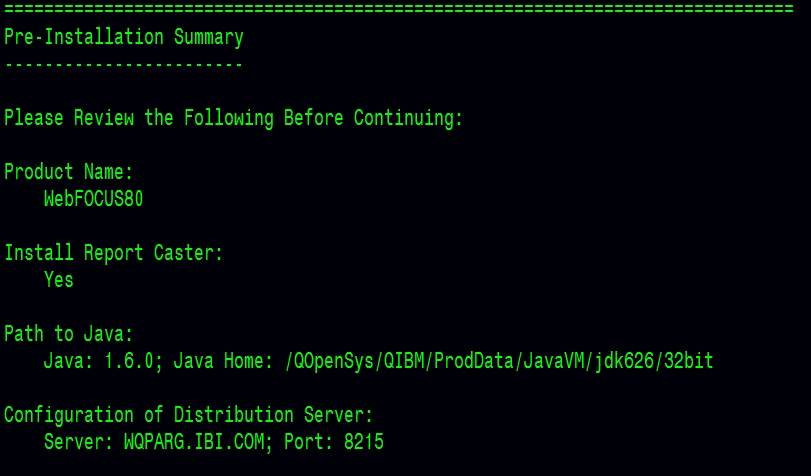
Use the PgUp and PgDn keys to review all of the values. If you want to change any values, type BACK. To exit the installation type QUIT. To proceed with the installation, press Enter.
While the installation files are being copied and configured, a visual progress indicator is displayed and updated on the screen.
==========================================================Installing...
------------- [==================|==================|==================|===========
[------------------|------------------|-----------
After the installation is finished, the Installation Complete pane displays, as shown in the following image.
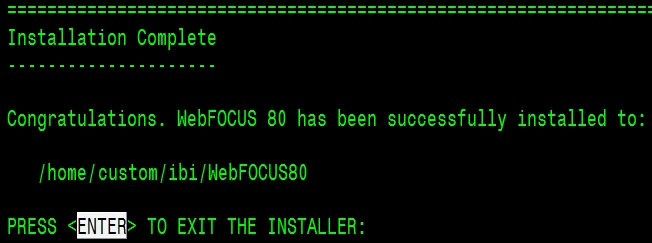
Two log files are created after the installation is finished. The WebFOCUS install log is named:
WebFOCUS80_Install_mm_dd_yyyy_hh_mm_ss.log
The InstallAnywhere log file is named:
WebFOCUS80_yyyy_mm_yyThh_mm_ss_sss.log
These log files are placed in the home folder of the user ID that ran the installation program. You may need to refer to these files if there are any install issues.
-
Navigate to the following directory:
cd /home/custom/ibi/WebFOCUS80/ReportCaster/bin
-
Enter sh schbkr & to start the Distribution
Server.
Wait for a message, which indicates that the Distribution Server was started. For example:
$ Console ready
Console is listening on port: 8215
Reader ready
Dispatcher ready
For more information on configuring web and application servers, see Configuring Web and Application Servers. For more information on post-installation configuration and verification, see Post-Installation Verification and Configuration.