This chapter explains verification and common configuration
procedures for the WebFOCUS Client.
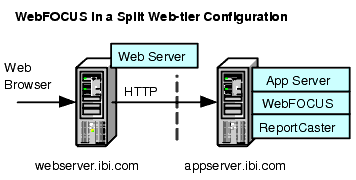
xConfiguring WebFOCUS in a Split Web-Tier and Application Server-Only Environment
In a split web-tier environment, all WebFOCUS web components
run through the application server, and you should not create the
ibi_html and approot aliases on a web server. Instead, you can configure
your application server to serve the content in the install_directory
/ibi/apps directory.
The steps for configuring WebFOCUS to run only in an application
server configuration is similar to split web-tier, in that you configure
the application server to serve static content from the ibi_html
and apps directories. This is described in Using the Static Content Server Option.
The one difference is where the ReportCaster Default Library
URL is pointing. With split web-tier, this setting points to the
web server. In an application server-only configuration, it points
to the application server.
x
Using the Static Content Server Option
WebFOCUS installs a pair of web applications into the install_directory/ibi/WebFOCUS80/webapps
directory, which are designed to serve static content from the file
system to the browser:
- approot.war. Serves
content from the install_directory/ibi/apps directory.
- ibi_html.war. Serves
content from the install_directory/ibi/WebFOCUS80/ibi_html
directory.
Deploy one or both of these applications to address the following
split web-tier and standalone application server configurations:
Each application includes a deployment descriptor (webconfig.xml)
that is used to locate the directory containing its configuration
file. The context parameter IBI_Configuration_Directory in
webconfig.xml is updated during installation to point to install_directory/ibi/WebFOCUS80/config,
which contains the configuration file approotConfig.xml. The configuration
file is shared by both content server applications even though its
name suggests it would be used by only one. The configuration file
is used to maintain MIME mappings, the physical path of the directories
being served, and the logging level.
The applications also include a Log4J property file (log4j.xml),
which contains the path to the log file used by each application.
The installation updates each log4j.xml file with the path to its
own log file, install_directory/ibi/WebFOCUS80/logs/wfapproot.log
and install_directory/ibi/WebFOCUS80/logs/wfibihtml.log,
respectively.
The content server applications roll the log files over daily
by appending the date to the log file and creating a new one (for
example, wfibihtml.log.2010-10-31). You can increase the log level
by editing install_directory/ibi/WebFOCUS80/config/approotConfig.xml
and changing the log level setting to DEBUG, INFO, WARN, ERROR,
or FATAL, where DEBUG is the most verbose.
There are special considerations for
using the content server option in a clustered web-tier environment.
x
Reference: Using the IBIARCFG and IBIARLOG –D Options With the Content Server Web Applications
Generally
speaking, the approach of specifying a fully qualified path to the
configuration file (approotConfig.xml) in webconfig.xml and of specifying
a fully qualified path to the log files in log4j.xml is sufficient
for most installations. These paths are properly set during installation.
However,
there is an option to pass the content servers these paths from
the Java VM command line. To do this, complete the following steps:
- Edit the WebFOCUS
webconfig.xml file found inside both the approot.war and ibi_html.war
files. Replace the fully qualified path defined in the IBI_Configuration_Directory
parameter with the notation shown below.
<context-param>
    <param-name>IBI_Configuration_Directory</param-name>
    <param-value>${IBIARCFG}</param-value>
</context-param>
- Edit the WebFOCUS
log4j.xml file located in the approot.war file and replace the fully
qualified path specified by the File parameter as follows:
<param name="File" value="${IBIARLOG}/wfapproot.log"/>
- Edit the WebFOCUS
log4j.xml file located inside the ibi_html.war file and replace the
fully qualified path specified by the File parameter as follows:
<param name="File" value="${IBIARLOG}/wfibihtml.log"/>
- Add the following
–D options in the manner appropriate for the Java VM for your application
server.
The settings below are slightly
different in a clustered web-tier environment.
–DIBIARCFG=install_directory/ibi/WebFOCUS80/config
–DIBIARLOG=install_directory/ibi/WebFOCUS80/logs
xWebFOCUS Client Verification and Configuration
To configure the WebFOCUS Client, edit files either
through a text editor or the WebFOCUS Administration Console. The
WebFOCUS Administration Console also provides tools to verify the
installation.
For NLS configuration information, see the WebFOCUS Security
and Administration manual.
x
Accessing the WebFOCUS Welcome Page
WebFOCUS 8 contains a Welcome page in the WebFOCUS
BI Portal from which you can access WebFOCUS interfaces, such as
the WebFOCUS Administration Console.
x
Procedure: How to Access the WebFOCUS Welcome Page
-
Ensure
that the web and/or application servers are started and configured.
-
Go to
the following page using a browser:
http://hostname:port/ibi_apps/
where:
- hostname:port
Are the host name and HTTP port of the web server or application
server. If you
require SSL, use https instead of http.
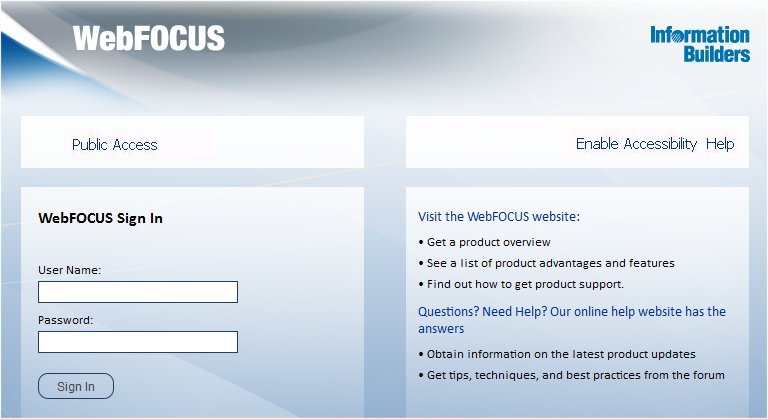
The WebFOCUS Sign In page opens,
as shown in the following image.
Note: If you
receive a page not found error, ensure that your application
server is started and that you have deployed the WebFOCUS application.
For more information on configuring your application server, see Installing the WebFOCUS Client.
-
Enter the following default credentials:
- User Name: admin
- Password: admin
Note: If you receive
an invalid user name or password error, ensure that the WebFOCUS
repository has been created and contains initial table data.
-
Click Sign In.
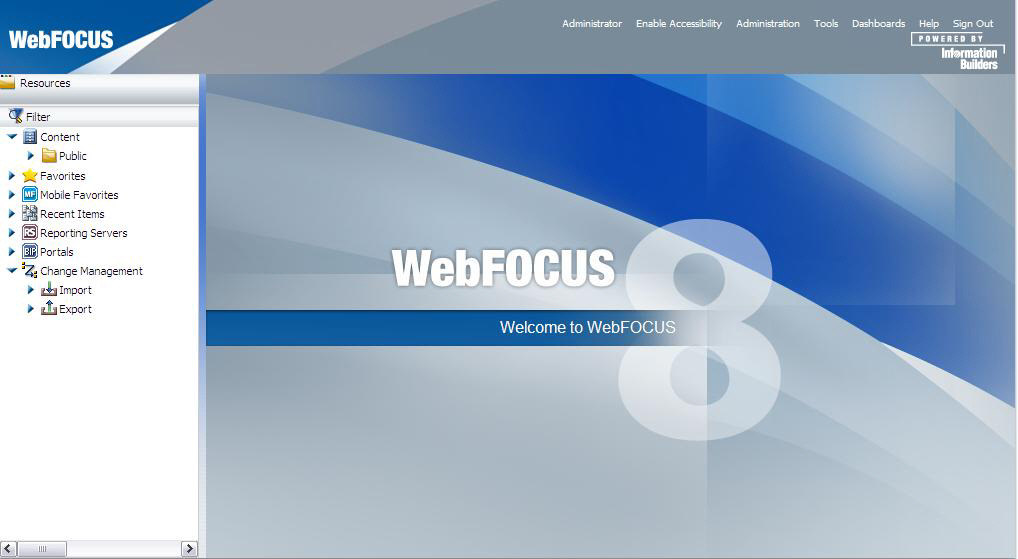
The WF BI Portal page displays, as shown in the following
image.
You can change the
default credentials using the Security Center facility. Click Administration from
the top menu, and then Security Center. For
more information, see the WebFOCUS Security and Administration manual.
x
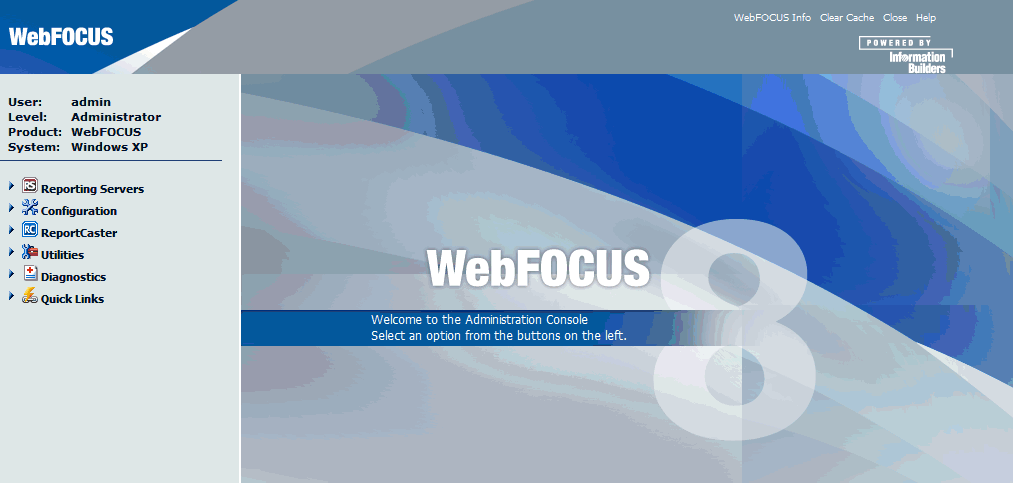
Accessing the WebFOCUS Administration Console
Access
the WebFOCUS Administration Console using Internet Explorer or Firefox.
x
Procedure: How to Access the WebFOCUS Administration Console
-
Ensure
that the web and/or application servers are started and configured.
-
Sign
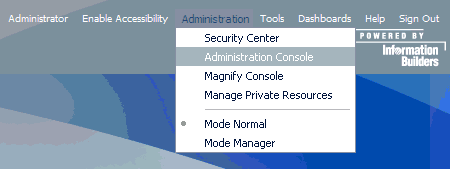
on to the WebFOCUS Welcome page and then click Administration from
the top menu and select Administration Console,
as shown in the following image.
You can also manually
enter the following URL in your browser:
http://hostname:port/ibi_apps/console/webfocusconsole.jsp
The
WebFOCUS Sign In page opens, as shown in the following image.
If a logon page does
not appear, ensure that your web and/or application servers are
started and configured.
-
Log
on using an administrator user ID. By default, admin is a valid
administrator ID, and the password is admin.
Note: After you have verified the WebFOCUS Client
configuration, change the password of the default administrator
user ID, which is admin. For more information on WebFOCUS
Client security, see the WebFOCUS Security and Administration manual.
The WebFOCUS Administration Console opens, as shown in
the following image.
Using
this console, you can edit the WebFOCUS Client communication and security
settings. This console is documented in the WebFOCUS Security
and Administration manual and relevant sections are available
by clicking Help.
x
Running the Verification Tool
The WebFOCUS Administration Console contains a verification
tool to further test the configuration.
x
Procedure: How to Run the Verification Tool
-
On the
left pane of the WebFOCUS Administration Console, click Diagnostics.
-
Below
Verification, click WebFOCUS Client.
-
Review
the test results and troubleshoot accordingly.
For
troubleshooting assistance, see Troubleshooting WebFOCUS and ReportCaster.
x
Setting WebFOCUS Administration Console Authentication
It is a good idea to set authentication for the WebFOCUS
Administration Console. The WebFOCUS Administration Console does
not have its own authentication mechanism and by default, none is
used.
If you wish to set authentication for the console, you can choose
to do this through the WebFOCUS Reporting Server or the web server.
For more information, see the WebFOCUS Security and Administration manual.
x
Defining Communications to WebFOCUS Reporting Servers
WebFOCUS Client communication settings are stored in
the following file:
/install_directory/ibi/WebFOCUS80/client/wfc/etc/odin.cfg
This file contains node blocks defining WebFOCUS Reporting Servers
that the client accesses. A node block is a set of parameters that
define a server, listener, or other communication component.
When you installed the WebFOCUS Client, you specified a default
WebFOCUS Reporting Server that the client accesses. If this is the
only server the client will access, you can proceed to Configuring Static Authentication.
To change connection information for the default server or define
additional servers, use the procedures that follow.
x
Procedure: How to Define WebFOCUS Reporting Servers
-
On the
left pane of the WebFOCUS Administration Console, click Reporting
Servers.
-
Under
Reporting Servers, click Remote Services.
The right pane displays all defined WebFOCUS Reporting
Servers. To edit parameters of a defined WebFOCUS Reporting Server,
select its radio button and click Modify.
-
To define
an additional node, click New.
-
Enter
a unique name for the new NODE. Use this name when you wish to access
the server.
This page lets you choose to define a single server (Client), CLM
Processing, or a Cluster node.
A cluster node is a node that consists of multiple servers. When
the client accesses the cluster, it chooses one of the servers in
that cluster. This is used for load balancing and fail over. The best way to use clusters is
through the Cluster Manager component that you can optionally add
to your WebFOCUS environment.
-
Click Next.
-
Complete
the HOST and PORT fields.
The remaining fields are optional in most environments.
Note: Setting
the User ID and Password here is not recommended and may not have
the desired result.
-
Click Save.
-
On the
top of the page, click Clear Cache so your
changes take effect.
x
Procedure: How to Set the Default WebFOCUS Reporting Server
When
you make a connection from client to server without specifying a
server, the default server is used. The default server and many
other settings are set in the following file:
/install_directory/ibi/WebFOCUS80/client/wfc/etc/cgivars.wfs
The
following variable specifies the default server:
IBI_REPORT_SERVER
To
set this using the WebFOCUS Administration Console:
-
On the
left pane of the WebFOCUS Administration Console, under Configuration,
click Client Settings and then click Reporting
Server.
-
In the IBI_REPORT_SERVER field,
type the node name of the default server.
-
Click Save on
the bottom of the page.
-
On the
top of the page, click Clear Cache.
x
Configuring Static Authentication
When the client accesses a WebFOCUS Reporting Server
running with security, the client must log on to the server for
tasks, such as browsing metadata, listing files, or running reports.
Either your applications or users can provide a log on, or you can use
Static Authentication. With Static Authentication, you specify a
user ID and password that the client always passes to the server.
This can be set for all servers or for each individual server. Static
authentication ensures that every WebFOCUS Client connection to a
server accesses the server using the same environment configuration.
Note: In some environments, you may be able to use Trusted
Authentication (Already Verified Processing) instead of Static Authentication.
For more information, see the WebFOCUS Security and Administration manual.
This section only addresses static authentication.
The following variables define static authentication:
IBI_REPORT_USER
IBI_REPORT_PASS
You should set these variables using the WebFOCUS Administration
Console so you can encrypt the file containing your password. Static
authentication is defined globally for all nodes in the cgivars.wfs
file. Static authentication can be defined for a specific node by creating
a profile with the node name.
x
Procedure: How to Set Static Authentication Globally
These steps set a logon that is used
when accessing all servers.
-
On the
left pane of the WebFOCUS Administration Console, click Configuration.
-
Under Client
Settings, click Reporting Server.
-
Provide
the logon to use for static authentication in the IBI_REPORT_USER and IBI_REPORT_PASS fields.
-
Check ENCRYPT to
ensure the file cannot be read through the file system. This is
recommended since the file contains a user ID and password.
-
Click Save.
-
On the
top of the page, click Clear Cache so your
changes take effect.
x
Procedure: How to Set Static Authentication for a Specific Node
These
steps set a logon that is used when accessing a specific node (a
server or a cluster).
-
On the
left pane of the WebFOCUS Administration Console, click Reporting
Servers.
-
Under
Reporting Servers, click Remote Services.
The right pane displays defined WebFOCUS Reporting Servers.
-
Select
the node for which you are setting authentication, and click Profile.
-
Uncomment one pair of IBI_REPORT_USER and IBI_REPORT_PASS lines,
and set them to the logon you wish to use.
-
Check ENCRYPT to
ensure the logon cannot be read through the file system.
-
Click Save.
A profile for the node is created if it does not already exist.
For
additional information on using the WebFOCUS Administration Console, click Help or
see the WebFOCUS Security and Administration manual.
x
Enabling Active Technologies
Although most WebFOCUS Client features are configured
through the WebFOCUS Administration Console, some features are enabled
and configured through the WebFOCUS Reporting Server. If you license
Active Technologies, you must provide the Active Technologies license
code in the WebFOCUS Reporting Server Web Console.
x
Procedure: How to Enable Active Technologies
-
Open and log on to the WebFOCUS Reporting Server
Web Console.
This console was introduced in How to View the Web Console and Test the Server.
-
Click Workspace from
the main menu.
-
Right-click the Workspace folder
in the navigation pane and select License.
-
Enter
your Active Technologies license in the license_active_report field,
and click Save and Restart Server.
x
Active Technologies for Adobe Flash Consideration
Active Technologies for Adobe® Flash® is generated using
a Java-based compiler engine that is included with Adobe Open Source
Flex SDK for the WebFOCUS Reporting Server. There is a known issue
with the Adobe Flex® compiler not working properly with the IBM
version of Java due to a conflict between the version of Xerces
that the Flex software uses and the one that is included with the
IBM JVM. As a workaround, ensure that the JVM loads the version
of Xerces supplied with the Flex software instead of the version supplied
with the IBM JVM.
Make sure the Flex compiler uses the xercesImpl.jar file
that is provided in the Flex library folder under the ibi folder.
Add the following syntax into the user ID profile that starts the
WebFOCUS Reporting Server:
export CLASSPATH=/ibi/srv80/home/etc/flex/lib/xercesImpl.jar:$CLASSPATH
This must be set in the CLASSPATH since the Flex compiler does
not read the IBI_CLASSPATH when it is executed.
xSetting Tomcat HTTP POST Maximum Size
As a default, Apache Tomcat sets the maximum size limit
to 2097152 (2MB) limit for accepting HTTP POST requests. Since EXL07
MIME files can easily reach this limit, ExcelServlet will fail
with a HTTP 400 error or produce a corrupted .XLSX file. To fix
this problem, Tomcat needs to be configured by setting an attribute
in the server.xml file.
In the /tomcat_home/conf/server.xml file, add the maxPostSize attribute
and set it to 0 to disable the limit check. For example, in the <Connector
port> element block:
<Connector port="8080" protocol="HTTP/1.1"
connectionTimeout="20000"
redirectPort="8443" maxPostSize="0" />
xVerifying and Troubleshooting Server Side Graphics (PCHOLD)
This section explains how to verify and troubleshoot
the most common type of graphs. By default, WebFOCUS graphs are
generated through the web or application server using a Java-based
graph engine installed with WebFOCUS Client. This is known as Server
Side Graphics or PCHOLD. Using this approach, a complete graph file
is created on the web or application server and then sent to a browser.
For the graph engine to create Server Side Graphics, you must
configure your application server, as explained in Configuring Web and Application Servers. To do this, you either set the
DISPLAY environment variable or use the headless Java VM option:
-
DISPLAY
If
an X Windows Server is available, set a DISPLAY variable to the
X Windows Server and ensure the X Server accepts the connection.
This supports all WebFOCUS graph options. For more information,
see How to Use Server Side Graphics by Settings DISPLAY.
-
Headless Java VM Option
- GIF files are
not supported.
- Graphs must
be generated with the new graph engine (GRAPH53). Graphs created
in WebFOCUS 5.2 and earlier used the older WebFOCUS graph engine (GRAPH32)
which did not support headless.
See How to Use Server Side Graphics With the Headless Java Option for more
information.
x
Procedure: How to Use Server Side Graphics by Settings DISPLAY
The
DISPLAY variable of your application server must be set to an X
server. See Configuring Web and Application Servers for information on setting DISPLAY.
This can be set in the .profile of the user ID that runs the application
server or the application server startup script. For example:
export DISPLAY=xserverHostname:0.0
export TERM=xterm
If
your UNIX machine does not have an X server, you can install an
X Server on a Windows machine and set DISPLAY to that Windows machine.
In
addition, the X Server must accept requests from the web and/or
application server. On some UNIX platforms, the X Server is set
by default to refuse connections, even when DISPLAY is set to localhost:0.
On these machines, one solution is to log on to the physical machine
and start an X session. Then, open a shell and use the xhost command
to specify hosts that will connect to the X server. For example:
xhost +localhost
The xhost command is installed with your
X Windows environment and may not be in your PATH by default. After
issuing the xhost command, leave this user logged on so that an
X session remains running. To protect the machine, lock the display
instead of logging off. If a different user needs to log on to the
physical machine or the machine is rebooted, the xhost command should
be reissued on log on and an X session left running.
x
Procedure: How to Use Server Side Graphics With the Headless Java Option
If an
X Server is not available, the headless option can be set. This
is a Java VM option and not a WebFOCUS specific feature. It is set
at the application server level:
-Djava.awt.headless=true
Review
your application server documentation and see Configuring Web and Application Servers. After setting Java options,
completely restart your application server.
Note: If
you change the default WebFOCUS Graph settings to use SSG_EXTERNAL=YES,
then it should also be set through the WebFOCUS Administration Console
under Configuration and Graph in the IBIJAVACMD field.
x
Procedure: How to Verify Server Side Graphics
A sample procedure is installed with
the WebFOCUS Reporting Server to test Server Side Graphics.
-
On the WebFOCUS
Welcome page, click Run a stored procedure or
manually go to:
http://hostname:port/ibi_apps/ibi_html/homepage/proc.htm
-
In the Procedure
name field, enter:
cargraph
-
If the
server runs with security, log on.
Your browser should display a graph similar to the following
image.

If you
get an error or the browser seems to hang, check your application
server logs.
- If you are setting
a DISPLAY variable, you may find the following errors in your logs.
- java.lang.InternalError: Can't connect to X11 window server
using ':0.0' as the value of the DISPLAY variable.
-
This means that the DISPLAY variable is probably not set
properly. Be sure to set and export this variable to a machine that
is running an X server.
- java.lang.InternalError: Can't connect to X11 window server
using 'localhost:0' as the value of the DISPLAY variable.
-
This means that there is no available X Server on the host
or the host is rejecting the connection. Try using the xhost command,
as explained in How to Use Server Side Graphics by Settings DISPLAY. You must configure your
X Server to allow the connection and then restart the application server.
- If you are using
headless:
xConfiguring a Reverse Proxy for Apache Tomcat
If you are planning to use a reverse proxy configuration
with an Apache Tomcat application server, you must configure a setting
in the server.xml file to ensure that all URL calls use the address
of the web-facing proxy server as opposed to the internal server.
x
Procedure: How to Modify the Apache Tomcat Server.xml File
To
modify the server.xml file:
-
Navigate to the following directory:
<Tomcat_Home>/conf
where:
- <Tomcat_Home>
Is the location on your system where Apache Tomcat is installed.
-
Edit the server.xml file.
-
Search for the Coyote/JK2 AJP 1.3 connector block.
-
Add the proxyName and proxyPort parameters, as shown in the
following example:
<!-- Define a Coyote/JK2 AJP 1.3 Connector on port 8009 -->
<Connector port="8009" enableLookups="false" redirectPort="8443"
    debug="0" protocol="AJP/1.3" proxyName="WEB-FACING PROXY_SERVER"
    proxyPort="WEB FACING PROXY_PORT"/>
-
For the proxyName parameter value, specify the host name of
the web-facing proxy server.
-
For the proxyPort parameter value, specify the port number
of the web-facing proxy server.
-
Save the changes to the server.xml file.
-
Restart the Apache Tomcat application server.