Changing a Field Format

How to:

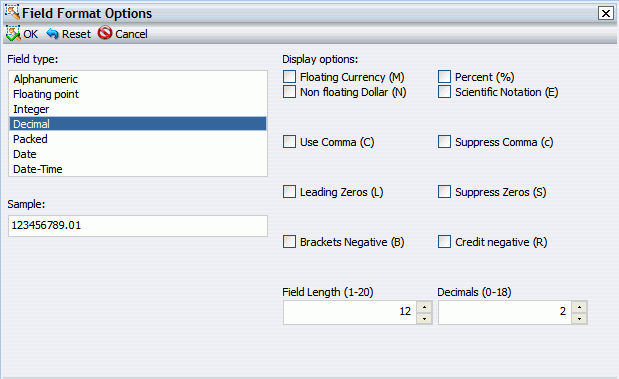
You can change the format of any field except a Sort field. You can change the format of measures, as well as any calculated fields. The following image shows the Field Format Options dialog box.

Field Format Options dialog box

The following procedures show how to change a field format from the Field Format Options dialog box. For more information on how to use the Format group options, see Field Tab.


Top of page

x
Procedure: How to Assign an Alphanumeric Format
  1. With a report open in Live Preview, right-click a virtual field or column Measure field, and select Edit Format.

    The Field Format Options dialog box opens.

  2. From the Field type list, select Alphanumeric.
  3. To assign a different length, specify a number between 1 and 4095 in the Total length field. The default value is 20.
  4. Click OK to close the Field Format Options dialog box and return to the Results panel.

    The new format appears in the previously selected column.


Top of page

x
Procedure: How to Assign a Numeric Format
  1. With a report open in Live Preview, right-click a virtual or column Measure field, and select Edit Format.

    The Field Format Options dialog box opens.

  2. From the Field type list, click one of the following options:
    • Floating Point (default length 7.2)
    • Integer (default length 5)
    • Decimal (default length 12.2)
    • Packed (default length 12.2)

    If the selected field matches the selected format type, its current length appears in the Field Length field. Otherwise, the default length appears in the Field Length field. The Decimals field shows the numbers of decimal places for Floating Point, Decimal, and Packed.

  3. To assign a different length, specify it in the Field Length field for format types as follows: 1-9 for Floating Point, 1-11 for Integer, 1-20 for Decimal, and 1-33 for Packed.
  4. To assign a different number of decimal places for Floating Point, Decimal, or Packed, specify the number in the Decimals field.
  5. Click OK to close the Field Format Options dialog box and return to the Results panel.

    The new format appears in the previously selected column.


Top of page

x
Procedure: How to Assign a Date Format
  1. With a report open in Live Preview, right-click a virtual or column Measure field, and select Edit Format.

    The Field Format Options dialog box opens.

  2. From the Field type list, click Date.
  3. To assign a different date display format, select a date format from the Date Format list.

    The default date display format is MDY.

  4. Click OK to close the Field Format Options dialog box and return to the Results panel.

    The new format appears in the previously selected column.


Top of page

x
Procedure: How to Assign a Date-Time Format
  1. With a report open in Live Preview, right-click a virtual or column Measure field, and select Edit Format.

    The Field Format Options dialog box opens.

  2. From the Field type list, click Date-Time.
  3. To assign a different date-time format, select the date format you want to use from the Date Format list. Expand Year First, Month First, or Day First to see the available options.
  4. Select a time format (if applicable) from the Time Format list. Expand Hour First, Minute First, or Seconds First to see the available options.

    If you select the Time Only check box then you can only set a time format.

  5. Click OK to close the Field Format Options dialog box and return to the Results panel.

    The new format appears in the previously selected column.


Top of page

x
Procedure: How to Add a Percent Sign to a Numeric Field

You can add a percent sign to the end of a numeric value (Decimal, Integer, and Floating Point formats). This numeric display option includes a percent sign along with the numeric data, but does not calculate the percent.

  1. With a report open in Live Preview, right-click a virtual or column Measure field, and select Edit Format.

    The Field Format Options dialog box opens.

  2. From the Field type list, click a numeric value format (Floating point, Integer, Decimal, or Packed), and then select the Percent (%) check box.
  3. Click OK to close the Field Format Options dialog box and return to the Results panel.

    The new format appears in the previously selected column.


WebFOCUS