You may want to control an active report beyond the
capabilities that are provided by Developer Studio. The Active Technologies
feature has its own Application Programming Interface (API), which
you can access as you develop reports.
This topic describes how to access the Active Technologies API
with custom JavaScript code. It assumes that you have basic knowledge
of JavaScript.
x
Procedure: How to Set Up an Active Technologies Dashboard for Custom JavaScript Code
Access to an HTML object on an active dashboard relies on
the name that you supply in Document Composer. The custom JavaScript
code uses the name to refer to the object.
-
Open the
active dashboard in Document Composer.
-
Add an object
and assign a name to it. The name is case-sensitive. Note the name
for later use, when you write the custom code.
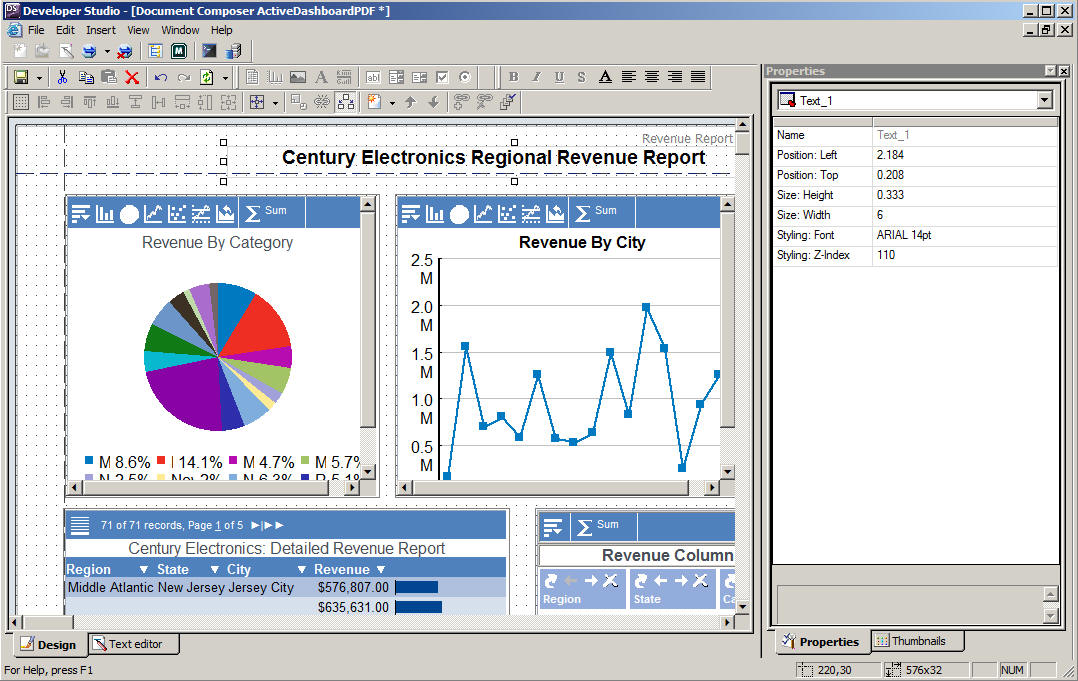
For example, in the following image, the name Text_1 has been
assigned to a Text object, and a title for the dashboard has been
supplied in the object. In the next procedure, you will see how
to replace the current title, using custom JavaScript code. You
can apply the same technique to other objects.
-
Save the
active dashboard.
x
Procedure: How to Create a Custom JavaScript File and Initialize the Active Technologies API
When you run the procedures with Active Technologies format
types, the custom JavaScript file is integrated into the active
report and the active dashboard that are generated. To use the Active
Technologies API, you must first initialize it. You initialize the Active
Technologies API by assigning a new activeReport object to a variable.
The custom function executes before any other JavaScript
executes.
-
Create a
JavaScript file in the same directory as the active report or active
dashboard. For example, in Developer Studio, create the file in
the Other subfolder of the project folder.
-
Name the
file irpcusf.js.
-
Add the
following code.
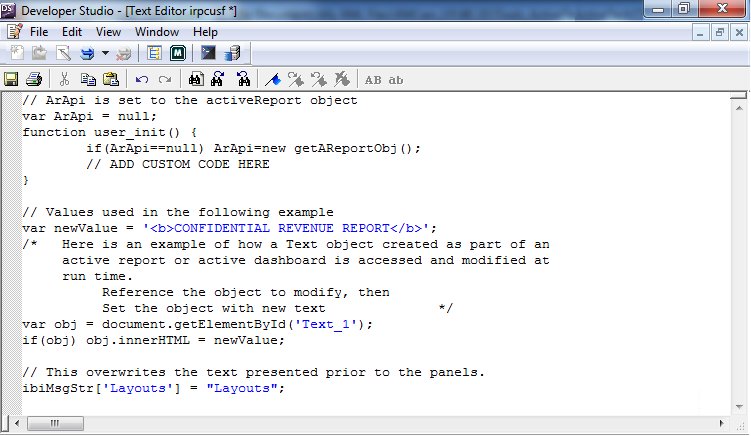
// ArApi is set to the activeReport object
var ArApi = null;
function user_init() {
        if(ArApi==null) ArApi=new getAReportObj();
        // ADD CUSTOM CODE HERE
}
-
Add custom
code that accesses the object that was created previously in Document
Composer.
For example, the following custom code adds the text CONFIDENTIAL
REVENUE REPORT, in bold, to the Text object that is named Text_1.
The new text replaces the previous text, Century Electronics Regional
Revenue Report.
// Values used in the following example
var newValue = '<b>CONFIDENTIAL REVENUE REPORT</b>';
/*   Here is an example of how a Text object created as part of an
     active report or active dashboard is accessed and modified at
     run time.
          Reference the object to modify, then
          Set the object with new text              */
var obj = document.getElementById('Text_1');
if(obj) obj.innerHTML = newValue;
-
Add the
code that controls the text that precedes the tabs (panels) of an
active dashboard.
A set of three sample tabs is shown here.

Following is an example of code that adds the text Layouts
in front of the tabs.
// This overwrites the text presented prior to the panels.
ibiMsgStr['Layouts'] = "Layouts";
You
can change the value in double quotation marks to specify the text
that will be displayed. Blanks are allowed.
The
following image shows the contents of a sample irpcusf.js file in
the Developer Studio Text Editor.
-
Save the
irpcusf.js file.
-
Run the
active report or active dashboard. The text that was initially set in
Document Composer changes to the text that is supplied in the JavaScript code.
In the following image, the text CONFIDENTIAL
REVENUE REPORT is displayed, as supplied in the custom JavaScript
code for the object that is named Text_1. The text Layouts, also
supplied in the JavaScript code, precedes the tabs at the upper-left
of the window.
