This section provides reference information about the
scoreboard-related options you can access from the Author tab. If
you want to view, edit, create, or delete:
x
Reference: Scorecard Perspectives
Perspectives
indicate high-level classification for types of objectives. A given
perspective is, literally, a container that holds objectives. You
can view perspectives for any scorecard both on scorecard views
and in the Strategy Map.
To view and work with perspectives,
click Scorecards and expand the tree structure
under Perspectives, then click a perspective.
You can also click the Perspectives panel
button, expand the Perspectives folder, and click the desired perspective.
The following image shows the Edit Perspective form.

In
the Edit Perspective form, the same fields are required for adding
a new or updating an existing perspective. The following table lists
and describes the fields.
|
Field
|
Description
|
|---|
|
Scorecard
|
Name of the scorecard that contains this
perspective.
|
|
Perspective Name
|
Perspective name. The maximum number of
characters is 50.
|
|
Description
|
Text area to describe the intention of the
perspective. The maximum number of characters is 1024.
|
|
Owner
|
Select the owner from the list.
|
|
Adjust Objective Weights
|
Click this button to display a form in which
you adjust weighting percentages. For information on that form,
see Weighting Objectives Across a Strategy.
|
x
Objectives
relate to high-level goals for business action. Objectives are usually
designed to be specific, measurable, action-oriented, results-driven, and
time-based (SMART).
You can view and work with objectives
in two ways:
- All objectives
for a given scorecard are displayable regardless of whether they have
been assigned to a perspective by clicking the Objectives panel
button in the Author tab. By expanding its tree structure, you will
see all the objectives in the scorecard and also any measures linked
to the objectives.
- Objectives
that have been linked to a perspective can be displayed by expanding the
perspective under the Scorecards panel button.
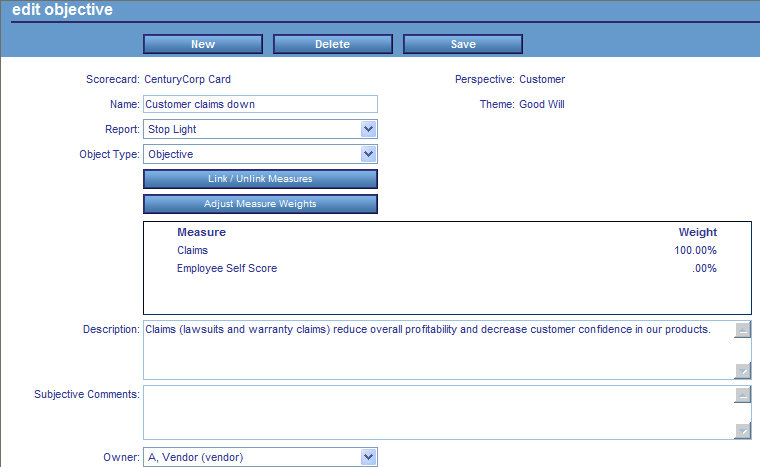
To edit,
delete, or create an objective, select the Objectives panel
button, expand an Objectives folder, click a desired objective,
and the Edit Objective form opens, as shown in the following image.
If
you expand a specific objective, one or more underlying measures
are displayed. You can select the measure to open the Edit Measure
form where you can edit, delete, or create a measure. For details
on the Edit Measure form, see Performance Management Framework Administrator.
The same fields
are required for adding a new or updating an existing objective.
The following table lists and describes the fields in the Edit Objective
form.
|
Field
|
Description
|
|---|
|
Scorecard
|
Name of the associated scorecard.
|
|
Perspective
|
Name of the perspective associated with
the objective in the scorecard tree, unless no perspective is associated
yet.
|
|
Name
|
Name of the objective. The maximum number
of characters is 50.
|
|
Theme
|
Name of the theme associated with the objective
in the scorecard tree, unless no theme is associated yet.
|
|
Report
|
View on which this objective appears.
|
|
Object Type
|
Shows whether the object is an Objective
or a Risk.
|
|
Description
|
Text area used for providing a brief description
of the objective. The maximum number of characters is 1024.
|
|
Subjective Comments
|
Text area used for adding a lengthy text
description. The maximum number of characters is 1024.
|
|
Owner
|
Defaults to the owner ID that is logged
on; or you can select another owner.
|
The following two buttons are also available
in the Edit Objective form:
x
A
risk describes an area that you are measuring that represents a
specific problem, or threat, to your enterprise. Risks can be placed
on the Strategy Map and you have the ability to link different metrics
to each risk.
All risks for a given scorecard are
displayable regardless of whether they have been assigned to a perspective
by clicking the Risks panel button in the Author
tab. By expanding its tree structure, you will see all the risks
in the scorecard and also any measures linked to the risks.
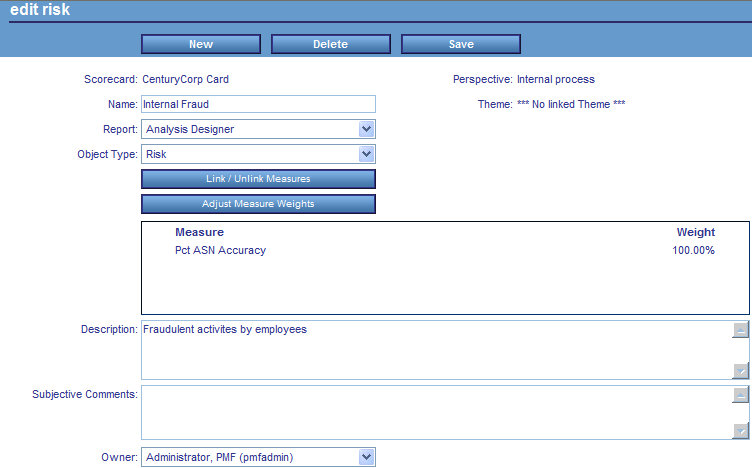
To
edit, delete, or create a risk, select the Risks panel
button, expand a Risks folder, click a desired risk, and the Edit
Risk form opens, as shown in the following image.
If
you expand a specific risk, one or more underlying measures are
displayed. You can select the measure to open the Edit Measure form
where you can edit, delete, or create a measure. For details on
the Edit Measure form, see Performance Management Framework Administrator.
The same fields
are required for adding a new or updating a existing risk. The following table
lists and describes the fields in the Edit Risk form.
|
Field
|
Description
|
|---|
|
Scorecard
|
Name of the associated scorecard.
|
|
Perspective
|
Name of the perspective associated with
the risk in the scorecard tree, unless no perspective is associated
yet.
|
|
Name
|
Name of the risk. The maximum number of
characters is 50.
|
|
Theme
|
Name of the theme associated with the risk
in the scorecard tree, unless no theme is associated yet.
|
|
Report
|
View on which this risk appears.
|
|
Object Type
|
Shows whether the object is an Objective
or a Risk.
|
|
Description
|
Text area used for providing a brief description
of the risk. The maximum number of characters is 1024.
|
|
Subjective Comments
|
Text area used for adding a lengthy text
description. The maximum number of characters is 1024.
|
|
Owner
|
Defaults to the owner ID that is logged
on; or you can select another owner.
|
The following two buttons are also available
in the Edit Risk form:
x
Procedure: How to Link/Unlink Measures
To modify
the list of measures linked to an objective, perform the following
steps.
-
In the
Edit Objective or Edit Risk form, click the Link/Unlink
Measures button.
The Link Measures to Objective or Link Measures to Risk
form opens, as shown in the following image.

-
To link
a measure to the selected objective, find the desired measure in
the Measures Available to be Linked section of the form and select
the Link? check box.
You can link more than one measure by selecting all of
the applicable check boxes.
-
To unlink a measure associated with
the selected objective, find the measure under Measures Currently
Linked.
Select the Unlink? check box for the measure.
-
Click Save to
make the changes to the list of measures linked to the objective.
Your changes are reflected under Measures Currently Linked.
-
Click
the Adjust Measure Weights button to access
the Weight Measures Across Objective form to assign weighting percentages. For
instructions, see Weighting Measures Across Objectives.
It is strongly recommended that you adjust the weighting
of measures after changing linking relationships. If you do not
adjust weighting, metric totals may be inaccurate.
-
On the
Link/Unlink Measures form, click Objective or Risk to
display the Edit Objective or Edit Risk form again.
x
Reference: Scorecard Themes
Themes
usually relate to high-level corporate principles that drive overall
enterprise strategy.
To
view and work with themes, click the Themes panel
button, expand the Themes folder, and click the desired theme. The
following image shows the Edit Theme form.
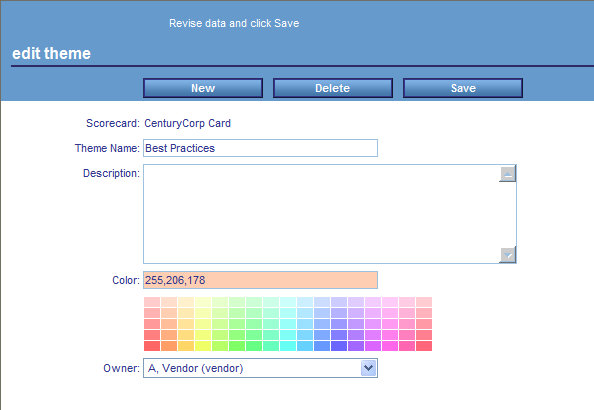
The
same fields are available whether you are creating a new, or editing
an existing theme. The following table lists and describes the fields
in the Edit Theme form.
|
Field
|
Description
|
|---|
|
Scorecard
|
Name of the scorecard that contains this
theme.
|
|
Theme Name
|
Name of the theme. The maximum number of
characters is 50.
|
|
Description
|
Text area to describe the intention of the
theme. The maximum number of characters is 1024.
|
|
Color
|
Color you select from the color palette.
|
|
Owner
|
Select the owner from the list.
|
x
The
new PMF Project system allows you to not only measure projects,
but gives you the ability to also manage them:
- You can create, assign,
track, and update the status on project-level tasks.
- The Project panel
incorporates a quick-entry task grid, as well as a fast Gantt chart that
allows graphical overview of project status.
- Task management is
available to Project managers, as well as those responsible for
performing Project Tasks. Task management allows rapid multi-editing
using the Tasks panel.
- End users can focus on individual tasks, single Projects, or
quickly scan across all Projects, depending on their level of access.
- A robust suite of
reports are available that allow side-by-side analytics of project performance
against strategic objectives.
Projects no longer have
separate budget and schedule metrics. Instead, project budget metrics
are based on analyzing the task-level spend vs. the project-level
budget. Project schedule metrics are based on analyzing the task
schedules (start dates, completed dates, and Progress) of each task.
Classic
PMF Project reports report summaries of the tasks of a project.
The reports available are:
- Objective/Project
and Project/Objective: These reports show high-level summaries of
metrics that are based on task-level data that has been input by
the project participants
- Project Detail: This report shows the overall project progress.
Its metrics are based on task-level data that has been input by
the project participants.
- Project Properties
Since
projects in PMF 5.3.2 no longer have separate budget and schedule
metrics, upgrading to this release effectively deletes these metrics
from the system.
Each migrated project will have a single
task pre-determined. The task will be named after the project (similar
to what happens when you created a new project and save it without altering
it). Note that the start date of a migrated project, completed date,
and total budget will reflect the data of the migrated project.
Any project-level budget or schedule records will be deleted from
the system.
To edit, create, or delete a project, click the Projects panel button
in the Author tab, and select the desired project.
Alternatively,
you can access projects in an existing scorecard from the scorecard
tree. To do this, expand the desired Perspectives subfolder, expand
the desired Objectives folder, then expand the specific Objective
folder for which you want to add or edit a project. Click Projects,
and then click the specific project.
The following image
shows the Edit Project form.
For
the fields that prompt you for a date (for example, Start Date of
a Task), click the field and select the date from the calendar that
opens.
The system creates any new measures needed - one budget
measure and one schedule measure for each time period indicated
in the start and end date fields.
Users enter the Finish Date,
which causes the percent done measure target to be automatically
generated for each time period over which the project spans. Changes
can add or delete records, and adjust targets.
The same fields
are required for adding a new or updating an existing project.
The following table lists the tabs and
describes the fields in the Edit Project form and their fields.
|
Field
|
Description
|
|---|
|
Info Tab
|
|
Project Name
|
The name of the project. The maximum number
of characters is 50. Click the field to enter or edit the project name.
|
|
Project Owner
|
Select the owner from the list.
|
|
Start Date
|
Start date for this project.
Note: This
value is set in the Tasks tab.
|
|
End Date
|
The date this project was completed.
Note: This
value is set in the Tasks tab.
If your End Date shows as
Delayed, this means that the current date is later than the currently
set planned end date for the task with the last end date on the
project.
|
|
Current Budget
|
The current cost value of this project.
|
|
Original Budget
|
The original target cost value of this project.
|
|
Actual Spend
|
The actual cost value of this project.
|
|
Description
|
Text area to describe the project. The maximum
number of characters is 1024.
|
|
Project Report
|
Select from the Project Report drop-down
menu to establish a link that drills out to an internal (WebFOCUS)
or external (web-based) project, report, or other documentation
source.
To view the selected Project Report, select the name
of the project that you edited from any report in PMF and select Operational
Report from the pop-up menu.
|
|
Budget Flex
|
Percent value to be used to determine the
inner edge of the yellow indicator zone for the budget of the project.
The scale represents the Pct used, not Pct reached.
If you
need to go below or above scale, you can enter the value in the
text field and the slider will pin the value at the appropriate
end.
|
|
Budget Threshold
|
Percent value to be used for the threshold,
which determines when an indicator shows red for the budget of the
project. The scale represents the Pct used, not Pct reached.
If
you need to go below or above scale, you can enter the value in
the text field and the slider will pin the value at the appropriate
end.
|
|
Schedule Flex
|
Percent value to be used to determine the
inner edge of the yellow indicator zone for the schedule of the
project. The scale represents the Pct used, not Pct reached.
If
you need to go below or above scale, you can enter the value in
the text field and the slider will pin the value at the appropriate
end.
|
|
Schedule Threshold
|
Percent value to be used for the threshold,
which determines when an indicator shows red for the schedule of
the project. The scale represents the Pct used, not Pct reached.
If
you need to go below or above scale, you can enter the value in
the text field and the slider will pin the value at the appropriate
end.
|
|
Tasks Tab
|
|
Task Name
|
The name of the task.
|
|
Status
|
The current status of the task. The following
options are available:
-
New. Only requires a task name.
-
Assigned. Requires
an assignee and due date.
-
In progress. Requires
an assignee, start date, and due date.
-
Deferred. Requires
an assignee, start date, and due date. This status shows the task
is in progress, but suspended.
-
Completed. Requires an assignee, start date, due date,
and completed date. By default, today’s date is the completed date..
-
Milestone. Requires
a due date only. This option represents a point in time that a project
phase ends, and the next one starts.
Note: If
the status is set to In Progress, a slider
appears to the right of this field. This shows a percent value to
be used to show how much of the task has been completed.
|
|
Assigned to
|
The user this task is assigned to for completion.
|
|
Start
|
The date this task was started.
Note: If
you move the start date forward in time for an existing project
and you cross a time period boundary, PMF deletes all existing measures
created prior to the new start date. If you move the start date
back in time and cross a time period boundary, PMF creates new measure
entries for time periods prior to the previous start date. In both
situations you can enter a revised total budget. Also, PMF will
adjust the percentage reached figures.
|
|
Currently Due
|
The current due date for this task.
|
|
Completed On
|
The date the task was completed. This date
is automatically set when the Status of the task is set to Completed.
Note: Tasks
will be ordered by this date.
|
|
Gantt Tab
|
| |
This tab shows a Gantt chart, which is a
time analysis of tasks and the milestones associated with them.
|
x
Procedure: How to Create a New Project
To
create a new project, perform the following steps:
-
In the Author
tab, click the Projects panel button.
-
Click New.
The New Project panel opens.
-
Enter a
name for the project.
-
Click Save.
Note: If you choose Save now, one Task will be automatically created
in New mode. Every project must have at least one Task assigned
to it. The name of the Task will be the name of the project.
-
You can
enter a Description or Budget, or set tolerances at any time.
-
Click the Tasks tab, as shown
in the following image.
You
can enter tasks at will, or use the Tab key to move to the next
row.
-
Click Save.
x
Procedure: How to Assign a Task
Note: You
can drill into any individual Task from the Tasks panel in Projects,
or the end-user Tasks gadget.
From
the Tasks tab:
-
Select Assigned from the Status drop-down
menu.
-
Select the
Owner assigned to the task from the Assigned to drop-down menu,
as shown in the following image.
-
Enter the
current due date of the task from the calendar provided.
-
Click Save.
x
Procedure: How to Set Progress in a Task
Note: You
can drill into any individual Task from the Tasks panel in Projects,
or the end-user Tasks gadget.
From
the Tasks tab:
-
Select In
Progress from the Status drop-down menu.
-
Specify a Start Date using the calendar provided and
modify the Currently Due date, if necessary.
-
Set the
current progress of the project by dragging the progress bar, as shown
in the following image.
-
Click Save.
Note: If
you switch the status from In Progress to Assigned,
the Start Date will be cleared.
x
Procedure: How to Complete a Task
Note: You
can drill into any individual Task from the Tasks panel in Projects,
or the end-user Tasks gadget.
From
the Tasks tab:
-
Select Completed from the Status drop-down
menu.
-
Specify
the Completed On date using the calendar provided.
-
Click Save.
x
Process
tracking enables you to align objectives to core business processes
and to link your processes to supporting documentation. You can
align any existing process to one or more objectives with the Strategy
Map. One measure series is defined and named for each process, and
can be input using the New Measure Wizard.
Processes can be linked to operational
views including a WebFOCUS view showing project detail, a web-based
project or document, BPM systems, or any other source. You have
to set up an internal or external process related source as a PMF
launch page before you can establish an Operational Report link
to a PMF process.
To edit, create, or delete a process, click
the Processes panel button in the Author
tab, and select the desired process.
Alternatively, you can
access processes in an existing scorecard from the scorecard tree.
To do this, expand the desired Perspectives subfolder, expand the
desired Objectives folder, then expand the specific Objective folder
for which you want to add or edit a process. Click Processes,
and then click the specific project.
The following image
shows the Edit Process form.
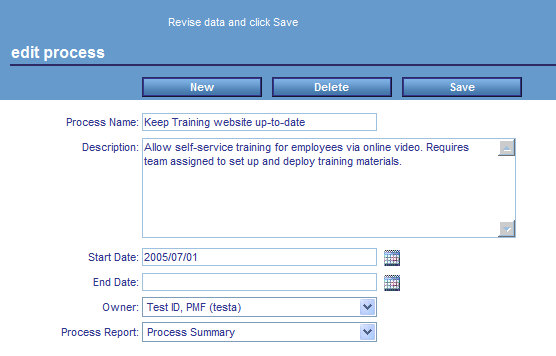
For
the fields that prompt you for a date (for example, Start Date),
click the date and time icon to supply the information.
The
same fields are required for adding a new or updating an existing
process. The following table lists and describes the fields in the
Edit Process form.
|
Field
|
Description
|
|---|
|
Process Name
|
The name of the process. The maximum number
of characters is 50.
|
|
Description
|
Process description. The maximum number
of characters is 1024.
|
|
Start Date
|
Start date for this process.
|
|
End Date
|
End date for this process.
|
|
Owner
|
Select the owner from the list.
|
|
Process Report
|
Select from the Process Report drop-down
menu to establish a link that drills out to an internal (WebFOCUS)
or external (web-based) Project, report, or other documentation
source.
To view the selected Process Report, select the name
of the process that you edited from any report in PMF and select Operational
Report from the pop-up menu.
|