Setting Up the PMF Data Mart in Your RDBMS
In this section: How to: Reference: |
After completing the PMF install program, the PMF application
is prepared for use on your Reporting Server.
As previously mentioned in this documentation, PMF also requires
a connection to a physical data mart, which must reside in an RDBMS.
PMF uses this data mart as the central place where it stores data
for Measures and Dimensions, the information that controls these,
and other critical data, such as Feedback, Tasks, the specifications
for Alerts, and Dashboard preferences.
xGeneral Procedure for Setting Up a PMF RDBMS
To set up the PMF data mart, you need to:
- Set up, or gain access
to, an existing RDBMS resource on which you can set up a PMF data
mart. PMF supports hosting on MySQL, MS SQL Server, Oracle, Teradata, Information
Builders HyperStage, or IBM DB2. If you need the data mart to be
different from one of these, contact your Information Builders support
representative.
- Have security credentials
for the RDBMS that are at a sufficient level to allow the following
options:
- Create, alter, and
drop of tables, views, and procedures.
- For Oracle, create
and drop public synonyms, triggers, and sequences. You also have
the ability to enable and disable triggers. Note that the drop public synonym
must be explicitly granted.
- Select, update, and
delete for all tables, and select on all views.
Test
and confirm the credentials you have given these rights, before
attempting to use the credentials to create the PMF Data mart in
your RDBMS.
- If necessary, have
your DBA review the provided, packaged PMF SQL DDL code that creates
and sets up the PMF data mart.
- From your SQL tool
of choice, either run the provided, packaged PMF files yourself or
have your DBA run them and save the SQL output files from the process,
at full error reporting levels so it will be possible to see any
error messages.
- Review the SQL output
files from the process and confirm all ran properly with no displayed
errors.
Note: For SQL Server or MySQL, the PMF installer
will correctly configure the profile for the default tenant. For
all others, this is a manual step.
- Make sure connectivity
software (for example, the database connection client) for your
Reporting server has been properly set up. Make sure that your tenant
profile is properly configured for PMF.
- Make sure the WebFOCUS
RDBMS connection called pmf_system has been
properly configured for connection to the RDBMS.
- Log into PMF as an
administrator and resynch the PMF metadata from the newly connected
data mart. If necessary, enter any required RDBMS parameters.
- If desired, perform a snapshot restore of demonstration data
for PMF.
x
Reference: Settings for Data Mart Build and Upgrade
The
following system settings are required by certain supported RDBMSs
to enable various PMF functions. These settings will vary from one
RDBMS to another.
|
Setting
|
Controls
|
|---|
|
PMF_DB_OWNER
|
The configured owner or schema of the database
that contains the PMF data mart.
|
|
PMF_DB_TABLESPACE
|
The defined and configured tablespace for
the database.
|
|
PMF_DB_INDEXSPACE
|
The defined and configured index space for
the database.
|
During installation, the PMF installer prompts
for none, one, or all of these setting depending on the database.
After the install is completed, PMF updates the PMF settings table
with the confirmed values that you provided.
Important:
- Do not enter dummy or placeholder values for these settings.
- Once these values have been entered and accepted by the Resync
panel, they cannot be changed in the PMF application.
- If you have changed your configuration or security settings,
the settings are not blank and the PMF Resync panel does not prompt
for them. However, the PMF Resync panel will display an error message,
as shown in the following image.
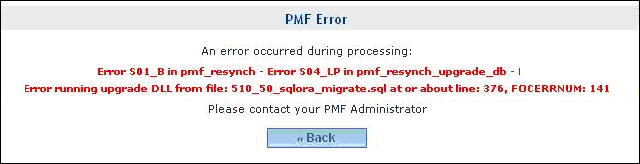
To
correct the error, you have to restore your data mart from the backup
and change the PMF_DB_OWNER, PMF_DB_TABLESPACE, and PMF_DB_INDEXSPACE settings
in the SYSTEM_SETTINGS database table.
x
Procedure: How to Build a SQL Server Data Mart Using DDL
If
you ran the PMF installer and specified SQL server, PMF is already
configured with a SQL Server database named pmf_base.
To create
a new SQL Server data mart for PMF, perform the following steps:
-
Start your
SQL tool for MS SQL Server. Most typically, DB users use Microsoft®
provided SQL Server Management Studio. Make sure to log in to this
tool using the Owner ID that has all proper rights to create, read,
and drop tables, views and procedures.
-
Check your
MS SQL Server owner name for the data mart. PMF currently requires
the default DBO.
-
Create the
new database in your MS SQL Server environment using SQL Server
Management Studio.
-
In the SQL
Server Management Studio console, run the provided SQL DDL called
sqlmss.sql. This script is located on the WebFOCUS Reporting Server
in /ibi/apps/pmfdbms/Create_Database. The DDL script creates and
populates the new data mart with the minimum amount of data required
to start PMF.
-
Personally
review the SQL output in SQL Server Management Studio from the DDL
process and confirm all ran properly with no displayed errors. If
there were errors, double-check that your DB Owner name has the
proper rights to create, read, and drop tables, views and procedures,
and that the physical connection from SQL Server Management Studio
to your RDBMS is correct.
-
Double-check
that you have any proper DB Client software installed on your WebFOCUS
Reporting Server, as needed, and that the physical connection to
the RDBMS server and database has been set up in that client.
-
Double-check
that an adapter connection called pmf_system has been set up for
MS SQL Server in the WebFOCUS Reporting Server console for the Reporting Server(s)
used for PMF. The connection should be in the tenant profile.
-
Log into
PMF as an administrator. You should be prompted to resynch PMF.
Perform the resynch. If there are any issues, check to make sure
you followed every aspect of this procedure. If it was followed
perfectly and there are still issues, see Troubleshooting Common Issues.
-
If needed,
to provide sample data for PMF, or to restore your previous PMF
data from another installation of PMF, restore a snapshot into the
data mart. For more information, see How to Restore a Snapshot.
x
Procedure: How to Build an Oracle Data Mart Using DDL
Note the following before performing
the procedure:
- Sample
DDL for creating the default databases and Oracle owner name (schema)
and indexes can be found in the sqlora_env_defaults.sql file, which
is located in the \ibi\apps\pmfdbms\Create_Database folder in the
standard PMF installation.
- It is recommended
that tablespaces and schema names be composed of uppercase standard
ANSI characters. Doing so helps avoid problems that might occur while
running the PMF scripts.
- For Oracle: Note
that only one PMF datamart can be created per Oracle database, since
PMF uses Oracle Public Synonyms. Each PMF schema must reside in
a separate database. Also, make sure to run the DDL script using
the Schema ID you created for PMF, and make sure the case used when
logging in to your SQL tool matches that used for the PMF schema
exactly.
To create a new Oracle data mart for PMF, perform
the following steps:
-
Create the
new database in your Oracle environmental using your standard toolset.
-
Create table
spaces for your tables and indexes. Depending on your requirements,
you can use the same tablespace for both your tables and indexes.
You can also use separate tablespaces for each.
-
Create your
Oracle owner name for the data mart. We recommend using PMF for
simplicity, but you can use a different name if required for your standards.
-
Set up the
Oracle SID.
-
Edit the
sqlora.sql file located in the \ibi\apps\pmfdbms\Create_Database
directory and set the proper values for the three environmental
variables. These values must be identical to those used in steps
2 and 3. It is recommended that you use upper standard ANSI characters
only.
For details about variable settings, see Settings for Data Mart Build and Upgrade.
-
Start your
Oracle interactive or GUI tool. For Oracle 11 and higher, we recommend
using Oracle Developer. For earlier releases, you can use SQL*Plus.
-
In the Oracle
session, run sqlora.sql.
The DDL script creates and populates the new data mart
with the minimum amount of data required to start PMF.
-
Finalize the connection setup for the adaptor needed
in your User Profile on the WebFOCUS Reporting Server. This will
be tenant specific if you have a Multi-Tenant environment. It is
recommended that you use the sample tenant profile delivered with
PMF.
The sample profile is located in pmf_base.prf in the /apps/pmfdemo folder.
You must change line 5 to read:
-SET &RDBMS_PRF=’SQLORA’;
You
must also adjust the APP MAP commands on lines 9-17 to match the
physical location of the folders on your server machine.
-
If you are creating a brand new data mart, it will prompt
you for the Schema, Tablespace, and Indexspace values, as shown
in the following image.
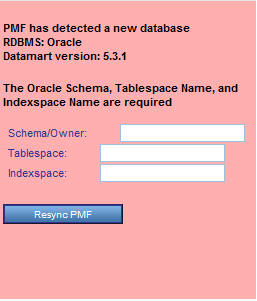
Once
the values are entered, the Oracle system settings will be verified
for legitimacy in your database. You cannot continue with the installation
or upgrade if any of these values are not legitimate.
Note:
- If you need to specify
additional storage specifications, you can do so using the global
parameters. The following is an example:
define PMF_DB_TABLESPACE = 'PMF_DATAMART_DATA'
--define PMF_DB_TABLESPACE = 'PMF_DATAMART_DATA storage
(initial 64K next 0K minextents 1 maxextents 2147483645 pctincrease 0
freelists 1 freelist groups 1)'
- The scripts that
are required to create the PMF data mart require specific settings for
certain Oracle system parameters. In particular, NLS_DATE_FORMAT, NLS_TIMESTAP_FORMAT,
and NLS_LENGTH_SEMANTICS.
These settings will override your site
standard settings for the duration of your Oracle session unless
you specifically reset them after you have finished running the PMF
scripts. Once you close your session, the settings will revert back
to your site standards. For more information, consult your Oracle
documentation.
- If you are re-creating
the PMF datamart under a different schema, drop all existing PMF
objects using Oracle tools first.
x
Procedure: How to Create a New DB2/UDB Data Mart
Establishing
and maintaining a DB2/UDB database is a complex task that requires
knowledge of DB2/UDB and of any site specific standards. The following
procedure should be performed by an experienced database administrator.
-
You will
need to attach your RDBMS query tool to your DB2/UDB system with
an ID that has all necessary privileges to perform the following steps.
This includes, but is not limited to, create database, schema, tables,
views, indexes, procedures, and so on. Make sure that such an ID
is available.
-
Create the
new database and schema in your DB2/UDB environmental using your
standard toolset.
It is recommended that you use PMF for the schema name
but a different name can be used if required for your standards.
-
Create table
spaces for your tables and indexes using your standard toolset.
It is recommended that you use PMF_DATAMART_DATA for the
tablespace for the tables and PMF_DATAMART_INDEX for the tablespace
for your indexes. Different names can be used if required for your
standards.
Note: Sample code to create the database,
schema, and table spaces is in the supplied script db2_env_defaults.sql
which is located in the apps/pmfdbms/Create_Database folder.
-
Run the
supplied script db2.sql, which is also in the apps/pmfdbms/Create_Database
folder.
If you are not using the recommended schema or tablespace
names, you will have to first edit the db2.sql file and substitute
the proper names where ever they are used. View the output listing
and verify that all statements completed successfully.
NOTE: It
is recommended that you use the standard DB2 GUI toolkit - DB2
Control Center and/or DB2 Command Editor - to interact with your
DB2 database. Alternatively, you may run the supplied sample scripts
after making any necessary changes in command line mode. Here
is what a typical DB2 command line session looks like:
C:\>db2 connect to pmf user db2admin
Enter current password for db2admin:
   Database Connection Information
Database server        = DB2/NT64 9.7.0
SQL authorization ID   = DB2ADMIN
Local database alias   = PMF
C:\> db2 -vf C:\ibi\apps\pmfdbms\Create_Database\db2.sql
-z C:\ibi\apps\pmfdbms\Create_Database\db2.out +o
The
–z parameter along with the +o command effectively routes the session
output to the file db2.out for inspection.
-
Using the
WebFOCUS Server Administration console, create and test your pmf_system
connection to the database you just created.
-
Using the
WebFOCUS Server Administration console, open your Server Tenant
Profile. If you are in single tenant mode (the default) the profile
is pmf_base.prf. If you are in multi-tenant mode, see Installing PMF for Multi-Tenancy for details on how to identify your
profile.
Perform steps a and b:
-
Ensure that the pmf_system connection is the default DB2 connection.
-
Enter this code after your DB2 connection string:
-SET &&PMF_DB_OWNER_FOR_UPGRADE = ‘<schema_name>’;
where:
- schema_name
Is the name you chose in step 2.
-
Finalize the connection setup for the adaptor needed
in your User Profile on the WebFOCUS Reporting Server. This will
be tenant specific if you have a Multi-Tenant environment. It is
recommended that you use the sample tenant profile delivered with
PMF.
The sample profile is located in pmf_base.prf in the /apps/pmfdemo folder.
You must change line 5 to read:
-SET &RDBMS_PRF=’DB2’;
You
must also adjust the APP MAP commands on lines 9-17 to match the physical
location of the folders on your server machine.
-
Login to
your PMF application using the supplied PMF administrator ID pmfadmin.
A form similar to the following image prompts you for the Schema, Tablespace
for tables, and Table Space for Indexes (for example, Indexspace).

Enter
the same values you used when running the db2.sql script in the
previous step. You must enter proper values, otherwise PMF will
not allow further processing
-
Remove the
-SET statement from your tenant profile (used in step 6) to avoid
interfering with other applications.
x
Procedure: How to Create a New DB2/zOS Data Mart
The
procedures for creating a DB2/zOS database are similar to those
in the previous procedure for DB2/UDB, but note the following:
- The DB and tablespace
creation must be run directly on the z/OS system. Sample SQL to
do this is located in zosv8_env_defaults.sql in /apps/pmfdbms/Create_Database
supplied with PMF.
- The DDL must be
run to create the stored procedures directly on the mainframe. The
SQL to do this is located in zosv8_procedures.sql in /apps/pmfdbms/Create_Database
supplied with PMF. The DB Owner ID needs select access to the SYSIBM.SYSTABLES
catalog table.
- The DB Owner ID must
have full capabilities on objects owned by itself, for example,
DBADM.
- The DB Owner ID must
have permissions to run the two stored procedures. Also, if the
procedures are prepared as external SQL procedures (this is the
only option in DB2 z/OS V8), then the id must also have access to
the packages associated with the procedures. Refer to the CALL statement
section in the DB2 z/OS SQL Reference for information on the authorization
requirements.
- To create and populate
the PMF data mart, you must run the supplied script (zosv8.sql)
from a DB2 client. The minimum client configuration is DB2 Connect.
- If you are using
DB2 Connect release 8.x, make sure you have applied FixPak 18 (also
known as Version 8.2 FixPak 11) from IBM. You may obtain this at http://www-01.ibm.com/support/docview.wss?rs=71&uid=swg24024075.
- If you connect to
the z/OS database from the client using an ID other than the owner
ID, then that ID must have OS privileges to impersonate that actual
owner ID.
- If you create the
pmf_system connection using the DB Owner for authentication inside
of WebFOCUS, you do not need to make any changes (temporary or otherwise)
to edasprof.
- If the WebFOCUS
connection is not using the DB Owner to connect,
you must apply z/OS permissions (for example, RACF) on the connect
ID in order to:
- Be able to use the
attach ID.
- Be able to use the
stored procedures.
- You may need to
edit the lsched.acx metadata files. lsdched is a cluster join used by
PMF in the PMF interface to the Report Caster. The issue is that
there can be multiple ReportCaster databases on any given LPAR and
there may be no way to point to a database without editing ldsched.acx
to qualify the tables.
x
Procedure: How to Create a PMF Data Mart in MySQL
Note the following before performing the
procedure:
- If you ran the
PMF installer and specified MySQL, PMF is already configured with
a MySQL database schema named pmf_base.
- Whenever upgrading
PMF to a new release, the upgrade migration scripts now run within
PMF using auto-migration functionality. A manual upgrade and/or
migration is not required.
- MySQL schema names are case sensitive on Windows. It is recommended
that you use only lower case ANSI characters for your MySQL schemas.
- In multi-tenant environments,
each PMF schema typically resides in a separate database on the
RDBMS server.
To create a new data mart for PMF, perform
the following steps:
-
Start MySQL
Workbench and connect to the RDBMS server.
-
In the MySQL
Workbench session, create your MySQL schema name for the data mart.
We recommend using pmf for simplicity, but you can use a different
name if required for your standards, or if required for Multi-Tenancy.
Important: Use lowercase standard ANSI characters
to name this schema.
-
Create the
new empty database with the defined schema name as the owner (recommended).
-
Check over
the DDL for creating the default databases and MySQL owner name
(schema) can be found in the sqlmysql.sql file, which is located
in the approot/pmfdbms/Create_Database folder in the standard PMF
installation. Make any edits necessary. For example, you might need
to change the schema name variable to the actual setting for your
schema.
-
Once changes
are made, run the DDL SQL to create the database structure for the
MySQL component. Ensure that no errors occur. If you do encounter errors,
make sure your schema has DBO level access, or at minimum can create
and destroy tables, views and triggers for the database you created.
This script creates and populates the new data mart with the minimum
amount of data required to start using PMF.
-
Finalize
the connection setup for the adaptor needed in your User Profile on
the WebFOCUS Reporting Server. This will be tenant specific if you
have a Multi-Tenant environment. It is recommended that you use
the sample tenant profile delivered with PMF.
The sample profile is located in pmf_base.prf in the /apps/pmfdemo folder.
You must change line 5 to read:
-SET &RDBMS_PRF=’SQLMYSQL’;
You
must also adjust the APP MAP commands on lines 9-17 to match the
physical location of the folders on your server machine.
-
Using the WebFOCUS Server Administration console, create
and test your pmf_system connection to the database you just created.
-
Login to your PMF application using the supplied PMF
administrator ID pmfadmin. A form prompts you for the schema.
Enter the schema name you created in the prior steps, along
with the table and index tablespace names.
x
Procedure: How to Create a PMF Data Mart in Teradata
Note the following before performing the
procedure:
- Whenever upgrading
PMF to a new release, the upgrade migration scripts now run within
PMF using auto-migration functionality, A manual upgrade and/or
migration is not required.
- It is recommended
that schema names be composed of uppercase standard ANSI characters.
Doing so helps avoid problems that might occur while running the
PMF scripts.
- In multi-tenant environments,
each PMF schema typically resides in a separate database on the
RDBMS server.
To create a new data mart for PMF, perform
the following steps:
-
Create the
new database in your Teradata environmental using your standard
toolset.
-
Start your
Teradata console.
-
Create your
Teradata owner name for the data mart. We recommend using PMF for
simplicity, but you can use a different name if required for your standards.
Important: It is recommended that you use upper
standard ANSI characters to name this only.
-
Open and
edit the sqldbc.sql file located in the approot/pmfdbms/Create_Database
folder on your system, and set the proper values for schema name
variables. These values must be identical to those used in step
3. It is recommended that you use upper standard ANSI characters
only.
-
In the Teradata
console session, run [ddl name].
-
After completing
the edits, run the DDL SQL script. This script creates and populates
the new data mart with the minimum amount of data required to start using
PMF.
-
Finalize
the connection setup for the adaptors needed in your User Profile
on the WebFOCUS Reporting Server. This will be tenant specific if
you have a Multi-Tenant environment. The typical configuration
for the standard shipped PMF tenant in HyperStage split cube mode
will look like this:
-SET &&PM_TNT_NAME_PRF = 'pmf_base' ;
-SET &RDBMS_PRF      = 'sqldbc' ;
-SET &RDBMS_CUBE_PRF = 'sqlhyp' ;
-SET &PMF_DB_SPLIT_MODE_PRF = 'OFF' ;

APP MAP pmfdata              "C:\ibi\apps\pmf_tenants\pmfdata"
APP MAP pmfdata_tenant
"C:\ibi\apps\pmf_tenants\pmf_base\pmfdata_tenant"

APP MAP pmfdb_system
"C:\ibi\apps\pmfdbms\pmfdb_system\pmfdb_system_&RDBMS_PRF"
APP MAP pmfdb_system_tenant
"C:\ibi\apps\pmf_tenants\pmf_base\pmfdb_system\pmfdb_system_&RDBMS_PRF"

APP MAP pmfdb_cube
"C:\ibi\apps\pmfdbms\pmfdb_cube\pmfdb_cube_&RDBMS_CUBE_PRF"
APP MAP pmfdb_cube_tenant
"C:\ibi\apps\pmf_tenants\pmf_base\pmfdb_cube\pmfdb_cube_&RDBMS_CUBE_PRF"
APP MAP pmf_custom_tenant
"C:\ibi\apps\pmf_tenants\pmf_base\pmfcustom"

-SET &APP_PATH_START = 'pmf_custom_tenant pmf_custom' ;
-SET &APP_PATH_CUBE  = IF (&PMF_DB_SPLIT_MODE_PRF EQ 'OFF') THEN ' '
ELSE 'pmfdb_cube_tenant pmfdb_cube' ;
-SET &APP_PATH_END   = 'pmfdata_tenant pmfdata pmfdb_system_tenant
pmfdb_system mainstreet' ;
APP PREPENDPATH &APP_PATH_START &APP_PATH_CUBE &APP_PATH_END

-*  Followed by ENGINE statements
SQL SQLDBC SET TRANSACTION BTET
ENGINE SQLDBC SET CONNECTION_ATTRIBUTES [connection attributes]
x
Procedure: How to Create a PMF Data Mart in Information Builders HyperStage
Note the following before performing the
procedure:
- You will need
to configure PMF for a split cube configuration. It is recommended
you use HyperStage for the cube portion of PMF, and the underlying
copy of MySQL on which HyperStage runs for the transactional component.
- Whenever upgrading
PMF to a new release, the upgrade migration scripts now run within
PMF using auto-migration functionality. A manual upgrade and/or
migration is not required.
- It is recommended
that schema names be composed of uppercase standard ANSI characters.
Doing so helps avoid problems that might occur while running the
PMF scripts.
- In multi-tenant environments,
each PMF schema typically resides in a separate database on the
RDBMS server.
To create a new data mart for PMF, perform
the following steps:
-
Start MySQL
Workbench and connect to the RDBMS server.
-
In the MySQL
Workbench session, create your MySQL schema name for the data mart.
We recommend using PMF for simplicity, but you can use a different name
if required for your standards, or if required for Multi-Tenancy.
Important: It is recommended that you only use uppercase standard
ANSI characters to name this schema.
-
Create the
new empty database with the defined schema name as the owner (recommended).
-
Check over
the DDL for creating the default databases and MySQL owner name
(schema) can be found in the sqlmysql.sql file, which is located
in the approot/pmfdbms/Create_Database folder in the standard PMF
installation. Make any edits necessary. For example, you might need
to change the schema name variable to the actual setting for your
schema.
-
Once changes
are made, run the DDL SQL to create the database structure for the
MySQL component. Ensure that no errors occur. If you do encounter errors,
make sure your schema has DBO level access, or at minimum can create
and destroy tables, views and triggers for the database you created.
-
Configure
the adaptor for PMF to point to the MySQL database instance. Test
and burn in PMF to ensure that it works with MySQL standalone. If
you encounter any errors, debug and fix them before proceeding.
-
Start the
HyperStage console, and connect to your HyperStage server.
-
Open and
edit the sqlhyp_cube.sql file located in the approot/pmfdbms/Create_Database
folder on your system and set the proper values for the three environmental
variables. It is recommended that you use upper standard ANSI characters
only.
-
After completing
the edits, run the DDL SQL script. This script creates and populates
the new data mart with the minimum amount of data required to start using
PMF.
-
Finalize
the connection setup for the adaptors needed in your User Profile
on the WebFOCUS Reporting Server. This will be tenant specific if
you have a Multi-Tenant environment. The typical configuration
for the standard shipped PMF tenant in HyperStage split cube mode
will look like this:
-SET &&PM_TNT_NAME_PRF = 'pmf_base' ;
-SET &RDBMS_PRF      = 'sqlmysql' ;
-SET &RDBMS_CUBE_PRF = 'sqlhyp' ;
-SET &PMF_DB_SPLIT_MODE_PRF = 'ON' ;

APP MAP pmfdata              "C:\ibi\apps\pmf_tenants\pmfdata"
APP MAP pmfdata_tenant
"C:\ibi\apps\pmf_tenants\pmf_base\pmfdata_tenant"

APP MAP pmfdb_system
"C:\ibi\apps\pmfdbms\pmfdb_system\pmfdb_system_&RDBMS_PRF"
APP MAP pmfdb_system_tenant
"C:\ibi\apps\pmf_tenants\pmf_base\pmfdb_system\pmfdb_system_&RDBMS_PRF"

APP MAP pmfdb_cube
"C:\ibi\apps\pmfdbms\pmfdb_cube\pmfdb_cube_&RDBMS_CUBE_PRF"
APP MAP pmfdb_cube_tenant
"C:\ibi\apps\pmf_tenants\pmf_base\pmfdb_cube\pmfdb_cube_&RDBMS_CUBE_PRF"

APP MAP pmf_custom_tenant
"C:\ibi\apps\pmf_tenants\pmf_base\pmfcustom"

-SET &APP_PATH_START = 'pmf_custom_tenant pmf_custom' ;
-SET &APP_PATH_CUBE  = IF (&PMF_DB_SPLIT_MODE_PRF EQ 'OFF') THEN ' '
ELSE 'pmfdb_cube_tenant pmfdb_cube' ;
-SET &APP_PATH_END   = 'pmfdata_tenant pmfdata pmfdb_system_tenant
pmfdb_system mainstreet' ;

APP PREPENDPATH &APP_PATH_START &APP_PATH_CUBE &APP_PATH_END

-*  Followed by ENGINE statements
ENGINE SQLMYSQL SET CONNECTION_ATTRIBUTES [connection attributes]
ENGINE SQLHYP SET CONNECTION_ATTRIBUTES [connection attributes]