Configuring Privileges and Other Authorizations
WebFOCUS users are authenticated against one of the
supported authentication sources (OPSYS, LDAP, DBMS, or PTH internal).
The underlying security system may divide users into groups. For
example, for OPSYS security the groups are defined in the operating
system, and in LDAP they are defined in the LDAP database. With a
PTH security provider, the server file named admin.cfg defines groups.
To assign privileges to server application and data files, you
must register a user (except for special users that may require
custom privileges) in a group (or role) and register each group
in a role. The authorizations then depend on the privileges assigned
to the role.
With any type of security, access to
the following categories of resources must be controlled:
-
DBMS data. Access
is controlled by the CONNECTION attributes in effect at the time
the data is accessed. The connections are stored in user or group profiles
or in the server edasprof profiles.
-
Access to Web
Console system functions. This category includes functions such
as change of server profiles, creation of metadata, or starting
the servers. Access to these functions is defined by the role assigned
to the user or group and is stored in the admin.cfg file.
-
WebFOCUS repository
files that constitute the application. These files include FOCEXECs,
Master and Access Files, HTMLFORMs, and application files that are
stored in the application directories.
The Server provides an Access Control function
that enables the Server Administrator to create and edit permissions
for different categories of users and groups. These permissions
define whether specific users and groups can read, write, and/or
execute WebFOCUS repository files and perform various Web Console
system functions. To open the Access Control page, select Access
Control on the Web Console menu bar.
In addition to users and groups, the server supports security
subjects called roles. The server comes with
a set of standard roles, and these roles come with a fixed set of
general privileges. For more information about these standard roles,
see Configuring Roles.
The Server Administrator can register roles, groups, and users.
When registered, they are assigned a set of general privileges and
file access privileges. By default, groups inherit privileges from
the roles they are assigned, and users inherit their privileges
from the groups or roles to which they are assigned. The Server
Administrator can create new roles and customize privileges for
any role, group, or user. The Server Administrator always has full privileges,
and those privileges are not adjustable.
It is considered good practice for a large user community to
define access rules on the group level and not on the individual
user level. This technique allows volume user provisioning to be
handled outside of WebFOCUS Server software (for example in the
LDAP server). The WebFOCUS Server in general registers group access
rights, plus some individual users as an exception, such as managers
or special project people.
The following defines the order of precedence
for access rights:
- User access overrides
group access, and group access overrides role access.
- If the user belongs
to multiple groups, the server group_profile setting determines whether
only the primary group is in effect or whether the user can select
a group at logon.
xConfiguring DBMS Authorization
With DBMS authorization, the
main object to be protected is the DBMS resident data that the server
reads and writes. Access control is implemented using ENGINE CONNECTION_ATTRIBUTES
statements that define the security attributes that are used by the
server agent for connecting to the DBMS. The connection security
type depends on the DBMS and can be one of three subtypes:
-
Explicit. The
userid/password is stored in a profile (encrypted).
-
Password passthru. The
userid/password combination or cookie, such as MYSAPSSO2, that were
provided during the connection to the server is passed to the DBMS
connection.
-
Trusted. This
type of connection applies to security provider OPSYS where the
agent operating system process impersonates the user, and the DBMS connection
is derived from that process.
The CONNECTION_ATTRIBUTES statement itself can be defined in
the user, group, role or server profile, and they override each
other in this order.
It is common initially to create connections in the edasprof
server profile. They will then be inherited by all users. Subsequent
configuration steps may define connections on other levels, such
as the group or user level.
The CONNECTION_ATTRIBUTES statement in effect passes the credentials
to the DBMS, and the DBMS server ensures the correct access control:
read and read/write rules on the DBMS tables, views, columns, and
rows.
For more information about the CONNECTION_ATTRIBUTES command,
see the Adapter Administration for UNIX, Windows, OpenVMS,
IBM i, and z/OS manual.
xConfiguring Server DBA Security
The server engine can add an additional level of access
control by defining DBA rules in synonyms to restrict access to
columns and certain data values. This applies only to data access
using the WebFOCUS language, and not to Direct SQL Passthru requests.
For more information about Server DBA, see the Describing
Data With WebFOCUS Language manual.
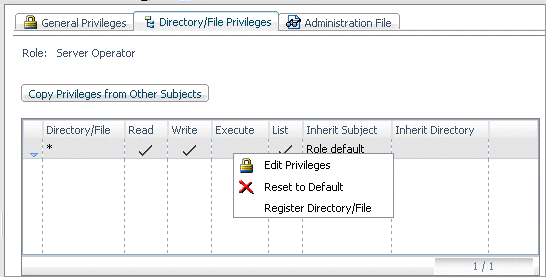
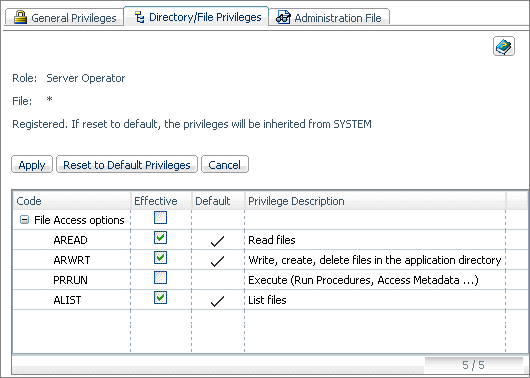
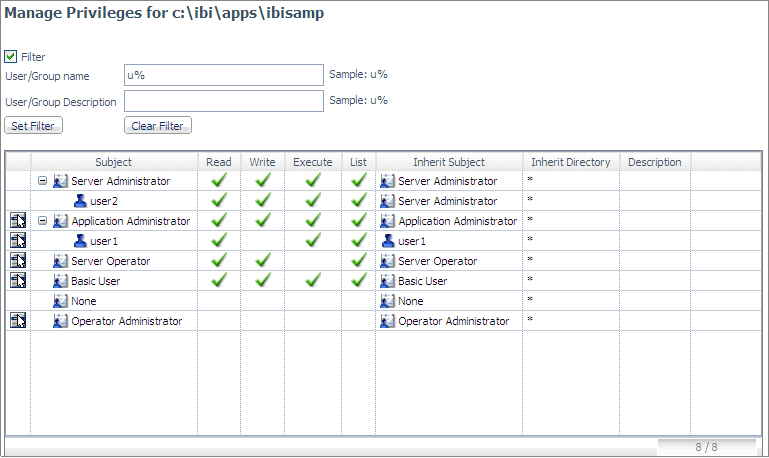
xPermissions for Server Application Files and Directories Using a Non-OPSYS Security Provider
The Server Administrator can specify read/write, execute,
and list privileges for files in application directories and for
the directories themselves. This control is in addition to operating
system file access control.
The Server Administrator can view or edit File and Directory
privileges by clicking the Directory/File Privileges tab
on the Access Control page for a role, group, or user.
Non-Server Administrator users can right-click any object on
the left panel and select Properties to see
their privileges for that file or directory object. The Server Administrator
has the option to Manage Privileges by right-clicking
an object.
By default, for compatibility with previous releases, file access
control allows complete access to all files and directories. However,
the Server Administrator can reset this default by right-clicking
a row in the table and choosing Edit Privileges.
After initial server installation, the Server Administrator should
review individual privileges for each role and customize them if
needed. For example, the privilege to create synonyms can be removed.
File privileges can be defined on the lowest level, such as a
specific file and specific user, but the recommended policy is to
define them on the application folder level and on the role and
group levels to reduce administrative overhead. Privileges defined
on the application level will apply to (be inherited by) all files
in this application and by all nested (lower level) application
directories, unless overridden on a lower level. The same applies
to roles, groups, and users. Privileges defined on the group level
will be inherited by the users in the group, unless overridden by
explicit user registration.
The following schematic shows the flow of privilege assignments
and inheritance.
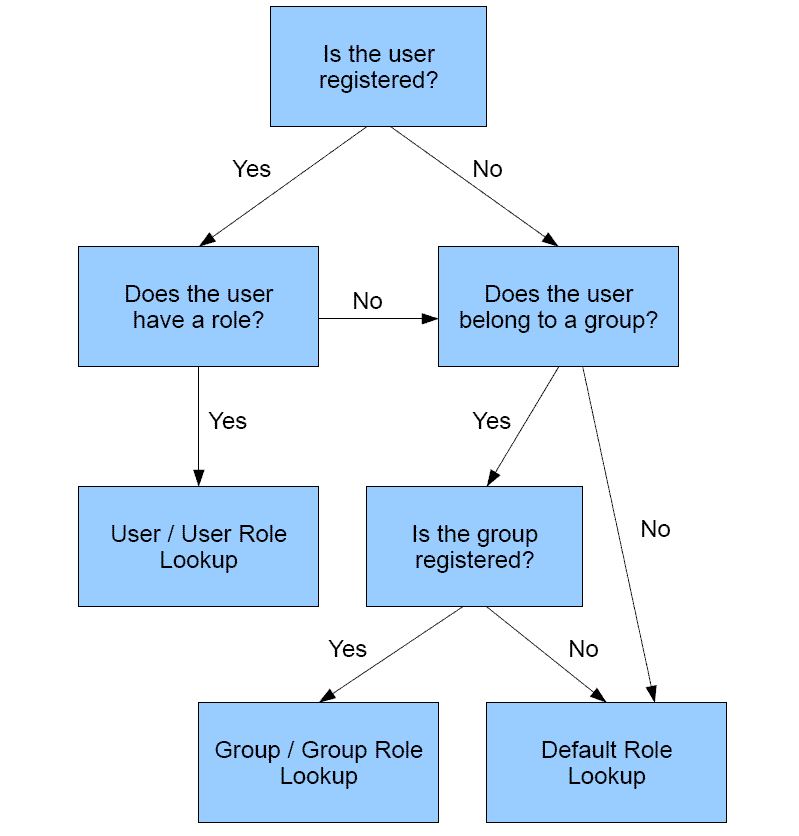
In effect, when the system opens a file such as app1/app2/car.mas for
user user1 in group1 belonging
to role1, the server uses a specific search
path until the privileges are found. The server administrator can
also see the directory and file privileges from the Application
Directories page by right-clicking an application and selecting
the Privileges option.
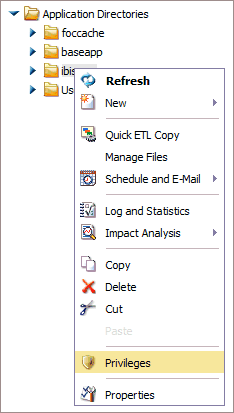
You can change access privileges using the right-click Privileges option.
Users without administrator rights can see the privileges from
the View My Privileges menu option.
x
Reference: Privileges for Users Who Are Not Registered
The
following describes the search path if user1 is not registered or
has not been assigned a role in admin.cfg. The lines ending with
an asterisk (*) denote a recommended practice:
- App1/app2/car.mas
for group1.
- App1/app2 for group1.
*
- App1 for group1.
*
- App1/app2/car.mas
for role1.
- App1/app2 for role1.
*
- App1 for role1. *
- Default role.
x
Reference: Privileges for Registered Users
If user1 is
registered in admin.cfg, the server uses the following search path.
The lines ending with an asterisk (*) denote a recommended practice:
- App1/app2/car.mas
for user1.
- App1/app2 for user1.
- App1 for user1.
- App1/app2/car.mas
for role1.
- App1/app2 for role1.
*
- App1 for role1. *
- Default role.
If
the user is registered under a role, the server does not consider
group privileges when access to the file or directory is calculated.
x
Reference: Understanding Access Control Permissions
Access
Control parameters are saved in the server admin.cfg file.
{admin_id|admin_group} = name
admin_privilege = object; privilege_name, privilege_name[, ...]
where:
- name
Is a user (admin_id) or group (admin_group) name.
- object
Defines the directory or file path.
Can be one of
the following:
Physical path to the file or directory.
For
example
c:\ibi\apps\app1 c:\ibi\apps\ibisamp\car.foc
where
* is a token that designates all physical files on the system.
- privilege_name
Defines the type of access. Can be
one of the following:
AREAD reads and displays the content
of a file to the user. For example, the user can see (but not change)
procedures and synonyms. The user needs read permission to open
data files.
ARWRT Write allows the user to read, edit, and
write procedures and metadata.
PRRUN Execute. This privilege
is typically given to end users who need to execute FOCEXECs and
use Master Files and relevant utility procedures. However, the data
file used by a FOCEXEC and Master File only requires read permission.
ALIST
allows the user to list and view files and folders on the application
tree or the output of a deferred execution run.
ANONE revokes
all permissions.
Note that all definitions in the admin_privilege
strings contain fully-qualified physical paths even for application
directories under APPROOT.
x
Reference: Supported Combinations of Permissions
- Full Access - read,
write, execute, list
This setting is typically used by developers
on applications that they develop and create directly.
This
is the default for all files not explicitly customized, unless the
default is reset. To explicitly specify full access, issue the following
setting in admin.cfg:
admin_privilege = directory/file_path; ARWRT, AREAD, PRRUN, ALIST
- Read, execute, and
list.
This permission can be used by developers for other utility
application directories that they invoke while developing their
own.
For example, a developer can keep common synonyms and
utility FOCEXECs in such a directory. Of course, the person that
creates such a directory needs full access to it, but all others
only need read and execute. Read is needed to open data files.
admin_privilege = directory/file_path; AREAD, PRRUN, ALIST
- Execute.
This
permission is typically given to end users who need to execute FOCEXECs
and use Master Files and relevant utility procedures.
admin_privilege = directory/file_path; PRRUN, ALIST
- Execute
and hidden.
This is the same as Execute except that it is not
shown on the Web Console.
admin_privilege = directory/file_path; PRRUN
- List and View.
This
allows the user to view reports from deferred jobs. This privilege
is lower than execute.
admin_privilege = directory/file_path; ALIST
- No Permissions.
This
revokes all permissions from the directory or file.
admin_privilege = directory/file_path; ANONE
Example: Sample Permissions
These
examples use the following directories and files:
/u1/pgmabb/myapp
/u1/pgmabb/myapp/data1.dat
The
following shows a sample permission distribution list:
admin_id = chief_developer
BEGIN
admin_level = APP
admin_privilege = *; ARWRT,AREAD,PRRUN,ALIST
admin_privilege = /u1/ibi/apps/work_app; AREAD,PRRUN,ALIST
END
admin_group = team_developer
BEGIN
admin_level = APP
admin_privilege = /u1/ibi/apps/main_app; AREAD,PRRUN,ALIST
admin_privilege = /u1/ibi/apps/synonym_app ; AREAD,PRRUN,ALIST
admin_privilege = /u1/ibi/apps/work_app; ARWRT,AREAD,PRRUN,ALIST
admin_privilege = /u1/admin/server/prod_data ; AREAD,ALIST
END
admin_group = end_user
BEGIN
admin_level = USR
admin_privilege = /u1/ibi/apps/main_app; PRRUN,ALIST
admin_privilege = /u1/ibi/apps/ synonym_app ; PRRUN
END
These security declarations
define the following roles and permissions:
- A user with the ID
chief_developer has full access to all applications, including main_app
and synonym_app, but he has no write access to work_app for the team_developer
group.
- A user that belongs
to the group team_developer develops applications in his own directory
but needs Read and Execute access to main applications to see what
was done before. A user with this role has read-only access to production
data in /u1/admin/server/prod_data. When the developer user is finished,
the chief_developer copies his procedures to the main_app.
- The end_user group
contains end users who need to execute the procedures from the main_app,
but do not need to see synonym_app on the Web Console.
x
Reference: Access Control vs. APP PATH
APP PATH defines two main aspects of
the system:
- Search path for applications
at run time for one part file reference such as TABLE FILE CAR.
- List of applications
shown on the Web Console application tree for the Application page.
The
privileges are on the physical directories, not the application,
so if the application is mapped to a different directory, the privileges
from the new directory will be in effect.
Note that with Access
Control, all such access is subject to Access Control rules which take
precedence over APP PATH:
- A one-part file reference
that searches APP PATH and finds a file in a directory without access
will skip it and search further in APP PATH.
- A two-part file reference
or FILEDEF attempting to access a file or directory without permission
will produce an error.
- The Web Console will
gray out actions such as saving a procedure or synonym where they
are prohibited.
For example, user u1 has the following
in his profile where both app1 and app2 contain file xxx.mas, and
f1.fex:
APP PATH app1 app2 app3,
In
admin.cfg for user u1, access to these applications defined as:
admin_privilege = /u1/app1; AREAD, PRRUN
admin_privilege = /u1/app2; PRRUN
admin_privilege = /u1/app3; ARWRT, AREAD, PRRUN
When
user u1 tries to execute the FOCEXEC f1 (EX f1), the one from app1
will be executed.
When user u1 tries to issue TABLE FILE xxx,
the app1/xxx.mas will be opened, since it only needs Execute privileges.
When
user u1 issues the following command, the app1/xxx.mas will be opened,
since it requires Read privileges:
EDAGET MASTER, xxx, T, ANY
When
user u1 tries to issue the following command ENCRYPT FILE XXX, the app2/xxx.mas
will be read, and an attempt to rewrite it in place will be made.
Since user u1 does not have sufficient privileges, an error will
occur and an error message will be issued.
Protection against
hacking
- The admin.cfg file
itself cannot be accessed with a WebFOCUS command. This rule is
enforced in the code.
- All files that are
not covered by the explicit ACCESS keyword are covered by the system
wide default.
x
Reference: Permissions for FOCCACHE and EDATEMP
EDATEMP
is a location where the server creates temporary files during agent
connection. All of these files are deleted on disconnect to provide
a clean environment for the next connection.
FOCCACHE stores
temporary files during execution of one Web session. These temporary
files can be stored in FOCCACHE for multiple agent connections,
and data can be accessed through the Web Console and WebFOCUS Server.
FOCCACHE is an internally mapped application directory to a unique
physical location for each Web session.
Both of these locations
have a full set of permissions for a connected user unless the default
location has been overridden by HOLDDATA, HOLDMETA, and remapping
of FOCCACHE from its default location using APP commands. In this
case, the access controlled permissions are applied based on the
admin role, group, or user.
x
Reference: Access Control Implications For Scheduling
The
DataMigrator scheduler initiates requests based on procedures (flows)
with scheduling headers that it finds in the application path. The procedures
are submitted for execution using the user ID and related profiles
that depend on the value of the sched_run_id keyword. If the option
is set to the following value, the effective server administrator
ID is used:
sched_run_id = server_admin_id
If
the option is set to the following value, the user ID found in the
flow is used:
sched_run_id = user
The
encrypted password is taken from the admin.cfg file. If the user
is registered without a password, trusted connection is used for
the LDAP and OPSYS security modes on all operating systems except
Windows.
If the installation has a large number of users,
it is good practice to protect which procedures the users are allowed
to schedule. The method to accomplish this is to define a special
application directory, for example schedule_app_1,
that contains process flows with scheduling headers only. The actual
procedures can be in any other application directory including a
home directory, for example app2. The process flows will contain
references to the actual procedures, for example:
EX app2/myrpoc
A
special scheduling directory such as schedule_app_1 can be protected
with file access privileges so that only a designated user ID, for
example user1 can write to it and create and modify schedules in
it. The user1.prf profile should have app1 in its application path.
The
scheduler is configured to scan this application directory by setting
the following keyword:
sched_scan_id=user1
This
ensures that only the schedules located in schedule_app_1 are
in effect and that user1 is the only user
controlling the scope of scheduling.
xFile Permissions for an OPSYS Security Provider
Impersonation of a user means that access to files is
controlled by the operating system security features in the native
file systems. Files are protected according to the permissions and
access control lists set for the impersonated user.
The main file areas within a configuration
are organized into four locations:
- EDAHOME (the software
installation structure).
- EDACONF (the specific
software configuration structure).
- APPROOT (the file
structure for holding application-related programming files).
- EDATEMP (the runtime
user area for server processes, which is normally located under
the EDACONF area).
Permissions for new files depend on how
the server is installed and started.
-
On UNIX, z/OS
(HFS deployment), and IBM i, the permission mask setting
of the process (umask) that started the server is inherited down
to the creation of each subdirectory or file, and thus defines the
permissions used for object creation.
-
On z/OS (PDS deployment), the
rules (permissions) are set but the security package (RACF, ACF/2,
or Top Secret).
-
On OpenVMS, the
permission mask of the process (SET PROTECTION= /DEFAULT) that started
the server is inherited down to the creation of each subdirectory or
file, and thus defines the permissions used for object creation.
-
On Windows, the
permissions are inherited down from directory to subdirectory, and
the permissions for any object created are taken from its parent directory.
So unless specific permissions are applied at any level, default
permissions will depend on where the server was installed.
x
Reference: Consequences for Files Under the EDAHOME/EDACONF Hierarchy
When
defining the permissions under a specific security policy, care
must be taken to ensure that all users who are expected to use the
server have Read/Execute access to files under the hierarchies.
Effectively, group writeable permissions should be used for server
administrators that share common resources, while non- shared resources
should have specific permissions.
x
Reference: Consequences for Files Under the APPROOT Hierarchy
Care
must be taken when defining default permissions for application
administrators who will create files under the Web Console that
need to be accessed by regular users. When application files are
written under the Web Console, they are created according to the
rules of ownership and default permissions applicable to the user
who logged onto the Web Console. Thus, application developers must
share a common default group if they are to work on a shared project.
x
Reference: Consequences for Files Under the EDATEMP Hierarchy
In
a server that runs with security OPSYS, special conditions apply
to the edatemp subdirectory and its contents. The basic principle
is that agent subdirectories under edatemp are owned at any given
moment by the user that the agent is impersonating.
With a
private security provider, this means that once a user connects
to an agent, he is explicitly given ownership of his agent subdirectory,
regardless of which user the agent impersonated during previous
connections. This ownership and the inherited permissions defines
how other users can access the connected user temporary files, if
at all.
On UNIX, z/OS (HFS deployment),
and IBM i, the edatemp subdirectory itself is an exception
because it is set up similarly to the /tmp directory. While it allows
any user to add files and directories underneath, only the creator
of a file can later rename or delete it. Files directly under edatemp
(for example, traces) and listener subdirectories are owned by the
super user (root, QSECOFR).
On z/OS (PDF deployment), all
temporary files created by a user are based on the rules in the
Security package.
On Windows, the permissions of the
parent directory of edatemp (usually EDACONF), which were applied
when the server was installed, are inherited when edatemp and then
the agent subdirectories are created, defining the kind of access
other users have to an agent subdirectory and its contents.
xConfiguring General Server and Web Console Actions
In this section: How to: Reference: |
An authenticated user interacts with the server using
the Web Console or Data Management Console (DMC). The Server Administrator
controls access to the Web Console actions permitted by assigning
general privileges to roles and registering users and groups into
roles.
x
Procedure: How to Configure General Privileges
General
privileges define access to the Web Console and DMC control pages
such as the Adapter and DBMS Connections configuration pages, the Metadata
creation pages, the Procedure editor and Procedures and Flows Run
Options page, and the Server Configuration pages.
These privileges
can be reviewed or customized from the Web Console by choosing Access
Control on the Web Console menu bar. General privileges can
be set on the role, group and user levels. Groups and users registered
under any role inherit the general privileges of that role unless
they are customized on the group or user level.

Users
other than the Server Administrator can see their own general privileges
by choosing Show Privileges on the My Console
menu. Server Administrators do not have this option because they
have full privileges to all pages of the Web Console and Data Management
Console.
x
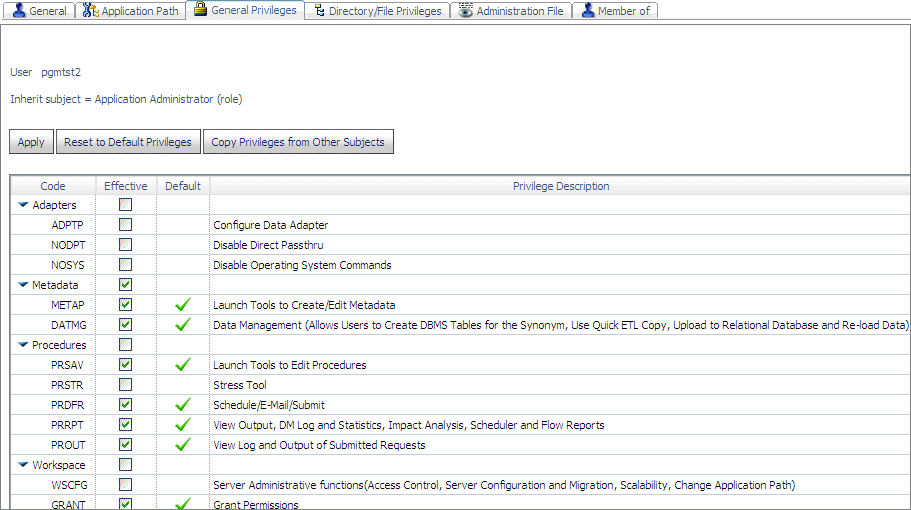
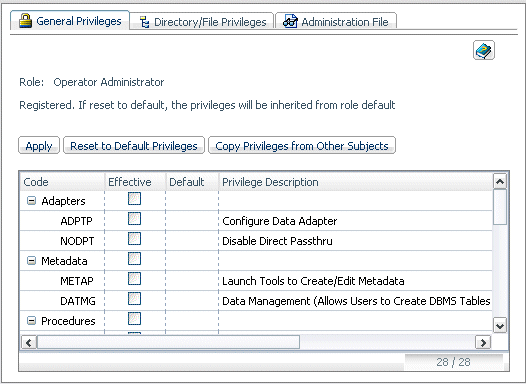
Reference: General Privileges
The
following image shows a sample General Privileges pane for a Basic
user, with default values.
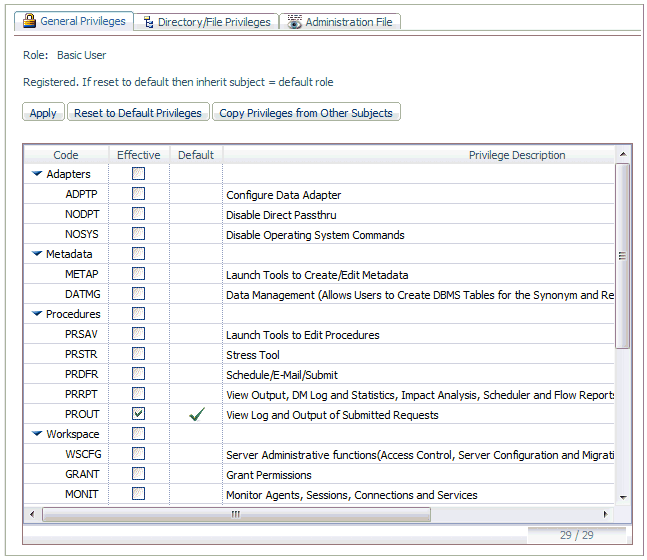
The
following table describes the general privileges.
|
Privilege
|
Description
|
|---|
|
Adapters
|
|
ADPTP
|
You can configure adapters and add DBMS
connection attributes.
|
|
NODPT
|
You can disable Direct Passthru.
|
|
NOSYS
|
You can disable the ability to execute certain
operating system commands.
|
|
Metadata
|
|
METAP
|
You can launch tools to create and edit
metadata.
|
|
DATMG
|
You have data management privileges, allowing
you to create DBMS tables for synonym and reload data.
|
|
Procedures
|
|
PRSAV
|
You can launch tools to edit procedures.
|
|
PRSTR
|
You can use the stress tool to stress test
the server.
|
|
PRDFR
|
You can schedule, email, submit, and run
deferred procedures.
|
|
PRLDF
|
You can list and view deferred procedures.
|
|
PRRPT
|
You can view the DataMigrator (DM) log and
statistics, and use impact analysis, the Scheduler, and flow reports.
|
|
Workspace
|
|
WSCFG
|
You can perform server administrative functions,
such as access control, server configuration and migration, scalability
control, and application path control.
|
|
GRANT
|
You can grant file privileges that you have
to other users.
|
|
MONIT
|
You can monitor agents, sessions, connections,
and services for all users.
|
|
KILAL
|
You can kill and stop agents, sessions,
connections, and services for all users.
|
|
SRVLG
|
You can view server logs and traces, and
you can create Savediag.
|
|
STPSV
|
You can stop and restart the server.
|
|
RARGP
|
You can use Resource Analyzer and Resource
Governor.
|
|
My
Console
|
|
CHGPW
|
You can change your password.
|
|
MONUS
|
You can monitor Data Service agents that
match your user ID.
|
|
MONGR
|
You can monitor Data Service Agents that
match your group ID.
|
|
KILT3
|
You can kill Data Service Agents that match
your user ID.
|
|
KILGR
|
You can kill Data Service Agents that match
your group ID.
|
|
APATH
|
You can change your application path (no
applock).
|
|
UPROF
|
You can edit your user profile.
|
x
Procedure: How to Control Access to the Web Console and DMC
Authenticated
users are permitted to perform certain control operations on the
Web Console, depending on their definitions in admin.cfg as Server Administrator,
Application Administrator, Server Operator, Basic User, or other
custom role defined on the server. Within a given role, additional
administration privileges may be applied. As a result, available
Web Console features may vary from site to site or between server
configurations at a site.
The Web Console or DMC functions
available to the user are determined by his role. If a user is not
assigned a role, does not belong to a group, or the group is not
registered, his access to Web Console functions is based on the default_admin_role setting.
Access to the Web Console
is also affected by the security provider in effect:
Security
OPSYS. Access to the Web Console is protected by user authentication
at the operating system level. Alternatively, if a server administrator
has established an Anonymous ID, it can be used to access the Web
Console as a basic user, without an explicitly entered ID. For details,
see Setting an Anonymous User ID.
Security PTH. Access
to the Web Console is protected by user authentication against the
admin.cfg file.
Security DBMS. Access to the Web
Console is protected by user authentication against the selected
DBMS.
Security
LDAP. Access to the Web Console is protected by user authentication
against the LDAP (or AD) server.
Security OFF. With security
OFF, anyone can access the Web Console, with full, unrestricted
use of its features.
Access to the
Web Console and DMC can be restricted for individual users or for
a group of users.
-
Access the
Web Console with a server administrator user ID.
-
From the
Web Console menu bar, select Access Control.
The Access Control page opens.
-
Expand a Roles folder.
-
Right-click
a user or group and select Properties.
The General Properties page opens.
-
Select a
role from the Inherit Privileges from drop-down
menu.
The
options are:
- Server Administrator
- Application Administrator
- Server Operator
- Basic User
- None. (No access
allowed.)
Select the value you want to apply. If only
users defined in the admin.cfg are to be allowed access, select None.
Note: If
the Server Administrator has created custom roles, they will available
in the drop-down menu.
-
Click Update.
Note: If
a server administrator has established an Anonymous ID, it can be
used to access the Web Console without an explicitly entered ID.
For more details, see Setting an Anonymous User ID.
x
Procedure: How to Set the Default Administration Role
A
default administration role provides access to Web Console or DMC
functions and to the server for users who are not assigned a role,
do not belong to a group, or whose group is not registered. It is
based on a selected role.
-
Access the
Web Console with a server administrator user ID.
-
From the
Web Console menu bar, select Access Control.
The Access Control page opens.
-
Right-click Settings and
select Configure.
The Access Control - General Settings page opens.
-
Select a
role from the default_admin_role drop-down
menu.
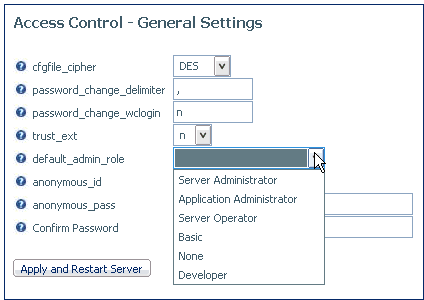
-
Click Apply
and Restart Server.
x
Transferring File Permissions With the GRANT Privilege
The server administrator
normally provides access control permissions for application folders
to groups and users. If the server administrator issues the GRANT
privilege to another security subject (role, group, or user), that
security subject can then grant its own file permissions to any
other security subject,
For example if user A has Read but not Write permission on folder
X, he can transfer Read permission to user B. He cannot grant Write
permissions to anyone.
Note that if user A loses the permission later on, user B will
retain his transferred permission.
Example: Granting
Permissions to Another User
In
the following configuration, user pgmtst2 is an Application Administrator
with the GRANT privilege:
User
pgmtst2 has Read, Execute, and List privileges on application app06,
while user pgmtst3 has no privileges on this application:
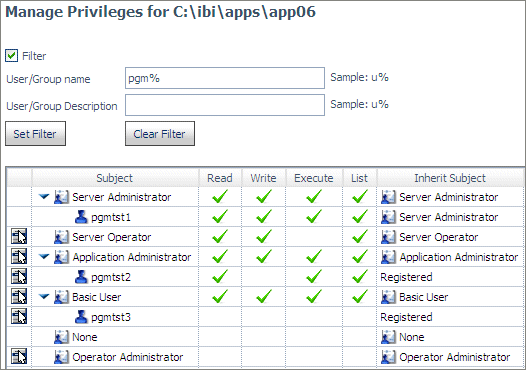
Since
user pgmtst2 has the GRANT privilege for this application, user
pgmtst2 can edit the privileges for user pgmtst3:
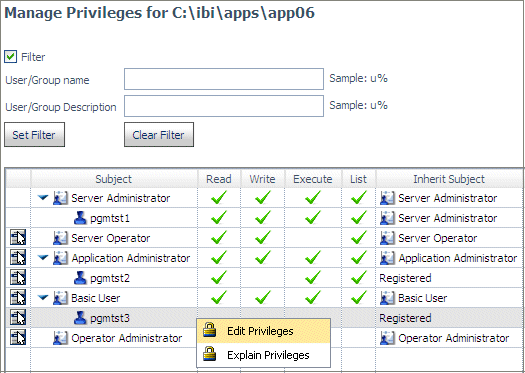
However,
the privileges pgmtst2 can edit are only those that pgmtst2 has
for this application. Therefore, the ARWRT privilege is not available
for editing:
When user pgmtst2 clicks Apply,
user pgmtst3 will be assigned Read and List privileges to app06.
x
The Server Administrator registers a group or user within
a role that has a set of privileges. Users and groups can be registered
for special privileges, both general privileges and file privileges.
It is a good practice to assign users to groups and to control groups
rather than individual users. The installation has a choice of grouping
users in LDAP or using the operating system security mechanism.
This grouping is external to the WebFOCUS or server software and
must be accomplished by the administrators for those external products.
The groups are then registered in the server, and a role is chosen
for them. By default, the privileges are inherited from the role
in which the group is registered.
At login time, the user group is determined and the proper privileges
are assigned. If the user does not belong to any registered group
or role, the privileges are taken from the default role. At installation
time, the default role is set to NONE, but the server administrator can
change this designation. The default role can be reset on the Access
Control General Privileges pages using the default_admin_role keyword.
A group can be assigned a profile stored as groupname.prf. Group
profiles support the same syntax as role profiles, which are described
in Configuring Roles.
The Access Control page for a user or group has tabs that enable
the Server Administrator to view or edit the Application Path, General
Privileges, Directory/File Privileges, Administration File, for
a user, the list of group memberships, and, for a group, the list
of members.
Note: Profile settings affect how groups connect to the
server.
To open the Access Control page for a group or user, right-click
the group or user and select Properties.
Note that for LDAP security, if the LDAP database contains the
email address, it is automatically populated on this page.
If a user belongs to multiple groups, the server either uses
the primary group privileges, allows the user to select the effective
group at login time, or merges the privileges from all groups. How
the server handles privileges for users in multiple groups is determined
by the group_profile setting in the edaserve.cfg file. You can access
this setting from the Access Contol page by right-clicking the top
level of the Access Control tree and selecting Settings.
The default value for group_profile setting is to use the primary
group. If the security provider is OPSYS, the operating system determines
the primary group. For LDAP, the primary group is the first group
alphabetically for the user.
GRPLIST is a function that returns a group name or a list of
group names (separated by colons) for the connected user. This function
is supported for LDAP security with all types of connections. If
the group list is empty or there is an error in the function parameters,
the function returns blanks.
x
Reference: Customizing User Privileges
Although
the recommended policy is to control groups, there may be a need
to create different sets of privileges for some individual users.
If a user cannot be assigned to a group or to a custom role, the
user can be registered with any role, and the Server Administrator
can customize the privileges as needed. The customization can include
general and file privileges, application path, and DBMS connections.
Such users should be kept to a minimum.
x
The server is shipped with five predefined roles that
allow basic operational control. Roles are listed under Access
Control on the Web Console menu bar:
The roles come with a fixed set of general privileges as follows:
-
Server Administrator. Groups
and users assigned to this role have full control of the workspace,
adapters, synonyms, and procedures.
-
Application Administrator. Groups
and users assigned to this role have privileges to create synonyms
and procedures and to run them.
-
Server Operator. Groups
and users assigned this role have privileges to start and stop the
server and monitor and kill agents.
-
Basic User. Groups
and users assigned to this role can execute procedures.
-
None. Users
assigned to this role have no privileges on the Web Console and
Data Management Console (DMC).
The default file and directory privileges allow full access.
The Server Administrator can customize the default privileges
and can create custom roles and assign them general and file privileges.
The only roles that cannot be changed are the Server Administrator
role, which always has full privileges, and the NONE role, which
has no privileges. If the Server Administrator customizes a role,
it displays with the text (Customized) next to its name on the Access
Control tree.
Roles can be assigned profiles that are stored in the location
identified by the $EDAPRFU variable. The profile for each role is
stored as the file named rolename.prf. The following items can be
controlled by a profile:
- DBMS connections
that are configured on the Adapter page.
- Application path
that controls the search for unqualified file names (for example, TABLE
FILE CAR). The application path is configured from the Access Control
page.
- Other WebFOCUS commands.
Predefined roles are assigned predefined
names:
|
Name
|
Description
|
|---|
|
SRV
|
Server Administrator
|
|
APP
|
Application Administrator
|
|
OPR
|
Server Operator
|
|
USR
|
Basic User
|
Note: When a user connects to the server, the role profile
is executed after the server profile.
x
Procedure: How to Create a Custom Role
-
From the Access
Control page, either click the Register button
at the top of the page or right-click the Roles folder, and select Register
Role from the context menu.
The Register Custom Role page opens.
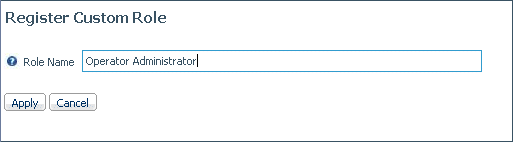
-
Enter a
name for the role, and click Apply.
A dialog box opens informing you that a new role will be
registered.
-
Click OK.
A page opens on which you assign privileges to this new
role.
The
page opens to the General Privileges tab,
but you can click the Directory/File Privileges tab
to assign file and directory privileges.
-
You can
assign privileges by:
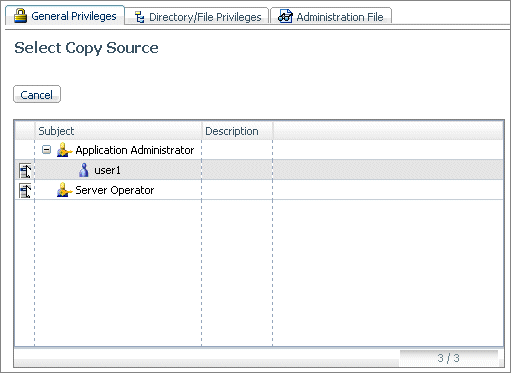
-
To copy
the privileges from one of the listed subjects, right-click the
icon on the left of the subject and click Copy.
A dialog box opens informing you of the source and destination subjects.
-
Click OK to
copy the privileges.
Note:
- Once the custom role
has been created, the Server Administrator can register users and
groups to the role.
- The Server Administrator
can create a role profile that will be executed when a user registered
to this role connects to the server.
- The Server Administrator
can set the custom role as default_admin_role on the Access Control/General
Settings page.
xRegistering Users and Groups in a Role
A server administrator can assign specific users the
following roles: Server Administrator, Application Administrator,
Server Operator, Basic User, or All Users. A server administrator
can also create additional roles and select or deselect certain
privileges for these users or groups.
The user and group roles are stored in a release independent
file called admin.cfg, which is located, by default, in .../ibi/profiles.
This location is defined with the server configuration parameter
edaprfu, which is stored in the edaserve.cfg file. The admin.cfg
file should not be shared between servers that run with different
security modes.
x
Procedure: How to Register a User in a Role With OPSYS, LDAP, or DBMS Security
This procedure assumes that the user
is logged in to the Web Console as a server administrator.
-
From the
Web Console menu bar, select Access Control.
The Access Control page opens.
The Register User
page will differ depending on the security provider. The following image
reflects the OPSYS provider.
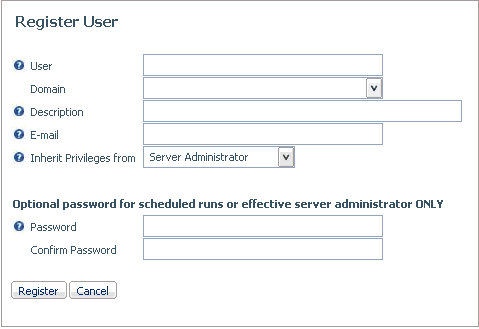
-
Enter a
user ID in the User field.
-
If you use
domain names with the user IDs (Windows only), enter the domain
name in the Domain field or select one from
the drop-down menu (OPSYS only).
-
Optionally,
in the Password and Confirm Password fields,
enter the password for the user ID. A password is only required
for scheduled runs.
-
Enter an
email address for the user.
-
Select an
administrator level from the Inherit Privileges from drop-down
menu. The options are: Server Administrator, Application
Administrator, Server Operator, Basic,
or None.
-
Click Register.
x
Procedure: How to Create and Register Users With PTH Security
This procedure assumes that the user
is logged in to the Web Console as a server administrator.
-
From the
Web Console menu bar, select Access Control.
The Access Control page opens.
-
Expand the Security
Providers folder.
-
Under the PTH folder,
right-click PTH Users and select New.
The Add PTH User page opens.
-
Enter a
user ID in the PTH User field.
-
Optionally,
enter a description in the Description field.
-
Enter an
email address for the user.
-
In the Password and Confirm Password fields,
enter a password for the user ID.
-
Optionally,
you can assign the user to a group by selecting the check box next
to the group name.
-
Click Add.
The user is added to the PTH user list.
-
To register
the user, click the Register button above
the navigation pane or right-click a Roles folder
and select Register PTH User.
The Register User page opens.
-
Click Next.
-
Select the
check box of the user from the user list.
-
Select a
set of privileges from the Inherit privileges from drop-down
menu.
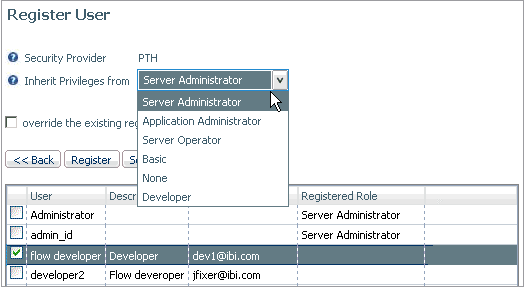
-
Click Register.
x
Procedure: How to Register a Group in a Role
This
procedure assumes that the user is logged in to the Web Console
as a server administrator.
For the OPSYS, LDAP, or PTH security
modes, a server administrator can assign a role to groups of users
by following these steps:
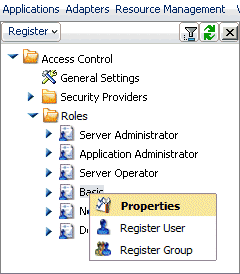
-
From the
Web Console menu bar, select Access Control.
The Access Control page opens.
-
Right-click
a Role from the Roles folder and select Register
Group.
The Advanced Group Registration page opens.
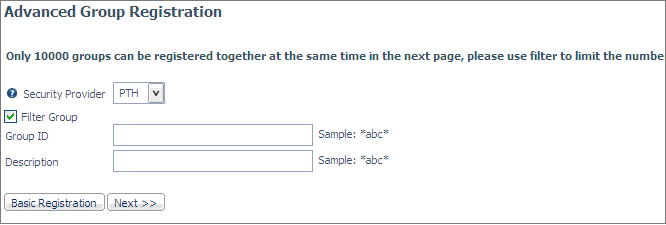
-
Select the
security provider from the drop-down list.
-
You can
either generate a list of available groups or enter the group information
without generating a list.
-
If you want to generate a list of groups to be available for
registration, optionally enter any filtering characters for the
group ID, domain, and/or description, and click Next to
open the Advanced Group Registration page with the list of available
groups populated.
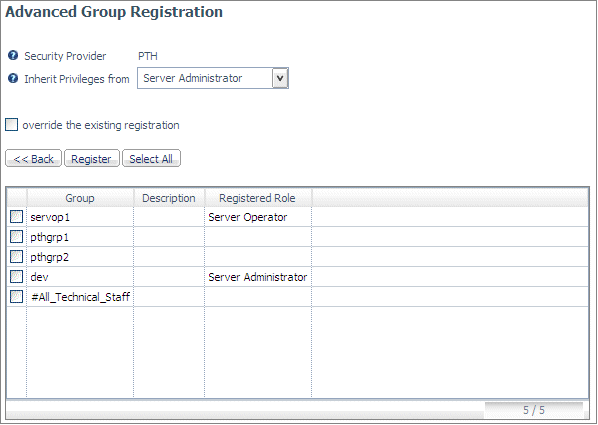
Select
the group or groups you want to register, or click Select All to
select all of the groups on the list.
If you want to override
the existing group memberships, check override the existing
registration.
-
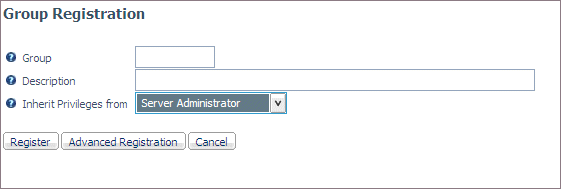
If you do not want to generate a list of groups, click Basic
Registration to open the Group Registration page on which
you enter the group name in the Group entry field. You can then
enter a group description in the Description entry field and select
a role from the Inherit Privileges from drop-down
list.
-
Click Register.
x
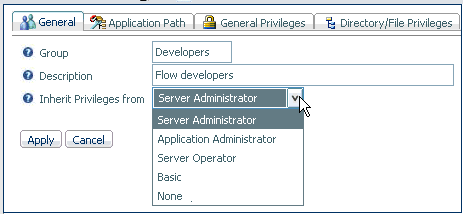
Procedure: How to View or Change the Properties of a User or Group
-
From the
Web Console menu bar, select Access Control.
The Access Control page opens.
-
Expand a
Role from the Roles folder.
-
Right-click
the user or group whose properties you want to view or change, and
select Properties.
The General Properties page opens.
-
You can
change the user role by select a different role from the Inherit
privileges from drop-down menu. For more information, see How to Configure General Privileges.

Note: If
only one user is defined as a Server Administrator, you cannot change
that user role.
-
Click Update.
The
user or group is moved to the new role.
x
Procedure: How to Edit PTH Group Membership
-
Open the PTH
Groups or PTH Users page by right-clicking
its icon under PTH, and selecting Show All.
-
Right-click
the user name or group name, and select Properties.
If you selected a user from the PTH Users page, the PTH
User page opens. All PTH groups are listed, with check marks for
the groups that have this user as a member.
If you selected
the group from the PTH Groups page, the PTH Group page opens. All
PTH groups are listed, with check marks for the users that are members
of this group.
Check
or uncheck the appropriate users or groups, and click Update.
Note that a user can belong to multiple groups.
x
Procedure: How to Unregister a User or Group
-
From the
Web Console menu bar, select Access Control.
The Access Control page opens.
-
Expand a
Role from the Roles folder.
-
Right-click
the user or group and select Unregister.
You are prompted to confirm that you want to unregister
the user or group.
-
Click OK.
The
user or group is unregistered.
x
Procedure: How to Delete a User or Group (PTH Only)
-
From the
Web Console menu bar, select Access Control.
The Access Control page opens.
-
Expand the Security
Providers and PTH folders.
-
Right-click PTH
Users or PTH Groups, and select Show
All.
-
Right-click
the user or group, and select Remove.
You are prompted to confirm that you want to delete the
user or group.
-
Click OK.
Note: If only one user is defined as a Server Administrator,
you cannot delete that user.
The
user or group is deleted.
x
Procedure: How to Set Customized Privileges for Roles
A
server administrator can set selected privileges for basic users,
application administrators, and server operators. Configurable options
are tailored to each user group.
-
On the Web
Console menu bar, select Access Control.
-
Right-click
a role in the navigation pane.
The
General Privilege page opens.
-
Select the
check boxes for the functions you want the role to be able to perform.
Configurable options vary by user group.
-
Click Apply to
confirm these setting.
-
Click Reset
to Default Privileges if you wish to revert to the standard
privileges assigned to that user group.